
Tag: General Embroidery
Quaker Tapestry kit – Cooperation is better than conflict
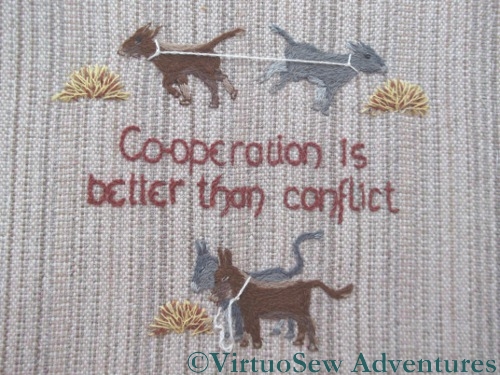
Cooperation is better than conflict
I suppose you could say I inherited this panel. A local embroideress died, and her daughter gave me (and I believe many others!) various bits of her stash. This was nearly, but not quite, finished. I’ve now finished it and haven’t the vaguest idea where to put it, as I’ve no wall space to spare!
It is based on one of the panels of the Quaker Tapestry, which is a fascinating piece of embroidery depicting the history and development of the Society of Friends. The woollen fabric was woven especially for the project, and the kit included not only the woollen fabric, but the cotton muslin backing that they recommend to stop the fabric puckering.
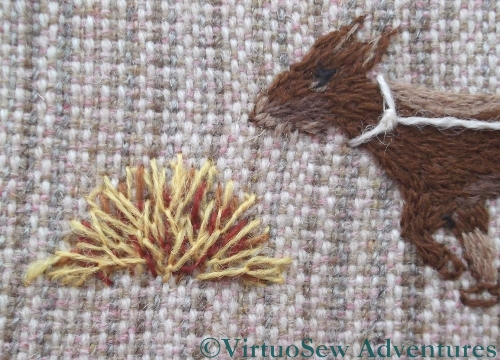
Fly Stitches For Hay
I was delighted that the lady was willing to give me this piece to finish, because we had seen the Tapestry (which, like the Bayeux Tapestry, is an embroidery!) during a visit to Kendal a few years ago, and I was fascinated by the variety of the stitches used, and very impressed by the general level of skill demonstrated, considering that it was embroidered by many groups of people.
In fact this kit doesn’t employ the whole variety of stitches used in the Tapestry, but I liked the use of Fly Stitches for the hay, and the use of the long taut straight stitch for the rope between the donkeys is just like my use of the same technique in the Camberwell’s rigging!
Rethinking The Elephant Doorstop
Needs More Thought
I originally decided to use plain stranded cotton for the Elephant Doorstop, in colours chosen to match the curtains in the living room as closely as possible.
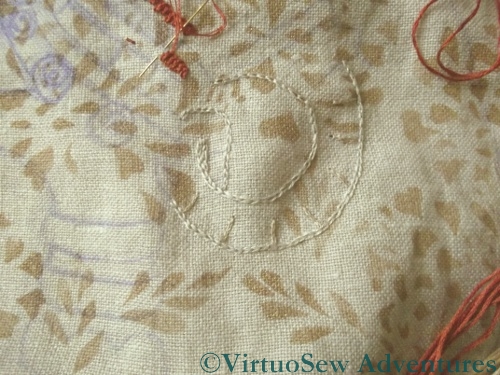
However, once I started stitching I rapidly came to the conclusion that that just wasn’t going to work. We don’t want the Elephant to cover all my careful stencilling, but at the same time, he needs to show up. And he looks pretty hidden, here, as you can see. What’s more, I wasn’t enjoying it, and picking stitches was proving troublesome. I knew I wanted to stitch him – revisiting the original inspiration has been in the back of my mind for a while – but somehow, not like this.
There are two things I need to think about – the colours, and the weight of the thread. The creamy colours we chose are too light to show up well against the rather busy stencilled background, and although two threads of stranded cotton would be fine on this fabric, if it were a plain fabric, it is rather fine. Furthermore, one of the stitches I want to use is braid stitch, which is always a bit tricky in stranded cotton.
I’d already unpicked this section twice before I came to this conclusion, and I was beginning to feel rather anxious in case inspiration flagged completely. Then out of the blue, I was deafened by some triumphant trumpetings.
“I know what to do, I do!”, said he.
“What, then?” said I.
“Use some of those variegated silk perlés you’re always looking at. You can do any stitch that takes your fancy, the colours shading in and out will give you the lightness of effect you want, and – Ta-DA!”.
So now I’ve been told….!
The Elephant Doorstop
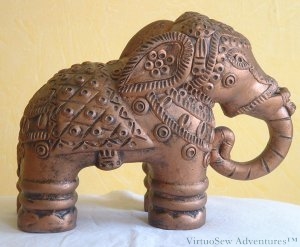
An Elephant Of No Distinction But Infinite Charm
Do you remember the Elephant of No Distinction But Infinite Charm, who inspired the canvaswork footstool I made for my mother? She’s now commissioned me to work a doorstop with the same inspiration. Naturally she didn’t want me to work it in the same technique. For one thing, the furniture in the living room has been reupholstered since I did it, and the jungle-inspired green background (although the footstool still looks quite happy) would no longer be as suitable as it was.

First Stage - stencil prepared and paint chosen
So we’ve picked a fairly loosely-woven linen, in a sort of pinkish beige (actually, “natural” unbleached linen run through the washing machine on Hot!), and rather than leaving the background completely plain, decided to stencil it with an all-over pattern taken from the lamps. The design is inspired by crystanthemums, as is the design on the curtains (a Designers Guild design which is older than me, and is proof that good design doesn’t date – it hasn’t looked dated or old-fashioned in more than forty years!).
Stencilled fabric
After consulting my clients (!) I’ve decided to use a gold fabric paint for the background pattern. When I tested the stencil on paper the paint ran under it a little, so I chose to use a sponge instead. That seems to help in ensuring that the fabric paint isn’t laid on so thickly as to be unembroiderable, as well.
I didn’t create a proper, regimented repeating pattern, because I felt that it would make the stencil design too obvious. Instead I have twisted and turned the stencil and added extra leaves to fill in any really obvious gaps.
Another early piece

Table Runner from The Needlewoman Magazine
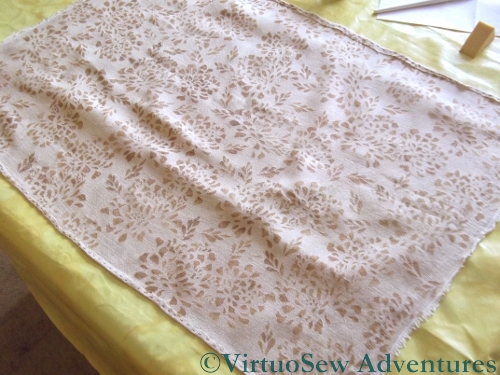
I worked on this very early in my embroidering career. The design comes from a free transfer in one of the Needlewoman Magazines my Grandmama gave me (September 1934, since you asked!), and I worked it to go with the curtains in my bedroom which were a wonderful Regency strip in red and gold. It’s a table runner – I used it on my dressing table – and it is very nearly two feet long.
The original article to accompany the transfer described several different colourways and a whole range of sketches of suggested uses. There was the idea of sprigging (organdie) curtains with the single motif, embroidering a sunshade, a bag (linen), a luncheon set, gloves, embellishment on the brim of a hat, even on a nightdress or slip (silk of course!). Sometimes I wish I had lived in the Thirties!
I used some fine linen – essentially altar linen, a fine even-weave, nothing fancy, and embroidered it using pearl cotton. As you can see from the close up, pearl cotton really was rather too heavy for the fabric, but then I liked it at the time, and if you don’t like what you’re doing, it tends to take longer to finish.
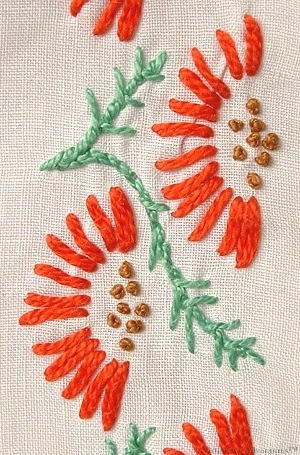
Motif Close Up
I should have had the courage of my convictions and worked the French Knots as seed stitches (I hated French Knots at the time – possibly because I wasn’t very good at them). There are only three stitches – straight stitch, stem stitch, and French Knots, so it was very easy and simple to work.
I simply had to keep going at it. That’s when I discovered that I’m not very happy doing repetitive embroidery!
And – in case you are interested – although the linen was old when I worked the embroidery, it has in fact outlasted the bedroom curtains… They don’t make fabric like that anymore!
The Camberwell Panel – Ten

Quayside First Stage
Quayside Second Stage
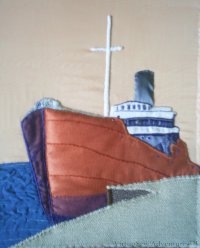
I ended up using both fabrics.
I decided to use a layer of the darker fabric to create the shadow of the face of the quayside edge, covered with a layer each of brown and navy net.
The two layers of net intensified the darkness of the shadow, but at the same time, suggested the roughness of the surface. The net was cut as fragments – not the same size – and the heavy material is cut to the same basic shape as the top layer, there were no lines of fabric edges showing through.
The slip for the upper layer was outlined in buttonhole stitch and then attached over the top. At this stage I felt that some additional stitching would be be needed to create an impression of the quayside in similar detail to the ship itself but now the only fabric to be applied was the border.
Which at this point I still hadn’t yet decided on….!
Finding Forgotten Projects
Every now and again, I find early – and usually not-quite-finished – embroidery projects stashed away in a quiet corner. This is a case in point.
Found Among Our Forgotten Projects
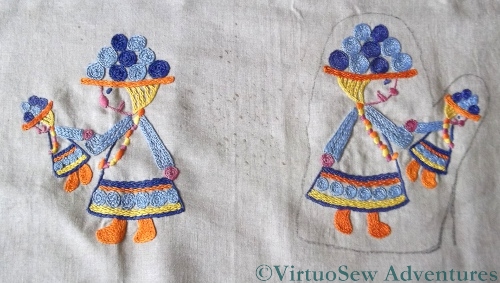
This is very early indeed, probably from my first year of embroidering. The design came from a very nineteen-seventies book of embroidery designs that will have to remain nameless unless I can find it again. I suspect that I went for this design because it was in colour rather than variations of Mud!
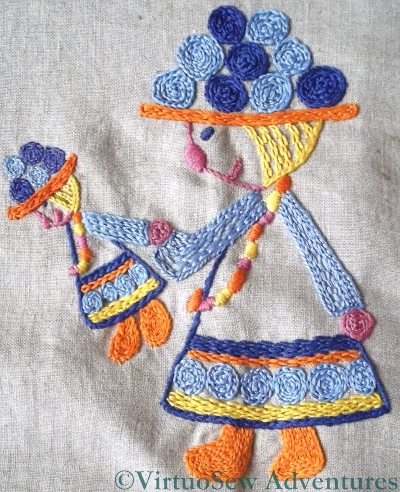
Girl And Doll Design Close Up
Other than that, I can’t find any excuse for it at all. The design was intended to embellish oven mitts, and when I get a chance I will probably finish them to make a pair and then put them in a church bazaar. Alternatively, I might outline the glove shape on both and then turn the fabric into a bag, which would be rather more use than home-made oven mitts now we all use those fire-retardant gloves.
I have noticed, however, that my passion for experimentation showed itself even at this early stage. I’m absolutely certain that the sleeves didn’t have that Closed Feather Stitch stripe down them in the original piece.
I also distinctly remember that I nearly ran out of thread and had to do some some very economical stitching to get everything stitched in the threads I’d picked out.
A Canvaswork Koala
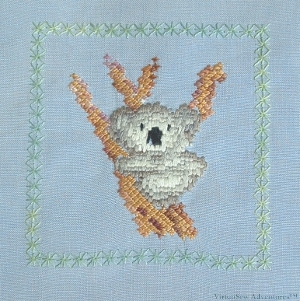
Canvaswork Koala
In fact this is worked on linen, but using canvaswork stitches. I was playing with some needlepoint charting software, in particular to find out how the stitches appeared on the chart and how easy it was to follow. I can’t remember where the Koala came from, whether he was originally in counted cross stitch or whether he was imported from a drawing. It is quite a simple design with relatively little modelling, and I’ve always been rather fond of it.
I used waste canvas to give me the stitch placement, and then simply worked the design according to the chart. The Koala himself is worked in straight stitches using stranded cotton, all six strands separated and made to lie side by side; the tree branch he is clinging to is worked in two shades of pearl cotton, using upright cross stitch (one of my favourites, as you know by now!), and the green frame of Algerian Eye stitches is worked in one of the Wildflowers threads from Caron Collection.
The embroidery has survived much better than the fabric it was stitched on. Originally I made a cushion cover, but the linen was already old before I started and now has holes in it. I’m going to do something with the Koala (suggestions please!) and then the rest will probably go into a rag rug…
More Details on the Peacock Skirt
Do you remember my Peacock Skirt? Megan of Elmsley Rose asked for some more close ups of the embroidery, and while I have been remodelling it (for a slightly less sylph-like waistline – I was a skinny teenager!) I took the opportunity to take some.
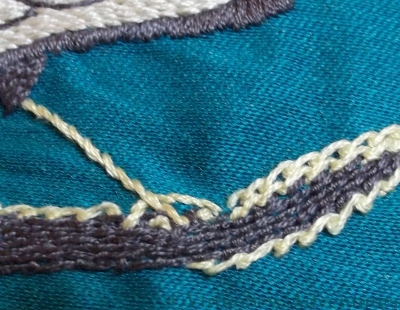
Close Up Of Branch
This, therefore, is a close up of the branch the peacock is standing on. I simply followed the instructions here, using coral stitch for the dark grey elements of the branch and scroll stitch for the pale yellow. I think that now if I were do something like this again, I would spend a bit of time tweaking the colours a little more, because I’m not sure I like having the peacock’s legs the same colour as the highlight on the branch!
You can see, too, that I struggled somewhat with tension and the fabric is a little puckered. This seems not to matter when I’m wearing the skirt – people still admire it!
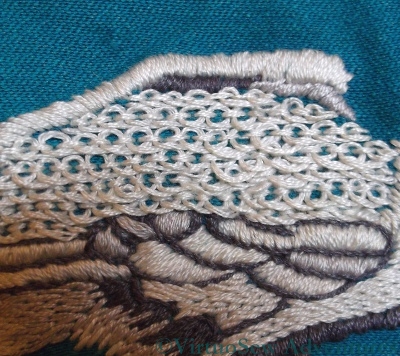
Pekinese Stitch On The Peacock's Back
The instructions for the Peacock’s back said to work the Pekinese Stitch fairly loosely to create a slight variation on colour and texture. Since the embroidery was worked in two strands of stranded cotton, that too contributes to a slightly “fluffy” appearance. The satin stitch sections around where the wing should be are in slightly different shades of grey, and worked at slightly different angles, again to produce varying tones and textures.
Looking at this close up now, I think the rows of stem stitch used for some sections of the body represent the feathers of the bird more successfully (although, again, the design doesn’t attempt a photo-realistic representation) than the sections of satin stitch or pekinese stitch. I do admit, however, that it was the chance to work pekinese stitch that attracted me to the design!
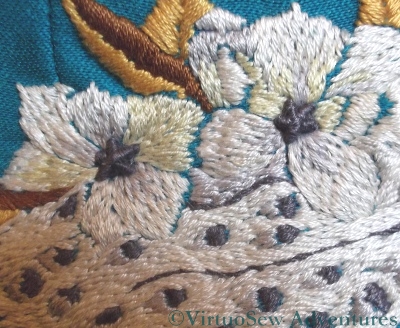
Spiders Web Flower Centre
The centres of the flowers were worked using a Spiders Web Wheel. The instructions specified working as much thread into the stitch as possible to obtain a raised and highly textured effect. This contrasts very well with the long and short stitch flowers and the stem stitches on the peacock’s tail.
Again, coming back to these pieces years after stitching them, it’s fascinating to look at surprising details. The gold and russet leaves look as though they’ve been padded, but I’m quite sure they weren’t. I remember doing padded satin stitch for the first time quite recently and wishing I’d known about it earlier!
An Experimental Seahorse
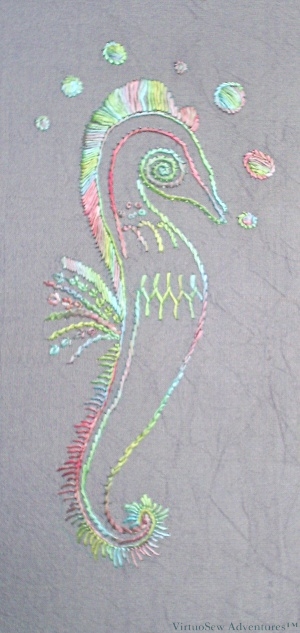
Small Seahorse in overdyed filament silk
Sometimes I play with threads for no other reason than to play with them. In this case Stef Francis gave me a skein of overdyed filament silk to play with. She tends to create a much more “freeform” style of embroidery than I do and she wanted to know what I thought of the thread.
I found a simple transfer that offered scope for several different stitches, and started playing. I had been concerned that it might twist up when I didn’t want it to, but it stayed fairly flat most of the time, and it is noticeable that the stitches look and feel different in a flat thread, as compared with a round one.
For example, in a round thread, the stem stitch line tends to be more textured, and the direction of slant is more obvious. Here, the slight flatness creates a smoother line. That same flatness makes the satin stitch smoother and cleaner looking. It also helps to mask any slight imperfections in the stitching!
On the other hand, that same slight “spread” of the filaments clouds the distinctiveness of the Wheatear Stitch in the fin on his back, so not an unalloyed success, but interesting and worth trying all the same.
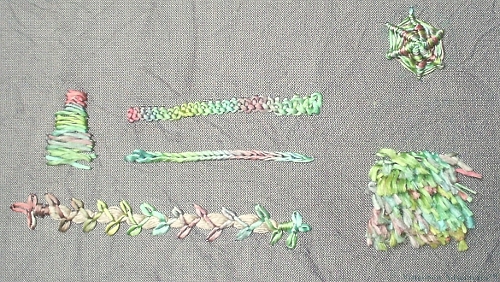
Silk Filament Experiments
Then I started just to play with stitches in a spare corner of fabric. The Braid Stitch (top row) works quite nicely, I think, and the Turkey work (bottom right hand corner) is better than I hoped, especially considering that I’ve not done it before. I can’t imagine what I would use that texture for in these colours, but Stef has a fabulous range of overdyed shades and I am sure that something would spring to mind for one of them. The little triangle of Closed Herringbone Stitch is hardly a success, but that may be a problem of scale. I don’t think the Braid Stitch would have worked if it had been any wider than it is here.
I don’t think this thread adds anything to the Reverse Chain Stitch, or to the Spider’s Web Wheel, but I do like the Chained Feather Stitch couching. In fact, that might have been better had I had the courage of my convictions and made the base that’s being couched about twice the width.
All in all, I had a lot of fun playing with this thread. I’ve now got a much better idea of What To Do and more importantly What Not To Do with it. One important thing to remember – make sure hands are smooth! Silk catches on everything and filament silk does so even more!
More Peacocks!
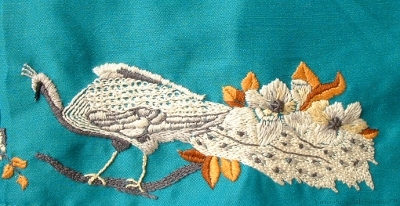
Peacock Motif
This design of peacocks and flowers was taken from a Time Life book on couture embellishments, and embroidered on a full skirt. It still attracts attention, and now full skirts are back “in”, I shall probably fish it out and start wearing it again. Although it has always been a challenge to find a suitable top!
I worked this as a teenager, and wore it at a cousin’s wedding. The design was worked at three places around the skirt, with each third showing two peacocks confronting one another across the sprig of flowers. The original design used two shades of grey-green, several shades of grey, lemon and white on a red satin background. I simply changed the two shades of grey green to a dark yellow and a chestnut brown to work on the bright turquoise/teal background.
The design attracted me because – alone of the surface embroidery patterns I had seen up to that point, it included more than the basic stem stitch, satin stitch, and long and short stitch. The peacock’s back was worked in Pekingese Stitch, deliberately worked loose and spaced so as to create a slightly mottled effect. The flower centres used a whipped spiders web wheel, worked close and tight so as to be slightly raised. The branches were worked in a combination of Coral Stitch and Scroll Stitch – neither of which I remember seeing used in a commercial design up to that point.
It was quite fun to stitch, but the deadline made life a bit exciting, and my mother had to help out with some of the embroidery so that I could get the job done!
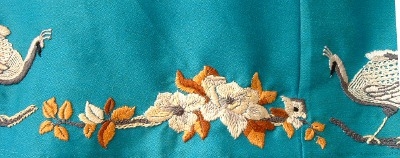
Flower Motif