
Tag: Dreams of Amarna
More people on the View Of the Excavation
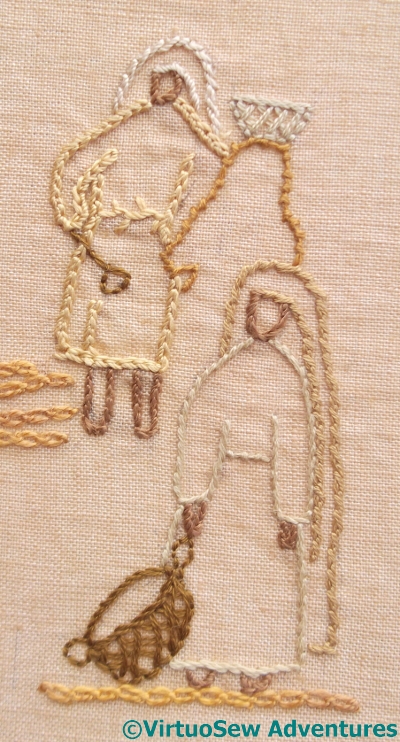
Closer Group..
Having decided I needed to Have Courage and Dive In, I realised that maybe sneaking up on this panel was the way to go. Unless I immediately hated an experiment, I didn’t take it out – and sometimes not even then. Sometimes you need to stare at the thing that is wrong to work out Why, before you can even think about What Else.
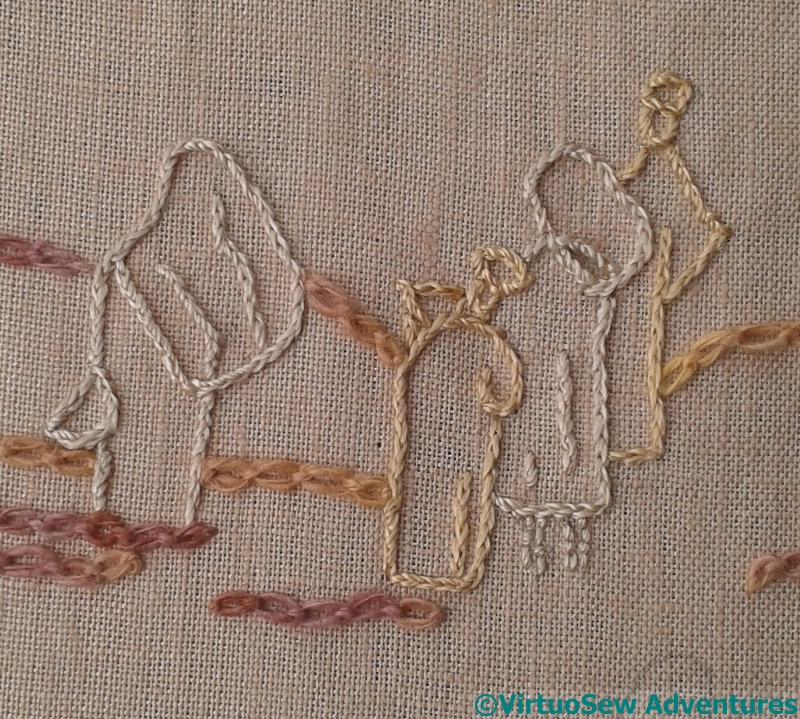
This group are in the middle distance, close enough that some details are beginning to be visible. At the same time, I didn’t want to make the detail too detailed, if you follow me. Coral stitch, fairly closely spaced, forms the outline of the middle figure, and the tunic of the furthest is in reverse chain stitch.
I find that reverse chain is much easier than ordinary chain stitch to work when the fabric is in a frame, and this panel was in and out of the hoop, depending upon the stitch and the mood I was in. As I do more and more embroidery, I’m beginning to find it easier to keep a sensible tension without a frame, but then the baskets were easier in a frame!
On His Own
Getting still closer, there was this fellow, all alone in his own little trench. I wonder what he’s found?
He’s worked in Pekinese Stitch, using one colour for the back stitch, and another for the interlacing. His hat is double interlaced back stitch in the same threads – round silk threads from Mulberry Silks, like the central figure in the top group. The others are in a mixture of stranded cotton, stranded silk, and another of the Mulberry Silks yarns.
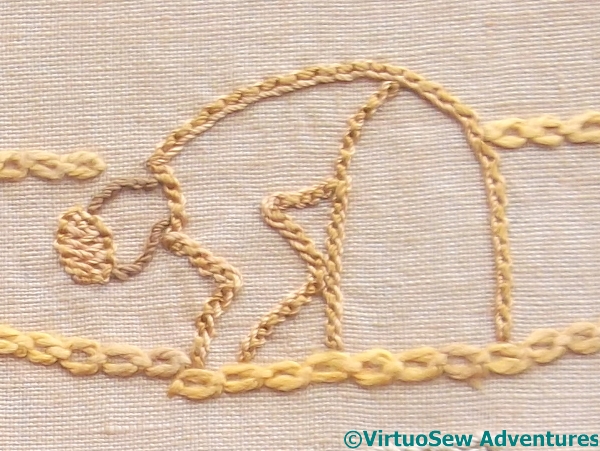
Clearing Spoil
I’ve only just realised that the design involved remarkably few people taking spoil away from the trenches, but at least there are two. I put a border on the tunic of the middle person, using a rather interesting blanket stitch variation from one of my Edith John books. The most distant person was in Portuguese Knotted Stem stitch, which is one of my longest-standing favourite stitches, and the girl at the front is Hungarian Braided Chain stitch, which is one of my newest favourite stitches.
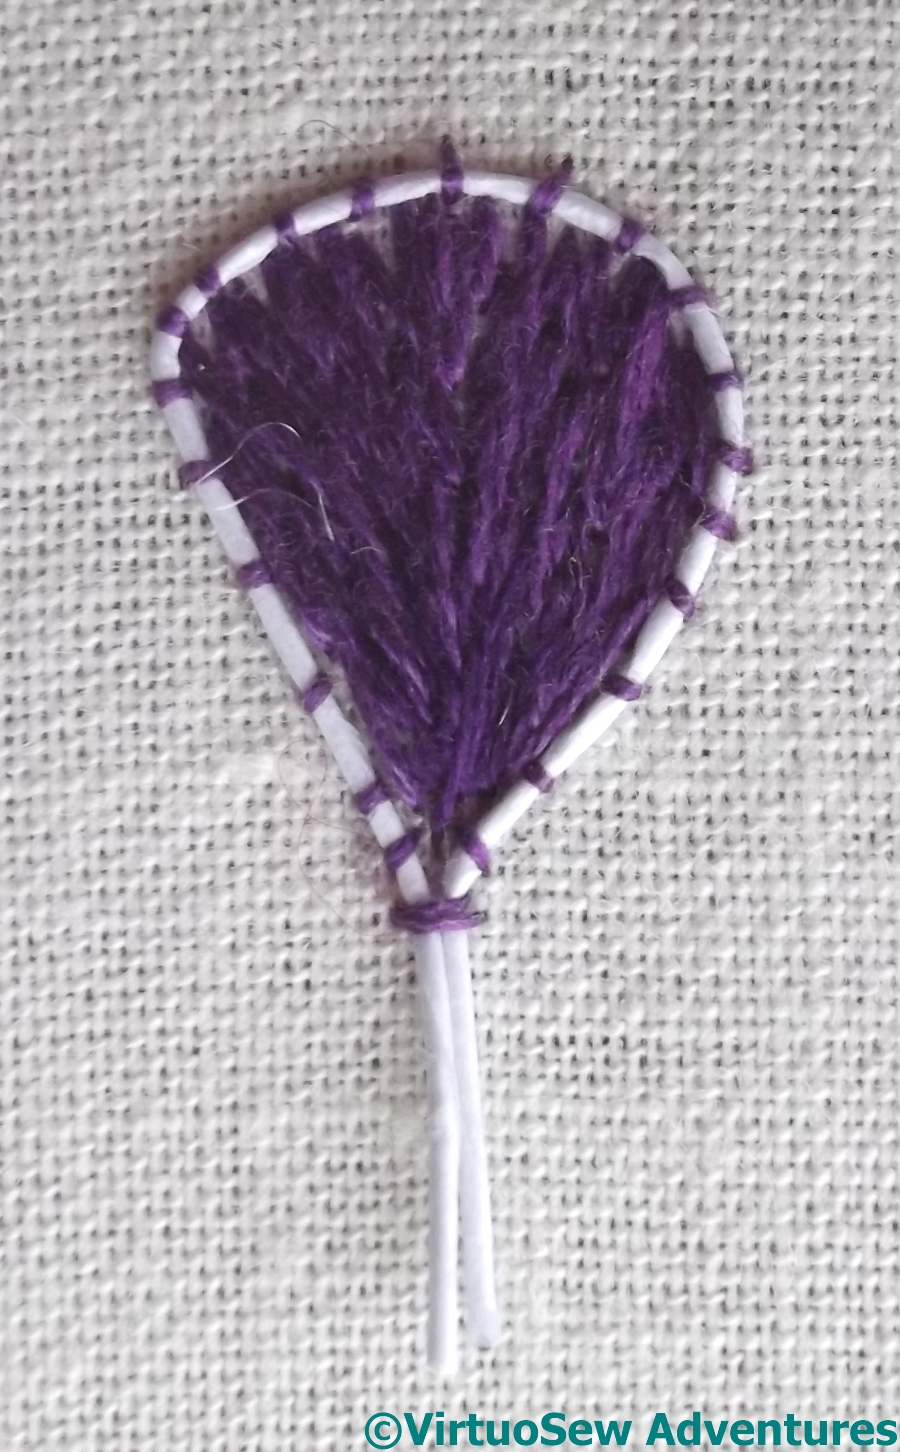
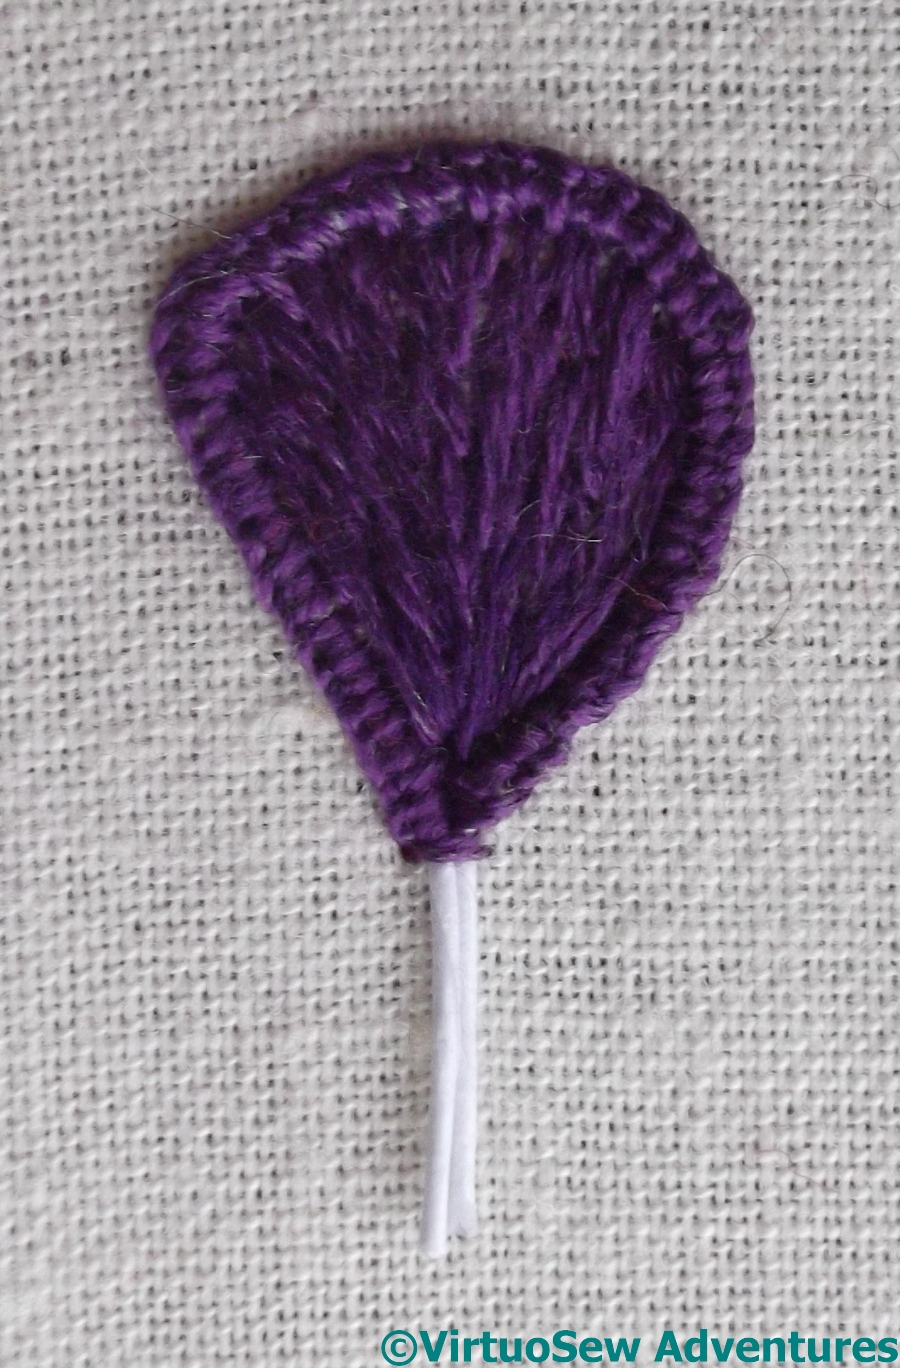
Banafsiga – Violets
First Petals Wired
In her book, Mary Chubb describes the sort of frustrating experience that many language learners will recognise, in which a word completely useless for present practical purposes somehow sticks in the mind, while the immediately useful and necessary words just don’t. In her case, she says that while the Arabic word for “bread” required constant effort to remember, for some reason the word for “violet”, transliterated in her book as “banafsiga”, in her words “perched, fragrantly and effortlessly in my brain from the start“.
First Leaves Wired
Naturally, I’m going to have to do some violets to represent the experience, and I’ve decided to do them in stumpwork. I’ve done a little raised embroidery – I suppose those fellows Loading The Felucca count, and there’s always the Kiwi – but wired stumpwork is new. I won’t claim to be approaching it full of trepidation, because no-one would believe me, but I certainly have no idea which bits I will find easy and which I will find hard.
First Filled Petal
Actually, as it turned out, the first difficulty lay in working out what a violet should look like. I wanted the simple, old-fashioned violets that Mary, brought up in the early twentieth century, might have known, and my image sources online kept on introducing African Violets, which apparently aren’t the same thing at all.
In the end, following a suggestion from a Twitter friend, I went rummaging on the RHS website, and found a complete rundown on viola odorata, which told me it has five petals, heart-shaped leaves, and is “mat-forming”, which I take to mean it spreads out rather than up. I don’t know how many flowers or leaves my bunch will have in it, so I’m expecting to do more than I need and pick the best.
Edge Covered
I’m using ordinary stranded cotton on this occasion (“Gosh“, I hear you cry, “What happened to all the eccentric yarns you use?“, to which I reply, “There’s paper-covered wire in there – what more do you want?“), and in this first flower, I’m going to use two strands for the embroidery. If I think it looks a bit chunky, I can always move on to single strand for subsequent flowers.
Thus far, I’m rather enjoying it. I may yet move on from these violets to the wired needlelace rose I saw in a Needlecraft magazine twenty-five years ago, and never got around to…
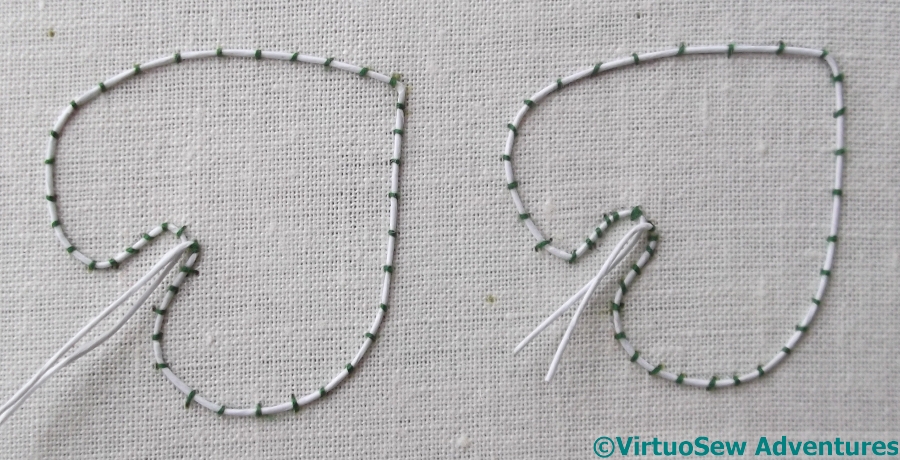
Have Courage, and Dive In!
Trials
I mentioned when you last saw the “View Of The Excavation” that I was rather anxious (for which, read: positively panicky!), because I’d been staring at it, on and off, for weeks, and found myself completely lacking in ideas and inspiration. I hadn’t the vaguest idea where to start, and I was even beginning to wonder whether I ever would. Since I still knew I wanted to do it, this was a bit of a problem…!
Finally, I screwed my courage to the sticking-point, and decided that the thing to do was to just dive in, playing with the stitches, and not necessarily expecting to like them the first time. My Twitter followers became accustomed to pensive tweets, wondering whether I liked something or not…
Very Distant People
Gradually, a vague sense of a system, or at least a pattern of stitch choices, began to emerge. The most distant figures were outlined using a single colour and a single stitch for each figure.
In fact, in this group, there are only two colours, and only the one stitch – split stitch, which is very good at providing a slim, unobtrusive, but definite line. If anything, there may be more lines in here than I really need, but true to my decision not to second-guess myself, I’ve left it for now, and when I have finished the whole panel, I’ll review everything again, just to be sure…
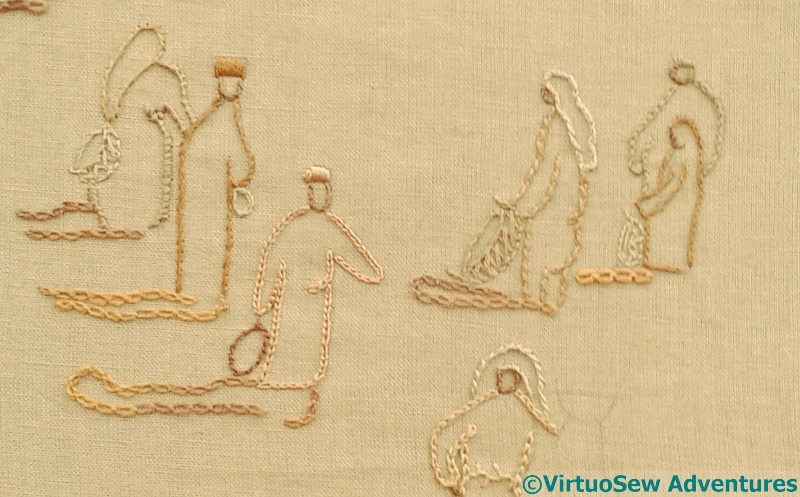
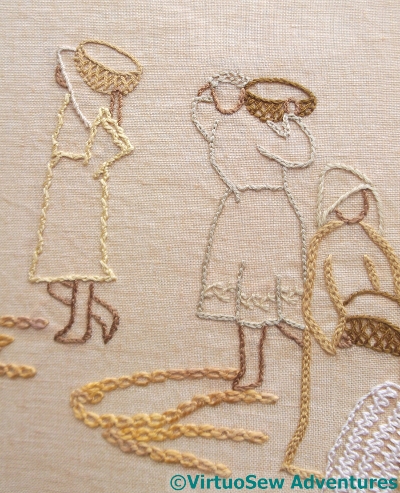
Distant Group
For the group in the middle distance, I began to use a greater variety of stitches and colours, even within each person.
One element which remains the same throughout the panel is the baskets. All of the baskets are worked to create a criss-cross, woven effect, except that the stitches in different directions aren’t interwoven. This helps to make them a little more fuzzy, and worn-in.
The people are worked with stem stitch, reverse chain stitch, twisted chain stitch, and even rope stitch, which is a knot stitch, but with the knot hidden by an arm of thread. I’m beginning to hope that I might be pleased with this when I’ve finished it!
Beginning to stitch the Panel of the Excavation
Finding The Ground
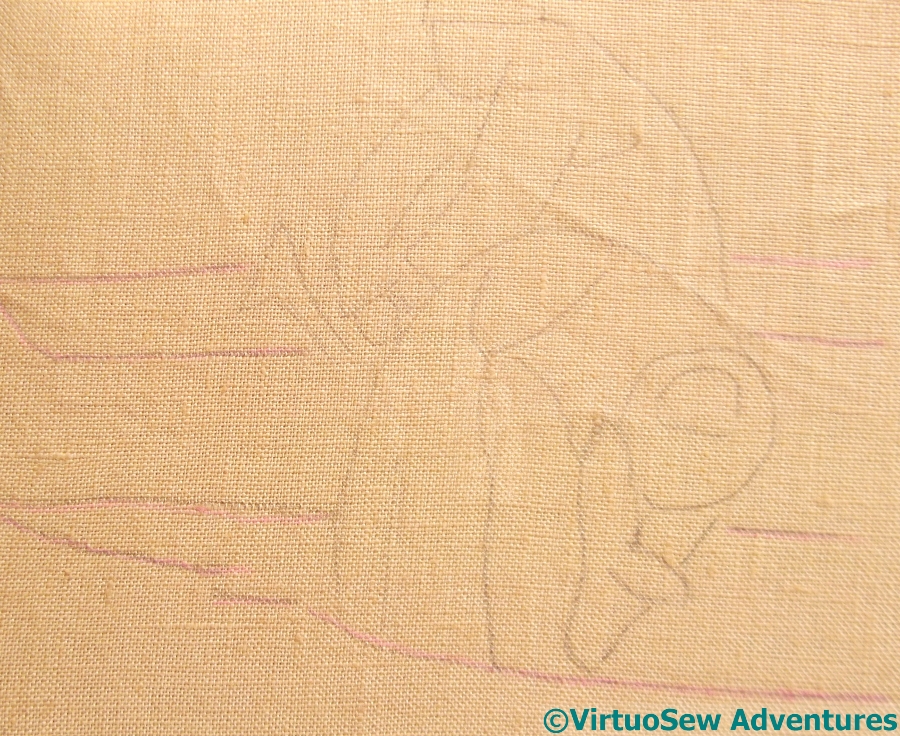
When I first looked at the picture of the Excavation, I realised that when I had only a small section on view, I was finding it hard to work out what was ground and what was human, so my first action was to go over the ground lines again, using a pinkish quilter’s pencil. It helped a little…
I decided next that if I could get the lines for the ground stitched, it should make decisions about stitching the humans easier. And those decisions need to be made a great deal easier, because since I transferred the design onto the fabric, I’ve stared at it, on and off, for weeks, wondering frantically how I was even going to start on it. I don’t usually suffer from this sort of bewilderment, so I’m in a terra incognita, here.
Not At All Sure
And truthfully, this isn’t as much help as I hoped. I’m working in the hand, because I find a lot of the basic stitches easier that way, and I am expecting it to be worked largely in line stitches.
The lines that have been stitched are all the ones in the design that indicate the ground surface (or, in the front, trenches and spoil heaps). There’s not enough structure here to help hold the panel together as I’m working on it, so I am going to have to think a little harder, work out a system for the people, and possibly completely rework the ground when I’ve done the people.
I know I can’t expect all my projects to flow as easily as did “Loading the Felucca”, but I really had hoped for a little less head-scratching and a little more stitching!
Stitching “Typed on Camelback in a Sandstorm”

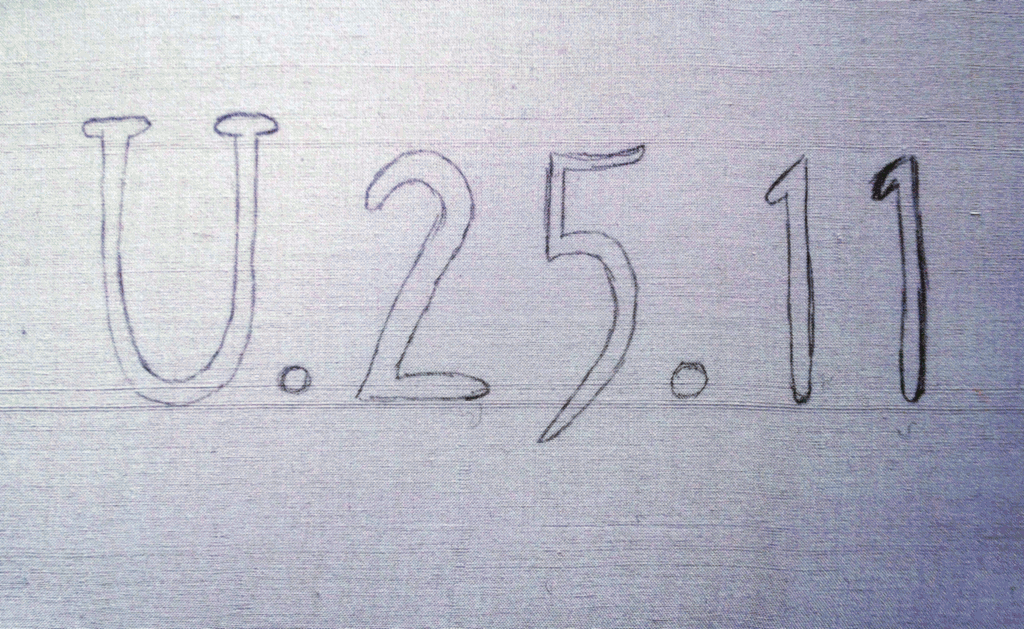
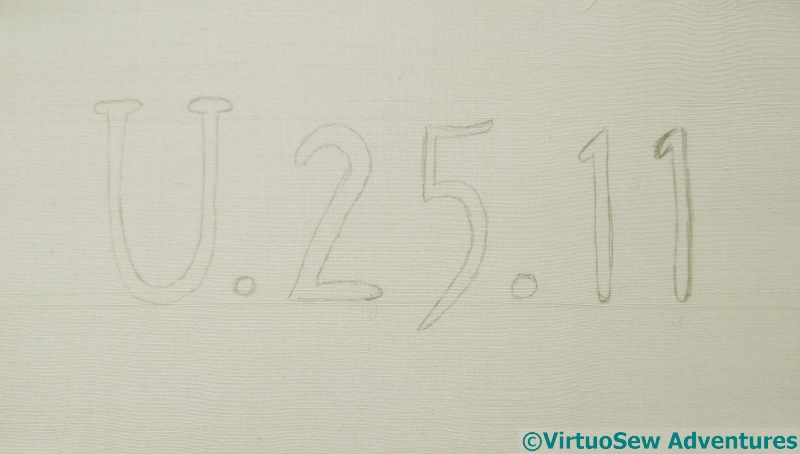
U.25.11 Detail
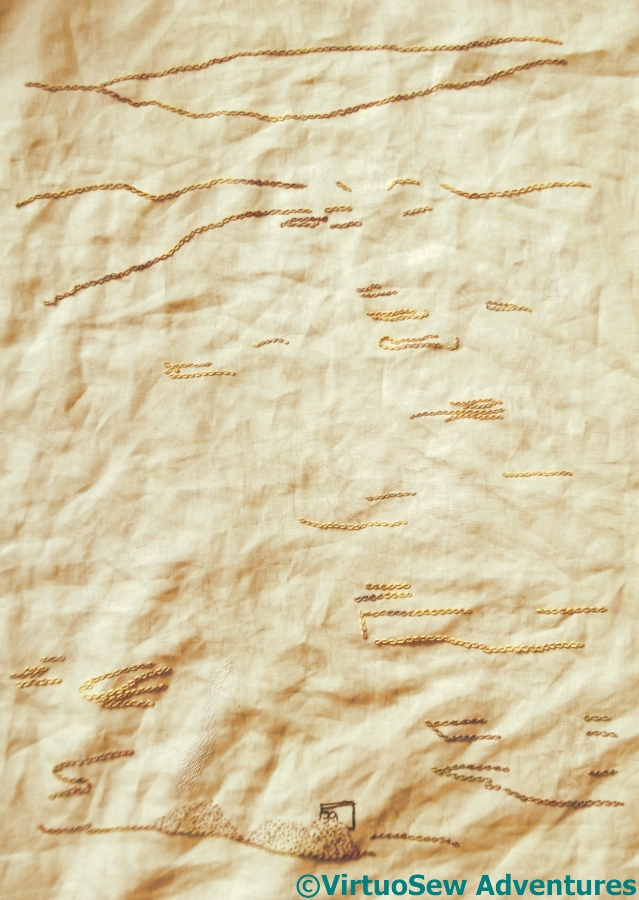
The whole idea of this patch is to recall an incident that Mary Chubb describes, in which sand adhered to a freshly-typed page, creating “a rather pretty embossed effect”. In the end, I chose the grid reference of the Expedition House, where the team lived during the digging season.
I used a selection of silk threads from Mulberry Silks, from a colour family called “Old Cotswold”, which I’ve also used for the panel showing the Crock of Gold Hoard. It included a russet, a mid-grey and a very pale greyish-white as well as several sandy colours.
I used all of the colours this time, and discovered that the threads are not all the same, some being finer than others. That’s perfect in this case – some of the grains of sand would be finer than others, and I could accentuate or reduce the differences by using more or fewer wraps in my French Knots. I think it looks really very sandy indeed!

U.25.11 Typed In Camelback In A Sandstorm
It took a remarkably short period of time. And what’s more, considering that I’m not really a fan of French Knots (I never could get the hang of them when I began embroidering), I rather enjoyed it. Although I must admit, it was beginning to get quite tricky, what with all those layers of thread. I swapped over to a sharp needle and even that was a struggle!
Still, that’s another piece completed…
Sandy Stitching – click to open in a browser tab and run the animation
And, as a bonus – an animation. This was put together by Simon Walters (@cymplecy on Twitter), using some photos I provided. I’m impressed with what he produced, considering that I didn’t take the pictures in a very controlled environment, and it will give you some idea of the view I had as I built up the effect, colour by colour
Thank you, Simon!
Typed on camelback in a sandstorm
One of the reasons Mary Chubb was sent out to Egypt with the Expedition was to ease the administrative burden in London by bringing the administration of the dig under control. In the nineteen twenties, of course, typing was not the mundane skill it has become, and although there was a typewriter in the Dig House, the excavation directors were not skilled in its operation, producing typed reports that looked, in Mary’s words, “as though they had been typed on camelback in a sandstorm”. The first task when a report arrived had always been to retype it into a more legible format so that no-one other than the secretaries would have to struggle to decipher it.
When she is out in Egypt, she soon discovers that some of the difficulties are not easily surmountable, even by an experienced typist. Sand adheres to the damp ink left by the typewriter ribbon, creating “a rather pretty embossed effect”, which sadly she isn’t always in the mood to appreciate, especially when dragged away from difficult, painstaking typing of lists to help with the excavation of delicate finds..
Text Laid Out
It was easy enough to work out how to represent the sand sticking to the paper – close-packed French knots in a mixture of sandy colours – but not so easy to decide what text to use. Maybe “faience”, a commonly used material for jewellery and ornaments? The names of the expedition members? References ascribed to finds?
In the end I settled on “U.25.11”, which was the site grid reference for the Expedition House, which was built up on the remains of an original house of the Amarna period. I don’t, of course, know precisely which typewriter Mary used, so I have sketched onto the fabric something that looks a little bit like typescript. It isn’t exactly right, but the letter and digit forms have been sketched from looking at the letters in a typescript we recently found, of an article my father wrote in the 1960s. My whole family is going to be involved in this project, whether they like it or not, and by whatever circuitous route I may devise…
Beginning on the panel of the Excavation
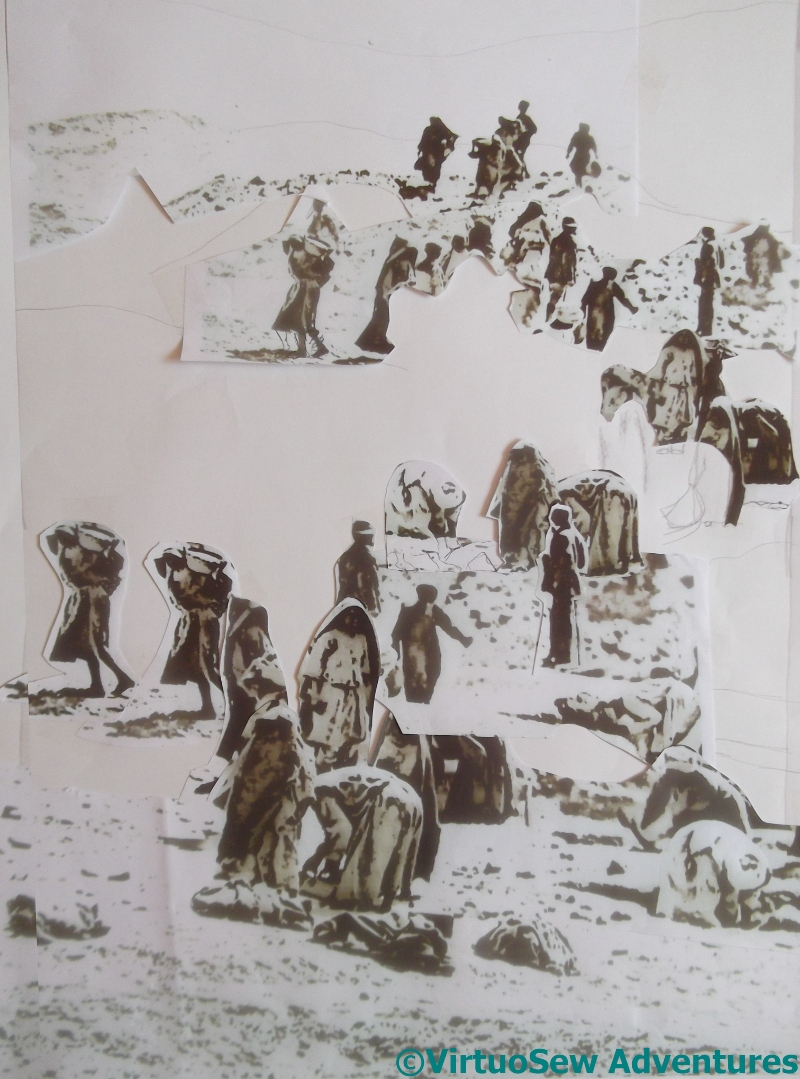
Draft Of Excavation Design
When you last saw the Excavation design, I had a rather blobby draft image, created with scissors, glue, and paper, and loosely based on one of the Egypt Exploration Society photographs. The pattern of shapes creates a pleasing effect, but there was more to do..
There followed the process of turning the design idea, layout, call-it-what-you-will, into an embroidery design. I outlined it onto tracing paper, took the tracing away from the paper, stood back and wailed.
None of the lines – taken from this image, I remind you – made sense.
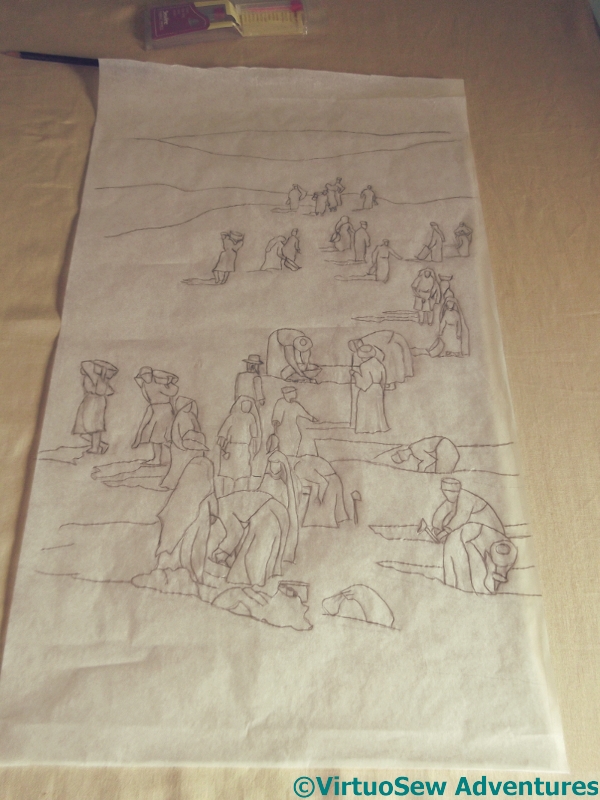
Transferring The Excavation
Fortunately my mother (an artist, remember, with a much better understanding of figure drawing than I!) came to my rescue, emphasising some lines and removing others, tweaking and balancing the figures, and then finally I got the design transferred onto a piece of the sandy coloured linen.
Now I have to invent my stitched version, based on the lines transferred, but quite possibly inventing others as I go.
At the moment I haven’t the vaguest clue where to start, so this may be another case of “set it up and stare at it”.
I seem to do a lot of that!
Final Details on Loading The Felucca – for now!
Comparing Hats
Woolly Hat
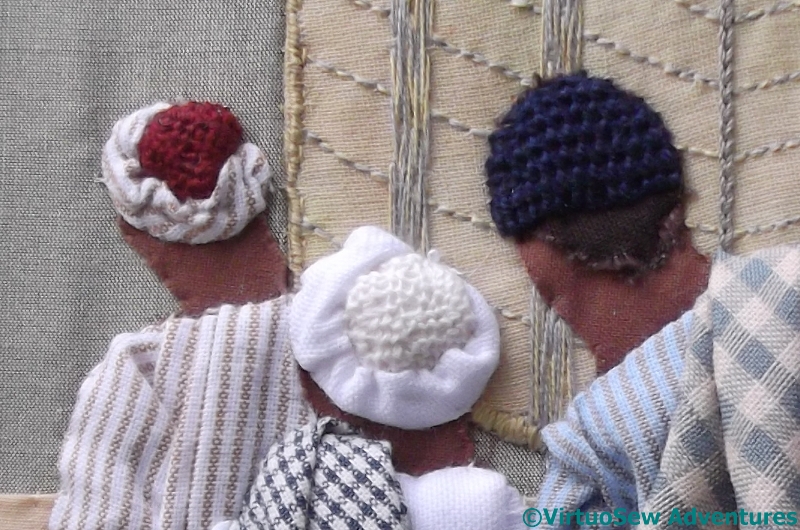
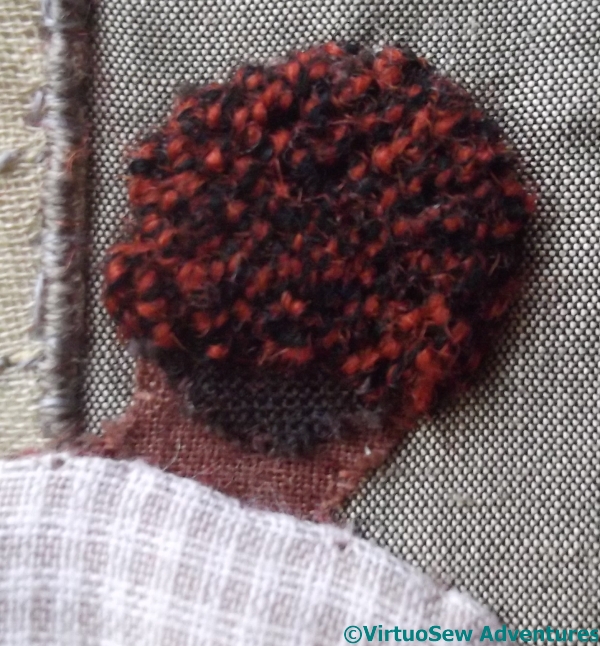
Both of the labourers on the right have a small piece of dark brown cotton attached to their heads to give the impression of hair.
Two of the hats (the ones on the right) are turban-like things with a central section and a twist of fabric, and you’ve seen them before. They were really very successful, but the other two labourers seem to be wearing knitted or crocheted caps. Somehow trellis stitch didn’t seem quite right, so in this case I’ve used detached buttonhole stitch with return, in navy blue pearl cotton.
The final hat is much woollier. I used a heathered worsted yarn and trellis stitch. I have a few doubts about this one, but for now I’m content with it.
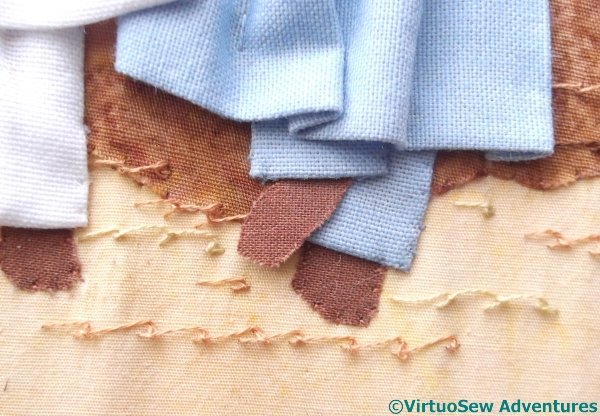
Foot Dangling Over Sand
I was concerned that the dark cotton and the light background cotton were too distinct, and made too much of a contrast. My first efforts to break up the surfaces were not as successful as they might have been, but in due course I arrived at the solution – rows of scroll stitch using a single strand of thread, in tones that lie between the two extremes.
I’ve left the little foot unattached, dangling over the sandy surface and seeming to poke out of the trouser leg just as it should.
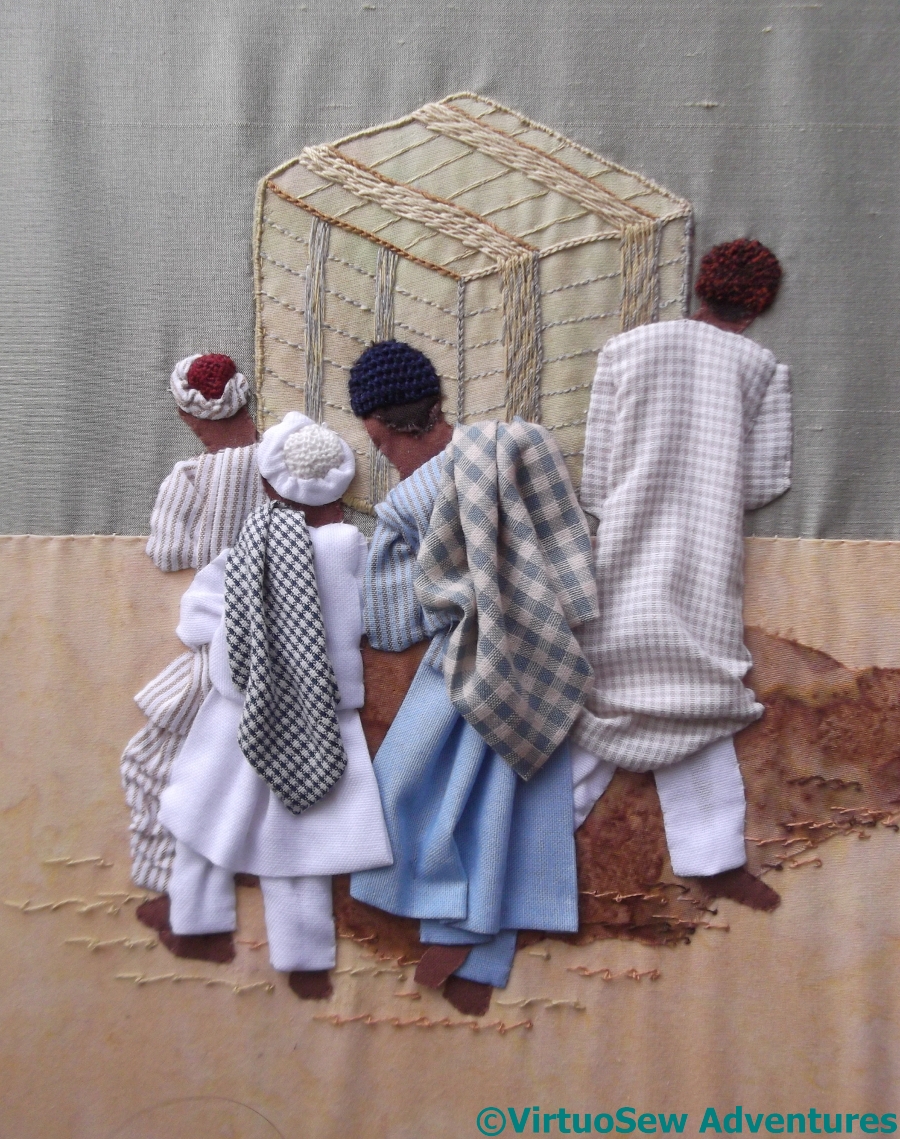
Finished I Think
And behold the (nearly) final version.
I think there is just enough of the scroll stitch, and the packing case has almost the right level of detail to make sense, but not so much as to attract more attention than it should. The people have worked, if anything, even better than I hoped they would.
I’m going to wait until I know where in the Dreams of Amarna the piece is going to live – either as a patch on one of the main panels, or as a stand-alone, separate panel – before I do any more. At the moment, I don’t know what more to do, or how to do it, and until I do know, I’m not risking the success I’ve already had.
The Fourth Labourer
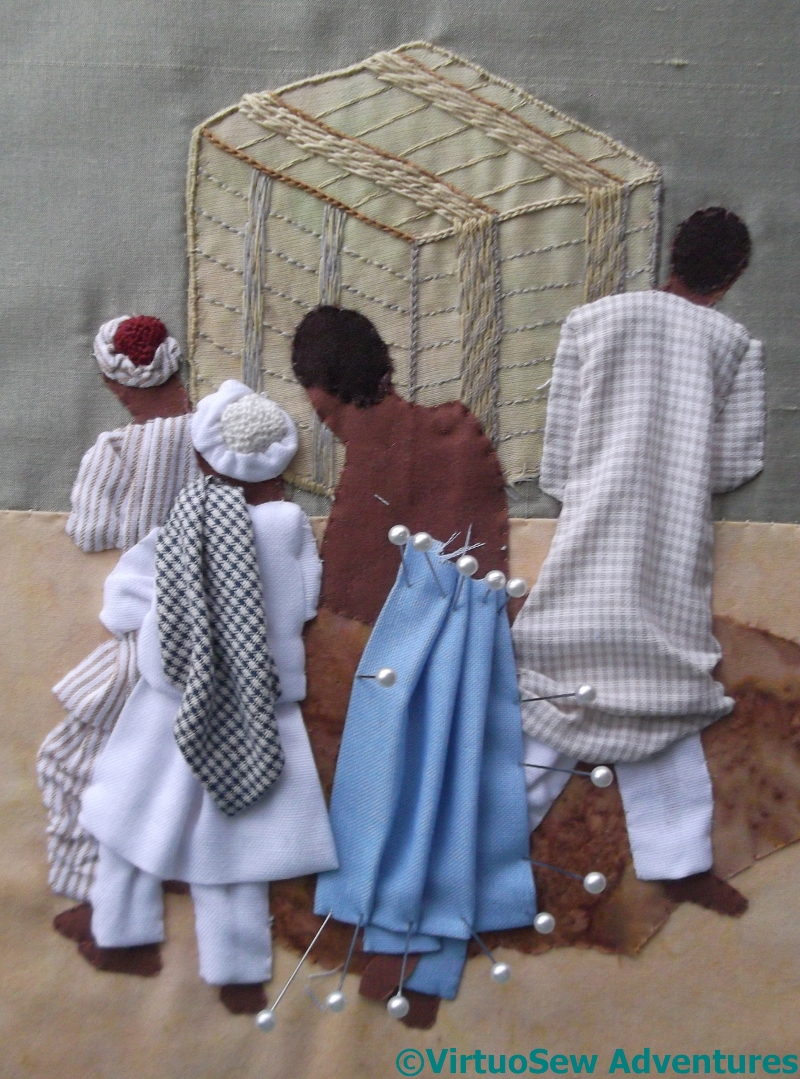 Finally, after all that trouble with the Third Labourer, I moved on to the fourth.
After some playing around with colours, I decided to dye some of the fabrics I’d bought to clothe these fellows (Bahama Blue, if anyone wants to know!). It proved to me that some of the fabrics which I had expected to be cotton weren’t, but that doesn’t matter in this context. This project is going to be a positive riot of different materials!
You can see that I made considerable use of pins to control the fabric and keep the pleats in something resembling order, holding the fabric to be ironed, and simply leaving it while I thought about the next stage.
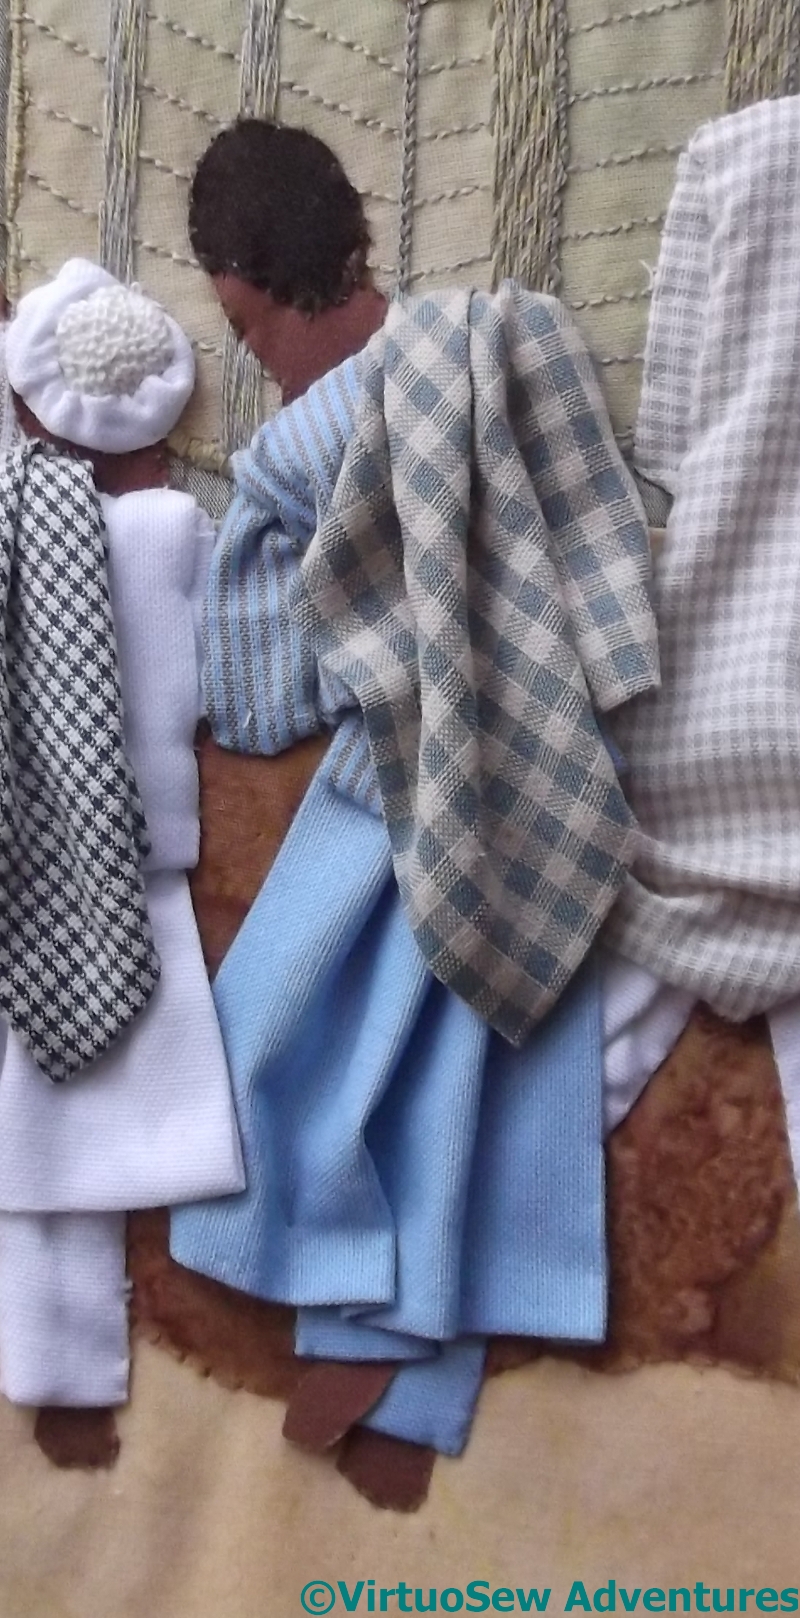
Fourth Labourer Finished
The stripy fabric for this fellow’s shirt is the same as the stripes on the first one, overdyed with the blue, and the bold blue check was overdyed with a stony beige colour, to try to make it look a little dusty. It barely made any difference, but sometimes “barely” is good enough.
I’m very pleased with the way the folds suggest the raised leg, and the turned in sections of the tunic create some bulk for the shoulders.
And, though I say it myself, I think the folds of the shawl (if that’s what it is) are an absolute triumph. They are secured in a few places, but I defy you to find the stitches, even if you zoom in on the picture, and I’ve avoided crushing any of folds.
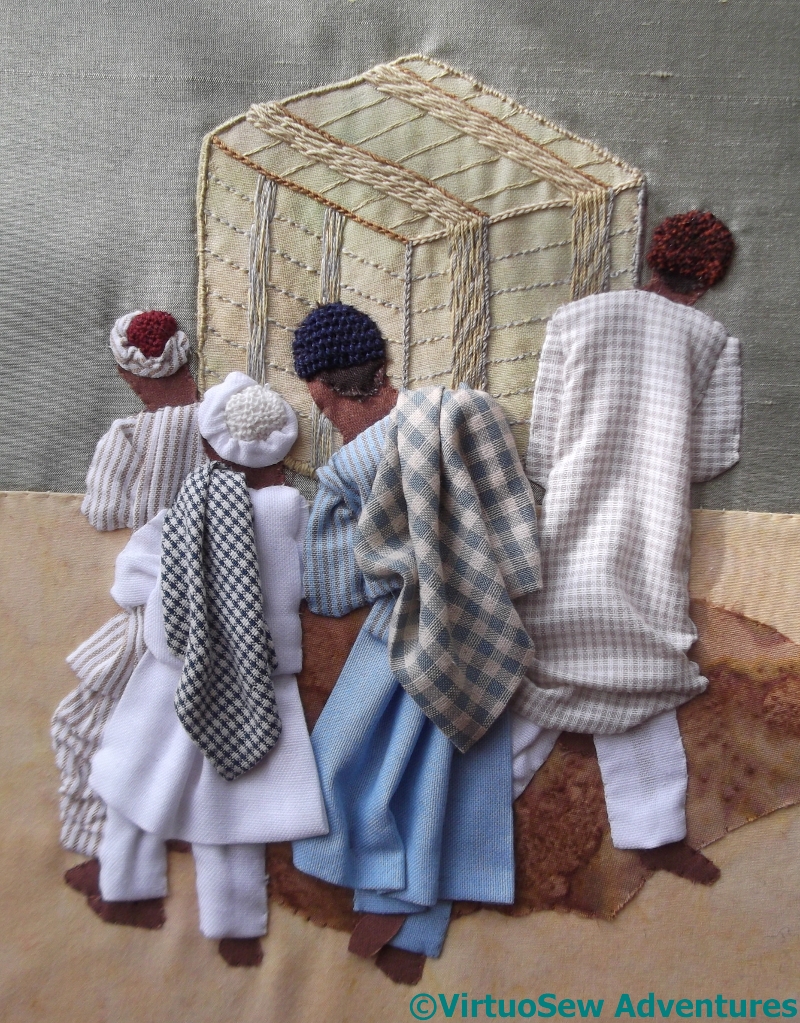
Yet Something Is Missing
The basic figures are now completed, and I’m really rather pleased with how they’ve turned out, but I do feel as though there may be some details missing.
More staring and thinking required…
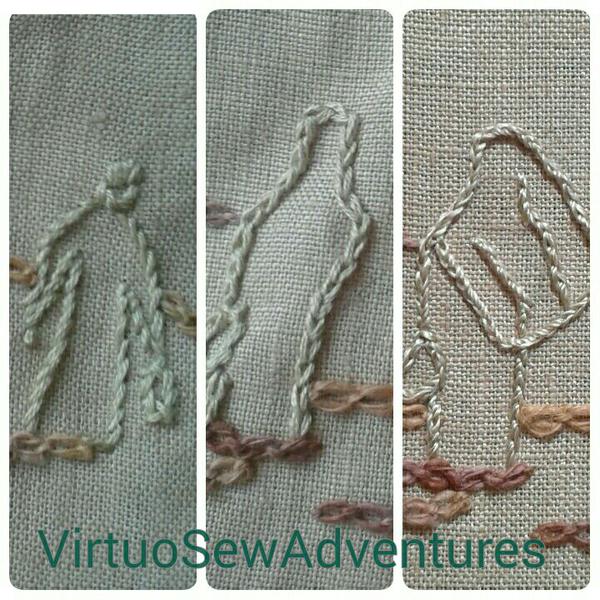
The Third Labourer
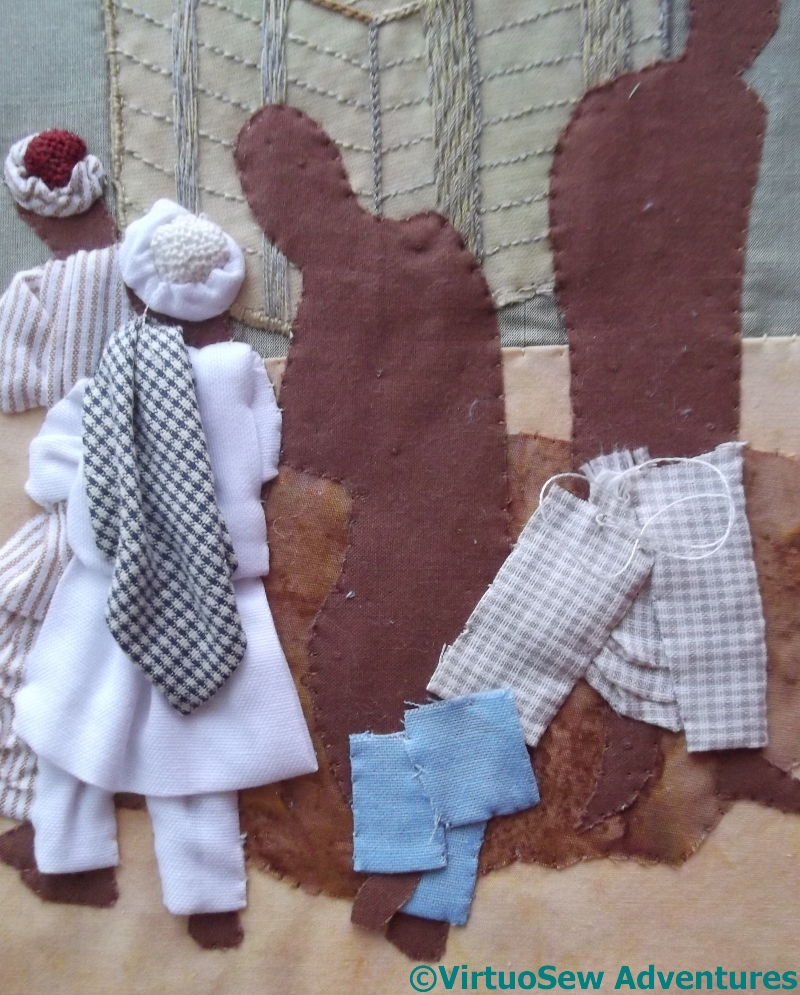
Beginning The Third Labourer
The mini-iron has been very helpful in turning and pressing the edges of the fabric pieces – sometimes before they’re applied, and sometimes afterwards, but at first I was very surprised to find myself wielding it left-handedly, more often than not. Then a little further thought, and it made sense – the difficult part is controlling the fabric, so naturally I would use my better hand.
First of all I started on the middle figure, forgetting that he is the nearest to the camera. So I stopped working on him – leaving his trouser bottoms in place – and moved on to the figure on the right.
Then the pleated drape cause me a great deal of trouble. Then I wasn’t sure about the left leg. Then I realised that I’d used the checked fabric I was intending for the overshirt.
More unpicking. Grr!
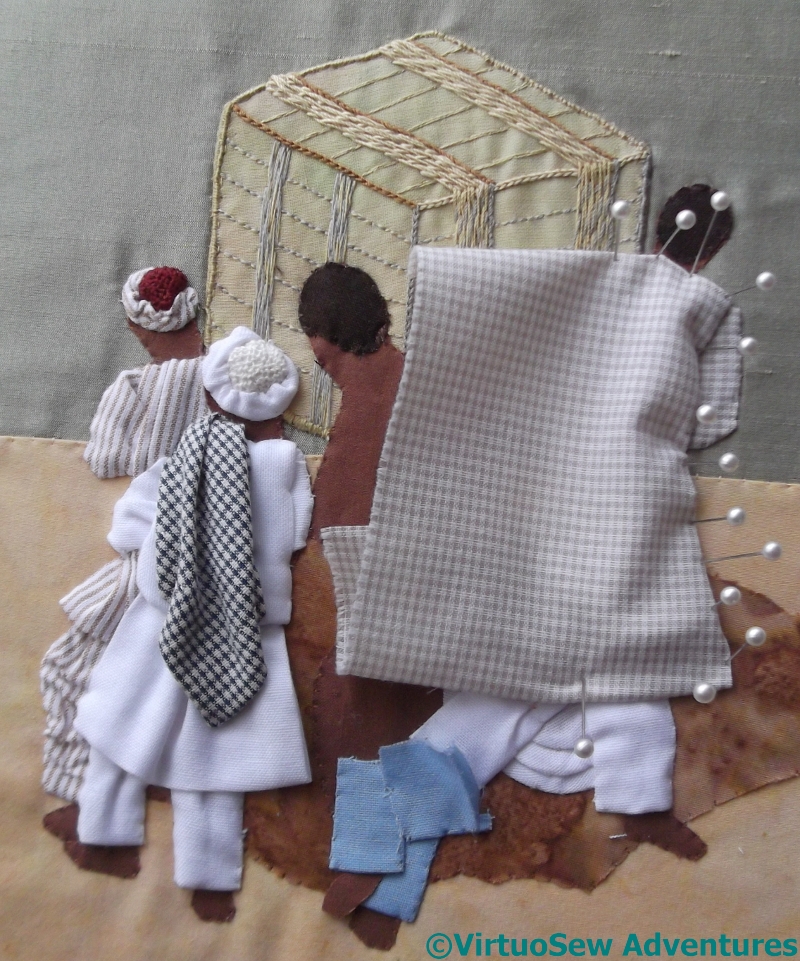
Pinning Third Labourer
I reinstated the trousers and the drapery in white fabric and then started trying to fit the overshirt.
I’ve been making extensive use of that set of pins that Karen Ruane sent me (thank you again, Karen – they’ve been invaluable!) as I try to work out how to make the overshirt sit properly.
In this case, however, having pinned and stitched, and unpicked and pressed and restitched, I decided I still had some reservations.
Still more unpicking.
Grr yet again!
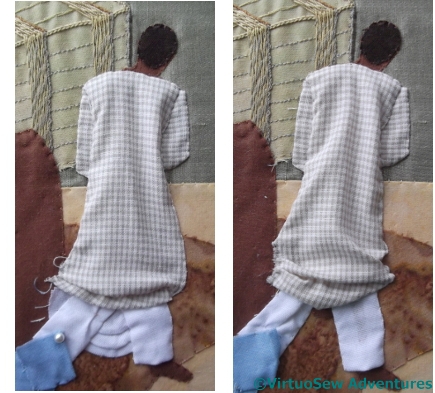
Spot The Differences!
So after much more puzzling and unpicking and re-stitching, I think I’m happier now. I’ve reduced the bulk in the left shoulder, removed the drapery, which is in the photo but didn’t “read” well in the applique, and reworked the overshirt.
Again.
None of the lower edges have been caught down, which I hope will help create the proper effect of garments that can move around a body. That does mean, of course, that I will have to be very careful not to crush the final piece when I’m storing it, but I do think it will be worth the effort!