
Tag: Needlelace
Yet another idea!
Long time readers of my blog know that I use it, not just to talk about the embroidery I’m doing at the moment, but also as a place to put some of my ideas, in the hope that the Search facility will help me find them again, rather than having to paw (I use the word advisedly!) through stacks of paper and notebooks. This is one of those posts!

Some of you may recall that the Association of Mouth and Foot Painting Artists used to send out, not just cards, but little sheets that had angels printed on them. You could press them out and curve them into a cone shape, making a charming little Christmas decoration. I was reminded of them when we got the decorations out of the loft, and found a whole boxful!
It occurred to me that I could use a variation on that little pattern to create a needlelace Nativity scene.
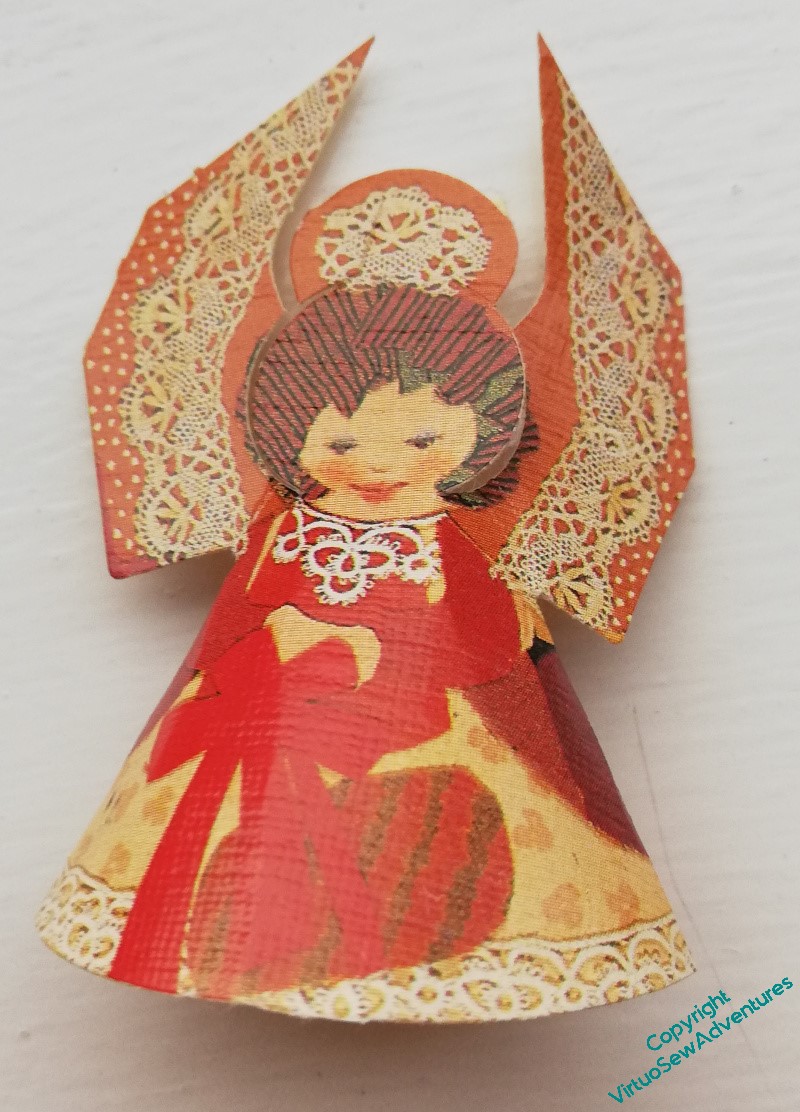
That idea became a bit clearer when I looked at a few of them. If you look at this one, the angel’s wings have clearly been made to represent fabric with a bobbin lace edging laid over it, and if that necklace isn’t based on a piece of tatting, I have never seen tatting before!
Clearly, I would want to tweak the shape a little. Only the angel, of the characters in the Nativity, needs wings, and besides, I think a bit of variation in height would be advisable!
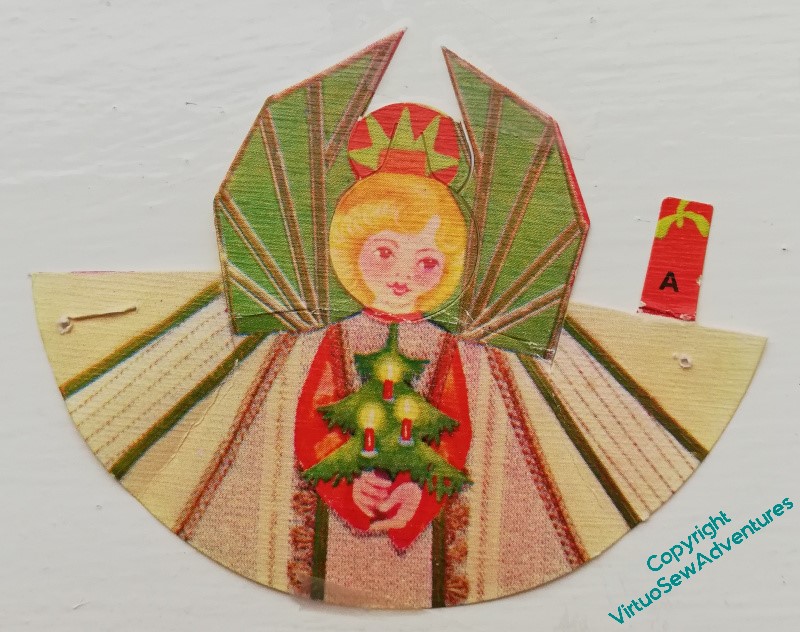
The basic shape can be seen when you open one of them out. The wings wouldn’t be hard to remove, for those that don’t need them. But the shape is fairly simple, and it would mean that I could use really gorgeous thread and stitch, allowing the thread and the stitch to do all the work.
I doubt I will be tackling the idea any time soon – I still have to work out how to create the Baby Jesus in the manger in much the same style! – but I think it would be fun to do.
Oak Leaf Wreath Testing
I mentioned that I had more experiments to perform on the leaves, and several people hastened to tell me that I should be sure to Test To Destruction. They are right, of course, and having plenty of samples in the pack that Caroline Hack sent me to play with, I was able to do just that.
One of them, I pulled and twisted, trying to snap the plastic. That turned out to be much harder than I had expected it to be, considering how flimsy it felt when I was nervously working needlelace over the leaf shapes.
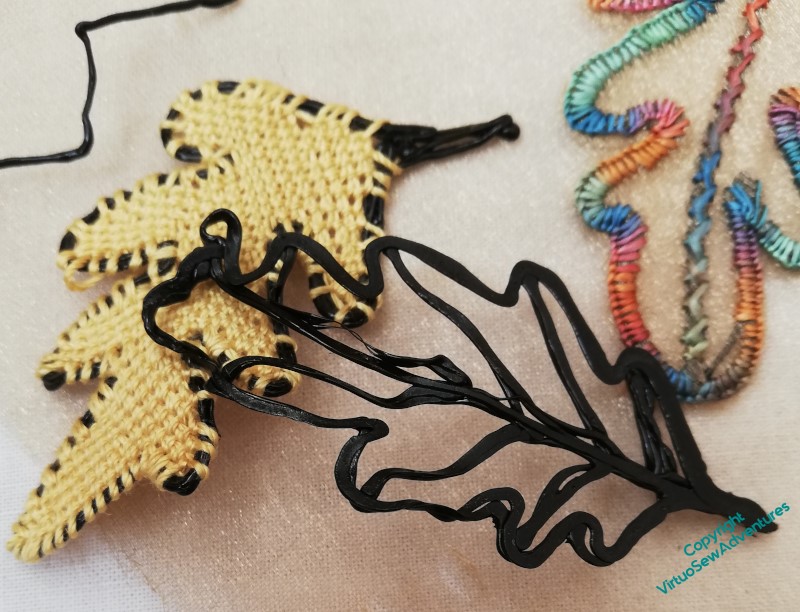
Then I fished out the heat gun that I still have left over from some experiments with paper crafting, covered a drinking glass with a bit of greaseproof paper, and tried to soften the plastic so it would match the curve of the glass. The plastic certainly moved, but not in a very controlled fashion, so I tried again, this time using one of my needlelace experiments. It was still an undercontrolled shift, but it did produce the sort of twisted look of a drying leaf. I tried hard to photograph it so that the curves really showed!
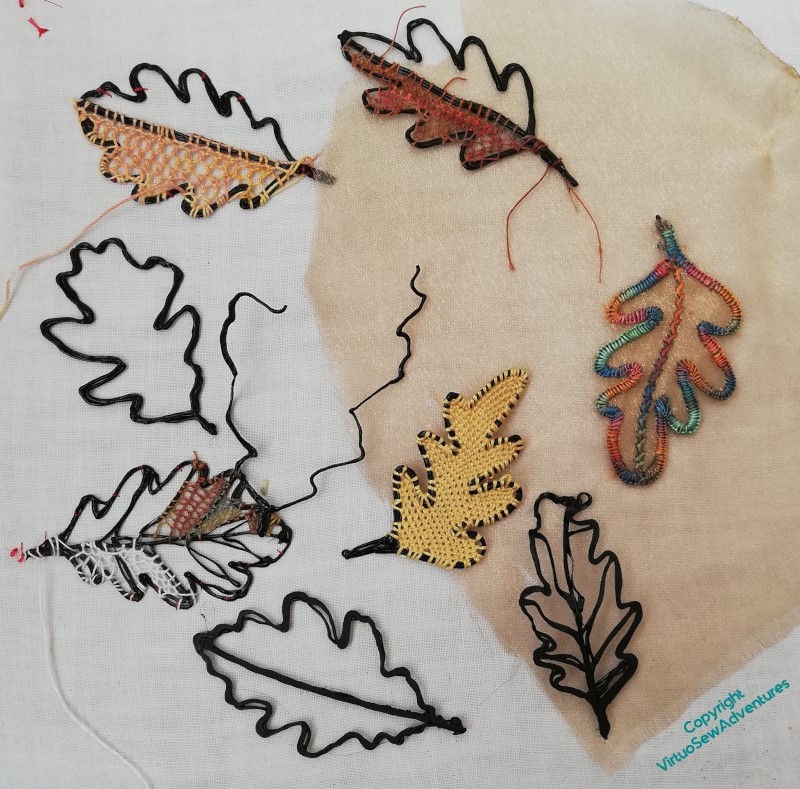
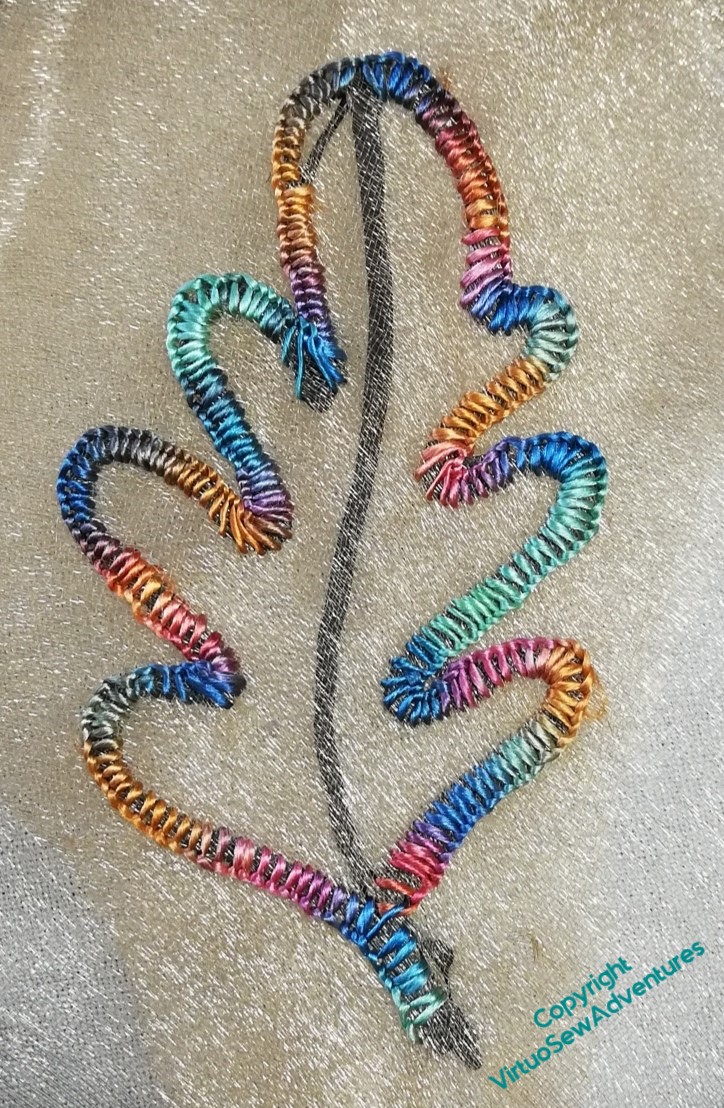
I worked a series of experimental needlelace sections in some of the other pieces. Knotted stitches in slubby linen (really don’t do this – friction becomes a real problem!), cloth stitch in silk (the yellow that in due course was melted and twisted) and a variety of others.
I think, in the end, the difficulty of covering the borders, and the slippy plastic which makes it hard to keep the threads in place, mean that this won’t be the best way to do the oak leaf wreath. I may still have thoughts about this as I begin to plan, and in particular, I need first of all to work out how big my oak leaves need to be in order to be in proportion with the mirror.
You can now watch Episode 67 of SlowTV Stitchery, which is entirely concerned with my battles with Swirl Stitch!
More Needlelace Experiments
I wasn’t at all sure how to tackle the Oak Leaf Wreath Experiments, but as always, charging in head over heels is the most enlivening strategy!
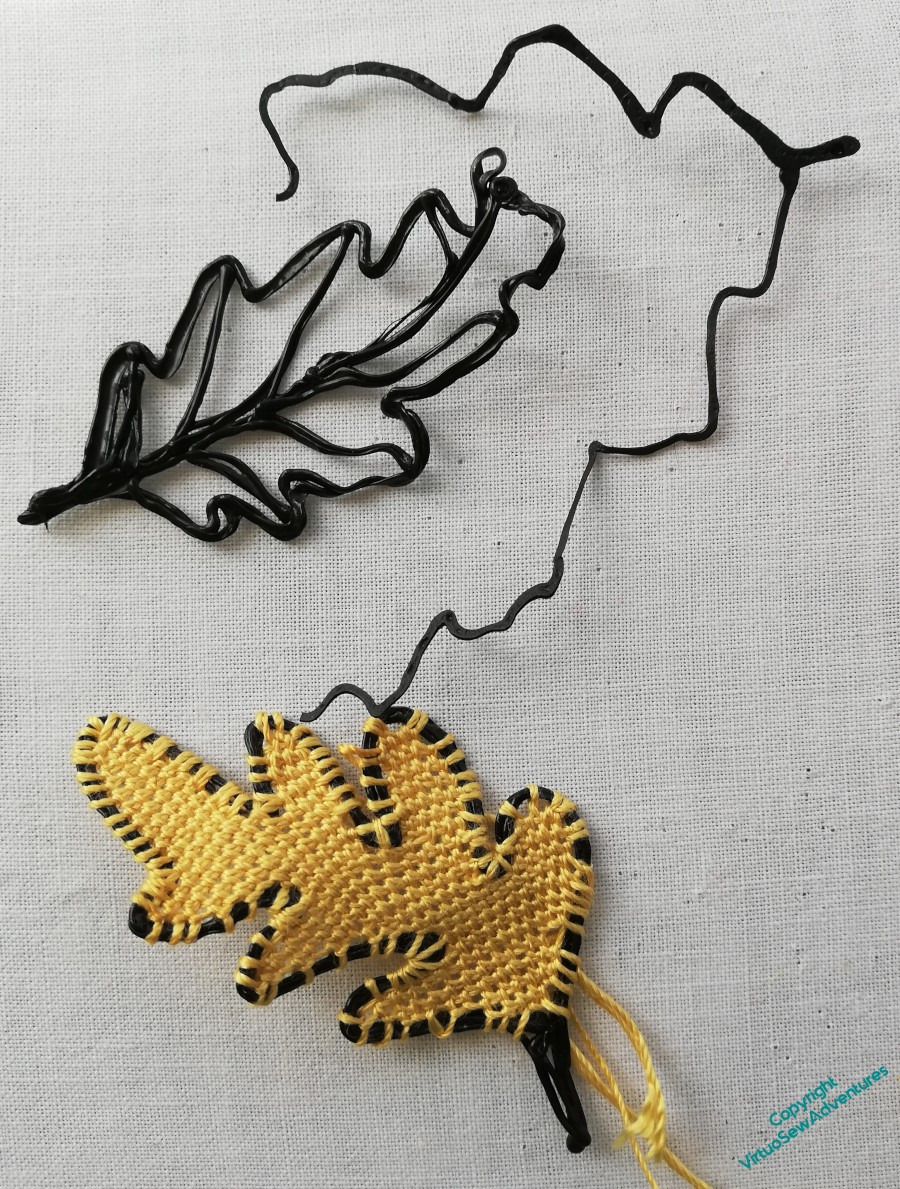
Having toyed with the idea of these drawn plastic oak leaves as the support for fabric leaves, I thought the next thing to play with would be needlelace, using different types of thread and different stitches. I want to get some sense of how to tackle a very difficult shape, and I think that even if I choose not to use the plastic pen, I will have learnt a great deal from the different combinations I’ve experimented with.
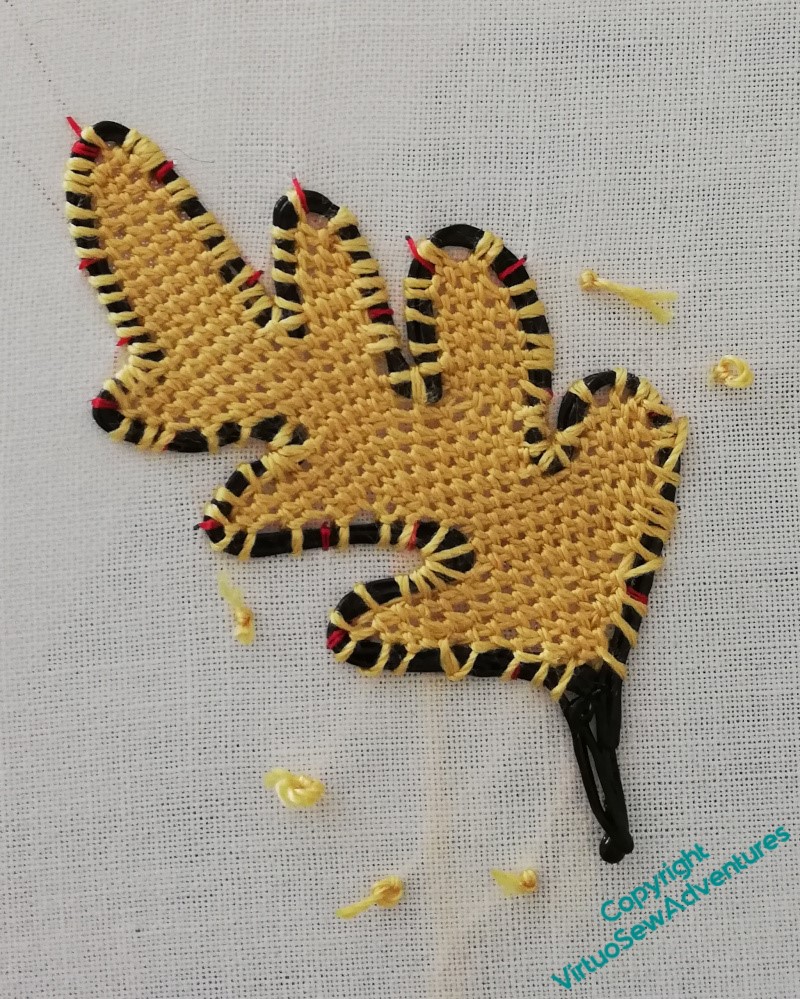
The first one uses a fairly heavy silk thread, not quite a perlé, but definitely not stranded. The stitch is the classic Corded Brussels Stitch.
I don’t think that this combination of thread and stitch leaves space to cover the plastic easily or neatly, and I can’t think of another way to tidy up all the ends I needed to use because of the uneven shape.
Also, my goodness, the plastic is slippery. Placement of rows might prove to be a bit of a challenge.
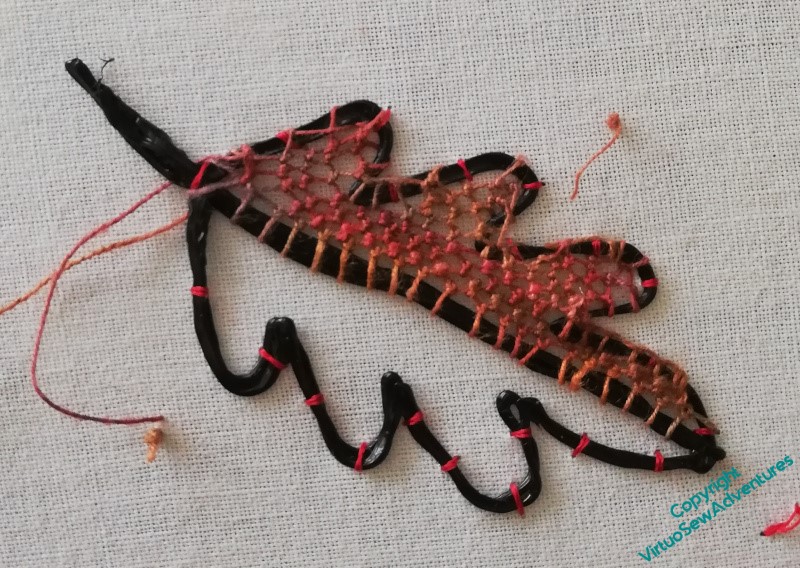
The next one is a rather finer linen thread, and I started from the extra line of plastic down the middle, which may have slightly simplified the stitching. There is probably enough space for a buttonhole stitch covering for the edge, but it was very hard to fit the needle around the more confined areas. Maybe I could devise some way to cover the edges once the leaf was off the backing?
The linen is a hard thread to work with, because the friction of the thread against itself it quite high, and since I chose a knotted stitch for this experiment, there was a lot of friction!
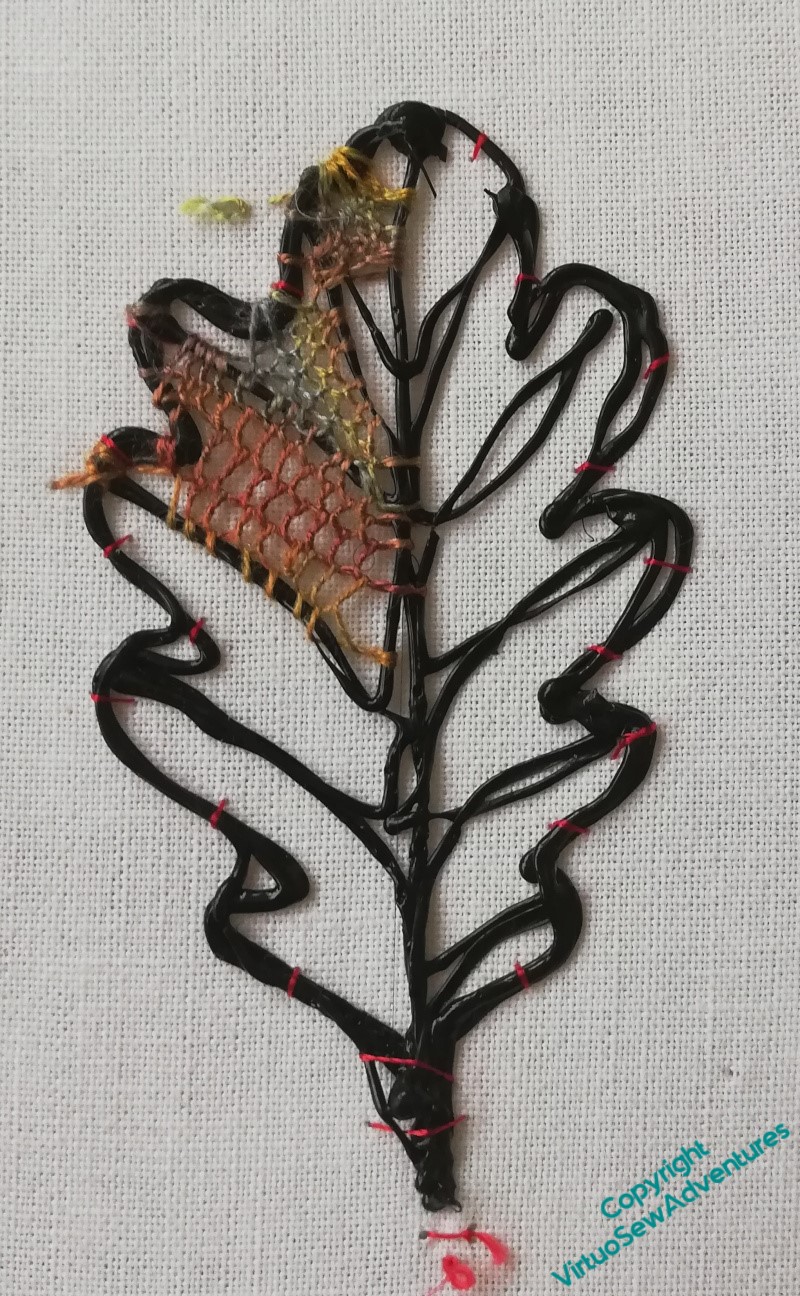
The final experiment for this week used a single strand of stranded silk. Caroline added veins to this one, and I tried to fit two different stitches around the veins and over the edges. Definitely not straightforward!
I found myself wondering about finding shorter needles for this project, maybe more like my Japanese needles, but blunt (the Japanese needles are super-sharp!). I’ve found the balance of the Japanese needles a bit challenging in the past, but fitting around the edges and corners of these shapes has also been a bit challenging.
What’s that saying about picking your battles?
And in the meantime, Episode 62 of SlowTV Stitchery is now live. In which we discuss Why The British Talk About The Weather, consider discoveries in the loft, and contemplate the placement of the needlelace slips.
More Experiments!
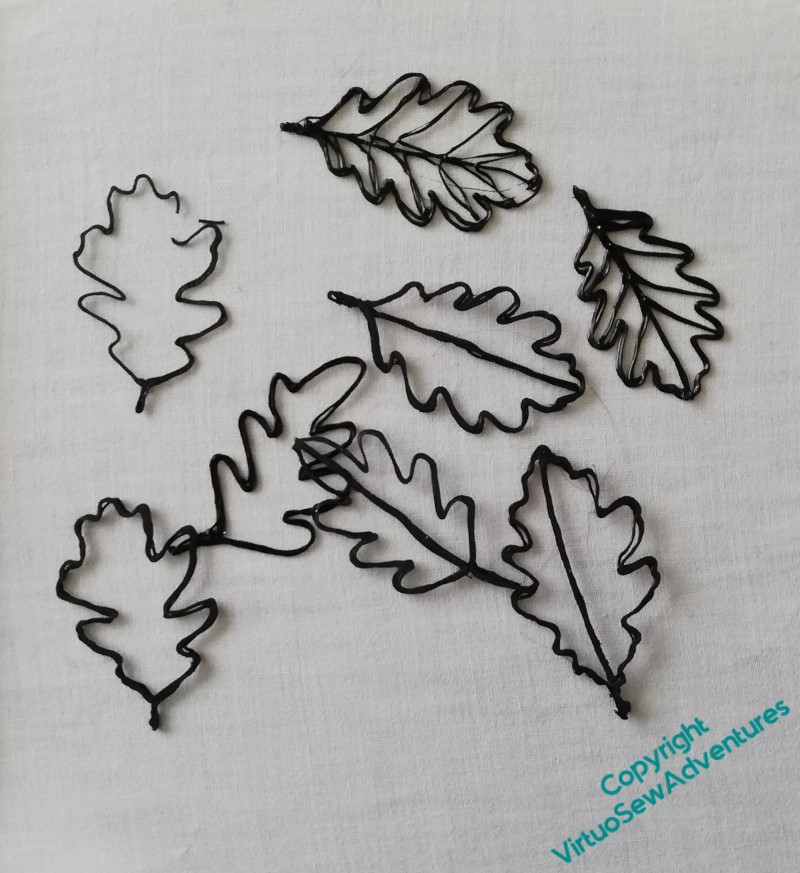
I have a rather nice circular wall mirror that my uncle passed on to me, which was his mother’s. That makes it close to a hundred years old, more than likely, and it occurred to me one day that it might enjoy having a stumpwork oak leaf frame.
Then one of the other embroiderers who joins in Hand Embroidery Hour on Twitter, the textile artist Caroline Hack, mentioned a new toy – a pen which allowed her to draw and create plastic outlines. Now, I know that there is perfectly ordinary cake-decorators wire to do the job, but I wondered whether this new material would add anything to the experiment. Like the star she is, Caroline drew a few oak leaf variations for me to play with, some with veins, some not, some using more passes of the pen, and some not, and posted them.
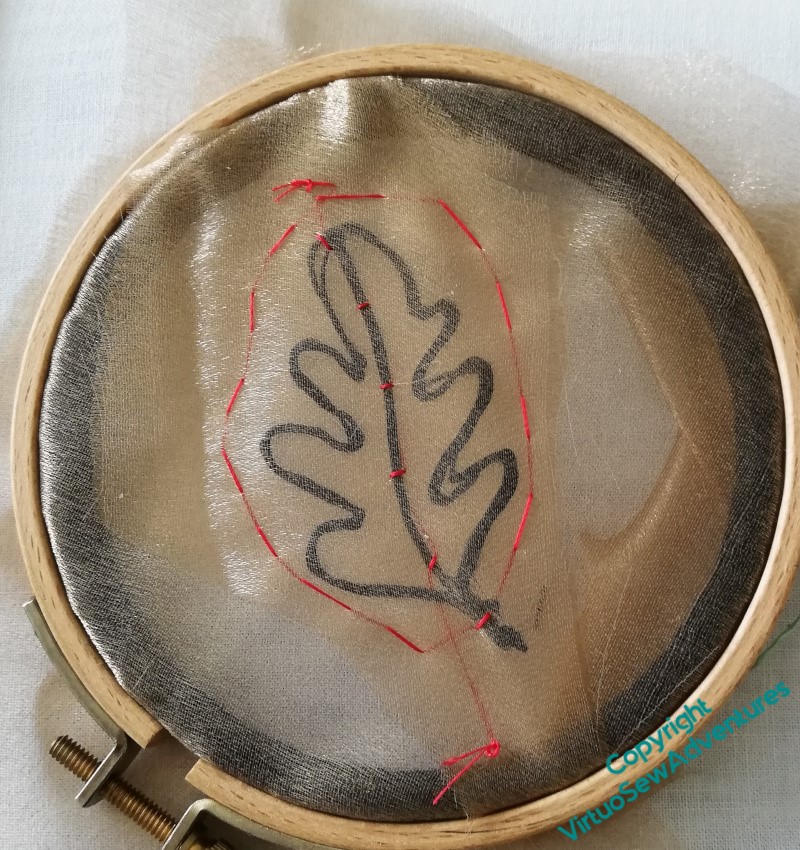
My first experiment plays with gauze. I’m thinking that the oak leaf frame might include some fabric leaves, as well as needlelace. After all, the mirror is a foot across – a wreath would involve a LOT of leaves!
So in this case, I have entrapped my leaf shape between two layers, tacking roughly around the edges to control the second piece of gauze, and very carefully down the central vein so that the leaf shape would stay where I wanted it to. Even by my standards, this is an odd proceeding…
I thought that while I was throwing experimental ideas together I would see whether the slight “spreading” qualities of floss silk help to cover the plastic outline, because gauze tends to ladder if you stitch it too closely. I don’t mind that if it’s part of the plan, but it’s better to know how to avoid it if you want to!
It was certainly an interesting experience. I didn’t quite get the floss silk to spread as much as I might have hoped, and there were some rather tense negotiations between the needle and the few points where there were two separate lines in the leaf shape.
I haven’t yet had the nerve to cut it out!
Episode 56 of SlowTV Stitchery is now live. In which I continue to make progress, almost silenced by the unnerving freedom offered by a Year of Experiments..
A Source of Inspiration (2)
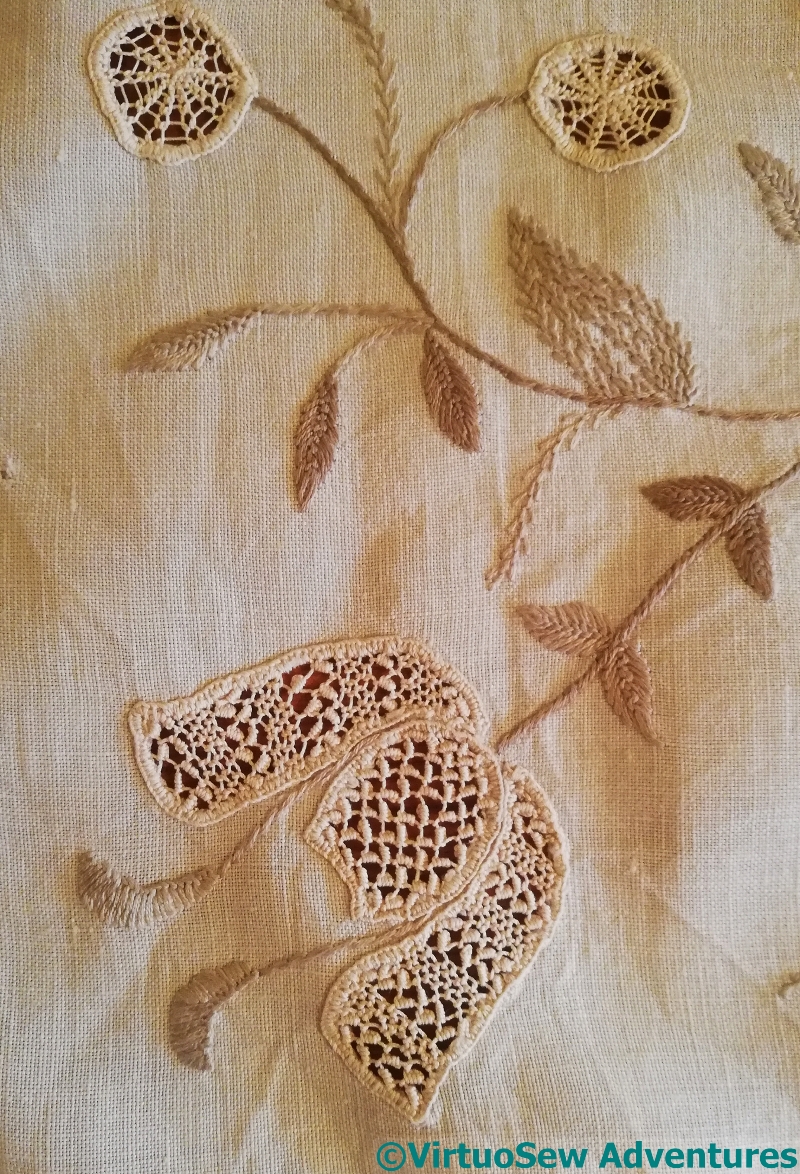
The Spiders Web Wheels in this case aren’t Spiders Web Wheels at all, but a needlelace variation. I think they are both worked in a spiral, and I’m not absolutely sure that they are the same: the slight difference in appearance may be purely a result of a different working tension or spacing.
I’ve only just realised that the small leaves aren’t worked stacked fly stitches, but in close, long-armed feather stitch. In fact feather stitches and their variations show up a lot in Grandmama’s embroidery – she must have enjoyed them!
I don’t think it has ever occurred to me to work needlelace stitches in bands, as she has here, but I can see myself trying it, one of these days! I do have a book, somewhere, full of needlelace stitches, ready for when I have a suitable project and the opportunity to Experiment…
When I was working on the lifebelts for the ship in “Leaving The Tyne”, I used the technique of a buttonhole wheel on thread, and discovered just how fiddly they are to make. Grandmama’s are even smaller and fiddlier, and sewn onto needlelace and not fabric!
The two embroidered leaves in the middle remind me just how effective simple stitch length variation can be. Much as I love my complex, textural stitches, sometimes all you need for a border is a blanket stitch variation!
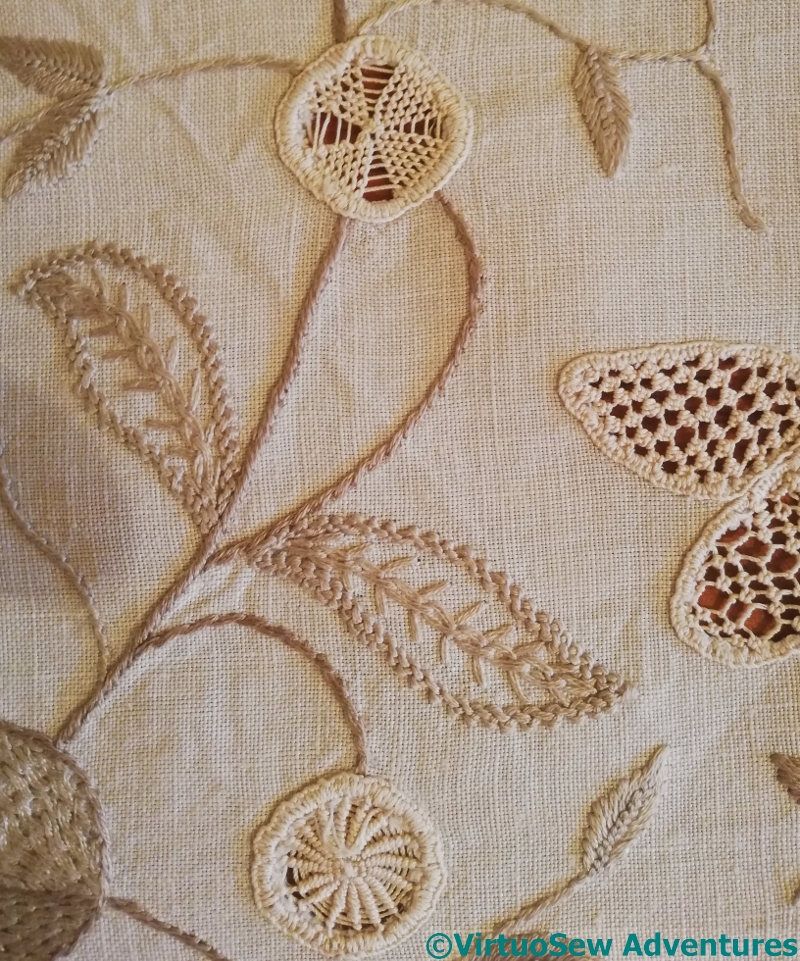
The variations possible to fill a circular shape seem to be endless, don’t they – a sort of beginning of a Maltese Cross at the top, a really dense Spiders Web at the bottom.
And this time, I think the two central leaves are in Wheatear Stitch, outlined with very close and small feather stitch outlines.
I really must try some of Grandmama’s stitches one of these days. Somewhere in the house I have the notes she took on a course, and I’m pretty sure they included sketches of stitches I haven’t seen in all my shelves full of needlework books….
A Source of Inspiration (1)
You might recognise some of the motifs on this teacloth..
Grandmama worked it, we think during the War, and it involves some motifs I used for the Coat of Many Colours.
In fact, even if I don’t use the exact motif, this teacloth, and a tablecloth (a sort of extended Director’s Cut!) are frequently the first places I look for inspiration when I am trying to put together a design for something stylised but floral. I suspect Grandmama would be laughing like a drain, as the family puts it, at the mere idea of being an inspiration all these years later!
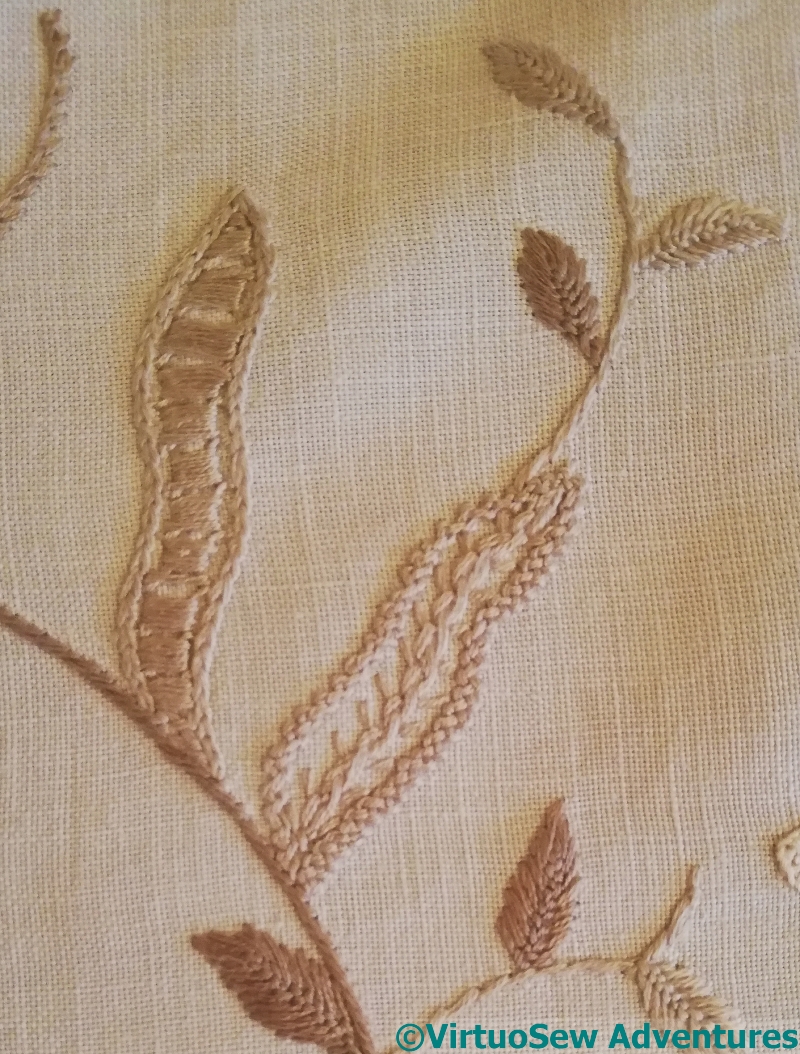
I’ve also learned an even greater respect for textile and embroidery historians, examining and cataloguing design and stitch use over the years. It’s all too easy to assume, complacently, that one’s first assessment of a stitch was correct, and I learnt when I looked at this photo that I was definitely wrong about the second of these two leaves. It might be Wheatear, but I suspect I will have to look at the back to be sure.
And I’m far from convinced that Grandmama didn’t simply make up the other one as she went along. It’s a whipped or wrapped Something, but it looks like a more complex composite stitch to me…
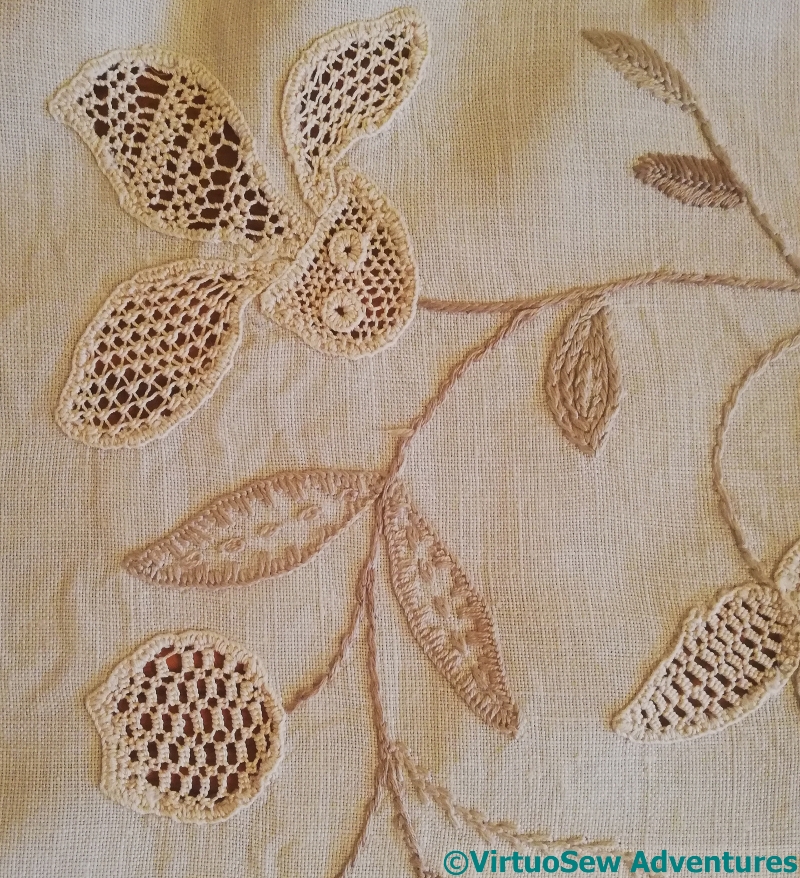
Whipped Spiders Web Wheel as a needlelace stitch, a sort of floral motif of needlelace, and a pair of leaves in the top left that I thought for a moment should have been cut away. However, looking more closely (aren’t smartphone cameras really useful on occasion!), I see that the edging isn’t buttonhole, but chain, so, no.
And that pair of leaves in the bottom left? They’ve been puzzling me for a while. The stitch looks a little as though it’s a whipped or wrapped stitch. Maybe stem stitch worked over foundation stitches?
Gabrielle, the Christmas Angel – Part Two
And now, the Finale…
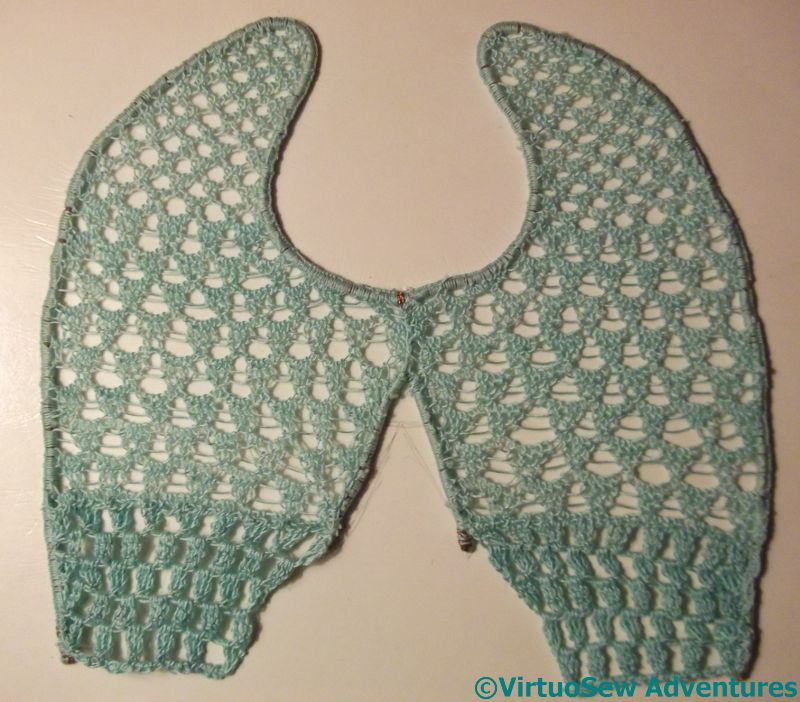
Gabrielle’s Wings – first stage
“Angels need wings. I have never made big wings before, only gauzy ones, so these grew a bit like Topsy! I had, fortuitously, a ball of crochet cotton which exactly matched Gabrielle’s dress, but I had already used crochet to make the lace on the overdress. Needlelace seemed an option if I could find a suitable former to hand. Wire proved to be too thin, and the thread slipped about, so in the end I made a frame from one strand of the plastic coated wire of electric cable. Yes, I know you can buy purpose made formers but I wanted to do it now.
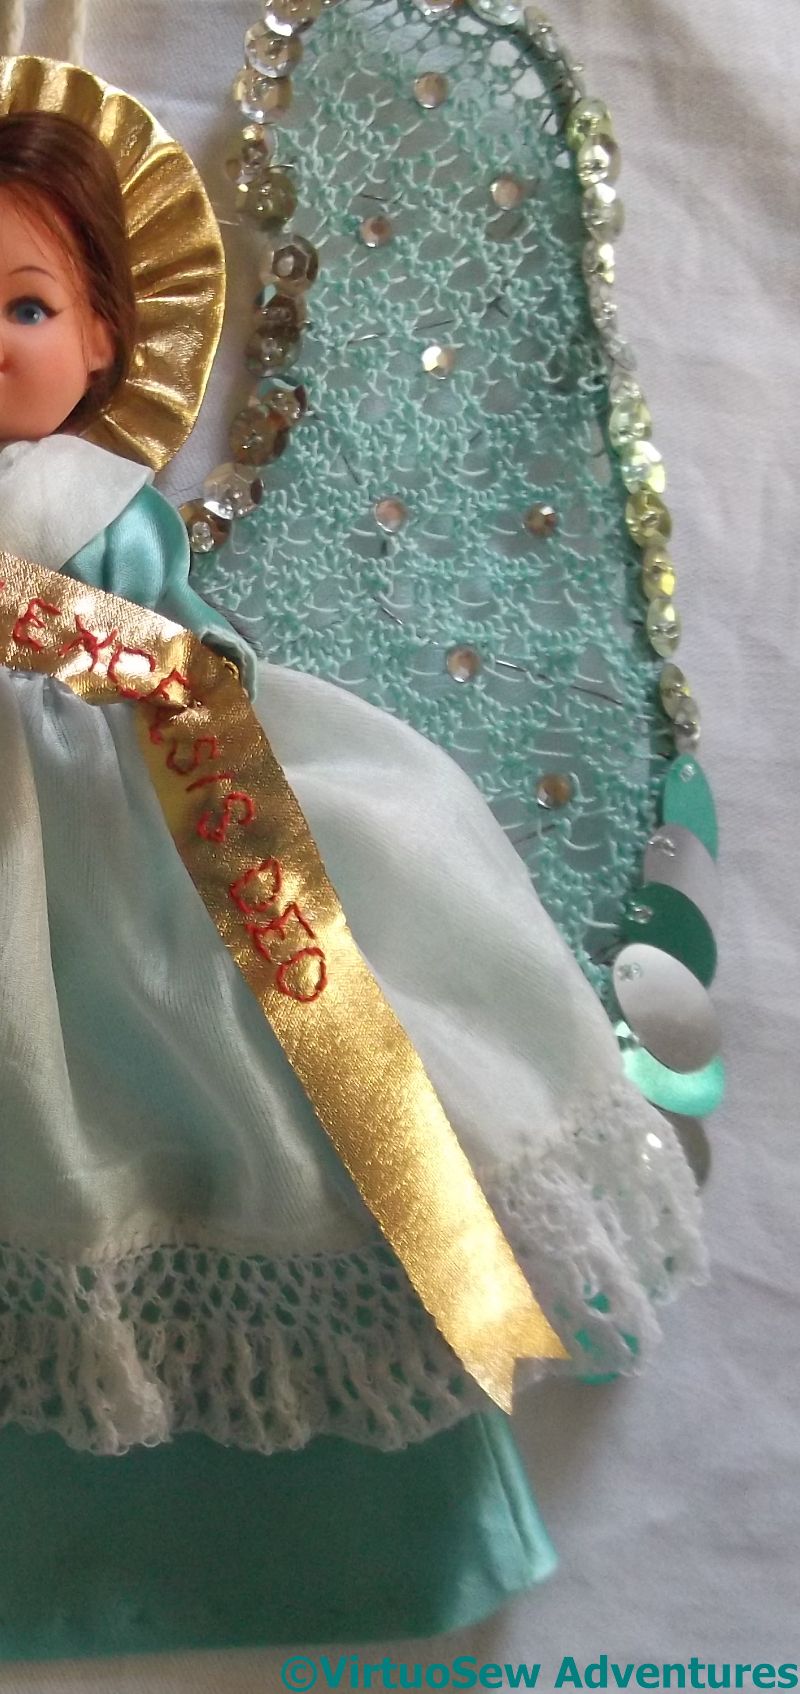
Sequins, crystals, and wire support
After drawing the shape on heavy card, and arriving at a good shape was an interesting exercise in its own right, I couched on the wire at widely spaced intervals, then covered the wire and its plastic coat in blanket stitch using my turquoise crochet cotton. Not only did this cover the wire but it provided a anchor for the needlelace itself. I used pea stitch at first then increased the number of loops in each group first to five and then to seven to add “weight” towards the lower edge. I hadn’t provided a former across that edge as I didn’t want it to be rigid, but needlelace requires just such an edge! A single thread helped a bit but a piece of applied crotchet finally did the trick.
She looked balanced, if a bit subfusc for Christmas, so I added sequins, left over from one of Rachel’s childhood projects, mainly cup-shaped but the lower ones are long ovals to suggest pinions. Again, the colours, turquoise and silver, were a perfect match. Some people have all the luck. Rachel added crystals to increase the “bling”. The halo is a cardboard former covered with cloth of gold. I used the gathered side to suggest an aura of radiating holiness and backstitched a banner “Gloria in excelsis Deo” in red on cloth of gold, too.”

Gloria In Excelsis Deo
We timed our photography just right, too – the last sunny day of Autumn, before the weather turned thoroughly nasty on us…
Outside, hanging from a fir branch in the garden, Gabrielle made a remarkably effective member of the heavenly choir.
A Needlelace Embellished Blouse
I must have worked the Needlelace Embellished Blouse when I was sixteen or seventeen – probably it was about the third or fourth project that I did, ever. Once I’d got hooked on embroidery – which happened over a piece that I’ve yet to show you, partly because I’m not sure where it’s hidden itself – I went from technique to technique and project to project almost without drawing breath!
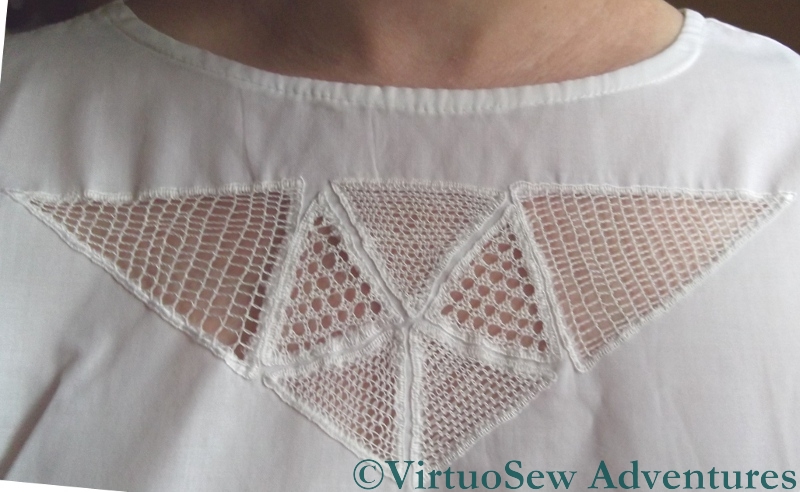
I wanted something “Floral-inspired but modern”, I remember, so my mother suggested a pentagon for a flower and triangles for leaves. Thus:

The Geometric Floral we designed for my Needlelace Embellished Blouse
We divided the pentagon into triangles, because I wanted to use three different needlelace stitches (and also because it would be more interesting that way), and transferred it to a boat-necked summer top with a V at the back.
Needlelace Blouse
It’s hardly surprising I gave needlelace a try – both Grandmama and my mother had worked needlelace embellished table cloths, so it was in the air, so to speak. It’s also not surprising that I didn’t attempt another tablecloth. Even then I knew that I didn’t have the patience for that size of project!
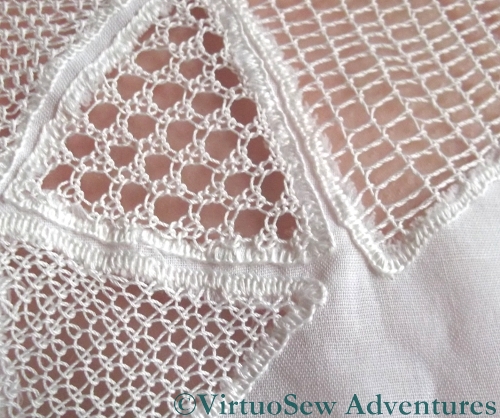
Needlelace Close Up
The triangles forming the flower I worked either in Pea Stitch or Corded Single Brussels Stitch, and the “leaves” were Corded Point d’Espagne. There’s a Needlelace Tutorial starting here on a lacemakers’ website for those who are interested. Then I buttonholed the edges (the wrong way round, I think, now I look at the photo again!) and, with much trepidation, cut away the fabric at the back.
And it worked! I wore the blouse quite a lot for a few years, and now I’ve found it again I suspect I’ll be wearing it some more – although not this year <shiver>!
Grandmama’s Embroidery – Two
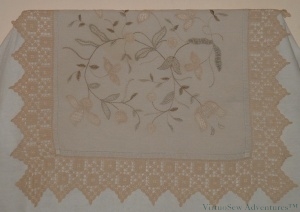
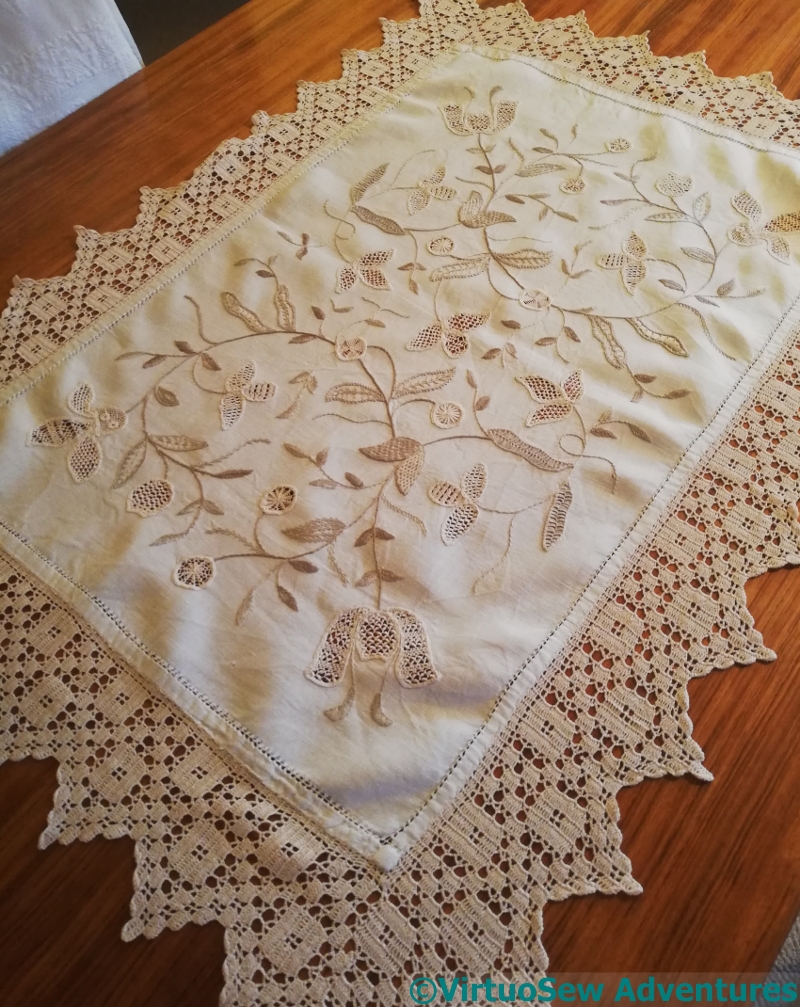
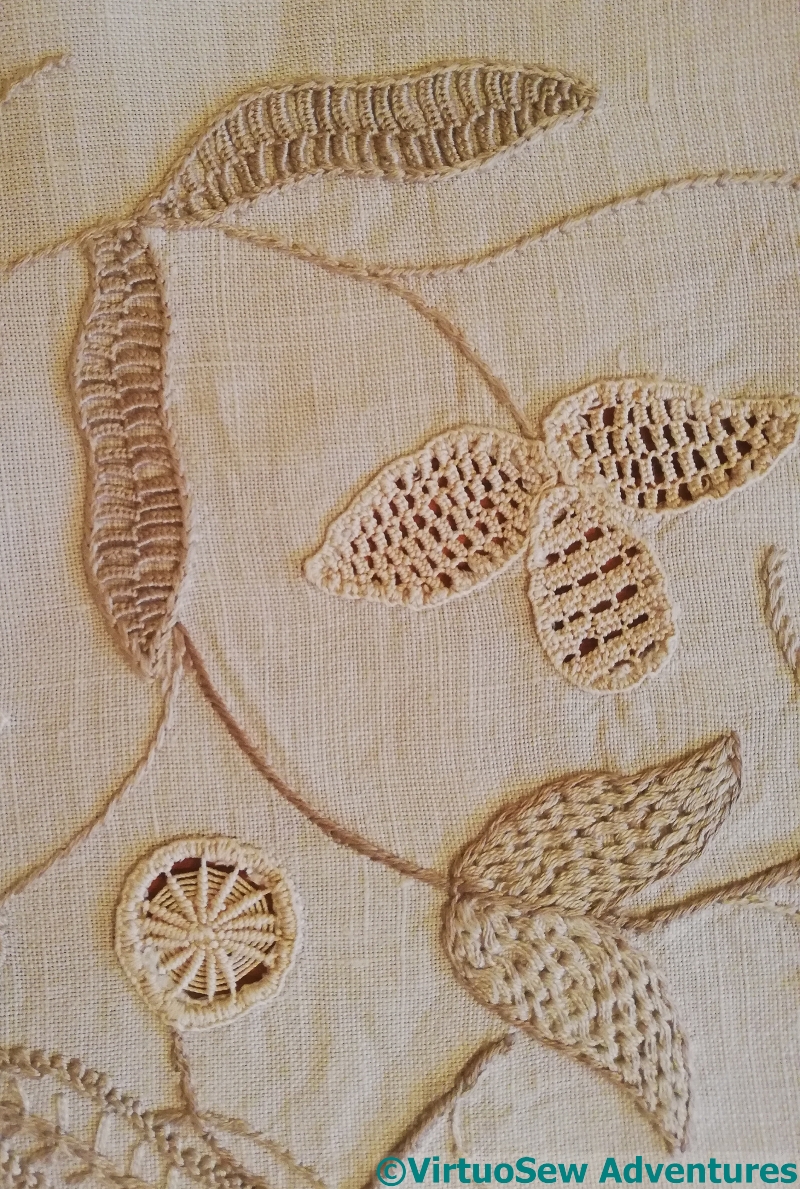
Grandmama's Tea Cloth in needle lace and filet crochet
Grandmama made a lovely linen tablecloth in white-on-white needlelace, but as I couldn’t get any sort of photograph of it, I photographed this small teacloth in ecru shades instead. I think this might have been a practice piece, not in the sense of learning a new skill so much as in the sense of trying it to see whether she enjoyed the technique. I now wonder – in the light of “Stitching for Victory” – whether this was another wartime project, and the various shades of ecru were all that was available.
It looks prettier in real life than in the photograph. I used some of the motifs as inspiration when I designed the Jacobean Firescreen.
Grandmama worked the filet crochet border as well. We have a couple of teacloths with Filet crochet edgings she worked using Mary Card designs. There’s also a crochet lace teacloth that was going to be a bedspread – it is the only occasion that any of us know of, in which Grandmama failed to finish what she started! I’ll try to find the photo of that and scan it to put it up another time.
Scattered around the family, there are also examples of canvaswork, stitched rugs (two quite large ones and a small mat, which is in our hallway), tablecloths, napkins and bedlinen, and a footstool (two footstools, actually!). Not to mention assorted knitwear (I still have, and wear with pride and glee, an intarsia sweater she knitted for me when I was eighteen), and some crocheted work.
She also tried a sort of pressed metalwork, drying flowers and foliage, and Heaven knows what else.
I’ve been told I “collect skills”. Where do you think I inherited that from?