
Category: Goldwork
Finally Displaying Tudor Trinkets!
As I forecast, I had a rather entertainingly messy time with plaster bandage and acrylic paint to create my Trinket Tree.
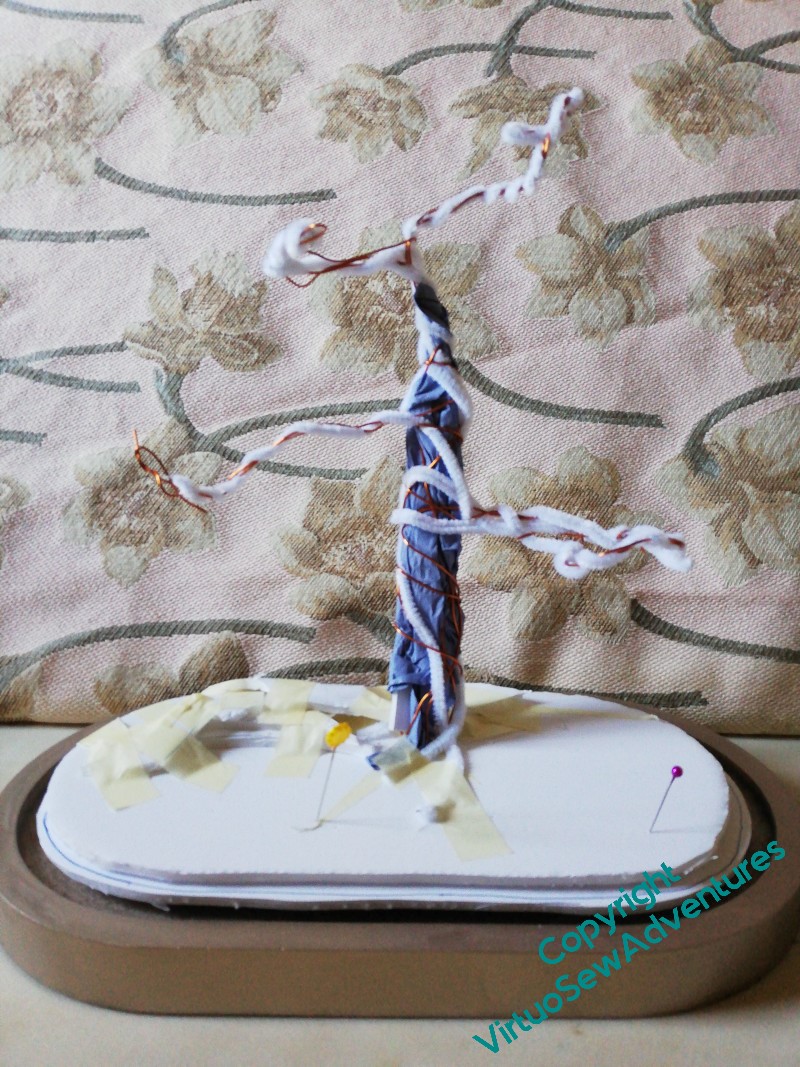
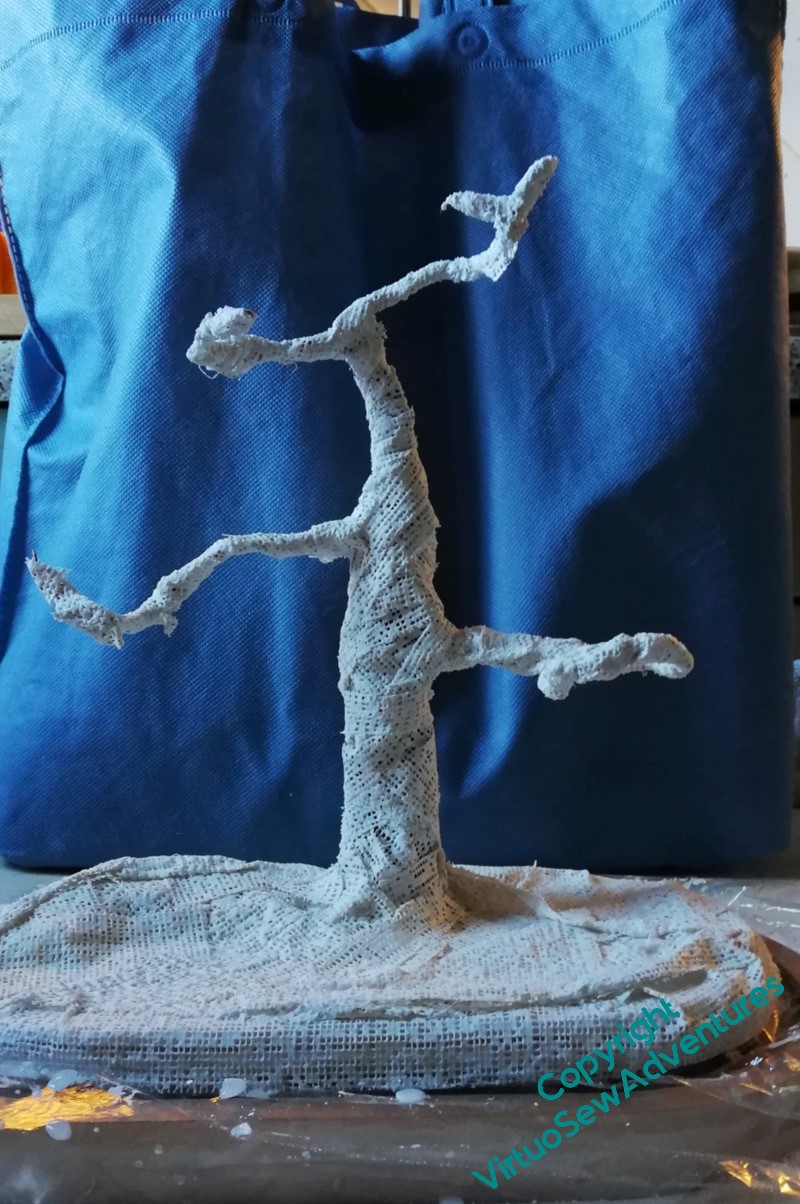
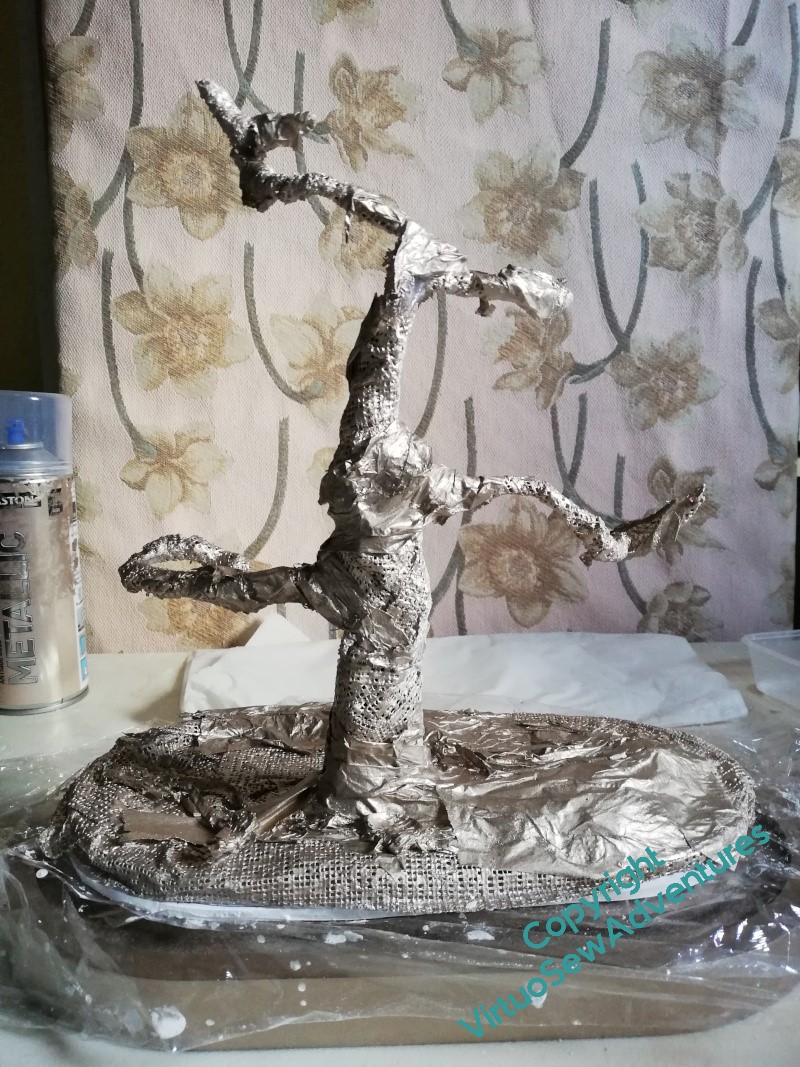
As you can see, foamcore, wire, crumpled paper and lots of tape were involved, as well as some tissue paper to vary the texture a little. Although I needn’t have worried – now the Trinket Tree is loaded, you can barely see it!
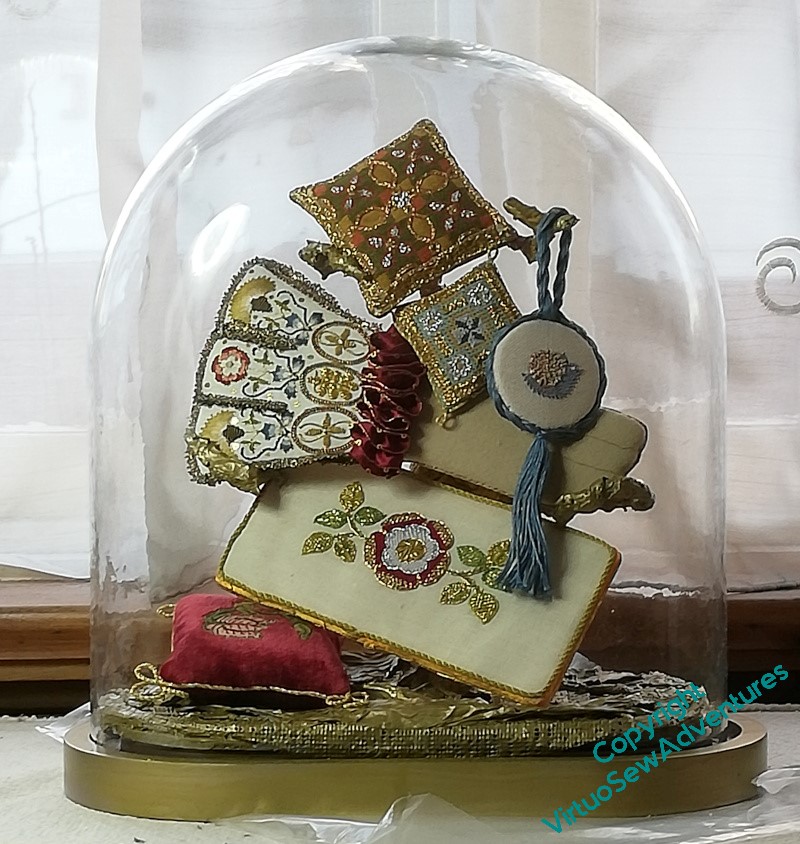
At present it sits on the hall table – the table it is on for this photograph is where I stitch and usually covered with bits and pieces relating to the current task. Not a good place for a glass dome, although it fits so neatly over the trinket tree’s base, that it’s quite hard to knock adrift!
Stuart Silk Purl Flower – Month 3
The small leaf was rather “meta”, in a way, because long “stitches” of silk purl were couched down with shorter ones. I’ve likened it to Burden Stitch, or even the couching form used in some opus anglicanum, and it includes colour changes as well.
All of these techniques have been simple enough in concept, but the execution isn’t simple at all. Spacing, angles, and cutting the lengths are all, as The Australian would say, non-trivial (mathematician-speak for “quite tricky”) and practice may make perfect in the end, but it hasn’t done so yet!
The final leaf was worked by alternating the hummocks and simple couched techniques of earlier months. In a way this shows that it is possible to create new textures by “layering” or “overlaying” techniques, so the only limits are in the stitcher’s imagination.
It creates an interesting ribbed effect, although with all my care, the raised hummocks aren’t all raised to the same degree. That said, I defy anyone looking casually at the real thing to notice the fact – at only about three inches by five, that would be a lot of detail to be able to distinguish!
And there are other dazzlements in store…

The final detail is to add spangles, which are reliably confusing and dazzling to the eye.
Just imagine all that flickering in the candlelight and shadows of the silk purl textures casting mysteries over each other!
I’ve thoroughly enjoyed this Online University course. Now I only need the time to sit down and read the extra information and watch the videos!
Stuart Silk Purl Flower – Month 2

There was quite a lot to do in the second month, learning new ways to wrangle silk-wrapped purl.
The first element was composed of the loops of purple, short lengths bent in two and controlled by an extra small couching stitch to hold them in place.
This is a technique I’m sure I’ve seen before, and I must say I rather like the effect, although I found it rather worrying to do. The purl is small and fragile, and I think that at the moment I still don’t quite have the headspace to do as well as I would like.
I do think, however, that the time for just not doing it is passed. If I want my skill to come back to me, I will have to use it! Who was it who said, “the more I practise, the luckier I get”? I would like my embroidery to be good because I have worked at it, not because I “just got lucky”!
The next was chipwork, which is just like chipwork in ordinary purl except for the added terror in case the silk wrapping comes off..
And then I got more practice with those nested loops, with the added adventure of adding shading as I went along.
Finally, there was more chipwork, and some little raised humps. These are made of purls stitched on like beads, but with a stitch slightly shorter than the length of purl chosen.
Again, these are not quite as consistent as I would like them to be, although I carefully used the ruler provided in the instructions to cut the lengths.
More practice needed!
Stuart Silk Purl Flower – Month 1

There’s a new course from Thistle Threads, concentrating on the use of silk-wrapped purl threads. It looked like fun, and it includes the bonus of some extra samples of different sizes and colours.
I’m always trying to learn more about the more obscure and interesting corners of embroidery, and the reconstructions of no-longer-current threads and materials play directly into my fascination with early technologies.
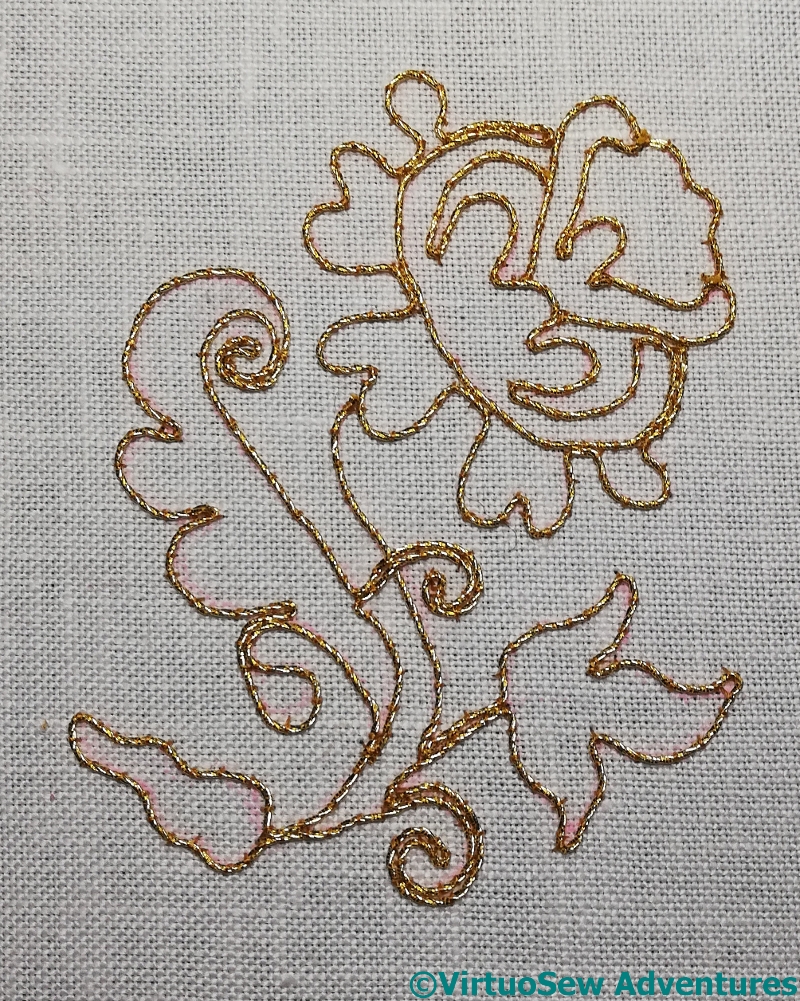
The first stage in this case is to work outlines in gold, and on this occasion I deviated slightly from the instructions.
Normal practice these days is to plunge the ends of the gold thread and sew them down at the back, but it used to be more common simply to cut the thread and oversew it firmly on the front. So I’ve done that. It saves a bit of the expensive gold thread, and as this is a small decorative panel and not for a garment or other item which will move a lot, I think it will be successful.
It’s still important to run the thread in the right way over the design to minimise the number of cuts, of course!
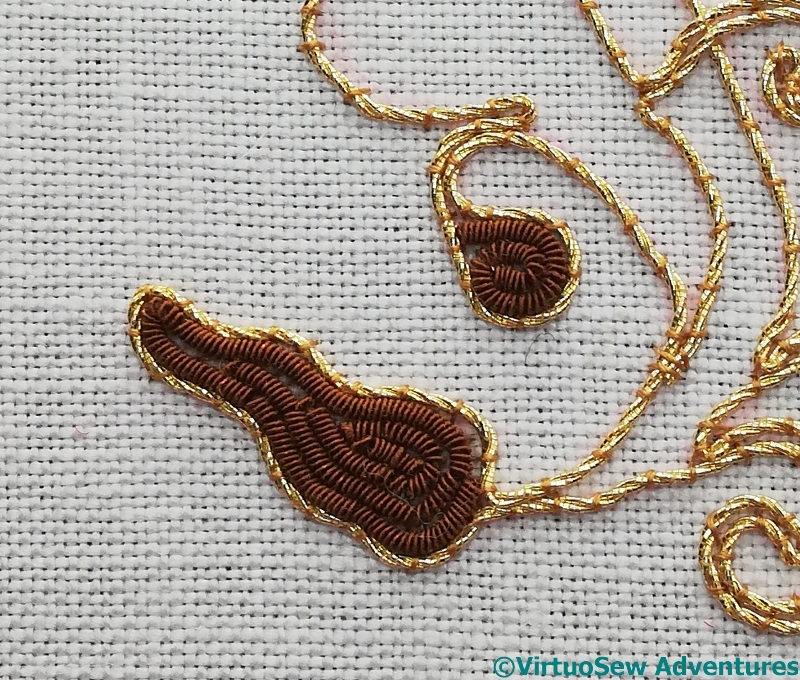
The final part of the first month’s instructions is the first element of the silk purl, couched in a spiral to fill a pair of leaf shapes.
You can see that I have rather crushed the silk purl into place, which is a pity as it has introduced breaks or cracks into the purl, but then, this is an extreme close up. Without a magnifier, it is simply an impression of colour and texture.
The spiral is worked inwards from the gold outline, which is probably the only way it could be done – imagine the difficulties of finding the right central point to start from!
Happy Christmas to you all
Christus Natus Est
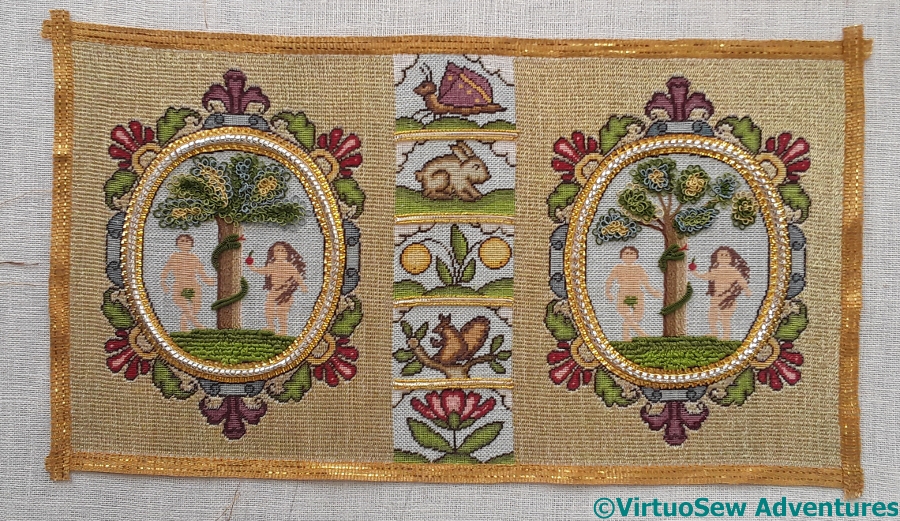
Finally Finished Eve In The Garden Of Eden
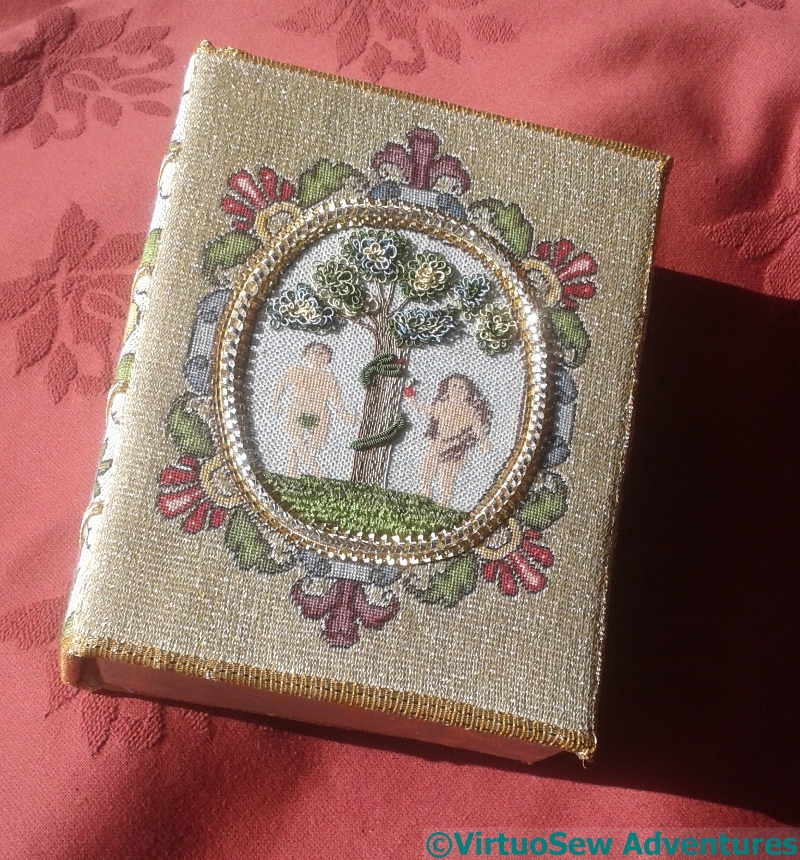
Eve In The Garden Of Eden Finished
Well, at last!
My word, it’s taken a long time! I started it in November 2015, and it took nearly a year just to finish the tent stitch, and then about eight months to do the gold Elizabethan Ground Stitch.
Progress wasn’t helped, of course, by the fact that counted work is something I can only do in short spurts. Or by the number of times I got distracted by wonderful new ideas I simply had to bring to life!
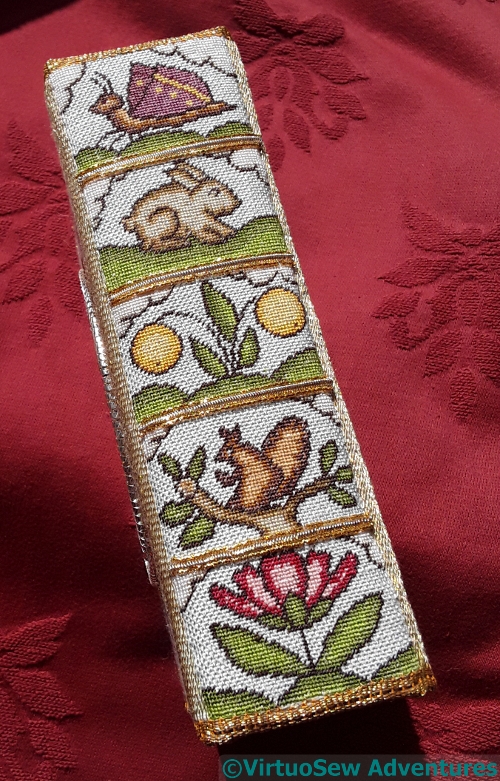
Spine Of Box
However, once I had got to the end of the stitching, and then the goldwork (isn’t it gorgeous, by the way – do click to zoom in on the photos!), there was a whole new level of puzzling to do, cutting out and assembling the lining for the box and then the box itself.
What with layers of padding and card, and the lining (silk, of course!) and the (silk) brocade covers for the outside of the box, there was a lot of pre-assembly to do, since the padding and lining, and the padding and external cover all had to be sewn together before the final assembly.
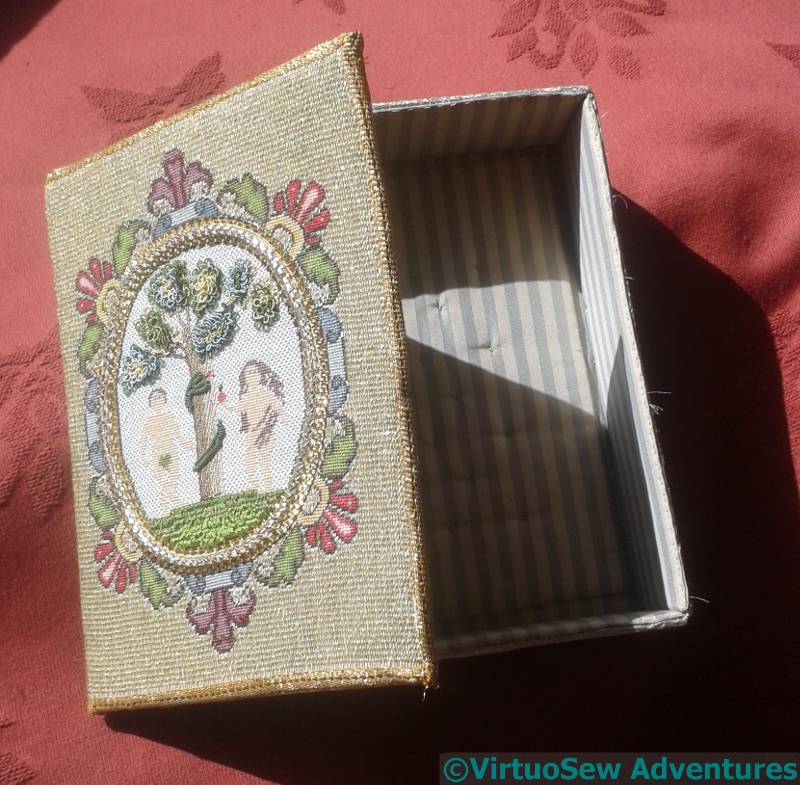
Silk Lined Box
That final assembly was fiddly in the extreme, but is now finally complete.
I’m going to wrap it up and hide it for a few weeks until the pain is merely a memory, and then find somewhere to put it and gloat, because I am very pleased with it. Just a bit sore from wrestling with sharp needles and too many layers!
Finally Finishing The Embroidery on Eve In The Garden of Eden
Coiled Silver Wrapped Strip Added
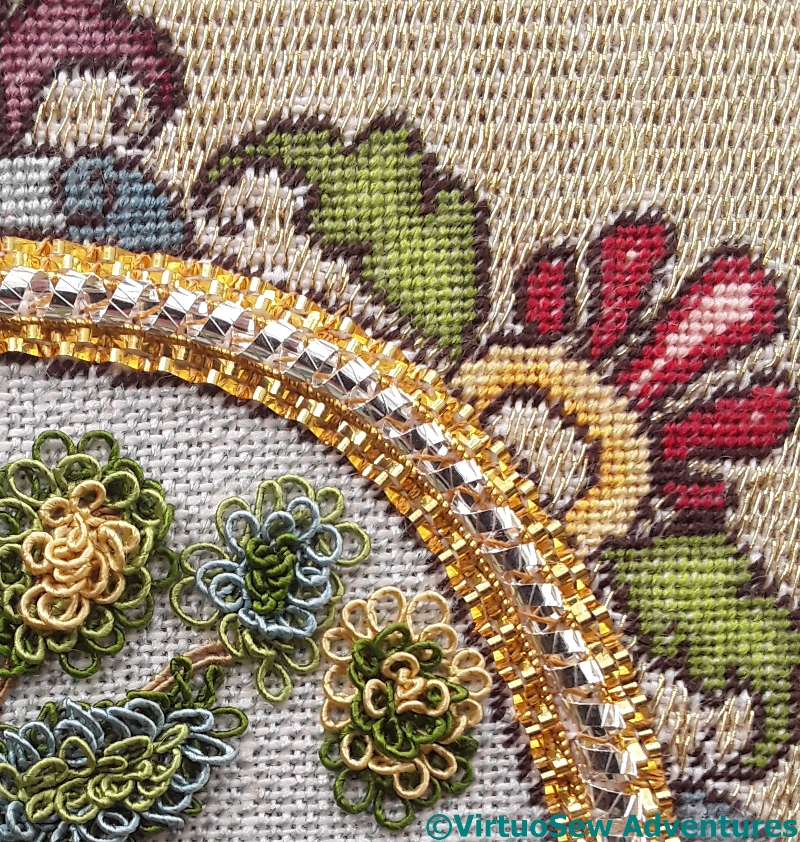
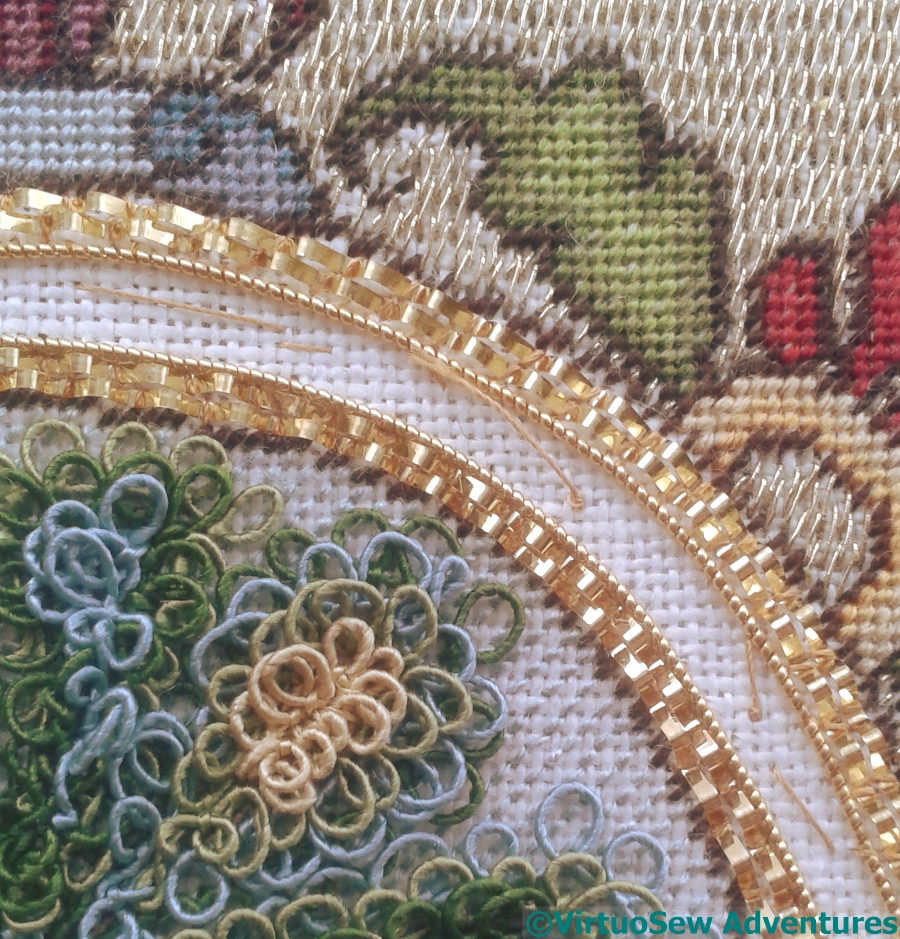
The Coiled Wrapped Silver Strip finishes off the metal thread frame for the cartouches beautifully. It fits between the rows of crinkle strip and pearl purl, and almost balances on top of the pearl purl, so it’s raised quite high.
And once the first cartouche frame is finished, there’s the second one to do!
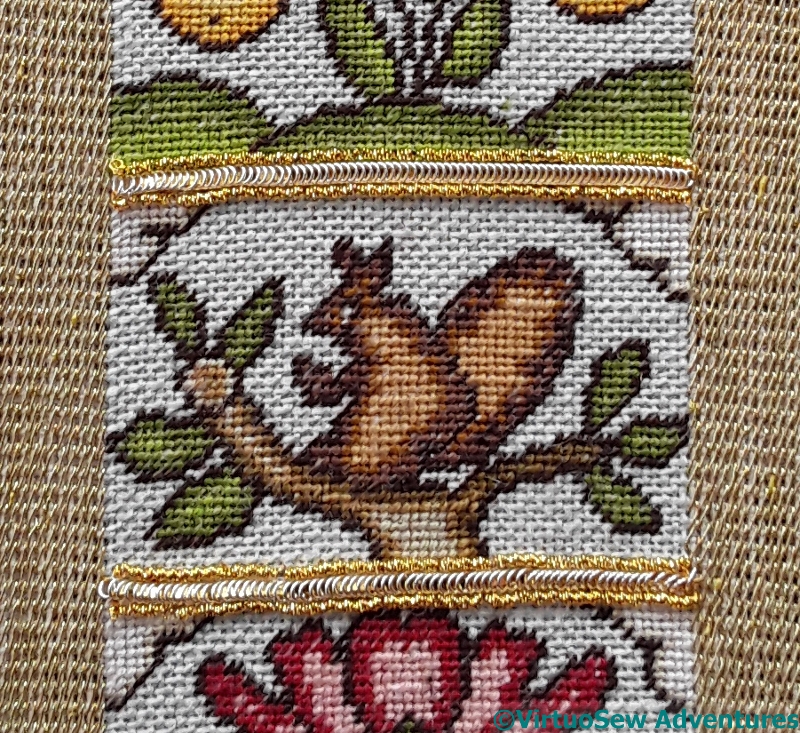
Webgimpe Added
Then, finally, the last stage before the adventure of turning it into a box is to add the gold webgimpe, which is a rather stiff woven ribbon.
I know it looks a bit twisted, but the next stage is to block it. Then I have to tackle the question of glue again. It will be a while before I tackle that challenge!
More Goldwork for Eve In The Garden Of Eden
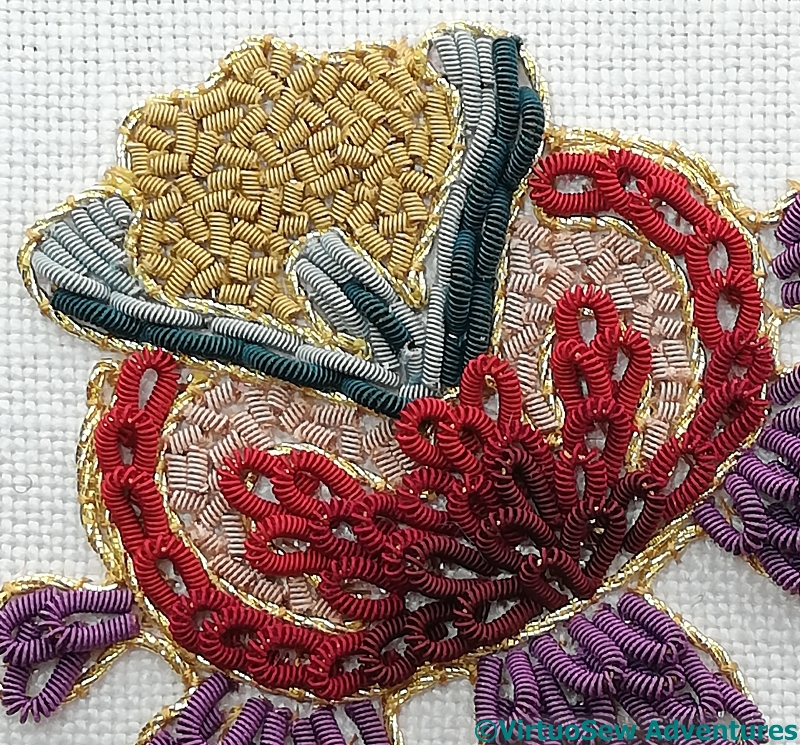
Very Fine Pearl Purl Added
The next stage in the goldwork cartouche frames for Eve in the Garden of Eden was to add a row of very fine gold pearl purl inside each double row of the crinkle strip. Now, this doesn’t need a stitch in every gap – it’s more like a very fine, very tight spring, and follows curves quite well – but it is quite fiddly and concentrated, and there’s rather a lot of it. Fortunately I did each cartouche individually, so I had a rest from pearl purl while I tackled the next stage….
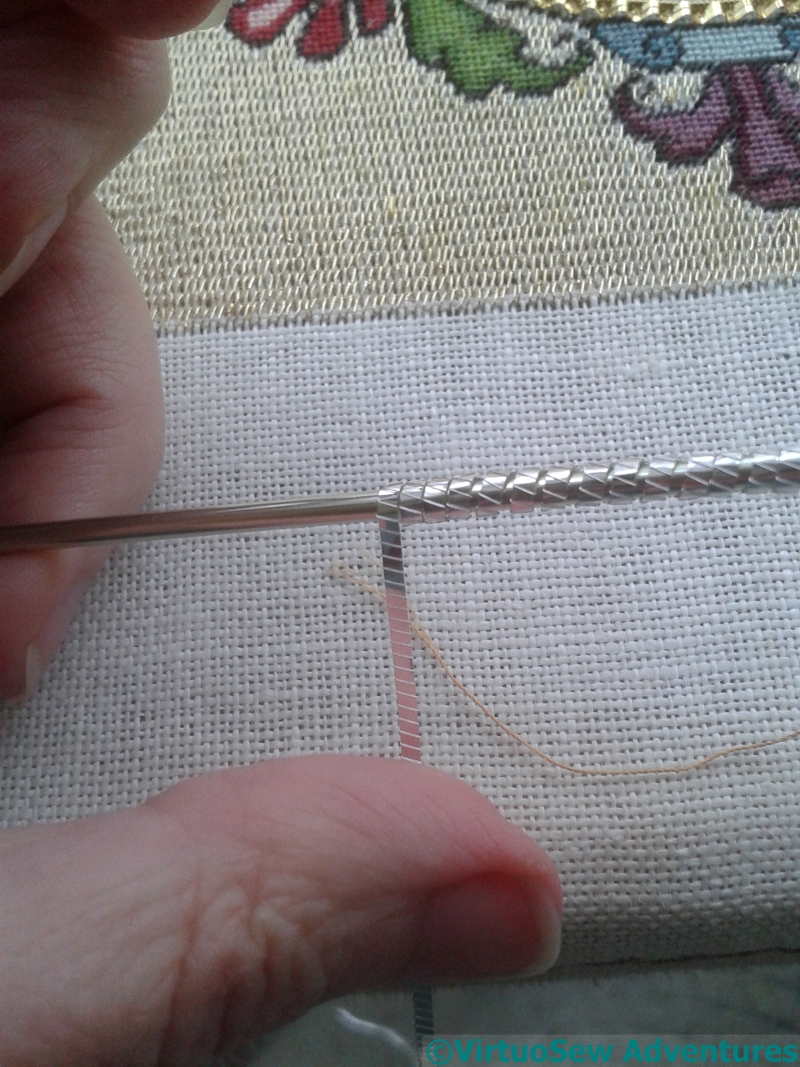
Twisting Silver Strip
Which was this!
The Silver Strip which was to be the central row of the cartouche frame arrived flat – or at least, loosely coiled in its box. In order to spring to life and create a gorgeous, opulent central row for the cartouche frame, it had to be coiled into a spiral around the second of the knitting needles that arrived with the kit.
One of the things I enjoy about Tricia’s courses is that sometimes our materials require further elaboration before we use them…
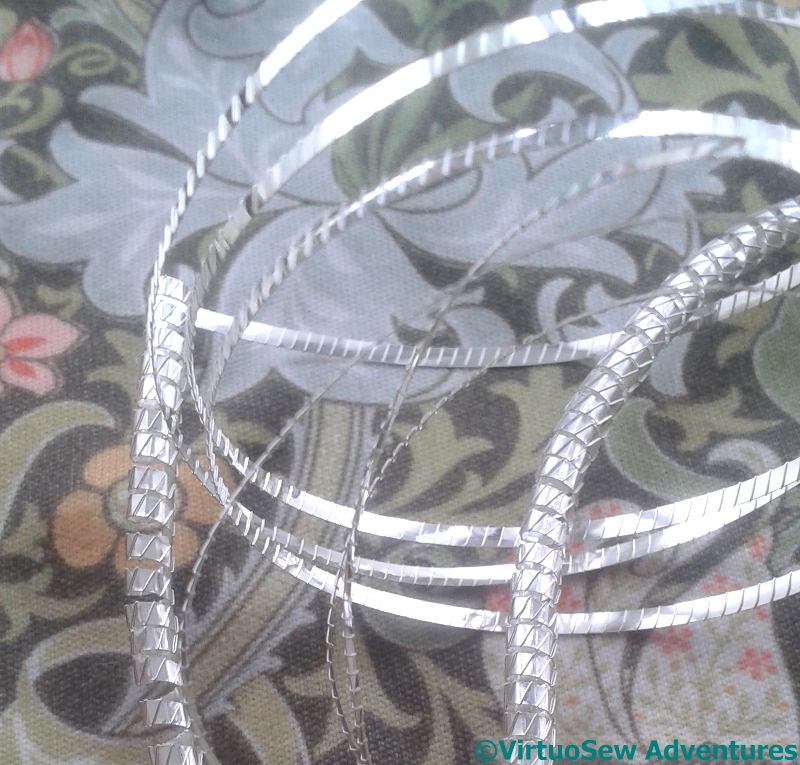
Half Twisted
Here you can see the texture of the Wrapped Silver Strip. I think it is engraved or embossed, rather than actually wrapped, but it does add to the general variety of response to light, and that, after all, is part of the reason for having metal threads on an embroidered piece….
You can also see how the effect is enhanced by twisting the strip into a spiral!
Adding Goldwork to Eve in the Garden of Eden
Spine Embellishment
Once the foliage and the snake were done, I could start on the goldwork.
First, the spine. Each gap between the polychrome panels was filled with three rows of metal threads. The middle one was silver wrapped around a gilt strip, and the two outer ones in each case were of a very fine check purl. This last was very fragile, and if I had realised in advance just how fragile, and how inclined to catch on cuffs, sleeves, and threads, I think I might have worked the spine last.
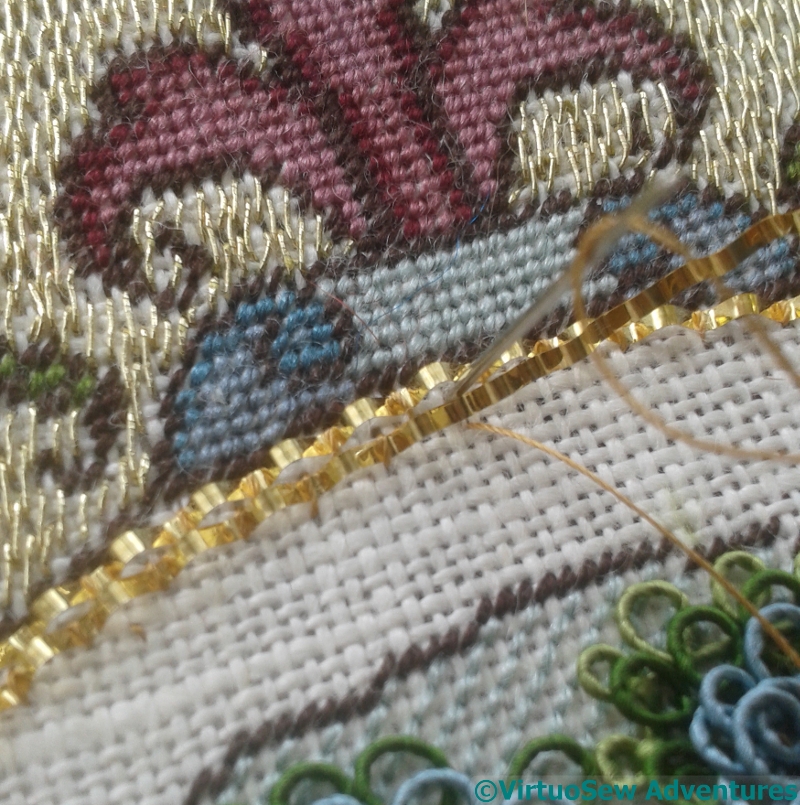
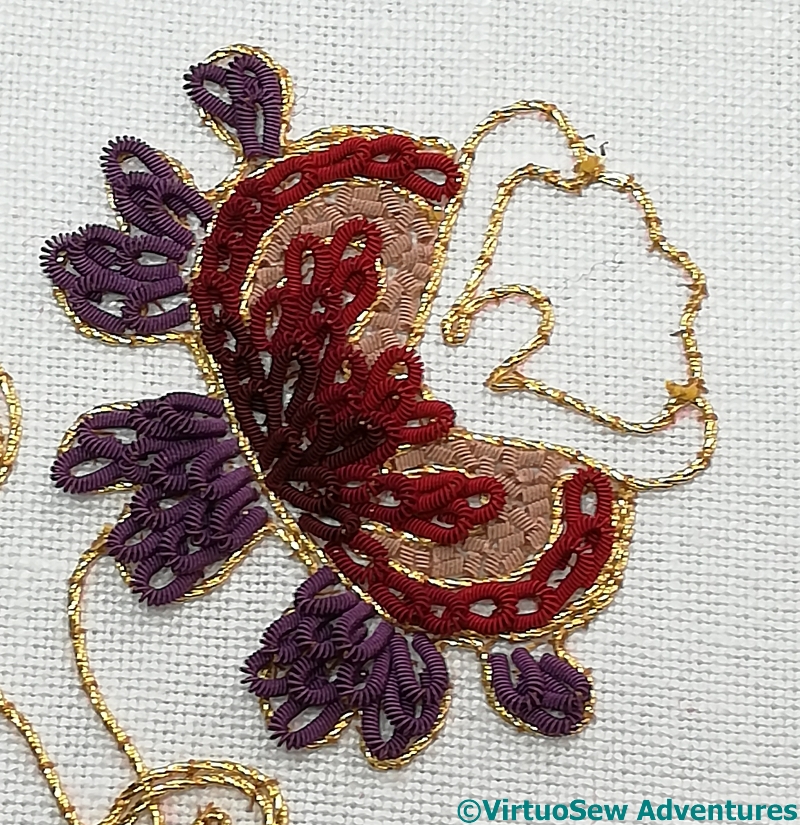
Gilt Crinkle Strip
The goldwork around the cartouches began with four rows of Gilt Crinkle Strip, two couched around the outside of the frame, and two around the inside.
The instructions said to place a couching stitch in every valley of the crinkle, which was certainly necessary – it doesn’t willingly follow curves when it is couched flat – but I might not have thought to do without instruction. It makes for a wonderful effect, if rather visually confusing when you’re working it, because the hills and valleys of the crinkle strip bounce light every which way, in a rather delightfully dazzling fashion…
You might think, by the way, that this is fairly straightforward and done in no time at all. You’d be wrong! That Gilt Crinkle Strip looks lovely, but my word, it has a mind of its own, and being very springy and having lots of little corners to catch, it makes a spirited attempt to tie itself in knots. A third – and even fourth – hand might have helped!
Overcoming the difficulty

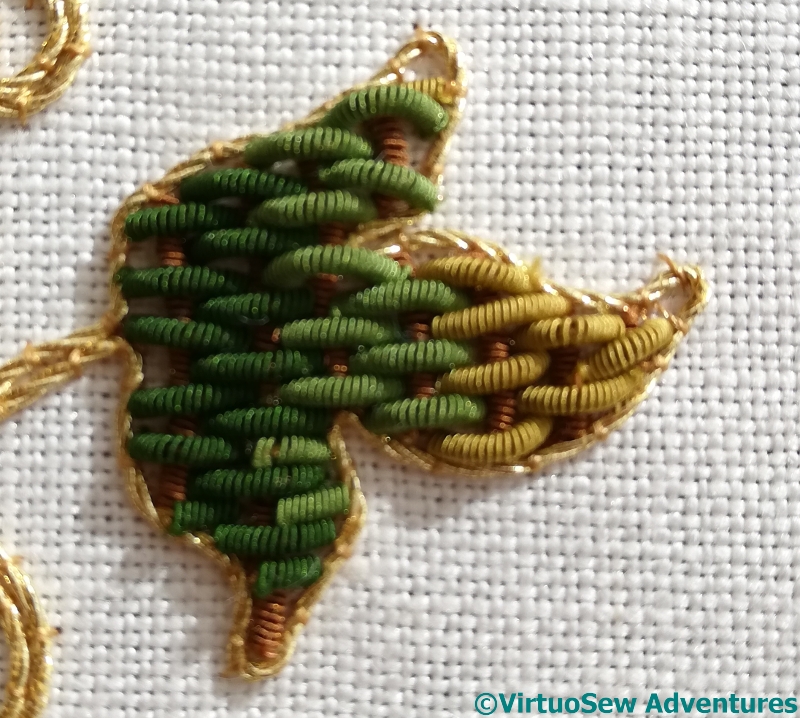
Second Tree Done
It took me quite some time – several weeks, in fact, before I got myself over my frustration with “Eve”, gathered up my patience and my courage, and had a go at the second lot of foliage.
The curls of gimp are a bit tighter, and more closely packed than in the first one, and the bunches of foliage are spaced out a bit to allow the branches to show through. There was a great deal of muttering, and I spread out the frustration by doing one clump at a time, then getting up and doing something else instead.
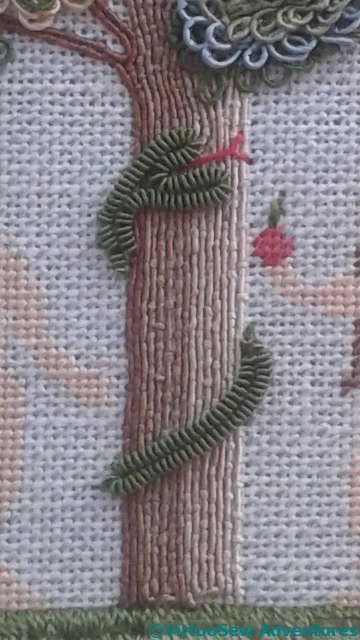
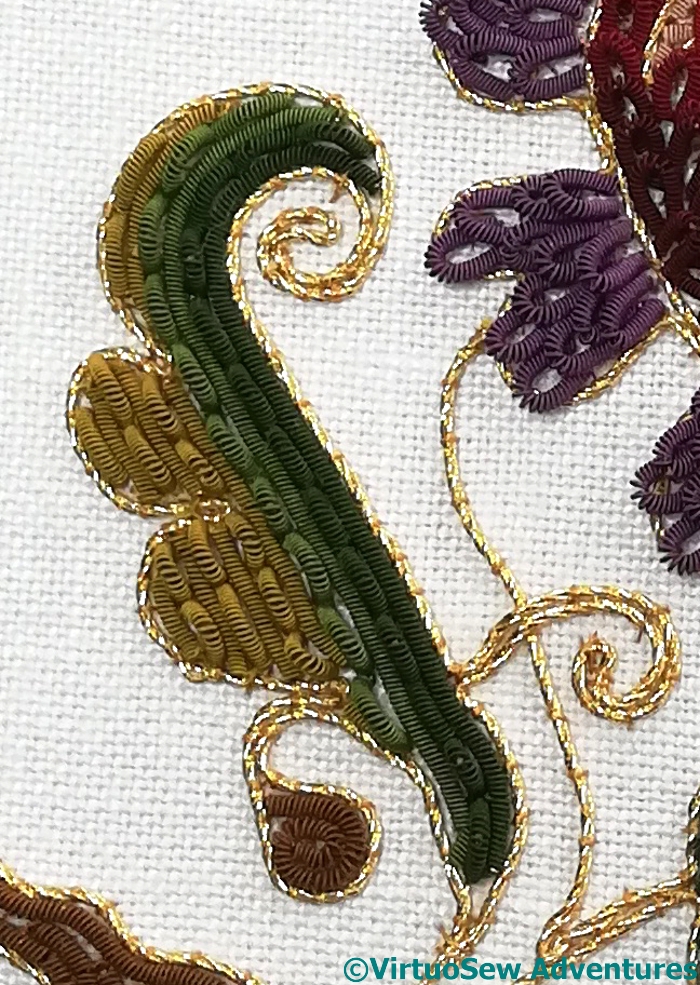
Snake In Silk Purl
Naturally no garden of Eden can be complete without a Snake. In this case, using green silk pearl purl, carefully couched down in two sections to create the head (with flickering red silk forked tongue) and then the tail, to give the impression that the snake has wound itself around the tree.
I rather enjoyed the Snake (both of them!), because I only seemed to need the two hands I already have, rather than the three extra that seemed to be needed for the foliage! The silk thread used to couch the pearl purl also made a leaf for the apple.
And now I’m ready for the next stage…

Both Snakes Added