
Tag: Goldwork
The Head of Nefertiti – Goldwork Completed

Primary Goldwork
There are small elements of goldwork which I am planning to work last, but most of it, I wanted to put in place first, so that I can be sure that the whole thing remains in balance.
As I’ve mentioned, the framework for the silk is in Ladder Stitch – the whole of the first section redone, as I threatened.
The narrow line around the base is in reverse chain stitch (much easier to work in a frame than the ordinary chain stitch). The coloured bust suggests a gilded inner section for the headdress, and I have yet to decide how to represent that. Maybe gold kid?
The ornament on the front of the headdress looks rather heavier and thicker than the other lines, so I’ve worked it in Hungarian Braided Chain Stitch. I’m a little disappointed with it at present, and wondering whether I need to pick a still heavier stitch – such as the dreaded (not any more!) Plaited Braid Stitch. I’ll decide, I think, when I’ve completed the rest of it.
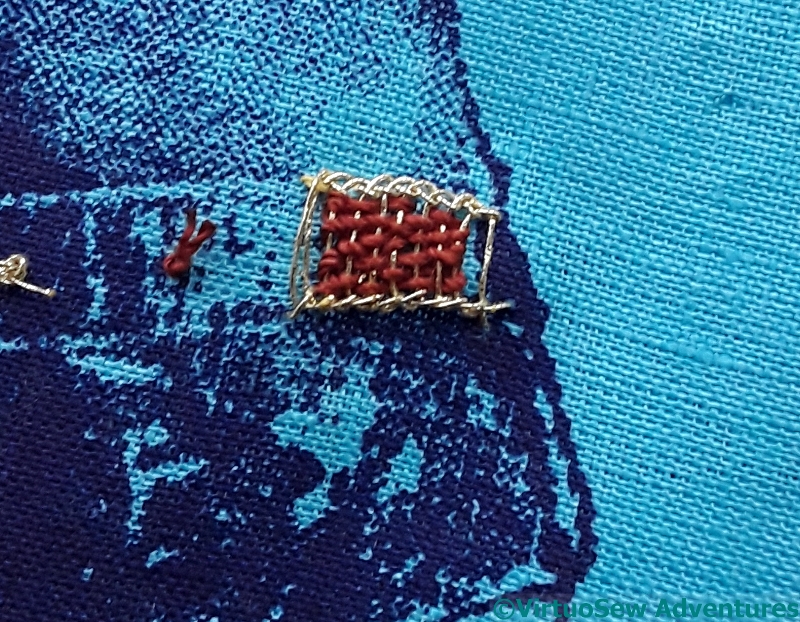
Trial Weaving
So, on to the silkwork. I had a previous, failed print to experiment with, and I’m just as glad I did.
I’m rather underwhelmed by this effect, with the silk woven through the gold. I thought it would allow a subtle glint of gold, but in the end it has simply undermined the effect of the silk. Hmm…
Chorus of Angels
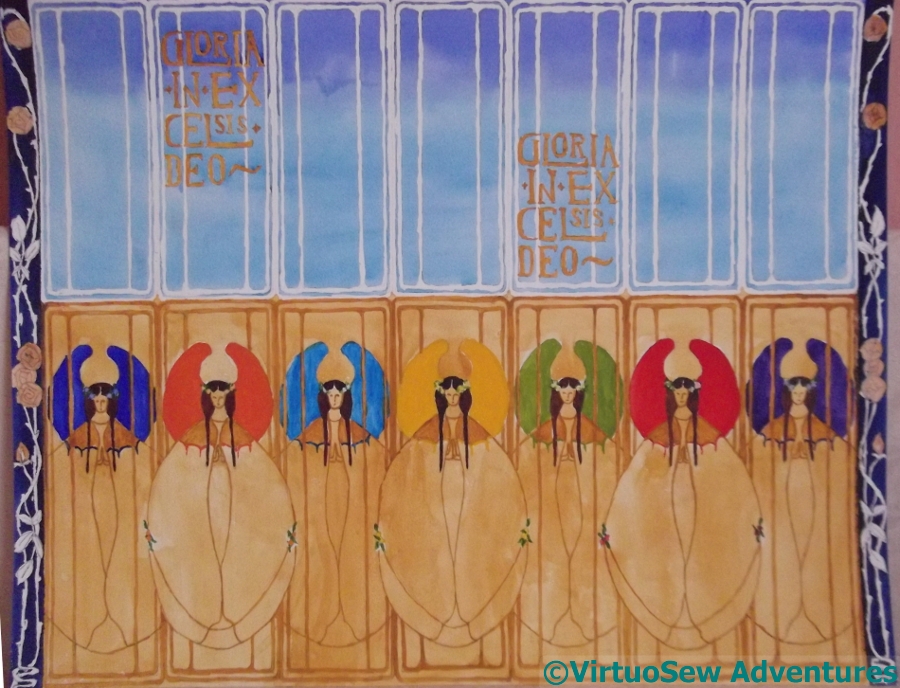
Chorus Of Angels
My mother and I have been planning a backdrop for some crib figures I inherited some years ago from a great aunt.
We started off by thinking about a stylised landscape (I might still do that one of these days), and then we thought about some sort of embroidered “stable” (likewise!), but none of the ideas really came together.
The crib figures are simple, and carved in wood, and we think they were bought in Germany after the war. We think that simplicity might be best set off by something really gorgeous and colourful, so then my mother designed a chorus of angels inspired by the “May Queen” design by Margaret Macdonald Mackintosh. She substantially simplified the basic design, added wings and then created two ranks of singing angels.
She’s also created a wonderful top panel of graduated blues and superimposed the text “Gloria in excelsis Deo” over the top. At the moment we are thinking about creating an ombré dyed section for the graduated panel, and couching gold and silver threads to make the framework. Then maybe using golden gauze for the lower panel, using a second layer for the capes.
As for the wings – well, detached buttonhole stitch, perhaps? Maybe in Gilt Sylke Twist, if I can get the right colours. I’m torn between a rainbow of colours, as my mother has painted them, or some other selection. Really, it will depend on what takes my eye when I get to that stage!
We want to work it on silk, and I want to be a bit clearer about what I’m doing before I get started. So it won’t be done in time for this Christmas.
Tudor Rose Turned Into a Panel

Tudor Rose (Finally) Finished
At long last I got a chance to finish up and turn the Tudor Rose into a little mounted panel. I got a local framing shop to cut me two pieces of acid free mount board, and mounted it over one of them, with a little padding to bring it to life. Then I covered the other (also with wadding) with some upholstery fabric that happened to be to hand, and overstitched the two boards together.
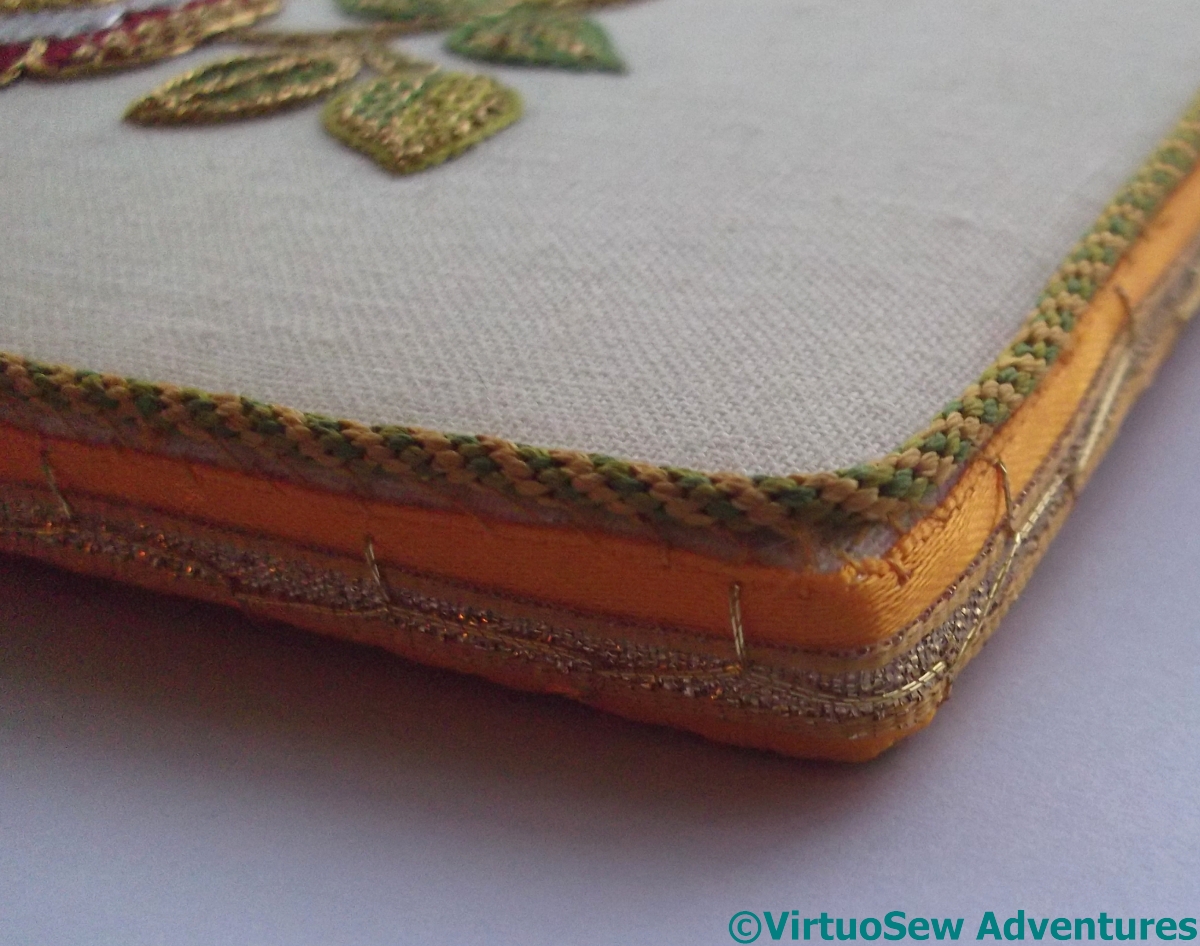
View Of Edges
I covered the overstitching with a ribbon trim left over from when I finally mounted Christus Natus Est (whoo-hoo, some stash busting achieved!) and then, at some length and not without difficulty, attached a fine kumihimo cord around the front edge of the panel to frame it nicely.
It will go in that famed (and so far, still mythological) Winter Decoration Corner that I keep on talking about – when I finally create it.
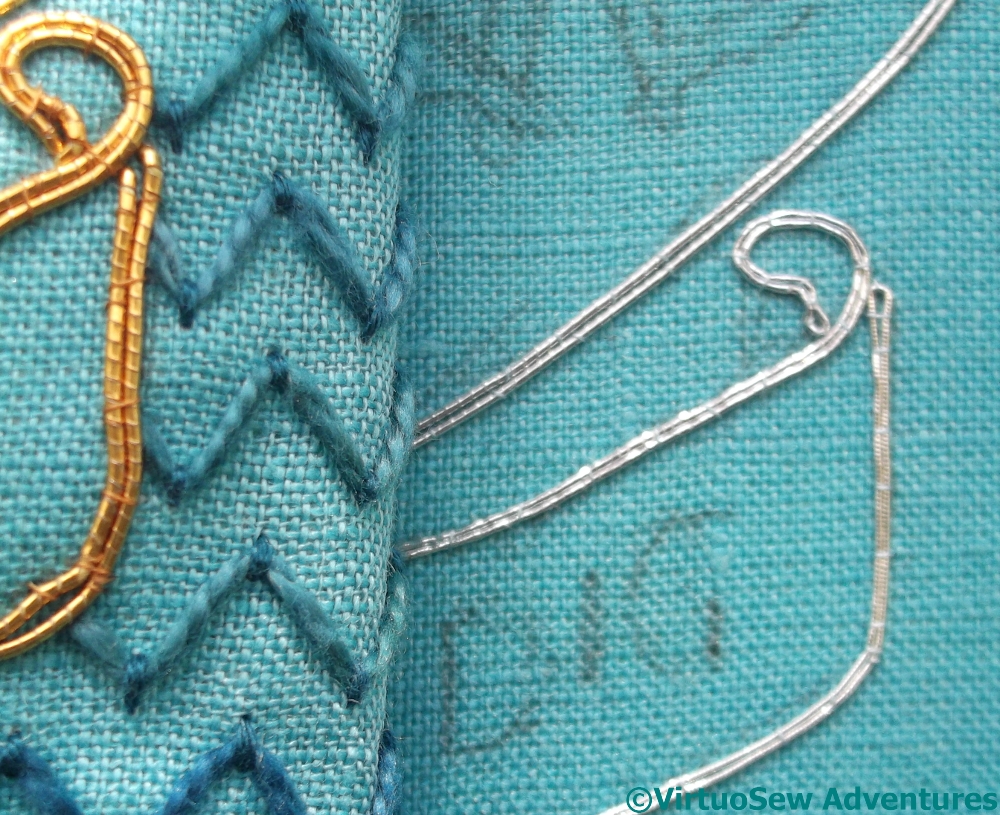
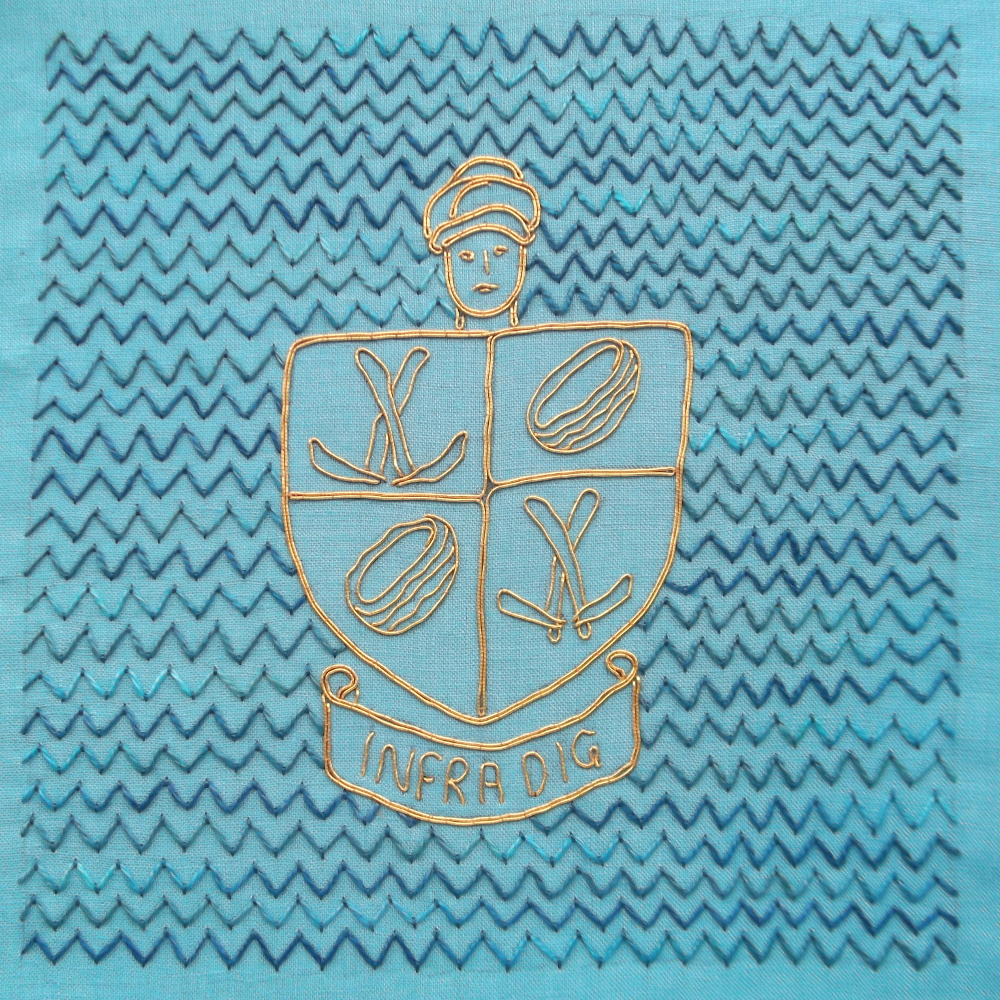
The Second Crest for the Dig
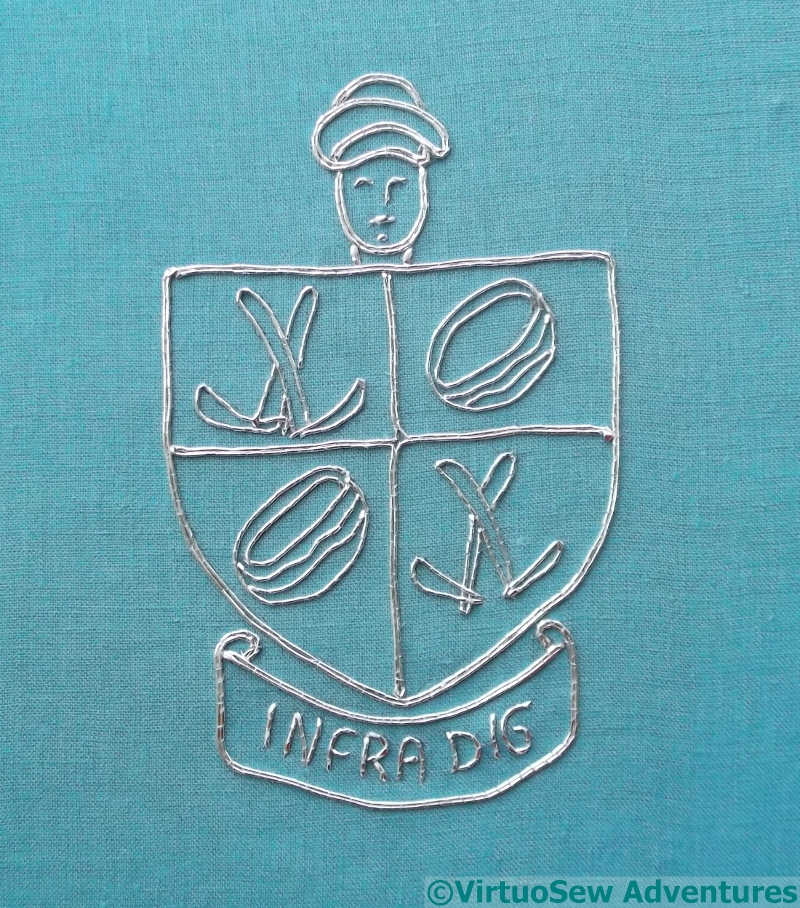
Silver Crest
Last month, I had made several unsatisfactory trials with silver thread, and took my headaches to the Harrogate Knitting and Stitching Show to ask advice on the Golden Hinde stand.
I got to the show with about 40 minutes to go of the Thursday evening late opening, which meant that the aisles were relatively clear and I could actually talk to Sarah. After some discussion, we came up with a very bright and blingy silver Jap. In fact it’s so bright and blingy as to be verging on mirrored, and I was surprised at quite how calm it looked when I finished it.
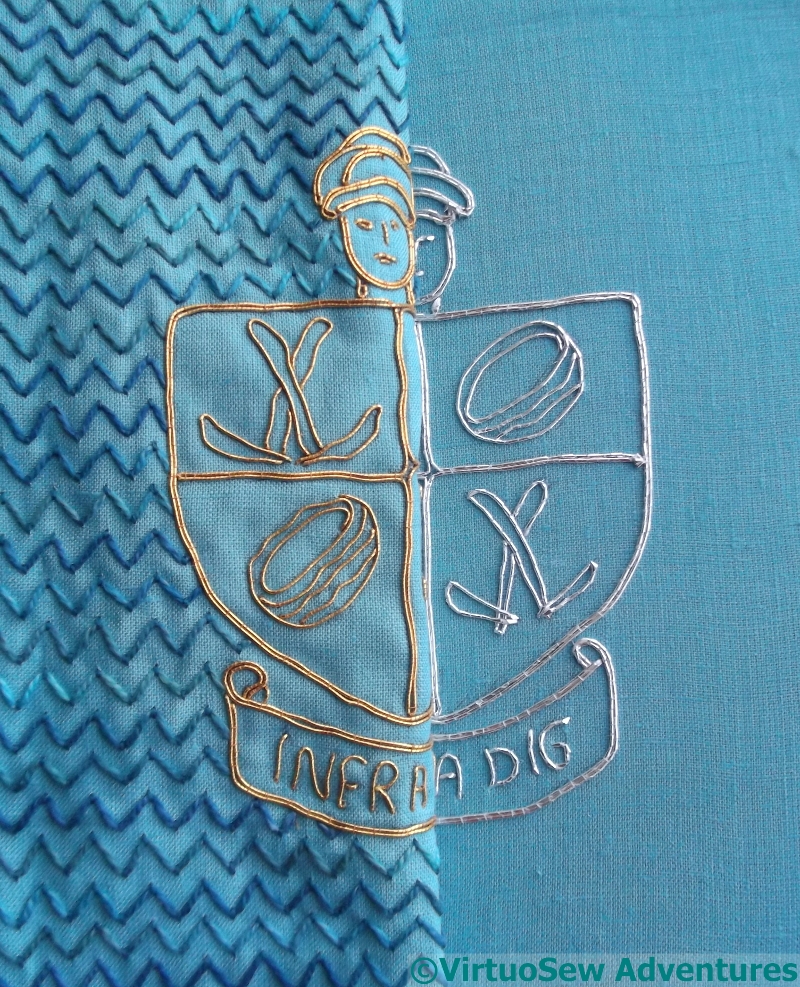
Crests Together
The reason it is so bright is that the metallic wrapping film is much broader than it was on any of the other silver threads I tried. That carries its’ own penalty, because turning corners becomes trickier – and indeed, in a few cases, rather untidier (click on the picture to enlarge it and look at a few of the corners!). I found that I had to devise new pathways for the couching, and use more short lengths. This panel is markedly more fluffy on the back than the gold one was!
I just have miles of that cloud filling stitch variation to do now (and, of course, choose and apply the braided edging!). The background stitching will help to throw the silver crest into relief. I have laid the completed gold over the silver so that you can see. With decent lighting, it should have enough personality to hold its corner.
If it doesn’t, I will frame it up as a separate panel, and show people just how difficult it was!
A Dilemma
Dilemma
Now, you may recall from when I began the first one that there are to be two Crests, one for each panel, balancing each other. Furthermore, since there will be a gauze overlay, everything has to have the visual strength to show through it.
I don’t think that this silver thread has enough force or shine. Even with a fairly strong background using my Cloud Filling variation, to throw it into relief, it will simply disappear.
Auditions
So I have been experimenting. The edge of the shield, the top of the scroll, and the bottom of the scroll, all use different threads.
All of them are equally insipid in comparison with the gold. I’m afraid that if I use any of these threads for the panel, I will end up with an unbalanced overall appearance with one corner panel seeming very faded in comparison with the other.
I hope to find a more suitable thread at the Harrogate Knitting and Stitching Show this week. Or alternatively – more of the gold so I can do a second gold one!
The First Crest for The Dig – Finished
Detail Of Crest
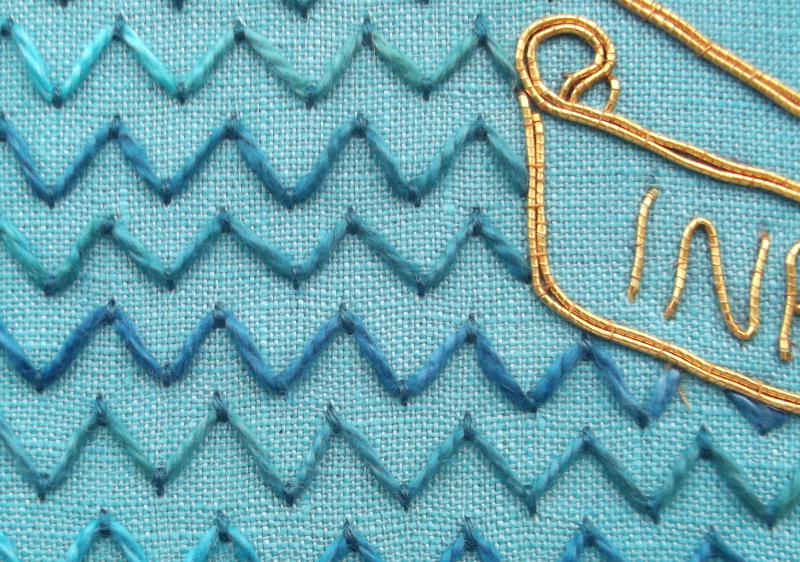
The Cloud Filling Stitch variation that creates the ripple effect is fairly easy to do, and once I had decided to get working on it, finishing the first panel really ripped along.
As you see, I’ve not been too pernickety about spacing. It would have been possible, but it wouldn’t have been in keeping with the original inspiration, besides being utterly maddening to achieve.
Finished First Crest
I began by working each row individually, first the short stitches and then threading the pearl cotton, but I soon found that it was much quicker to do several rows of the holding stitches, and then threading the pearl cotton through them.
So here it is, done. The other crest panel, when I get to it, will be in silver, with the same background. I need to get the other piece of fabric onto the frame and get ready, because it is good to have at least one project in which I know exactly what I want to do.
There is one question that remains to be solved – how will I edge each panel? I’ve been thinking about lucetting, crochet, or kumihimo. I have a feeling that a lot of experimentation lies in my future.
Progress on the Crest for the Dig
The goldwork on the Crest for the Dig went rather quickly, and I found myself running straight into a brick wall. I narrowed my background choices down to two, and then stopped. I’ve even extended the patches of trial background, and propped the frame up to stare at.
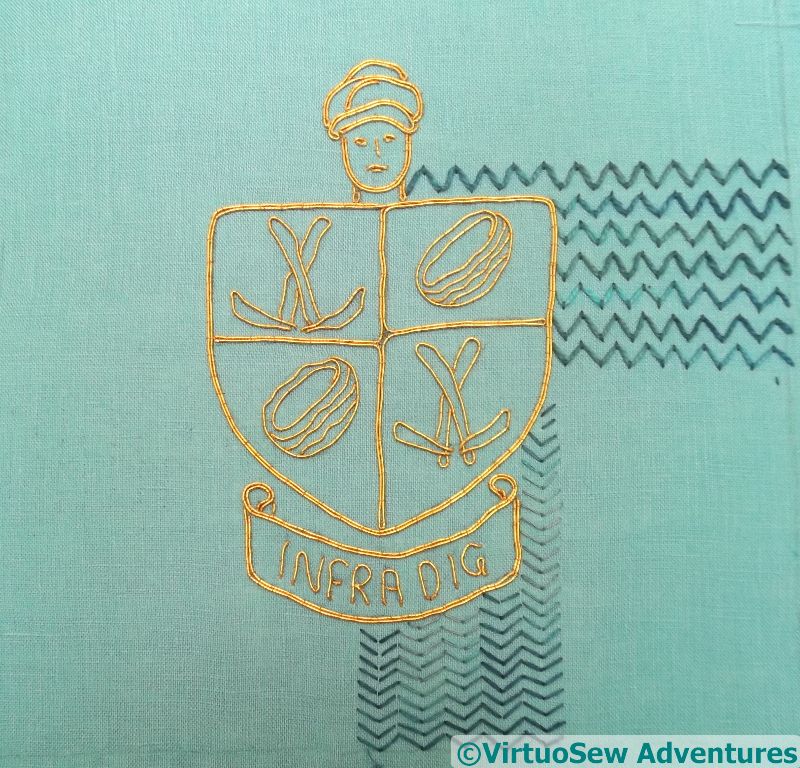
Two Background Choices
The arrowhead stitches create a subtle effect; patchy ripples, almost here-and-then-gone-again. Rather like Amarna, in fact – it’s thought the city was inhabited for less than thirty years.
On the other hand, the pearl cotton cloud stitch variation is more reminiscent of the rippling paint pattern that originally inspired me. The variegated thread helps to stop the background pattern from being too solid and monolithic.
Choices, choices….
In fact I took the frame to my parents’ house, last time I visited, and said plaintively “Help!”
We stared at it, talked about it, and finally decided that the pearl cotton variation on Cloud Filling Stitch is the way to go. It’s more in keeping with the idea of the doodle that inspired this design, the thread is closer in scale to the scale of the gold thread, and it’s also a better reflection of the ripple pattern I want to bring to mind.
I’m also considering how I’m going to edge the panel of stitching. At the moment, my ideas include lucetted cord or a flat kumihimo braid. The lucetted braid might be too narrow, but on the other hand I’ve only ever done one piece of kumihimo braid, so that would be rather a leap into the unknown!
Continuing On The Tudor Rose

Tudor Rose Leaves
The work on the Tudor Rose continues.. The stitches used for the leaves are what I really wanted from this course, as I am hoping that they will help me to create elements in the Dreams of Amarna – the ancient Egyptians were as keen on bling as the Tudors!
Zoom in on the picture to the right and you will see that there are four different combinations of metal and silk threads.
- The stem – whipped back stitch
- Alternating silk and metal chain stitches
- Ceylon stitch with silk thread woven through it
- Up and down buttonhole stitch with silk threads overcast through it
It was very hard to weave through the Ceylon Stitch – I didn’t pack the threads as tightly as Tricia’s instructions show, even after four leaves (two on each side). I think it would be easier in some of the applications I intend, though, because I am expecting at least some of them to have straight edges!
The overcasting through the Up and Down Buttonhole stitch was tricky to start, but once I’d got it started it was fairly straightforward – and a lot of fun.
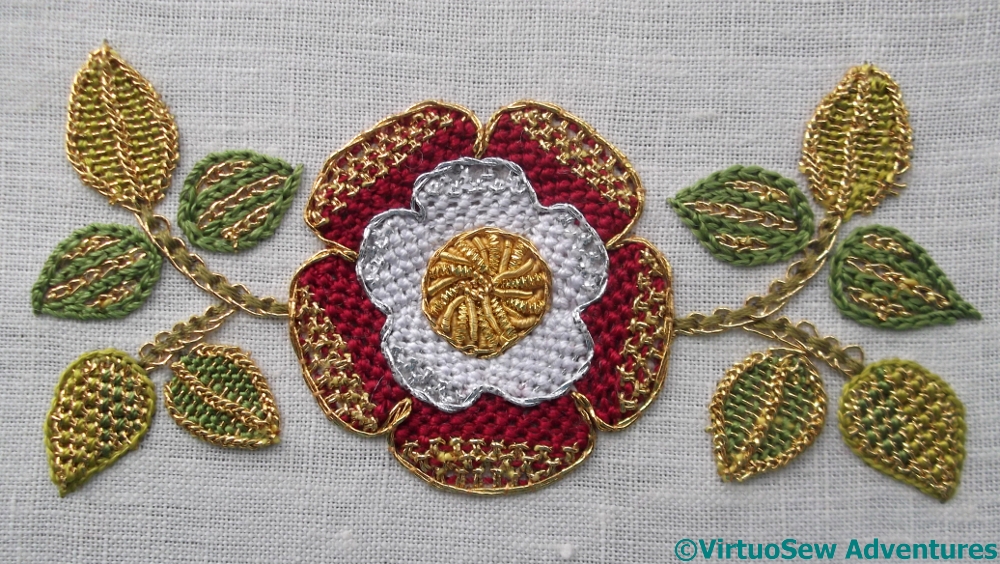
Tudor Rose Finished
The final element of the piece was the pearl purl and check purl in the centre. That was quite fiddly, and I am not sure that I worked the initial layer of bullion knots in silk in such a way as to make the layer using metal threads easy to do. I have much more practice to do to get my metal thread work to the level I saw at the Eye of the Needle Exhibition in the Ashmolean Museum a few weeks ago.
Continuing The Crest for the Dig
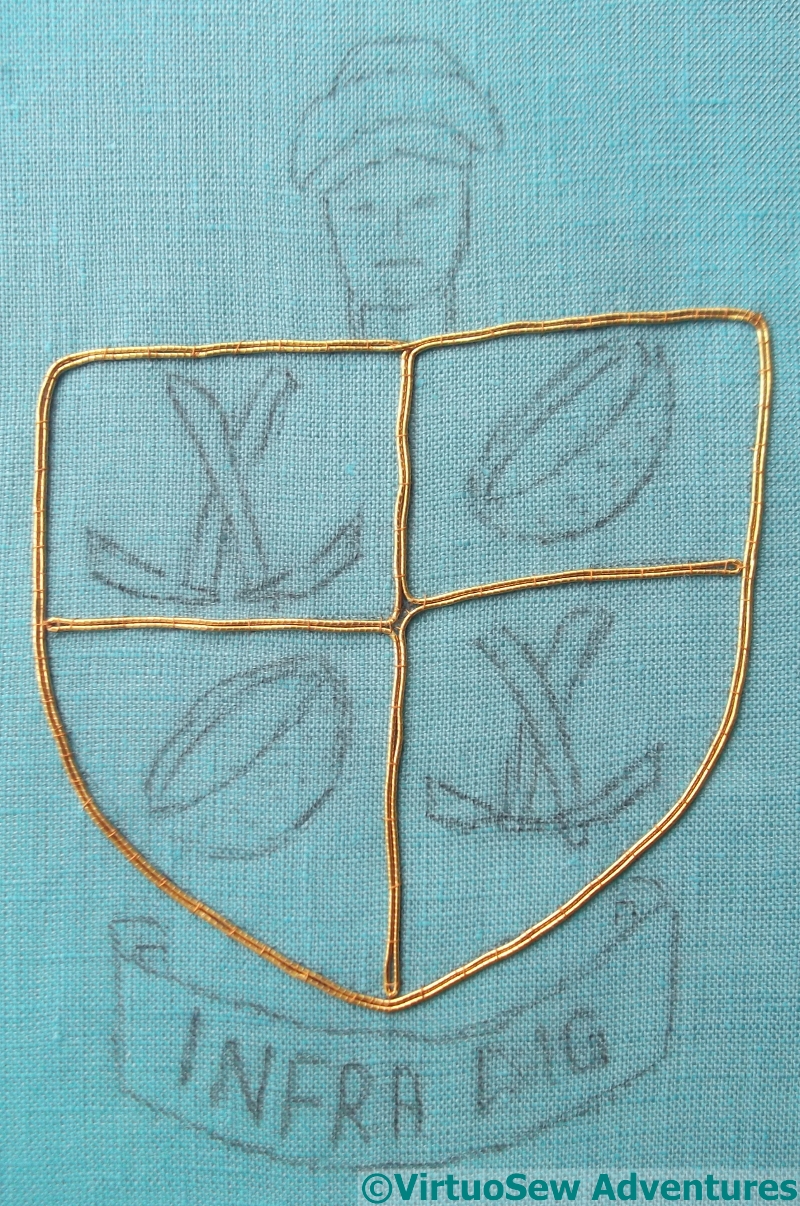
Working On Crest
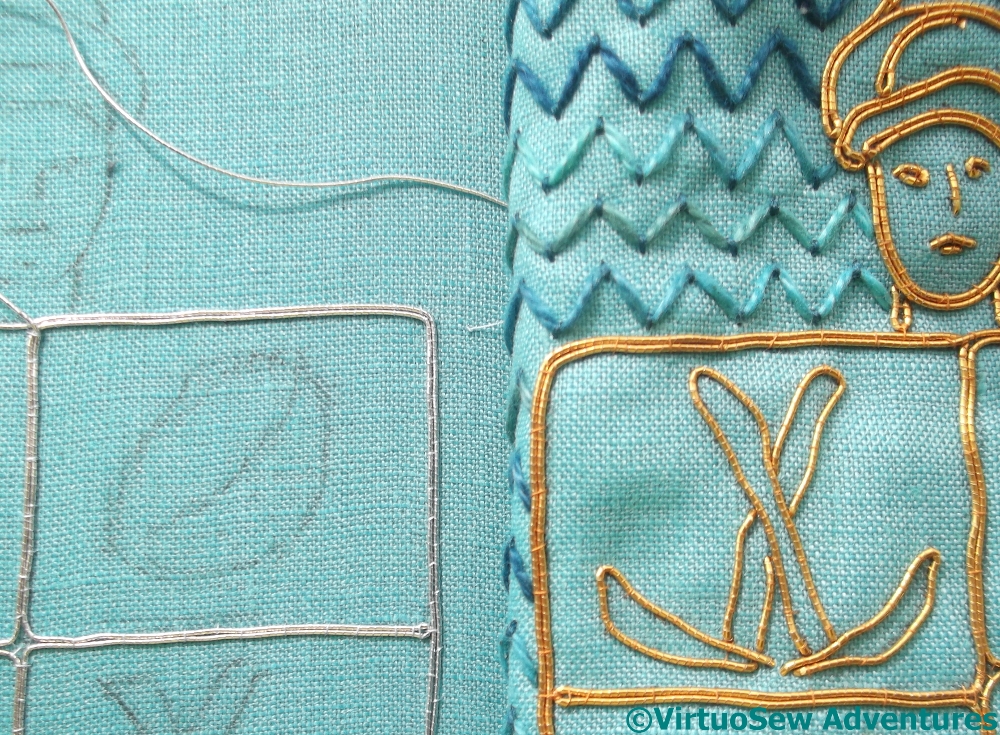
The sensible first stage for the Crest was to do the goldwork. First of all, I’m not at all sure how I am going to do the background, so I should concentrate on the bit I’ve decided on. Secondly, I was a little worried that I might not have enough gold thread of the type I wanted to use…
That being the case, I decided that rather than giving each line a stop and a start, I would try to keep the lines going. That has meant a lot of thinking had to go into getting all the double lines right, and a bit of a fiddle at the central crossing point!
In the interests of both contrast and economy, the charges – motifs, in non-heraldic language – and the motto will use only one line of gold, but the shield, the Gufti’s head, and the scroll will use double rows to help pull it out from the background.
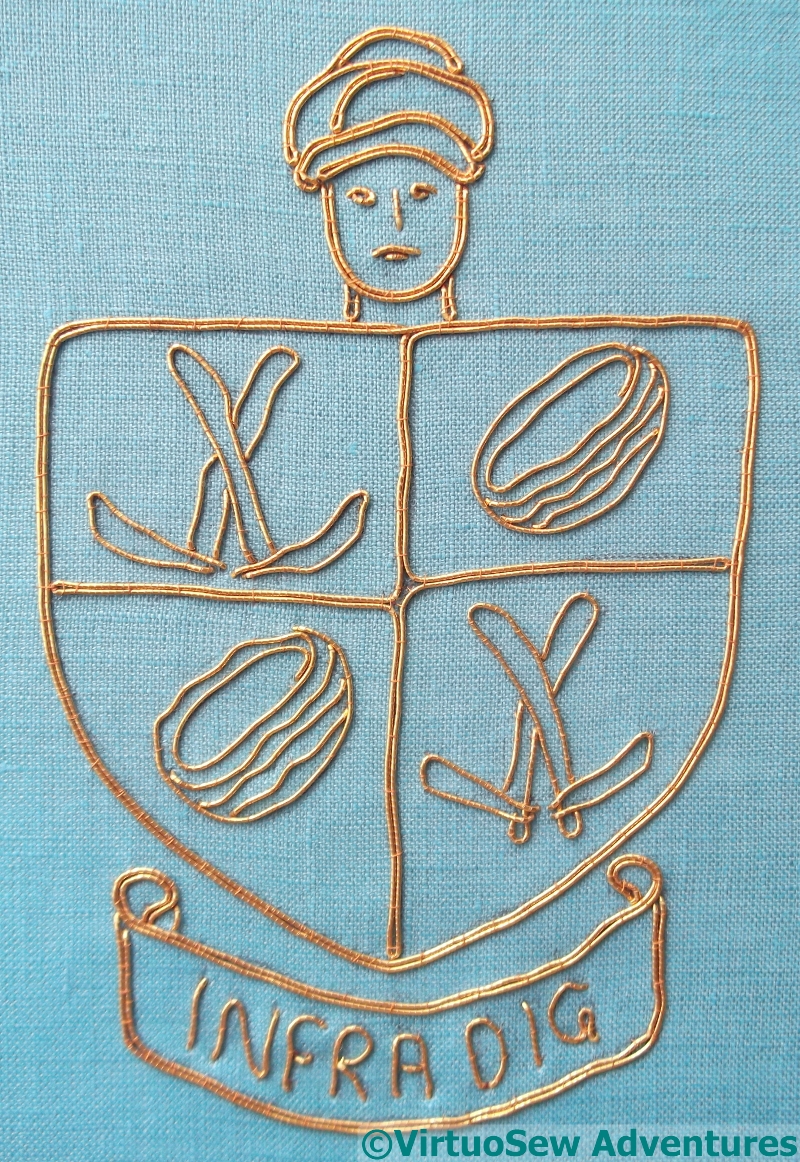
Goldwork Done
The goldwork of the Gufti’s head doesn’t have quite the same sense of life as my original sketch, but I am very pleased with how the folds of the turban turned out.
The charges – crossed touriehs (mattocks) and rush baskets (used to carry the spoil away) – have turned out well too. I was concerned that I might need to create a woven effect on the baskets, but now I look at the finished goldwork, I think it is enough to create the effect I am looking for.
The motto is a little uneven, but after all, it recalls Pendlebury just doodling something over dinner, and while drawing and sketching were vital skills for archaeologists – in fact they still are – I doubt he would have put the care into a doodle that he put into recording a trench!
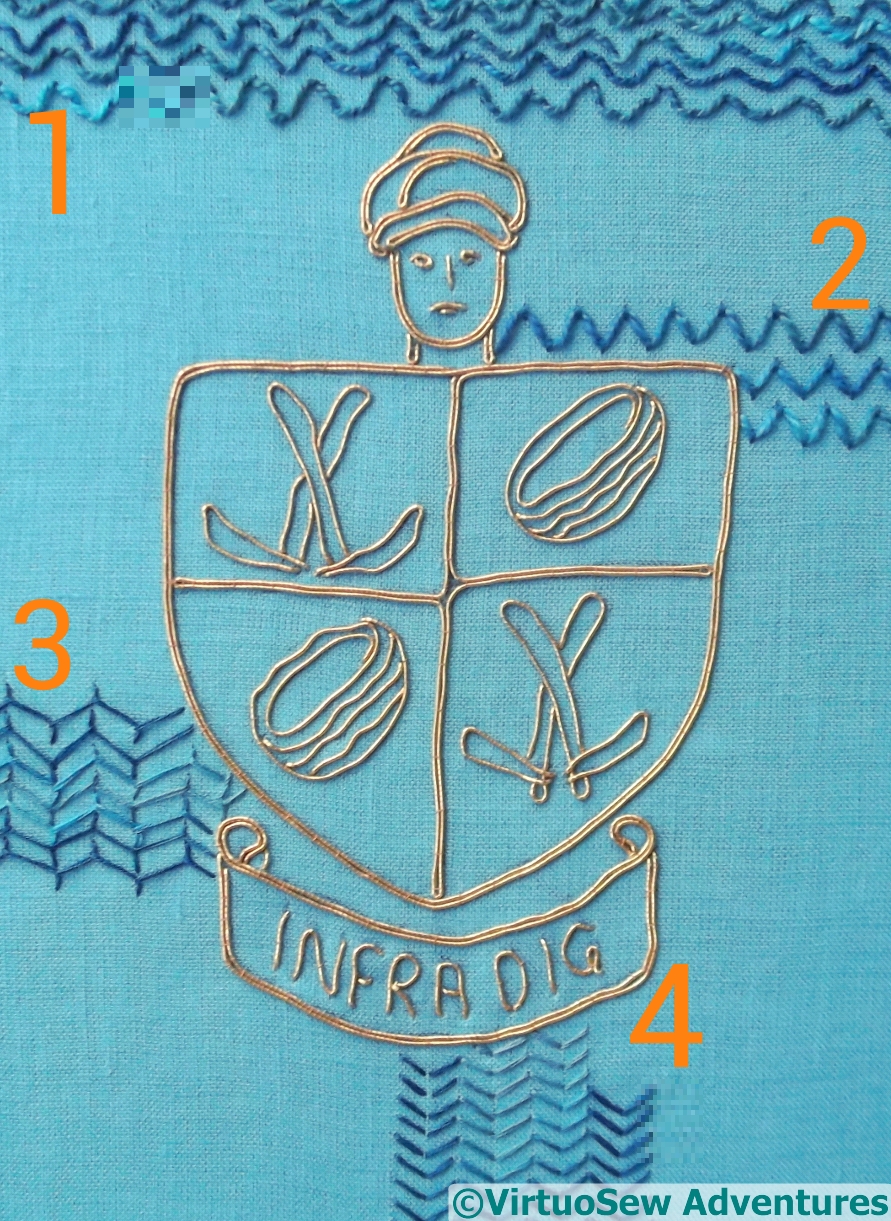
Trialling Backgrounds
That didn’t take very long, did it. Suddenly I realise that I should have thought it out a bit better before I started. There’s a rippling pattern sometimes seen on plaster which I would like to recall in the background. It’s a simple pattern, but I think it could be effective – if I can get it right. In order, the trials I have done here show:
1 – Variegated Pearl cotton following a ricrac “stencil”, couched as invisibly as possible using a single strand of stranded cotton.
2 – Variegated Pearl cotton in a variation of cloud filling stitch that creates a ripple effect instead of the usual diamond pattern.
3 – Variegated Stranded cotton in rows of open cretan stitch, using three strands.
4 – Variegated Stranded cotton in Arrowhead Stitch.
I’ve discounted the first and third possibilities, but I’m still staring thoughtfully at the other two.
Assembling the Gentleman’s Glittering Nightcap – Part Three
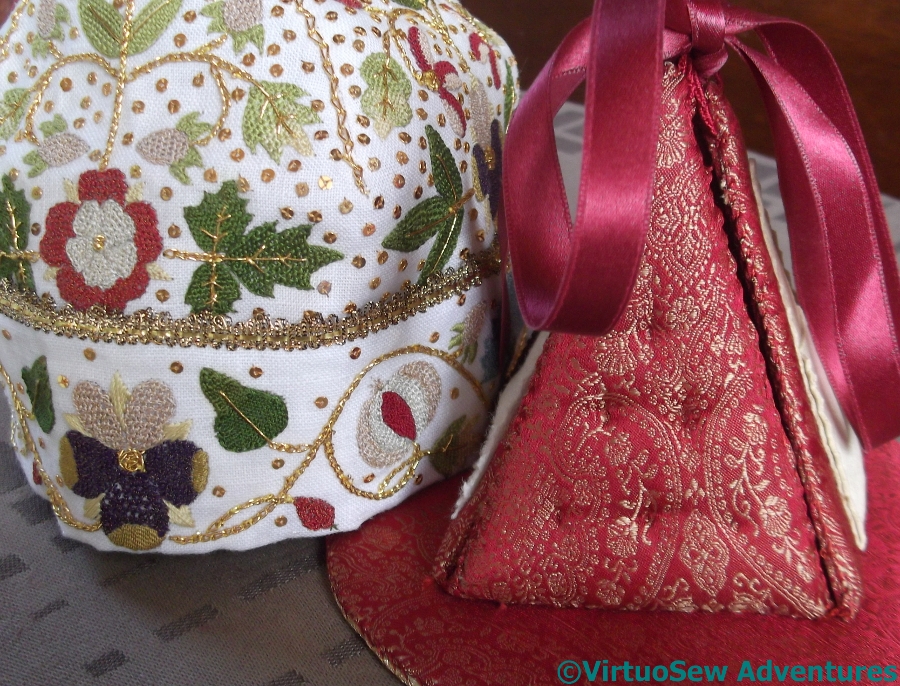
Pincushion
Having attached the ultrasuede and doctor’s flannel to two of the triangles, and made a brocade pocket on the third, the fourth was given extra padding, and extra stitches created an almost upholstered effect, making a pincushion.
Once the brocade backing triangles were attached, the four triangle assemblies had buttonhole loops added at the top corners, to provide a channel for the ribbon that will hold the étui closed. Then they needed to be joined in a chain at the bottom corners, and attached to the circular brocade-covered skirtex base to create a square-based pyramid.
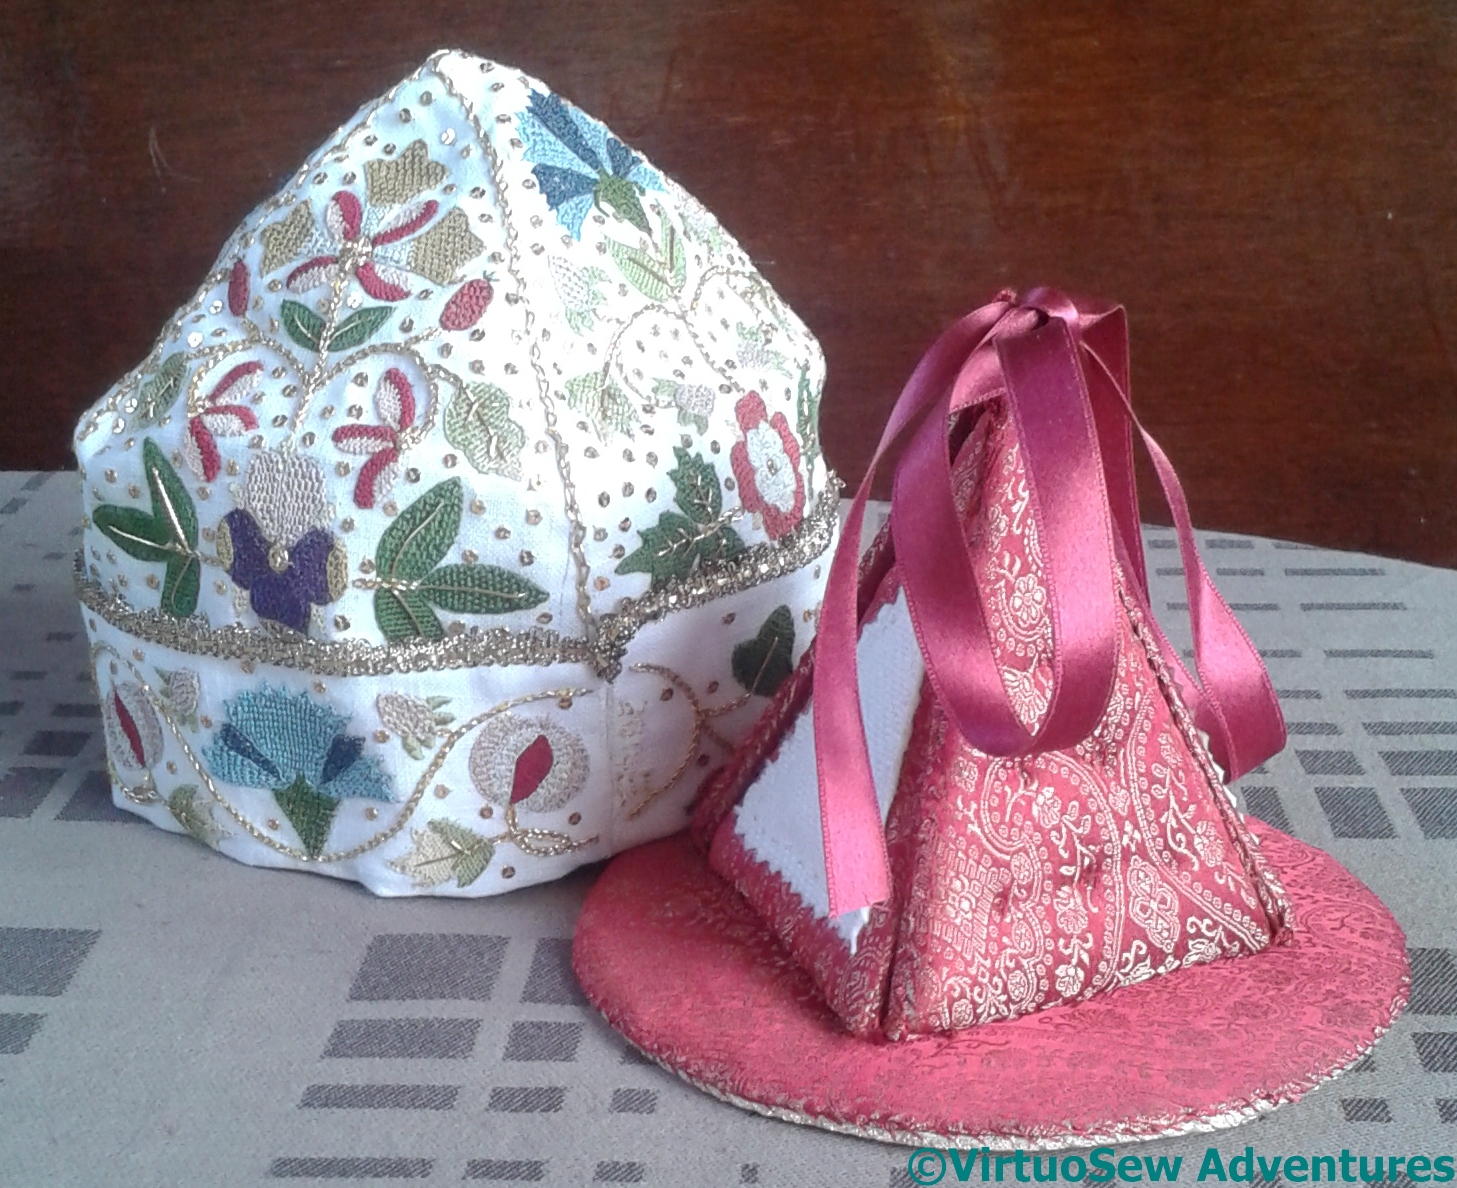
Etui Done
It turned out really well.
I’ve had lots of practice with trellis stitch and detached buttonhole stitch with return, I’ve Spangled until I’m seeing stars, and I’ve done a lot more reverse chain stitch in gold.
I can’t quite see myself using the étui in my ordinary stitching life, but I can see myself putting it in a carefully lit corner and gloating over it!