
Category: General Embroidery
A tree for the trinkets..
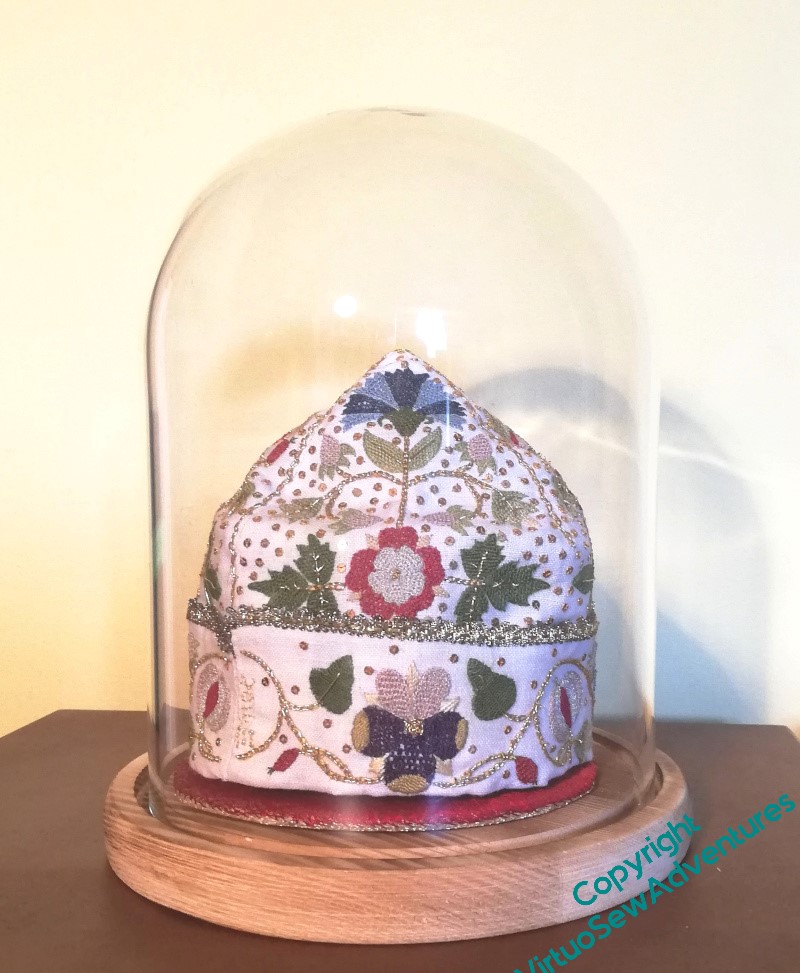
When I had the idea about using a parlour dome for the Violets and for the necklace, I realised that I would need to play with how I displayed them, trialled the Tudor Nightcap in the dome and realised that I could now put it on display.
So what about all the other Thistle Threads pieces?
Well, it turns out you can get parlour domes that aren’t round, so I got the largest I could bring myself to buy and then stopped to think…
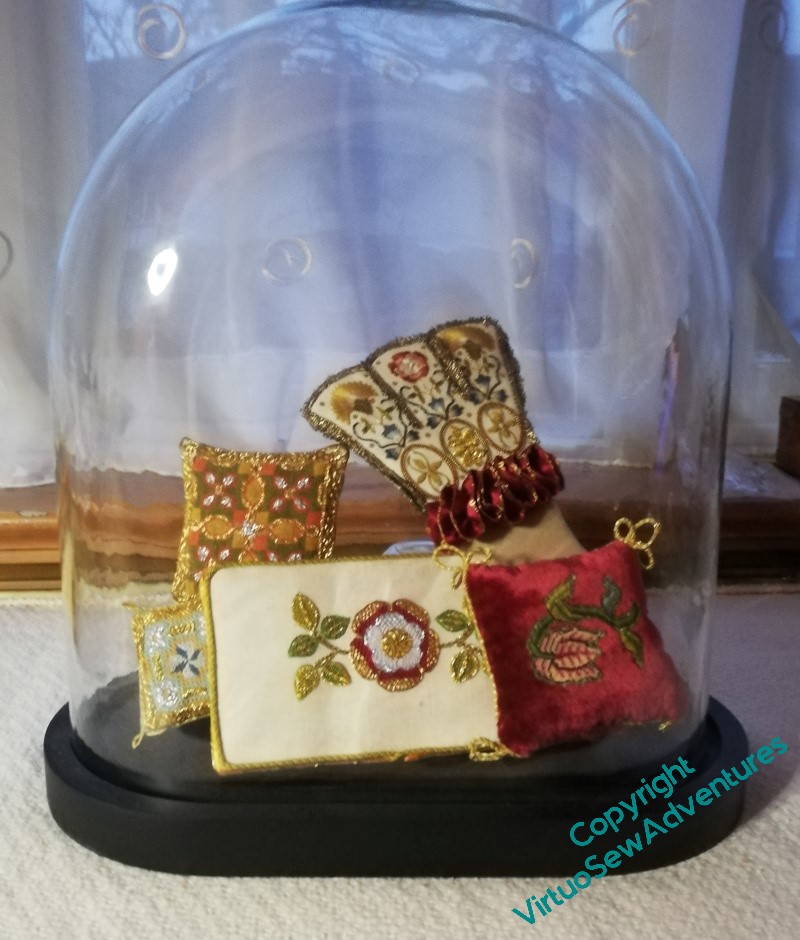
I started by playing around with propping the various pieces I’ve been planning for that Winter Decoration Corner against one another within the dome. It’s a flattened oval, and quite high, but anything I could improvise seemed not to have the height I wanted without taking up all the display space.
I think this shows the idea will work, but it doesn’t really have the presence that the pieces deserve.
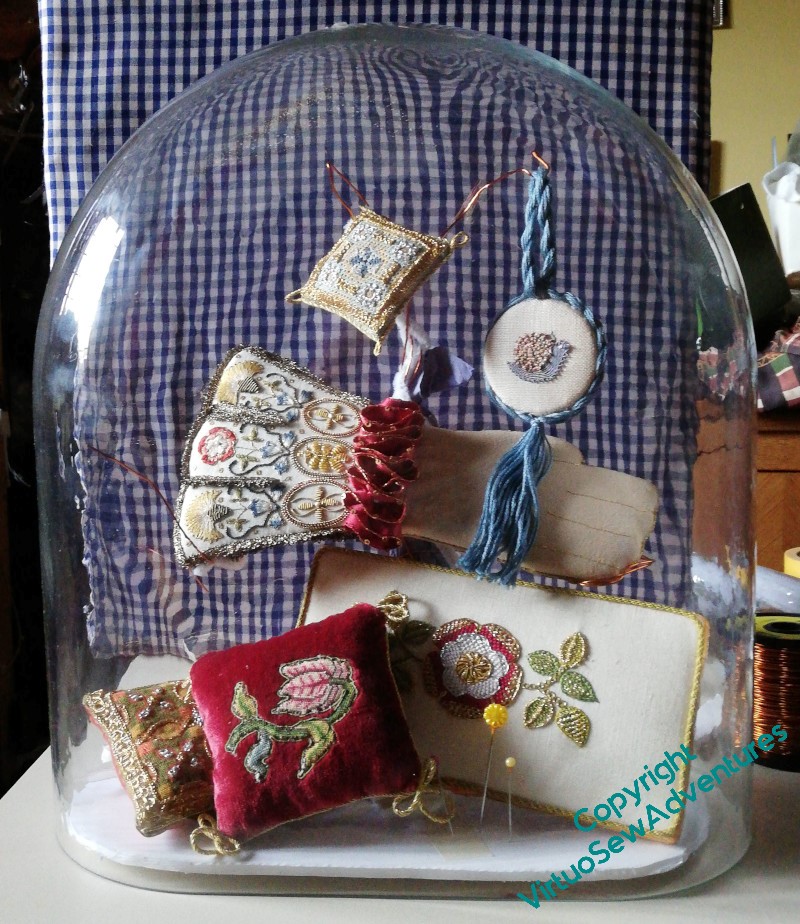
This is better. I’ve used offcuts of the foamcore that I bought to help me with Nefertiti and Akhenaten to create the base that will sit inside the glass, sandwiching the beginnings of the wires forming the tree between two layers. I’ve built up a support for the green and orange cushion at the back using smaller bits of foamcore, and wrapped pipe cleaners around the wires.
It’s not perfect, but I’ve set it up in the hall where I will pass it every day, to work out whether I like it. Then the idea is that I will have a lovely messy hour or so covering the wire with papier mache, allow it to dry, and paint the whole thing gold.
The Tudors were as fond of bling as the ancient Egyptians, after all!
Another Decision To Make
I can’t imagine how people can have a design planned down to the smallest detail before they begin. Even when I’m more organised than usual – William is a prime example – there are always details that either escape me, or that I hadn’t even considered at the start.
I should say, this isn’t a complaint. I don’t think I would find it remotely interesting to have planned everything out and have nothing to discover. These days, when I follow someone else’s design, it is to learn what they can teach me, so even though the design is planned, there is nothing sterile about the experience.
However, the fact remains that I am, yet again, wondering what to choose.
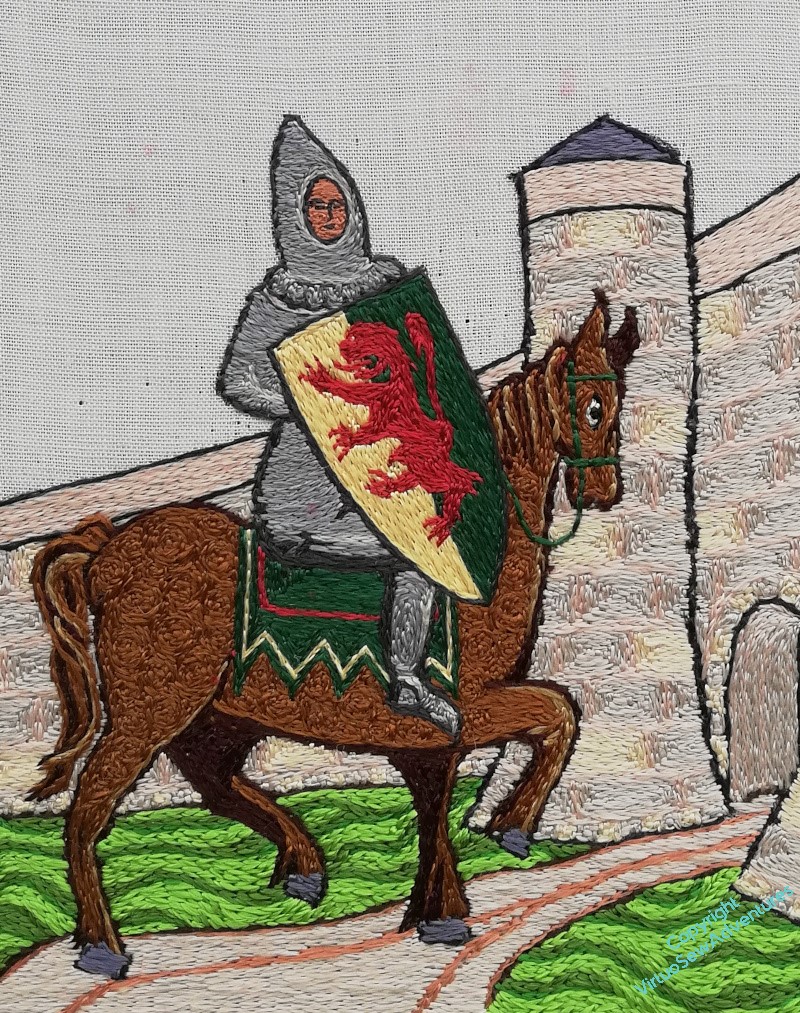
When I twisted together the fawn and the brown silk to stitch the stem of the dog rose, it was partly because I wasn’t happy with the colour and wanted to modify it slightly. When it was done, however, I felt that maybe I hadn’t, in fact, modified it enough. It seemed too close in tone to the background, so I worked the stem in the top right in just the light fawn.
And all the time I was working it, I felt twitchy. It seemed too bright, too bald, too obvious.
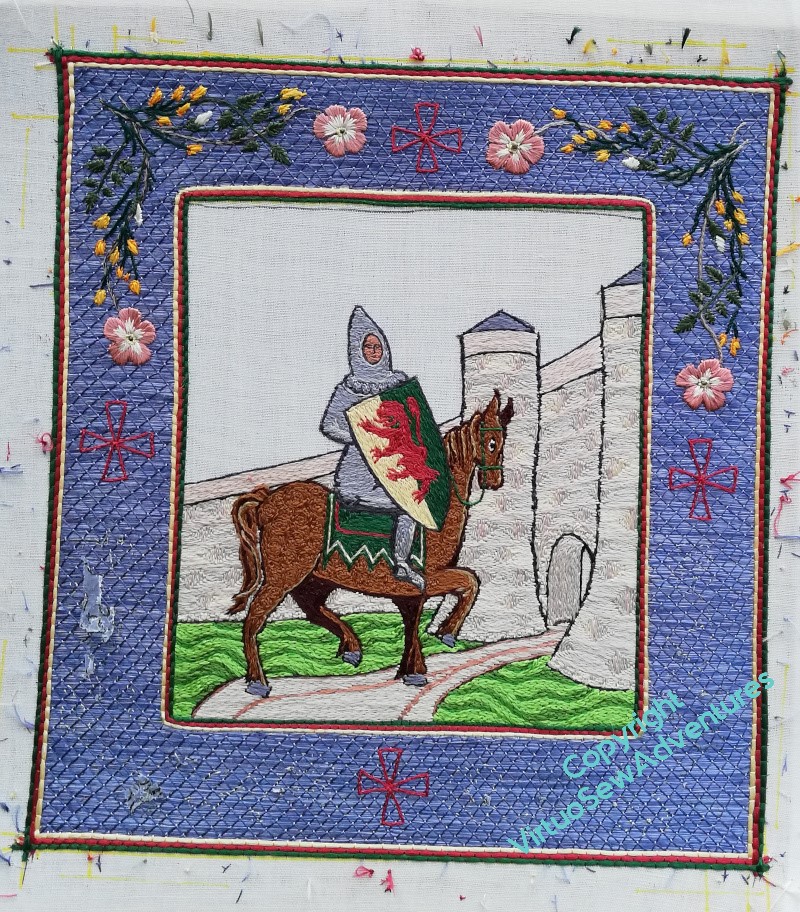
Now I have the top two corners done, and I have a decision to make – two colour stem, or single colour stem?
It doesn’t seem quite as glaring from a respectable distance. Note to self: for goodness sake, never decide anything from ten inches away, that’s not how anyone else is likely to see it, and if they do, you’ve already won them over anyway!
There is, of course, a middle ground. I could do the two colour stem on one diagonal and the fawn the another, echoing the angle of the castle walls and the trajectory of William’s career.
However, one decision has already been made – remember I wasn’t sure whether to fill in the crosses or not? I am now, and they will be filled.
A Happy Christmas to you all!
Beginning The Border
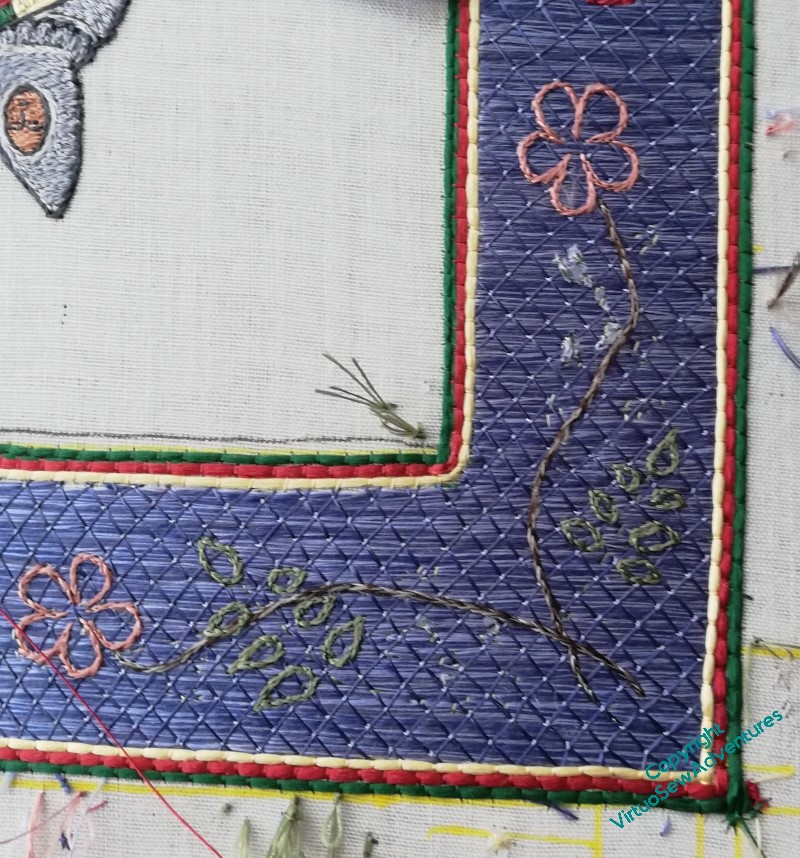
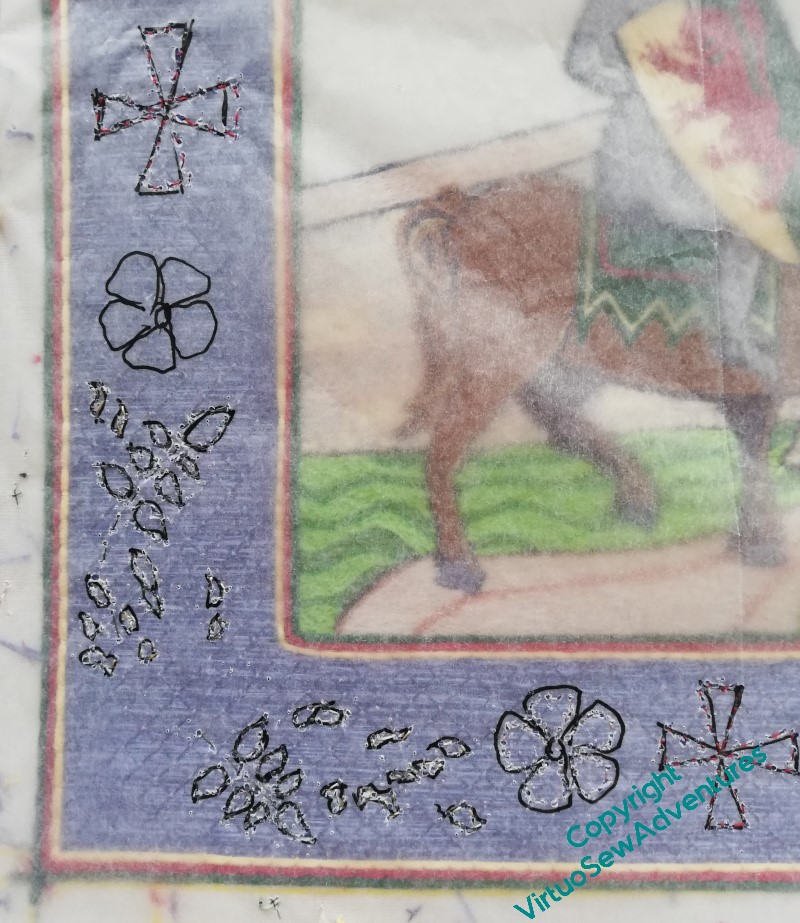
Once I took the tissue paper away, I discovered that in fact my running stitch transfer wasn’t very clear. So I’m going to start by split stitch outlining each element before I fill it in.
You can see in this photo that I still hadn’t quite got all the tissue paper that had the design on it out from under the stitches, and I’m only part of the way through outlining this corner.
I did think I might try to outline everything first, and then I thought about what happens when I have something like that to do, and decided that each corner would be worked to a finish separately!

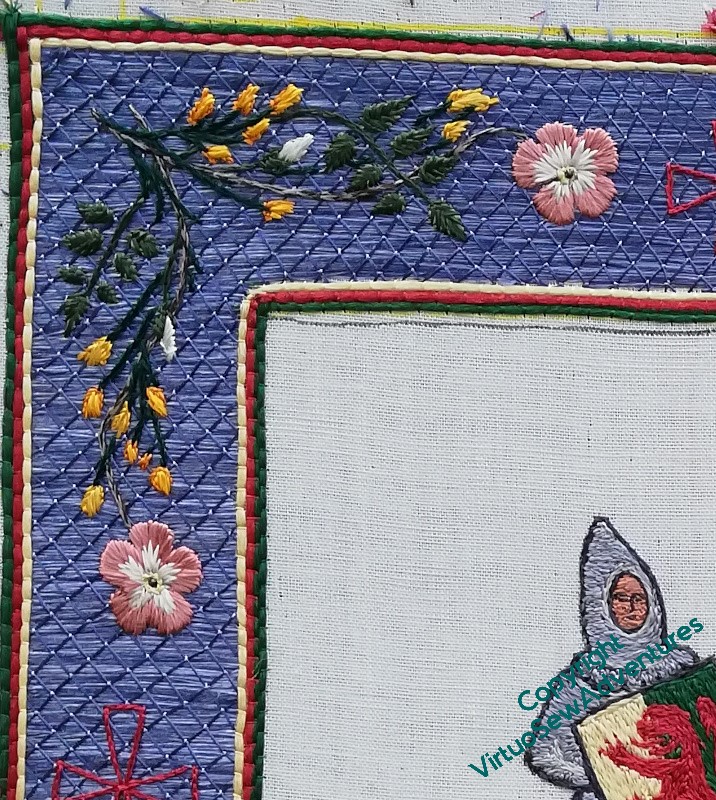
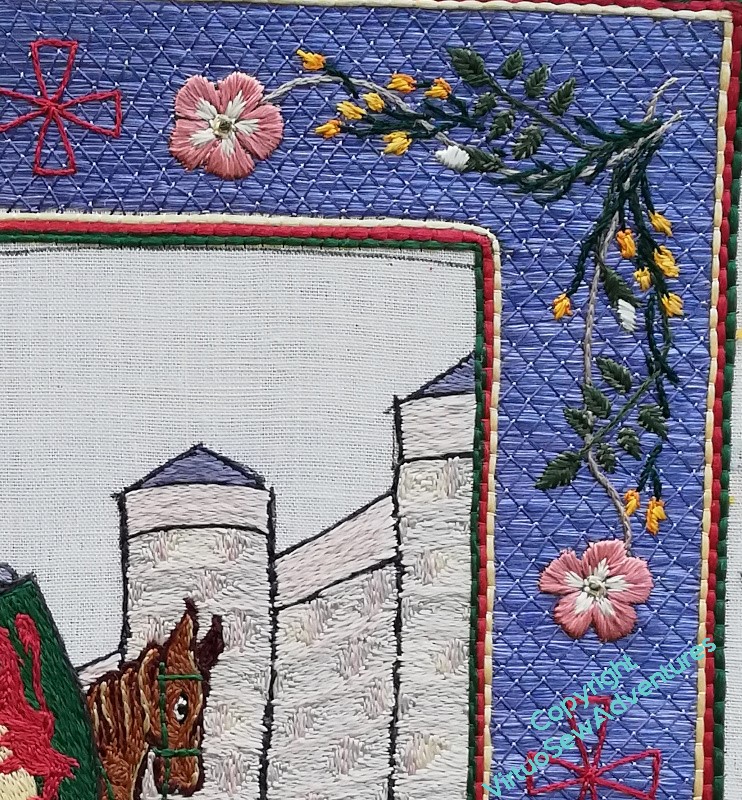
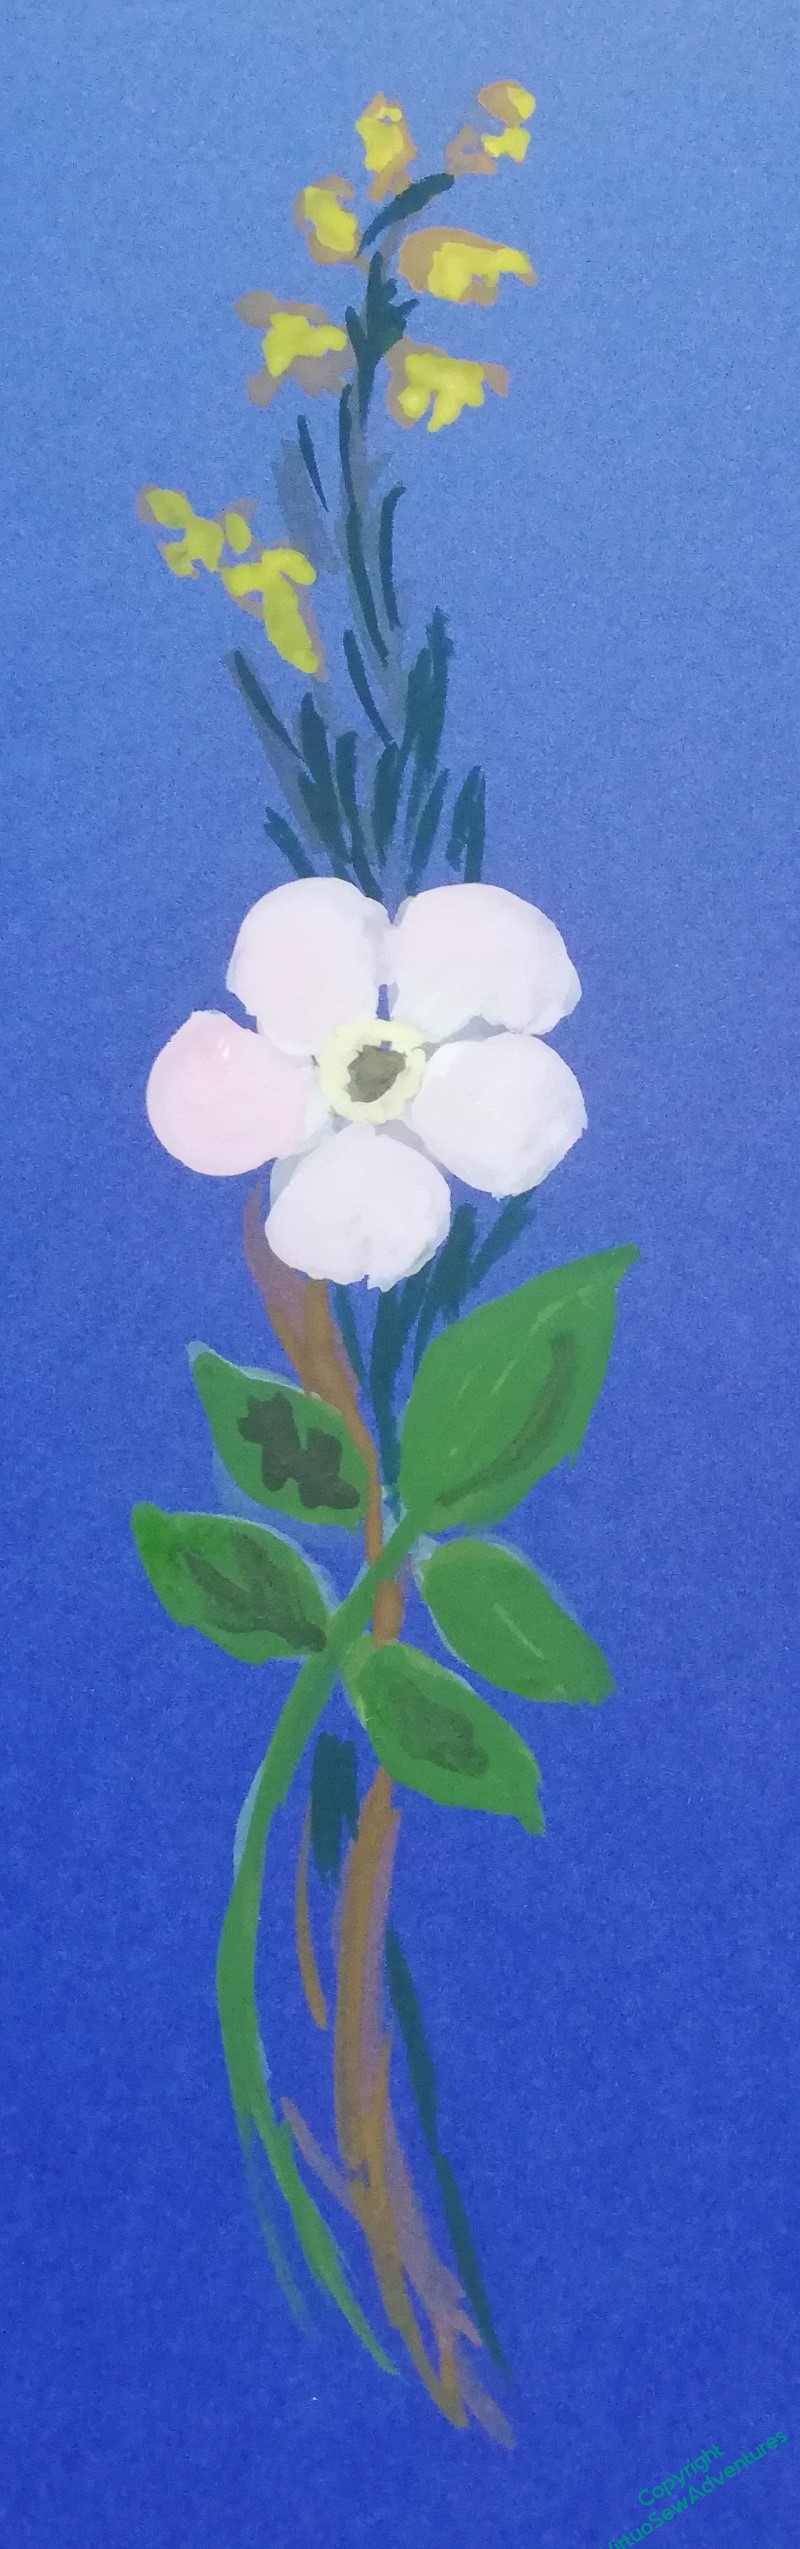
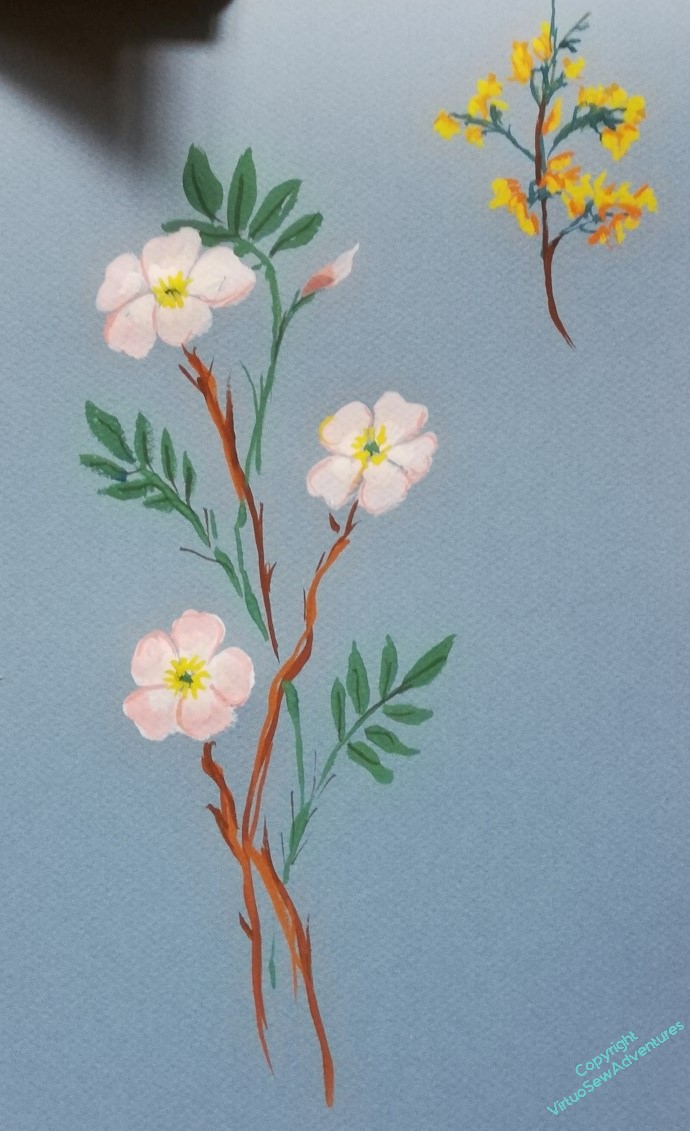
It is probably at this point that I start to wander from the path of classical Opus Anglicanum. I’m using fishbone stitch for the rose leaves and satin stitch for the broom. But after all, this is a modern work, by a modern embroiderer, not a reconstruction of an existing, or imagined, medieval work.
The wanderings continue with the dog roses – long and short stitch in the petals, over two rows of split stitch outline to help define the edges, and a tiny French knot for the dark centre.
I’m using two differnt dark greens for the rose leaves and the broom, to help the design make sense, and I worked the rose stem in split stitch using two shades of brown. I am not entirely sure about that, so I think the next corner around I will use one, maybe the darker one, and see whether that is an improvement. If it is, bringing this one into line might be a bit hair raising, considering how small all of this is!
Border Transfer
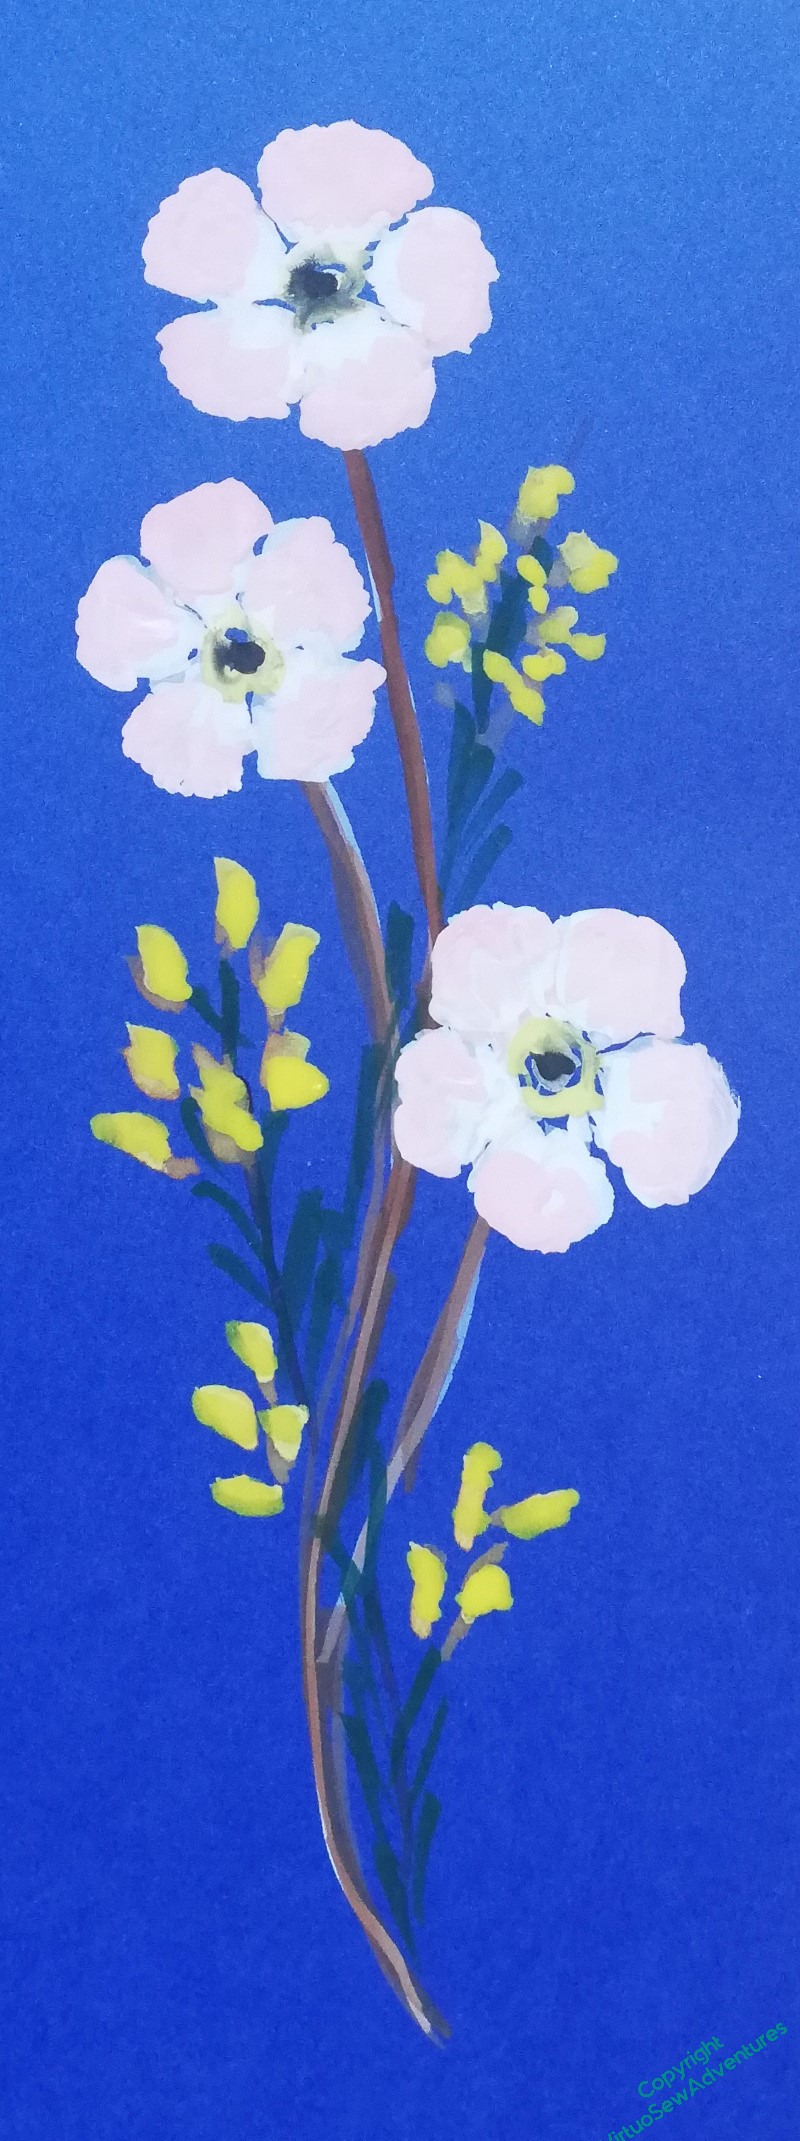
It may not be very obvious in the line drawing, but although the two sides of the corner sprig are very similar, they aren’t quite identical. I wanted to keep a sense of movement and flow, without the chaos of having every little bit different, so in the end I chose to create my corner sprigs based on two slightly different straight sprigs. In this photo you can see that the rose leaves are pointing in different directions, and the broom flowers are arranged differently.
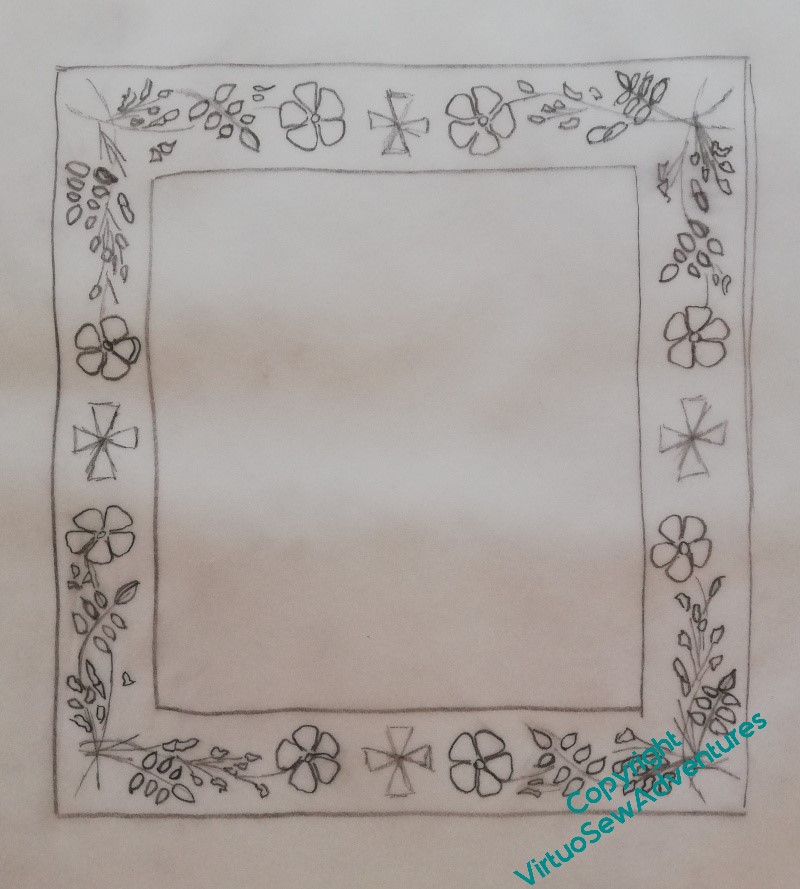
When I did the line drawing, I took my guiding sprig and turned it through ninety degrees for each corner. By doing that, there’s a sense of continuity, whereas I think if I had reflected the design in a mirror line through either the vertical or horizontal crosses, it would have created a rather stop-start effect. I was much impressed, years ago, by a programme about the carver and sculptor Grinling Gibbons, which said that he always aimed for balance rather than symmetry. I like that, it feels more human somehow, so that’s what I try to do too.
Now, however, I have to transfer the design to the border. Clearly that’s not going to be possible using prick and pounce or a drawing method, so I have chosen to create a drawing on tissue paper of the main elements, and running stitch along the design lines. I am hoping that this will be sufficient!
In any case, it allows time for the extra thread I had to order from Devere Yarns to arrive..
Finally, two Announcements:
- The eagle eyed among you may have noticed that the Ko-fi link went away and is now back (plug-ins not playing nicely!). I’m still hoping to put together an exhibition and a book about Dreams of Amarna, and any support, whether financial, moral, or material (suggesting venues, publishers, copy-editors) would be gratefully received!
- You may also noticed the lack of a link to Twitter. I’m mostly on Mastodon now, as @virtuosew@mathstodon.xyz, for reasons that anyone else who’s been on Twitter lately will probably understand very well!
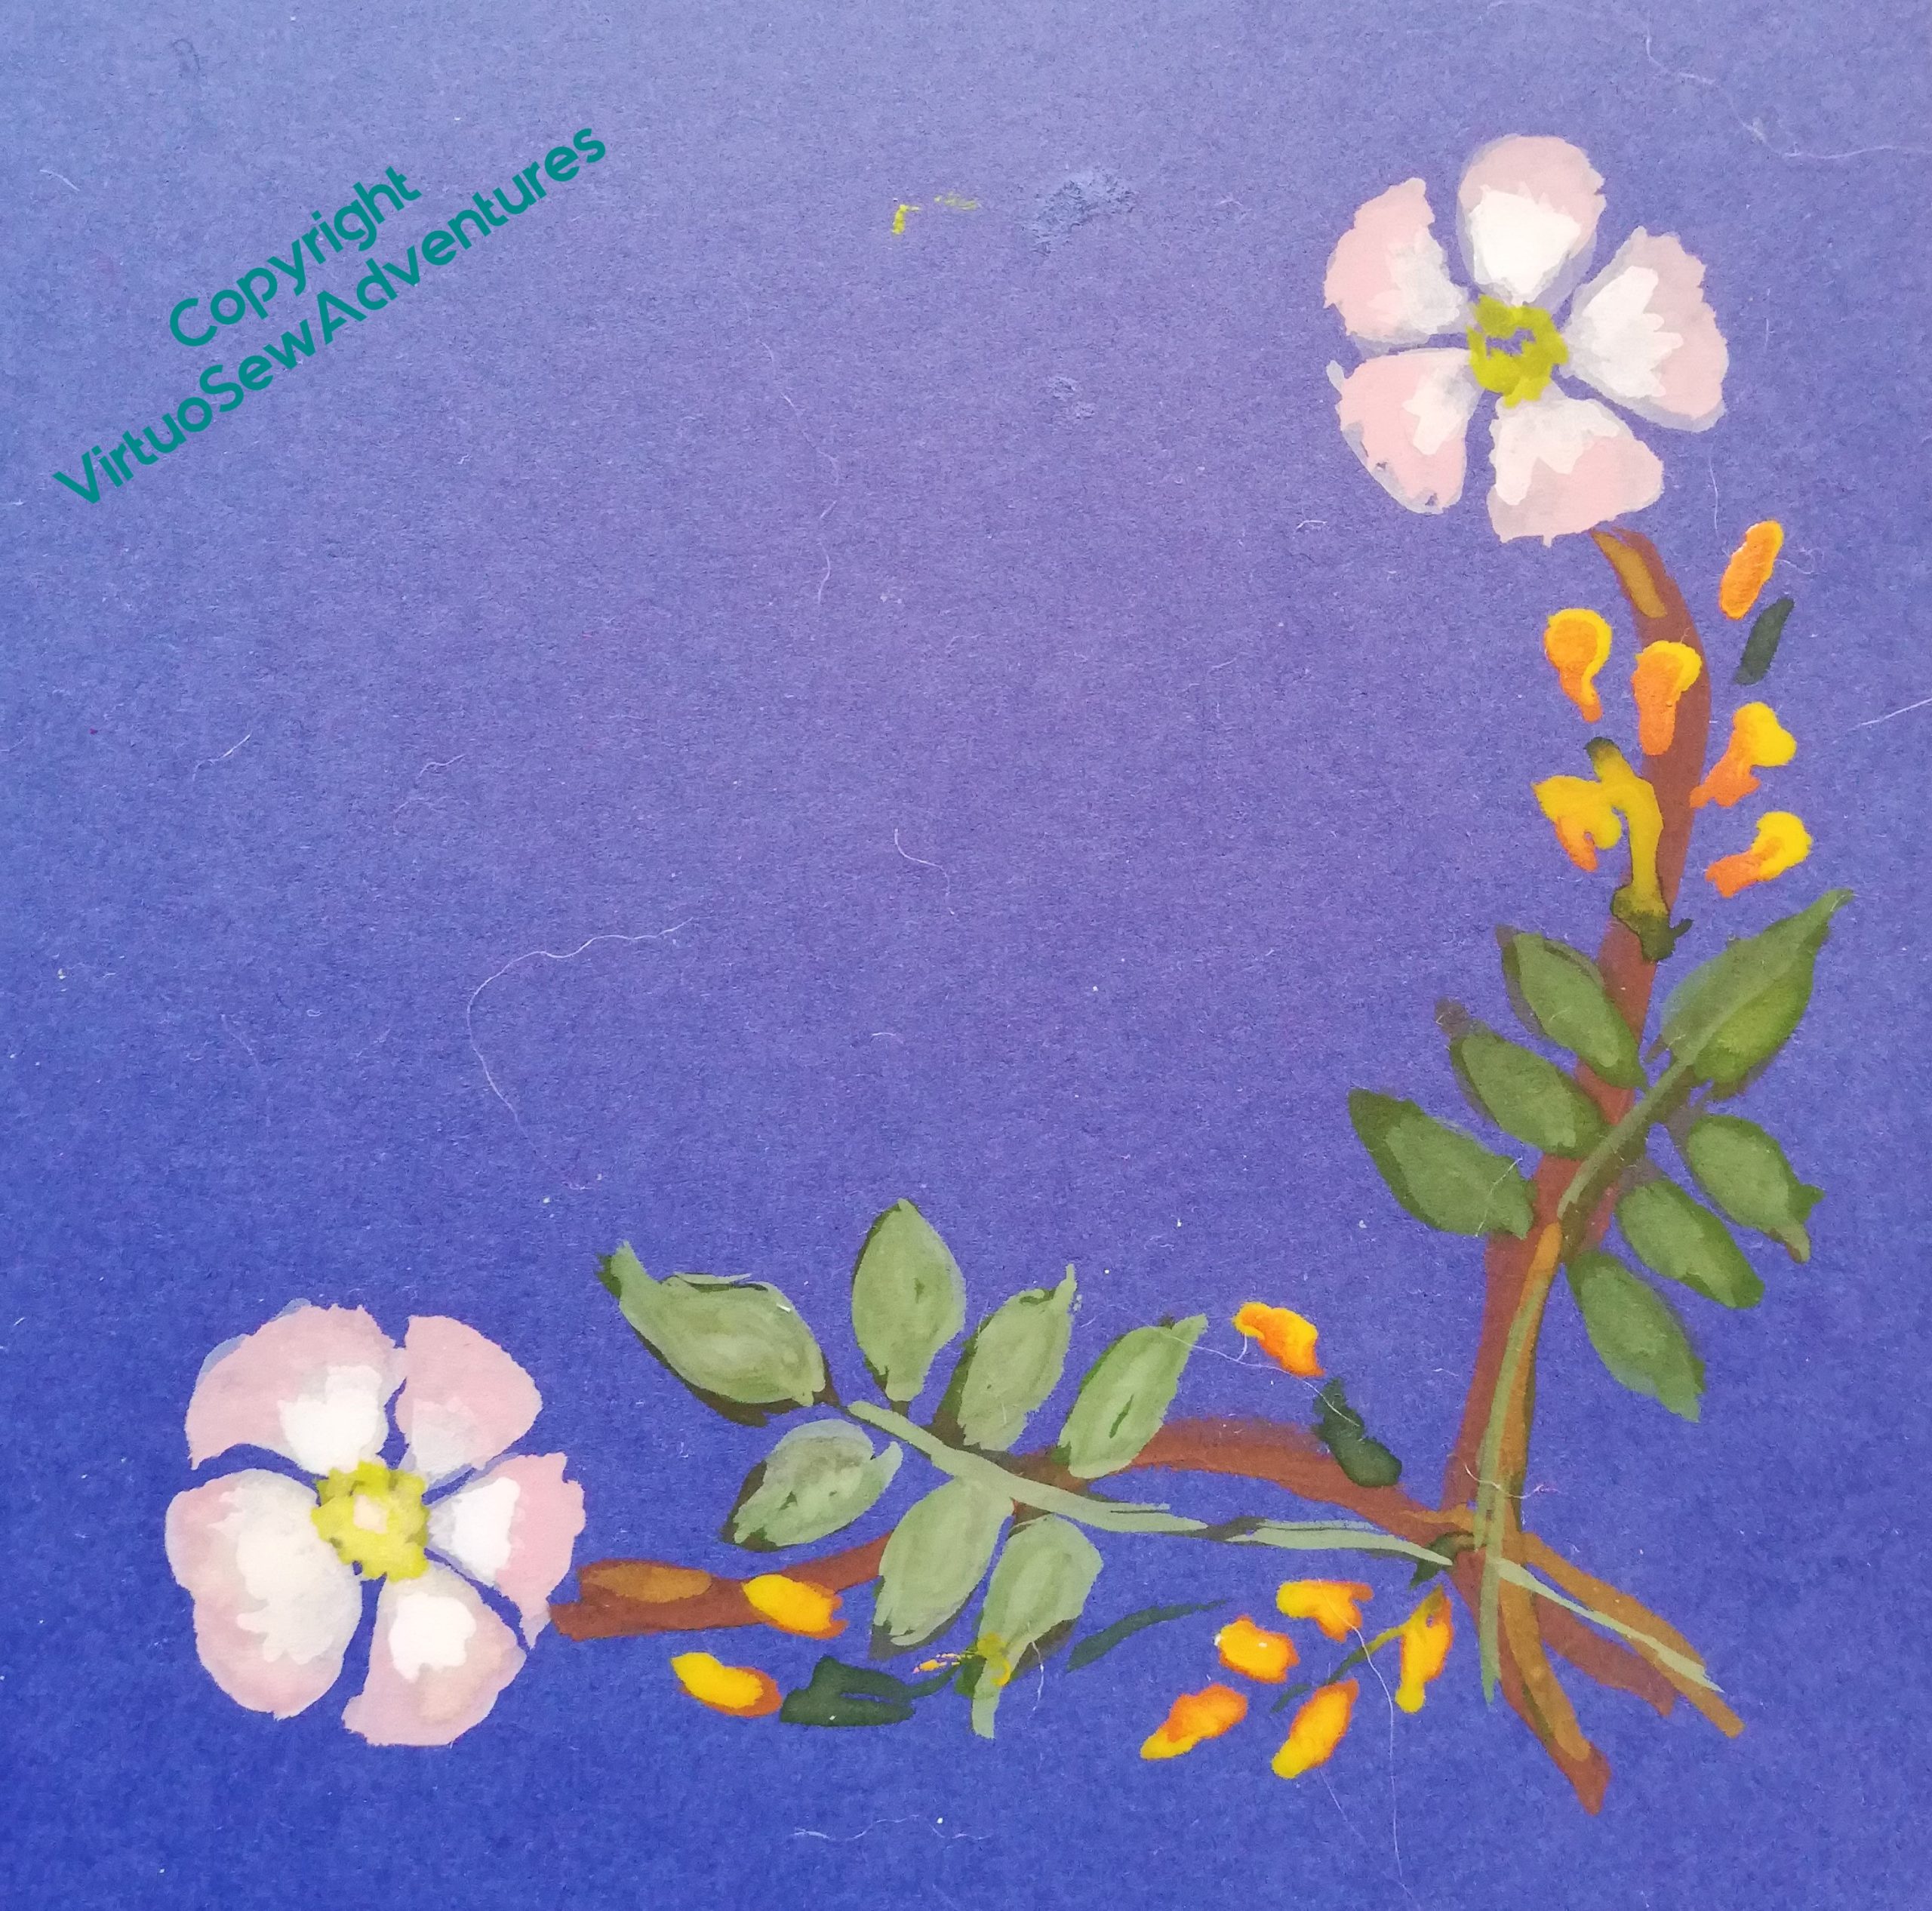
Border Design Finally Nailed!
Once I had the border trim in place, I felt I really had to get the details sorted out – but having that trim in place seemed to help. The dark green, red, and yellow on the inside, mirrored by the yellow, red, and dark green on the outside seem to bracket the blue just exactly as I planned, and I began to feel that all that painting and puzzling might have been worthwhile.
So I tried photocopying the full piece to see whether playing with my cut out sprigs on a flat surface I wasn’t worried about snagging might be useful.
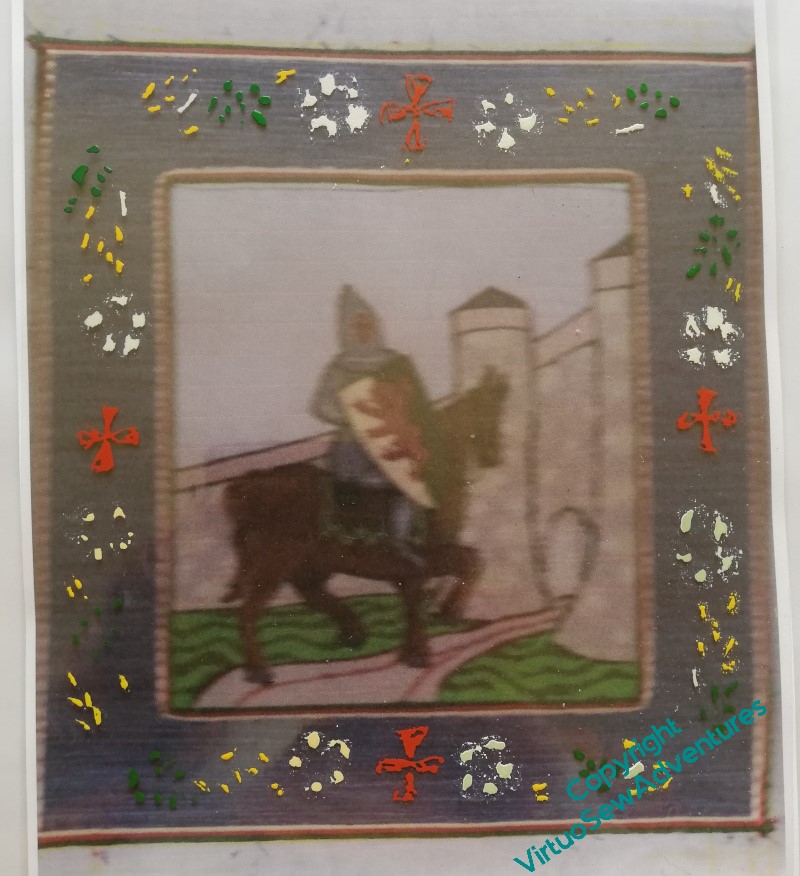
In actual fact, the photocopying wasn’t a great success, but it was close enough that when I overlaid an old acetate and experimented with the border sprig I’d finally, tentatively, settled on, I suddenly became a lot happier. The paint is gouache, and it really doesn’t get along well with the acetate, but I felt that it gave me just enough of the sense of the design that I could be confident it would evoke an illuminated manuscript – which is what I was hoping it would do.
It’s always so pleasing when a plan comes together!
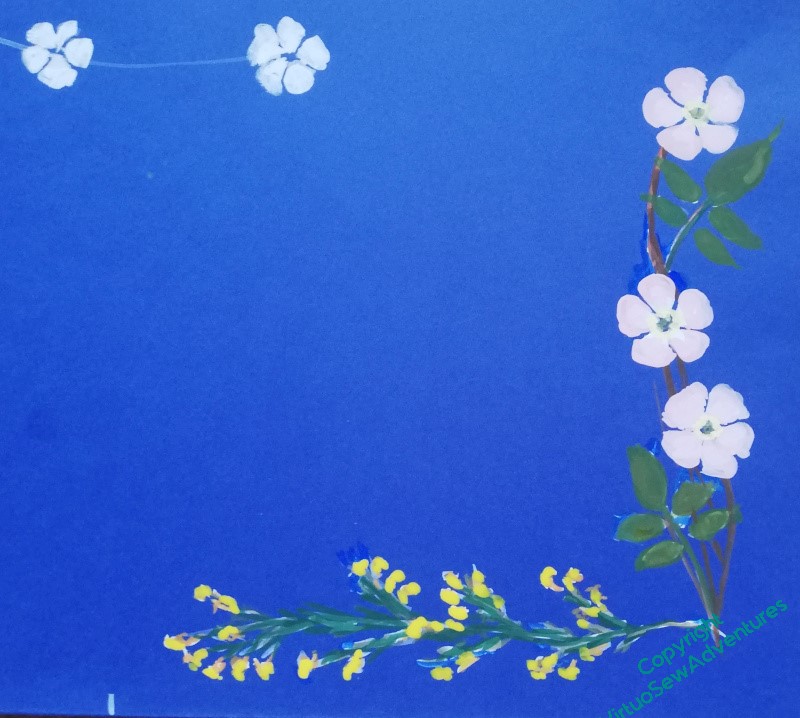
The next stage was to produce a line drawing of the planned design, and use that to transfer the final design to the piece itself.
And this was the point at which all that painting and drawing and redrawing began to show real benefits, because even though the photocopied sprig design I was using as a guide was distinctly muddy, I found myself drawing the lines I needed with a freedom from care I rarely experience with pencil in hand.
Well now, who’d ha’ thunk – more practice does produce better effects!
Still working on that border!
I continue to wrestle with the arrangement of broom and dog roses – my goodness, am I ever glad I’ve been working on planning with paint over the last two years or so! I do some exploration with digital images, but as it often results in a sore arm from mouse and trackpad manipulation, painting is a much better option. This selection of straight sprigs could be assembled into corner decorations, and potentially tweaked in size to fill a side or leave space for the Templar crosses.
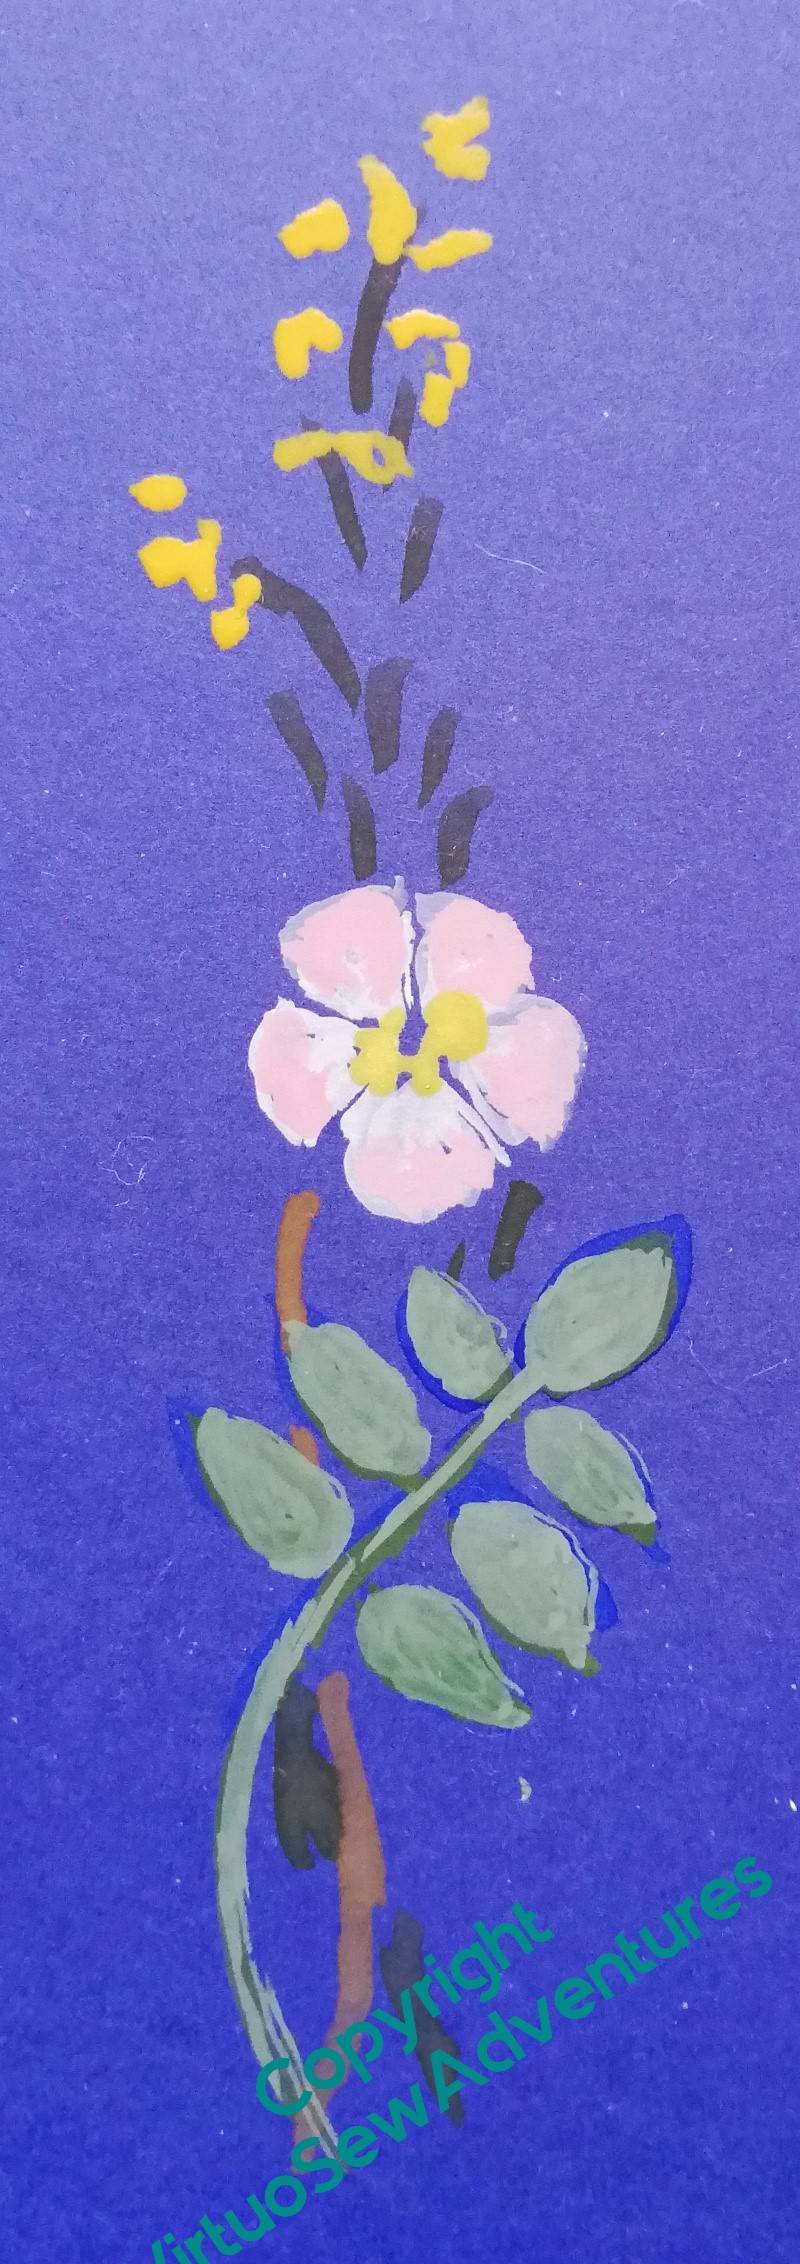
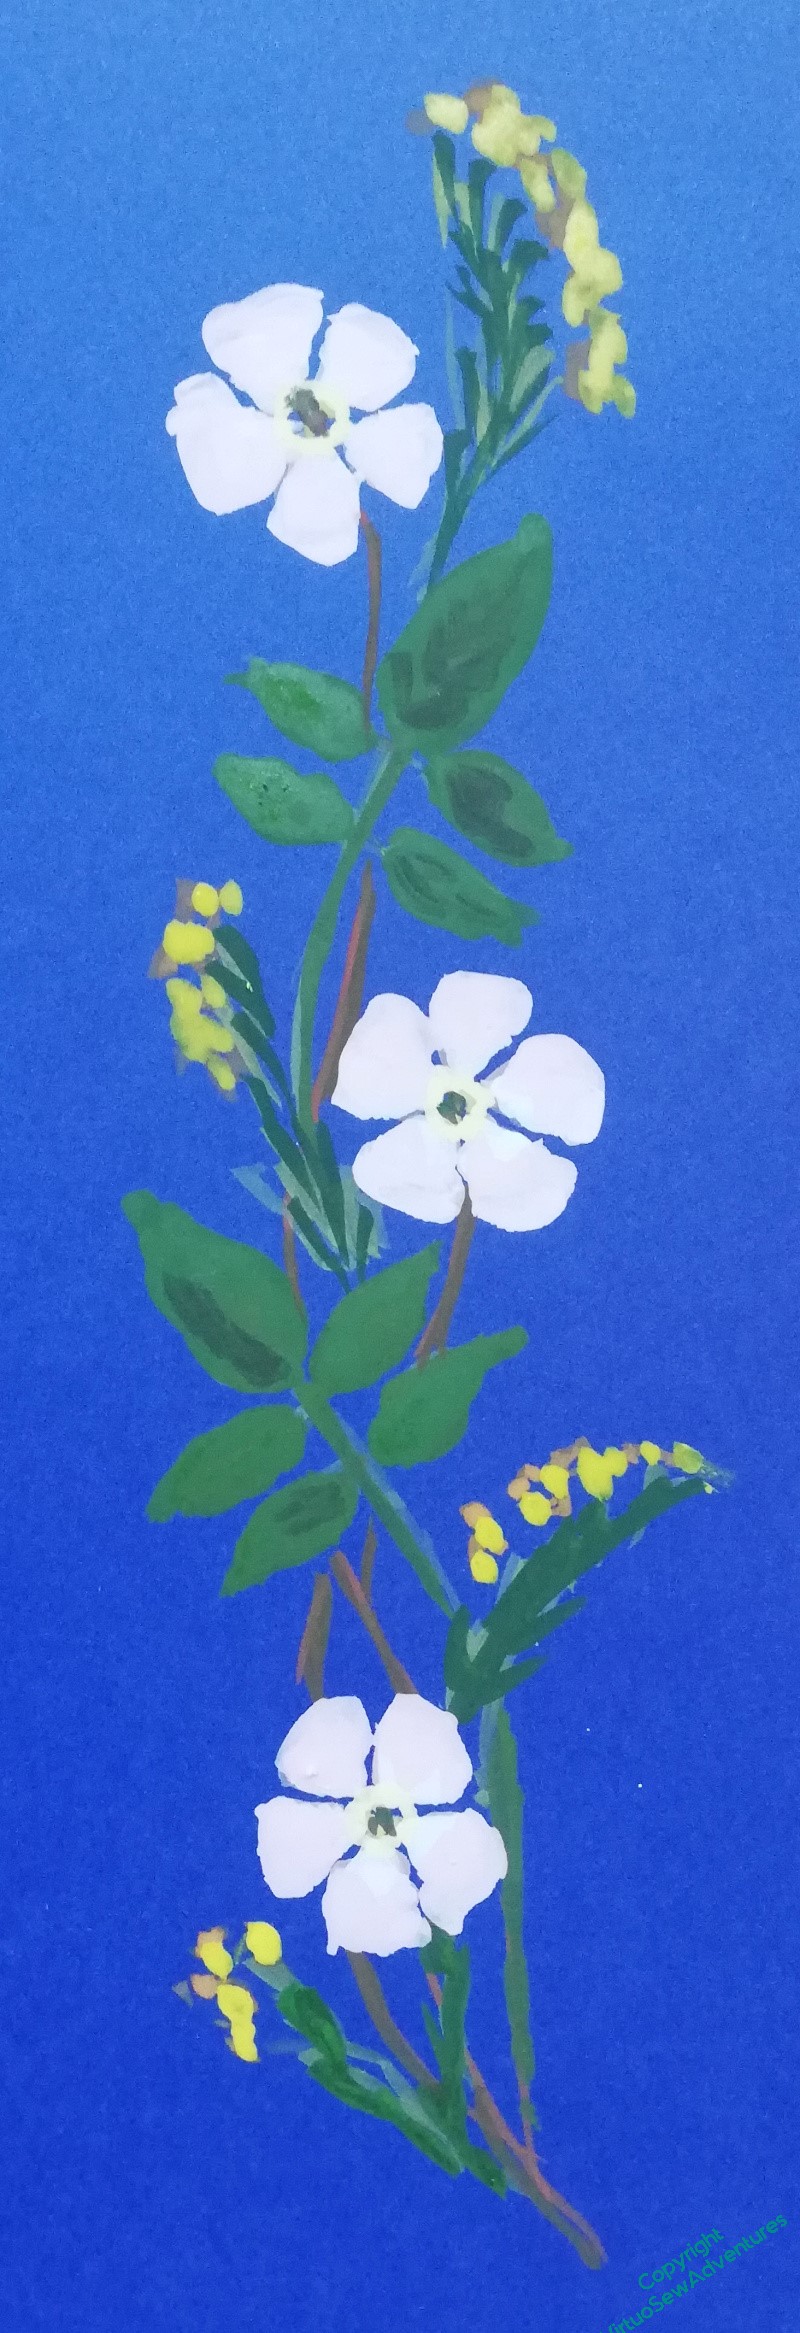
Indeed, I have painted so many straight sprigs and corner designs – so large, to make it easier to paint – that I’ve become quite blind and jaded with them, and can’t decide which I like. I did realise that I needed to put them against William and the chateau de Tancaville, so I photographed them and printed them out. And then told the printer to try something smaller and go again.

And that showed that those sprigs would have to be, if anything, even smaller than I had anticipated.
This tells me that I will have to be very much more careful about the colours I use, and the number of strands. I can’t afford to produce a border that looks muddy or confused, but equally, it mustn’t fight with William or his underside couched golden sky.
Tricky. Very tricky.
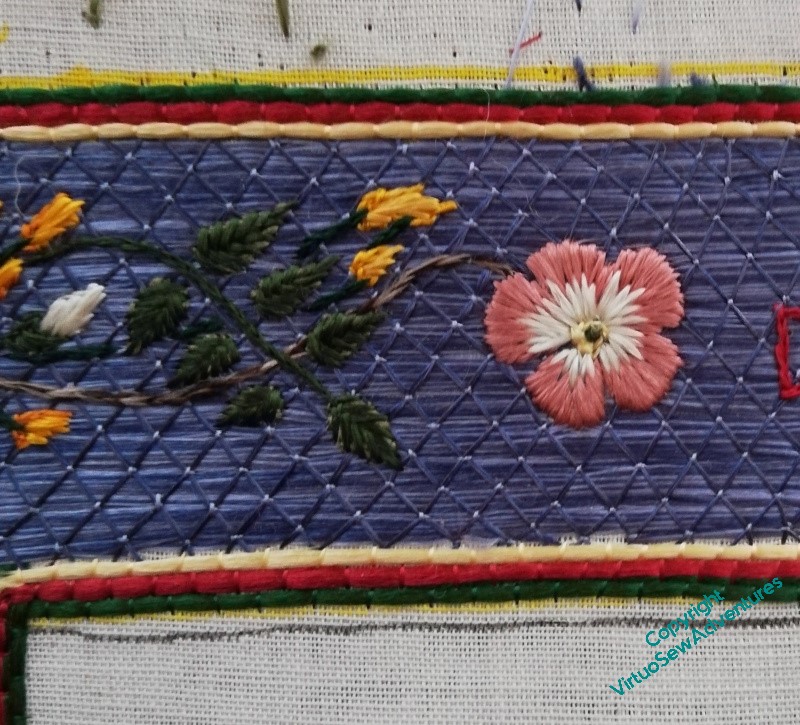
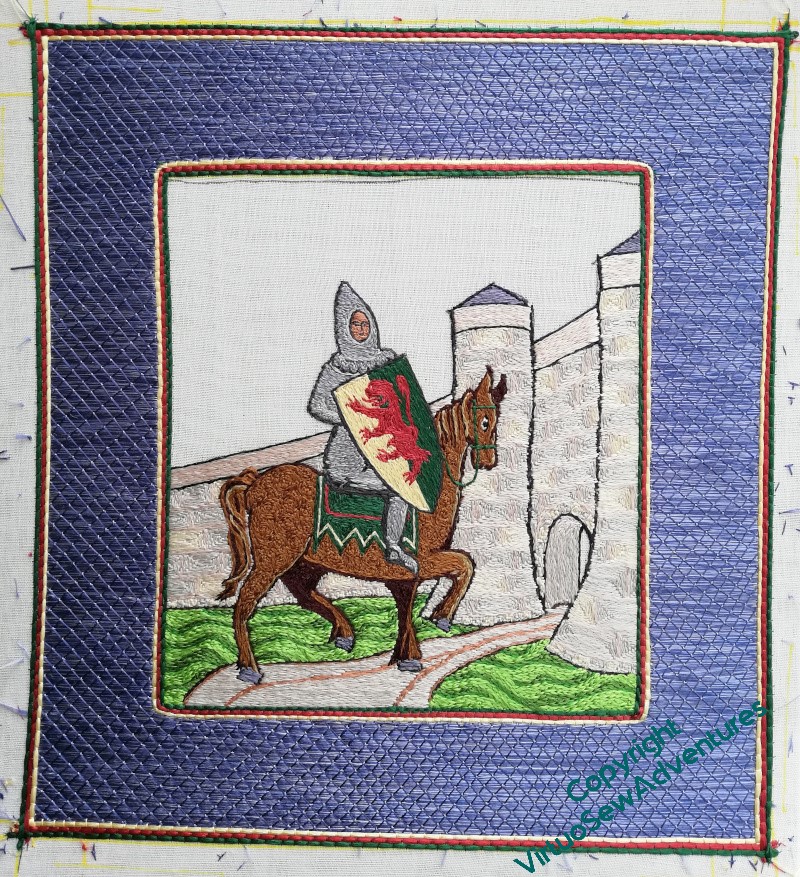
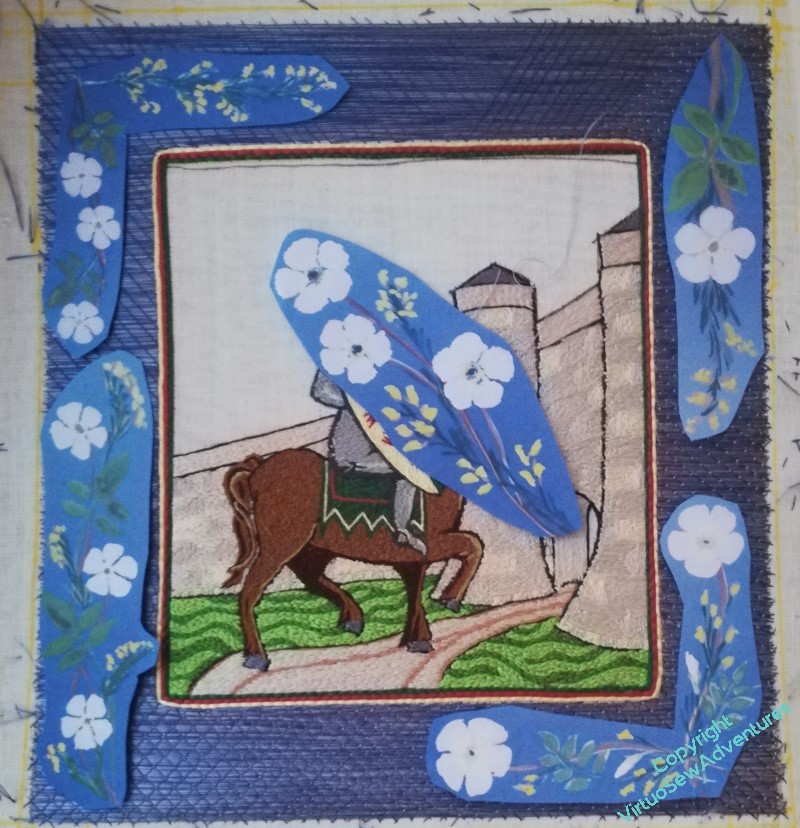
William’s Border – the background..

As you can imagine, it took me some time to decide on the way I was going to tackle the border. Since the “sky” is going to be underside couched in gold, it needed something to contain it, and I felt that it had to be a colour which wasn’t already dominant in the design – so not grey, and not brown.
Blue somehow became the obvious choice, and then I had to decide how to do it. I wanted the colour to have a bit of variation to make it less stark, but at the same time, calm enough to settle into the background. So I have three different shades of blue in the needle at once, and the base layer is surface satin stitch.
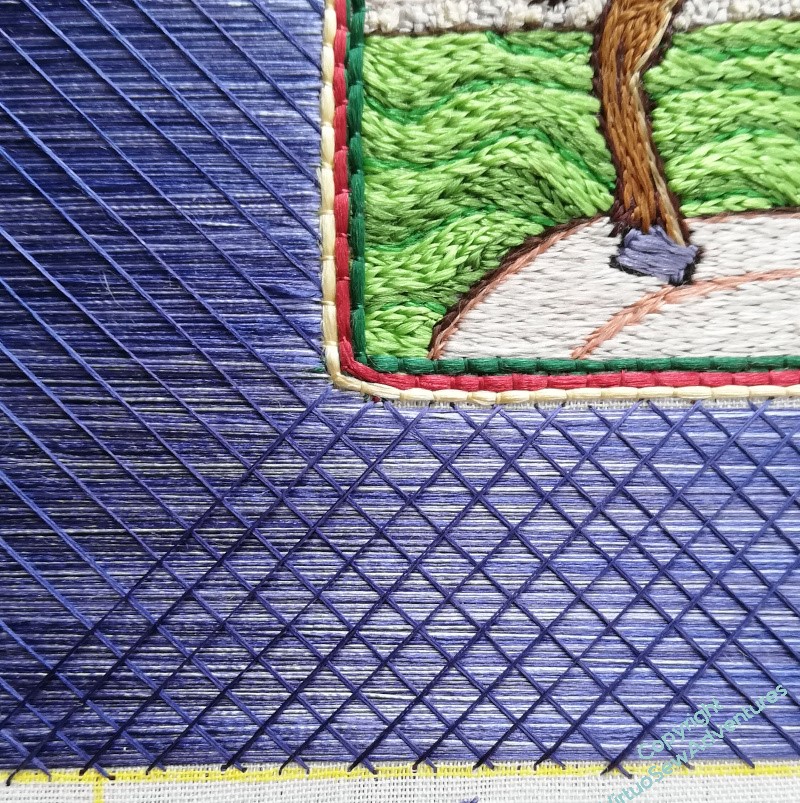
That isn’t at all stable, so it is going to have trellis couching over the top.
The first layer has a slightly watery look to it, not at all unsuitable for someone who travelled as much as William, but I wanted to calm it down some more, because, remember, it’s merely the background for broom and dog roses! So the hatching (the trellis part) uses the two darker shades of the three.
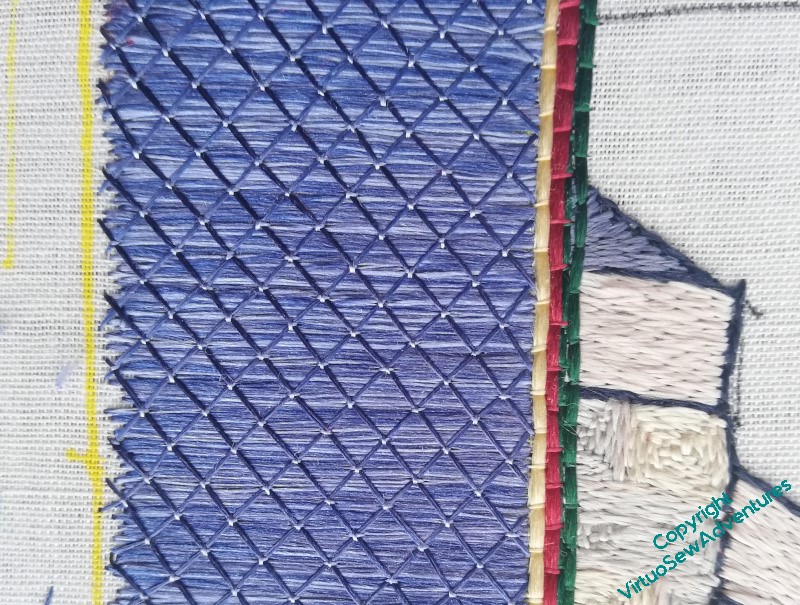
The final stage is tieing stitches, in the lightest blue. I’m really pleased with this, as it has produced the right control of the threads, and the light blue glints like a gem at the crossing points.
The outer edge will have the same as the inner edge, but in the reverse order. Soon I will have to finalise the ideas for the broom and dog roses, and when I’ve done that there will be no excuse to avoid the underside couching, the prospect of which is slightly unnerving me..
More thinking about that border design
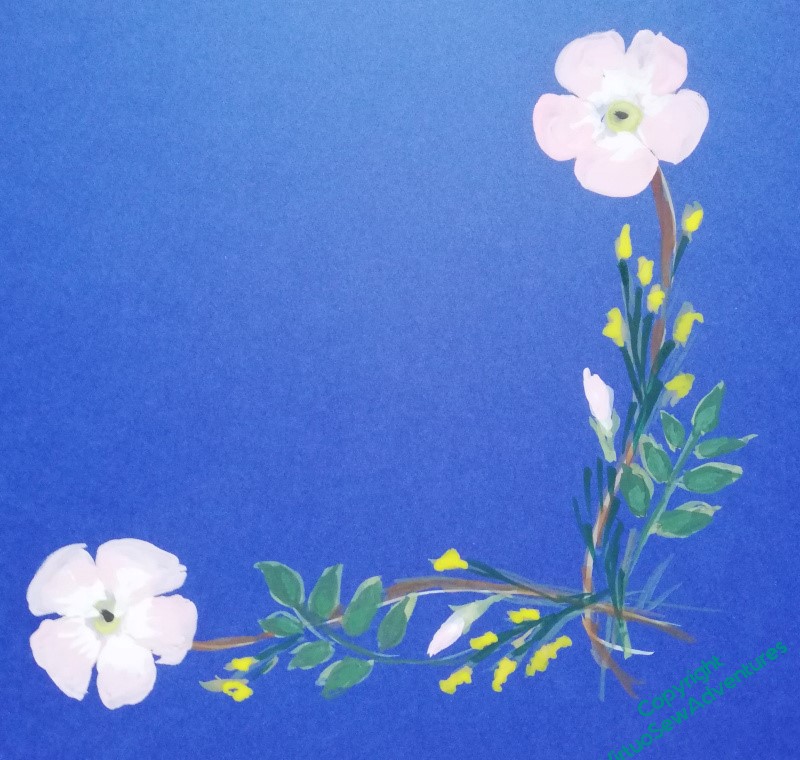
Once I’d got the panel done and got started on the background for the border, I knew that I was going to have a lot to do before the next stage of decorating the border. So I got out my paints, and started to play with the design elements I want to pull together – broom and dog roses.
My first effort, based on the drawings in the Observers Book of Wild Flowers, ended up as one of each, rather than a combination, so I knew I needed to think about that a little more; but I also realised that unless I worked out how the combination was going to be applied, I was going to end up doing a lot of work in the wrong direction.
So. Layout. I had begun by thinking about a wreath, but somewhere along the way, it turned into sprigs, and then I started to think about adding another motif – the cross the Knights Templar used, for Temple Church, where William is buried.
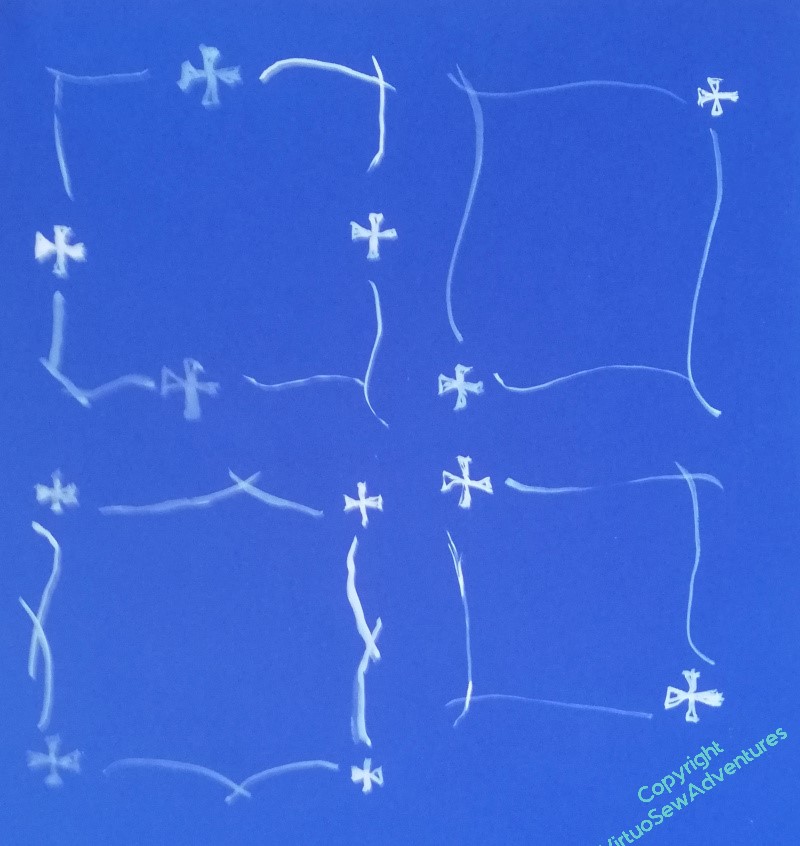
Combining the idea of the sprigs with the Templar cross, I’ve got four possible layouts, one with a cross at each corner, one with the cross in the middle of each side, and one with crosses on the the diagonals. At the moment, I am leaning towards the one with the cross in the centre of each side. The corner crosses seem to make a less purposeful pattern, somehow, and the diagonals – well, depending on the final form of the sprigs, they may work in the end, but at the moment, I’m not at all convinced!
When in doubt, delegate!
You may recall that I was beginning to think about assembling the Amarna panels, and suffering from Alarms, because I wasn’t sure how to make suitable mounts.

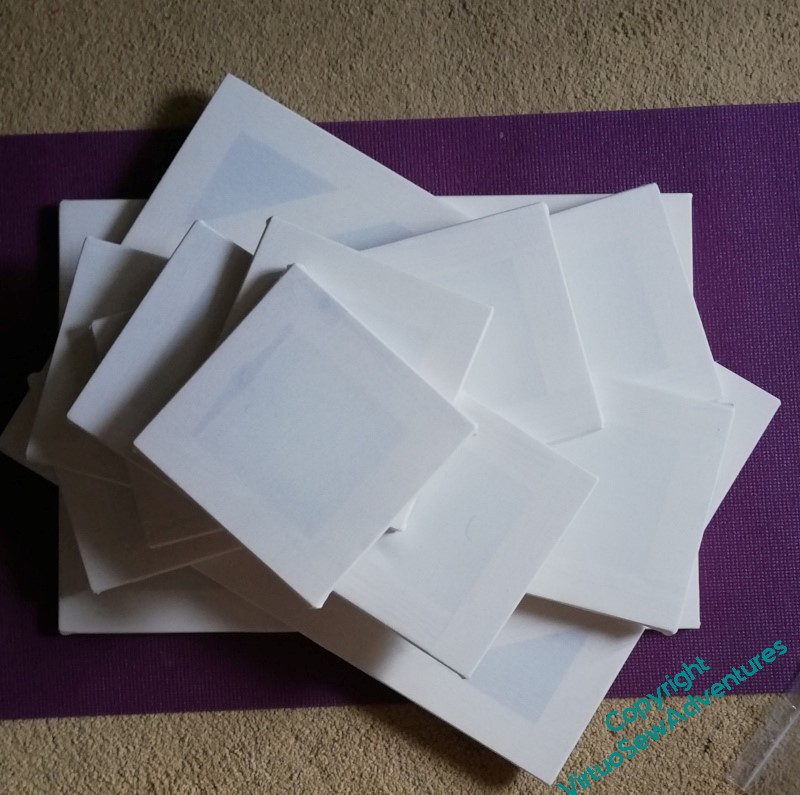
I was beginning to think about finding a timber merchant (our local one has closed) when a carpenter and his apprentice came to do some (very necessary) work on our windows. It didn’t take long to realise that they are both fine craftsmen, and it occurred to me that the intelligent choice was to ask whether, during the couple of days when they worked on things in the workshop, they could also make me some mounting frames for my embroidery.

Not only could they do so, but they made a beautiful job of them, as you can see from this test layout of one set of the panels. The wood has been sanded smooth so as not to snag either the cloth or the embroiderer, and there is some bracing to keep everything square and true. It seems a crime to cover them…
In fact, I was so thrilled with them, that I promptly asked for mounting frames for Akhenaten and Nefertiti as well!
Once I had them all, I decided the first thing to do was to cover each with a layer of calico to support the padding.
My word, that was a task. I’m very pleased with the results, but before I start covering them with the padding, and the real fabric, I need to have a break from the staple gun. It has a kick like a Victorian army mule, and very nearly as bad a temper!