
Tag: stumpwork
A Learning Opportunity
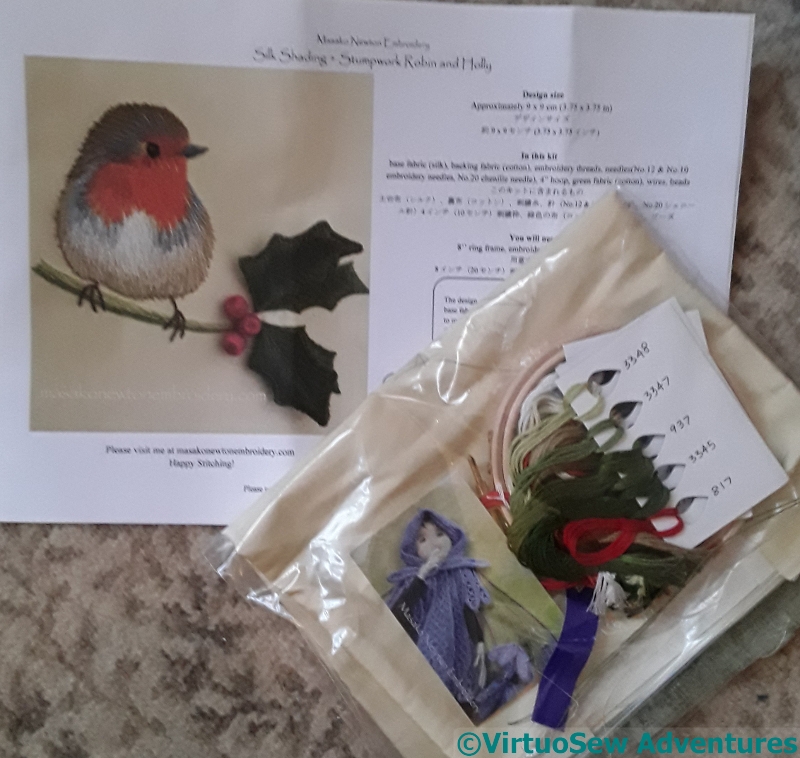
Robin Stumpwork Kit
I’m a very lucky woman. Sometimes, as in this case, I have to say so through slightly gritted teeth…
In this case, I am expressing my good fortune in having a family that takes my embroidery as seriously as I do – and the gritted teeth are because my parents elected to give me a learning opportunity for Christmas.
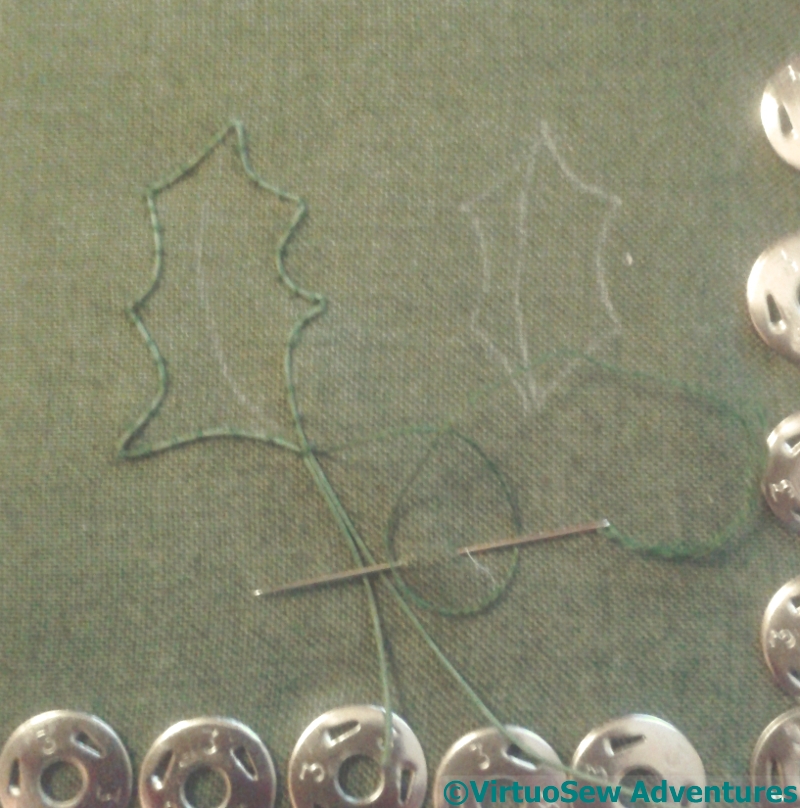
Starting The Wired Leaves
Silk shading is something I know I should work at, but would be most unlikely to choose to do, because the naturalistic representation it tends to be used for is not really my forte.
All the more reason, of course, to make an attempt, at least, to get to grips with it, but I haven’t been able to convince myself to do so!
Beginning The Split Stitch
That said, Masako Newton‘s Silk Shading and Stumpwork Robin and Holly is really very sweet indeed, and I am sure I will enjoy working it.
Furthermore, unlike the Jane Rainbow kit my parents gave me for Christmas twenty years ago, there’s no chance of this one being finished quickly.
I will certainly learn a great deal from doing the Robin, and he is going to be classed as one of my New projects for 6 and 6 in 2018.
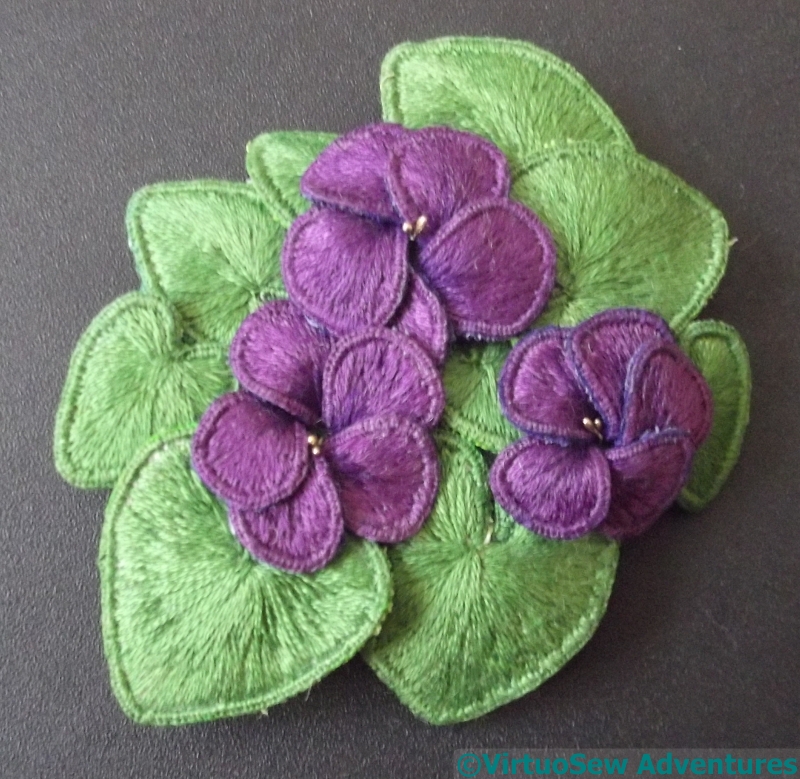
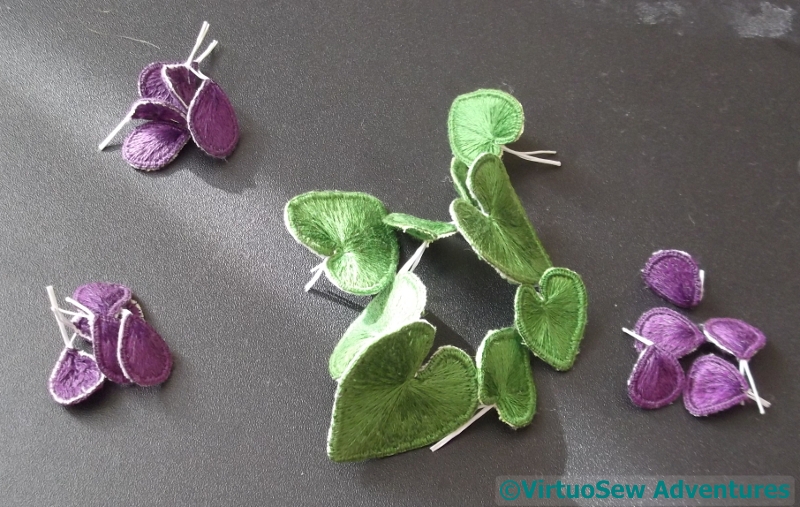
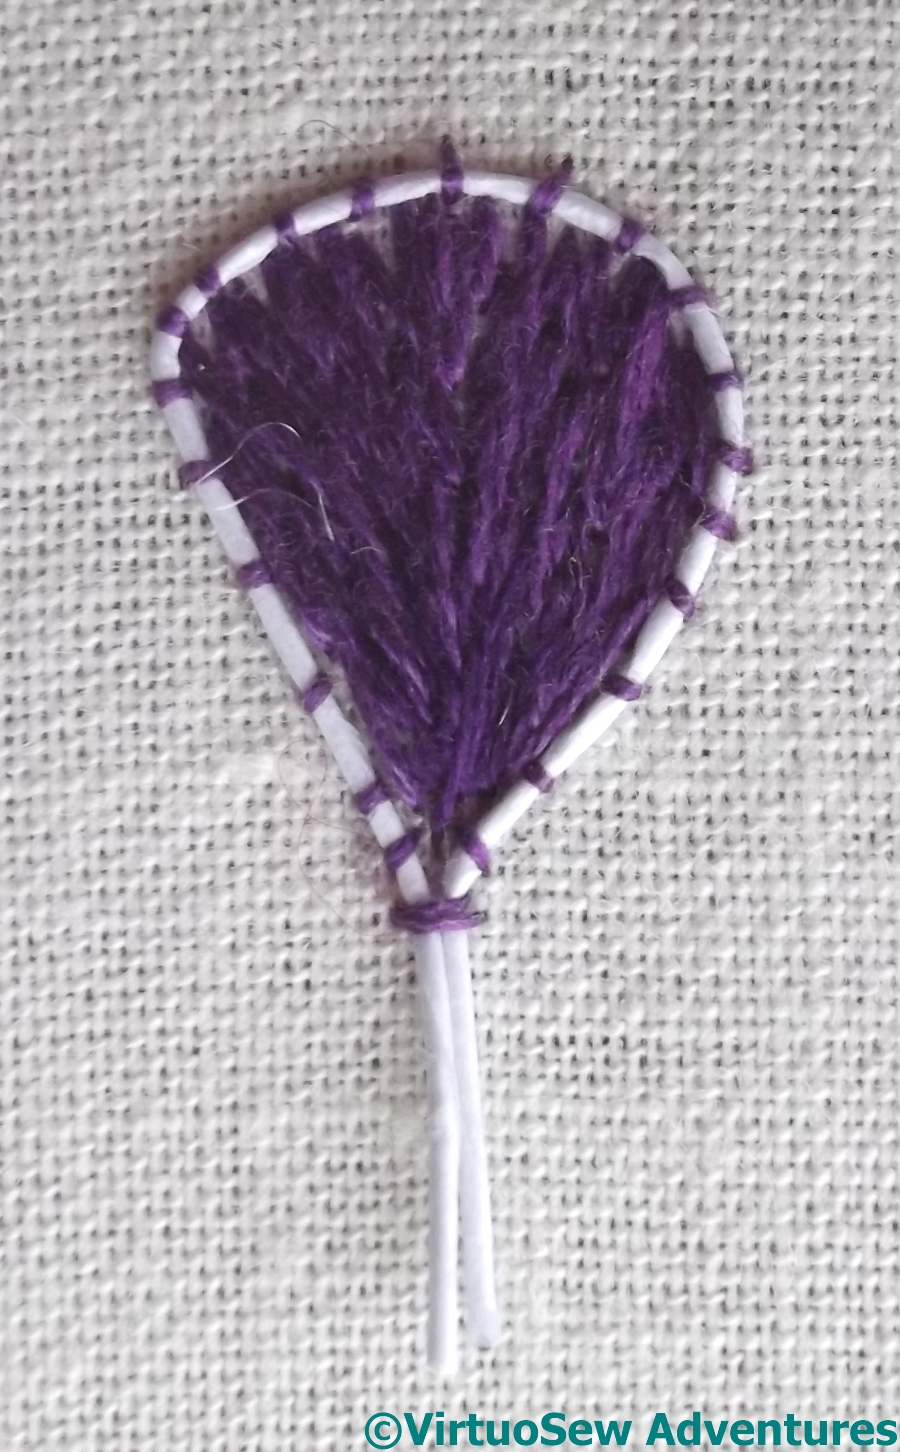
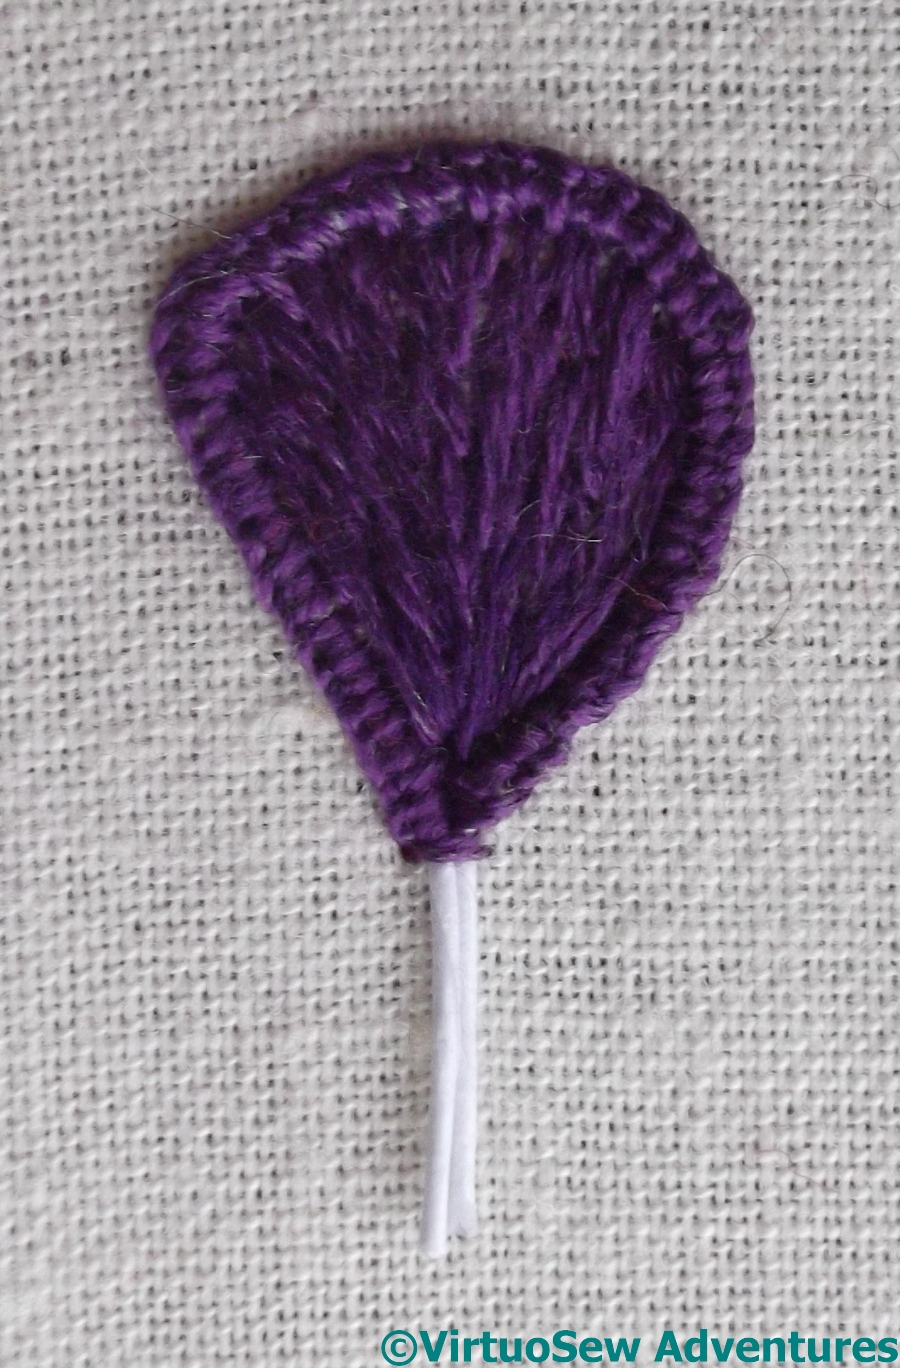
The Stumpwork Violets Finally Planted
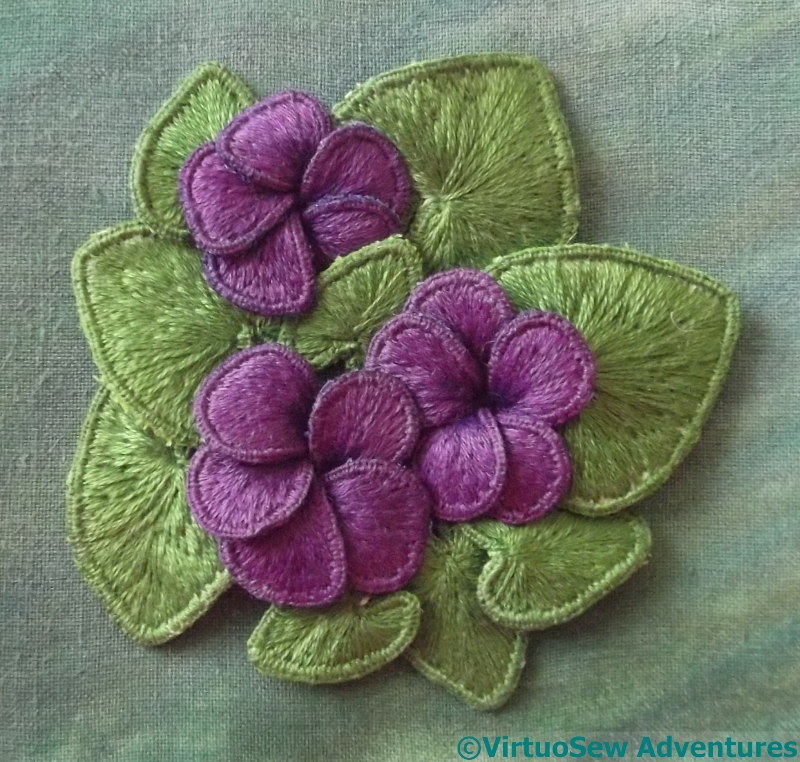
Assembled Violets
I wouldn’t care to do much real hand embroidery on a fabric “doped” (after the fashion of early aeroplane wings!), with the mixture of inktense and aloe gel. Once it had dried, the calico had something of the texture of a cheap printed furnishing fabric, and did not recover well from having holes poked in it. I suspect it would prove rather abrasive on more delicate threads, but in this case I was simply using stranded cotton.
And there were many holes poked in it – one for each of the elements. I turned back one of the two wires at the base of each, to help to support the curves I was trying to set into them, using the wires around the edge. The other wire I poked through a hole which was in turn poked through the fabric using a stiletto. Bending that wire back on itself should have kept the elements in the place, but as with all of my embroidery adventures – it wasn’t quite that easy!
Cut And Padded
When I fished out the packet of stamens from my second Frostings Box, I found that there were three strands of each of three types, and picked the most delicate gold ones, so as not to overpower the flowers. So that worked out nicely – one strand for each flower! – and caused three more holes in the calico..
The elements were still wriggling a bit, though, so I decided to put some padding behind the clump to help to entrap the wires, and also to enhance the domed effect that I was hoping for. That meant that it made sense to trim the padding and enclose it with the calico, creating a single, “free-standing” clump of violets. The elements are held in place with minimal stitching, the curves nestling together, and the wires and threads entrapped in the padding. It wouldn’t stand up to much handling, but then it won’t get any!

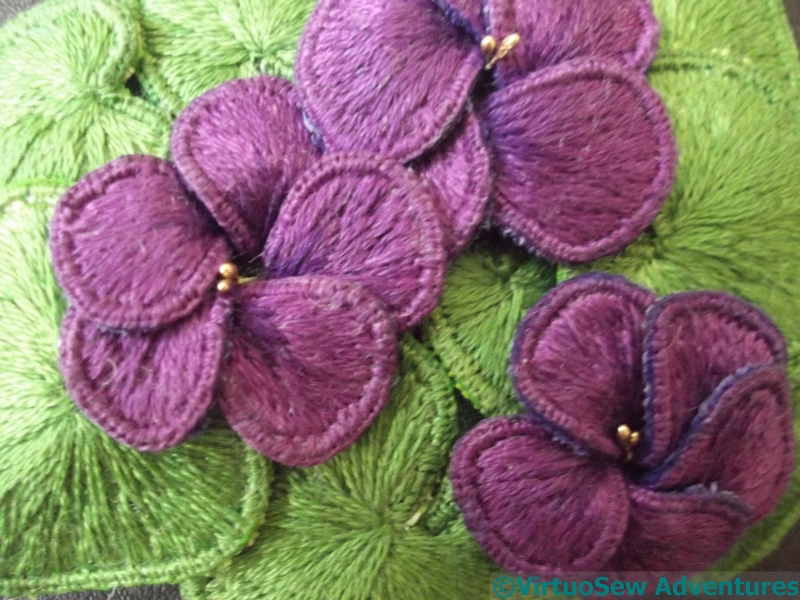
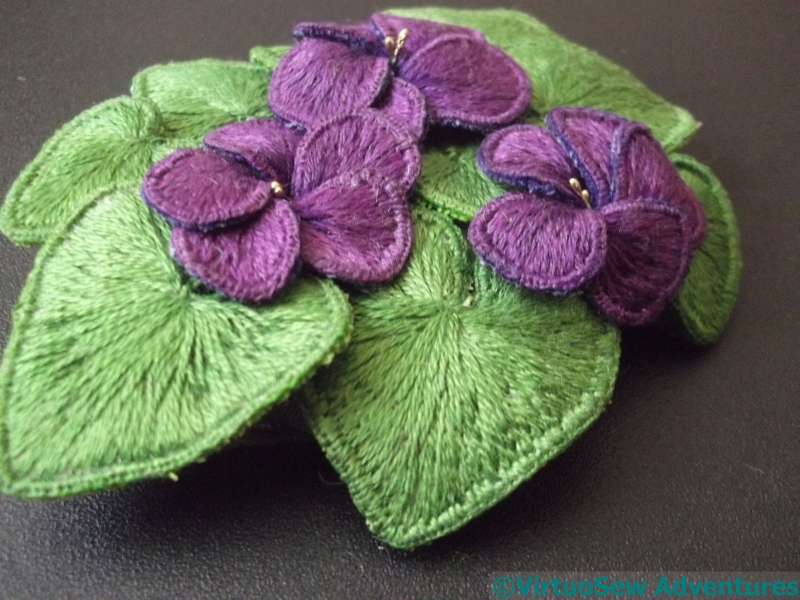
Click on the pictures to see them at full size – I think they give a good sense of the dimension and “loft” I managed to achieve.
Can you tell that I’m rather pleased with my violets?
Returning to the Stumpwork Violets
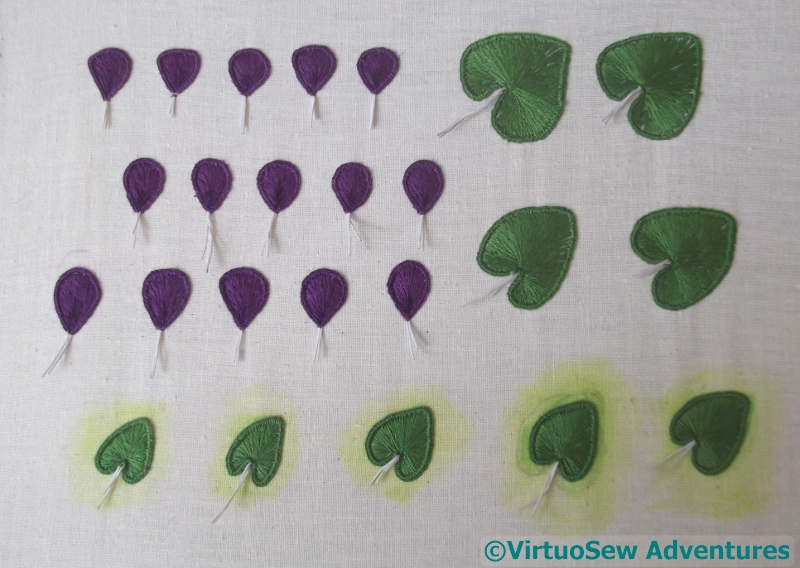
Array Of Petals And Leaves
I finally gave myself the necessary encouragement to get back to the Stumpwork Violets.
Er, that is to say, I spoke to myself very severely, and pointed out that it was looming over me and needed dealing with!
I used my new Inktense blocks to experiment with colouring the base fabric on the last few leaves, painting over the top with the aloe vera gel suggested by Deanna over at Eclectic Meanderings as a substitute for textile medium.
Background Inktense
I also used the aloe gel on the spare piece of calico I painted as a background for the clump of violets. I don’t intend any of this to be visible. It will just provide some dark green depths underneath the clump, rather than leaving me worrying that the fabric underneath might grin through if the leaves move. As with the clothing on Loading The Felucca, I don’t want to stitch everything down too much, so this will relieve a certain anxiety.
In this context, the effect of painting over the marks with the aloe gel, deadening the marks and blending the colours, is not a problem. I’m not keen on the overly blended effect with ordinary pastels, as it looks a little mannered, but as all I want is that a sense of depth behind the violets, I’m content. Given how much dust those few strokes created, I certainly would not want to have an un-fixed piece of fabric anywhere near the finished Dreams of Amarna panels!
Elements Cut Out
While the aloe-and-inktense blend was drying, I tackled cutting out the elements of the stumpwork.
In spite of all my care – and they do look lovely in the sunlight, don’t they! – I ended up with little white edges on all the pieces.
So, out came the inktense blocks and the aloe gel again, and I spent some time colouring the little white edges and then painting gel on them.
I wonder whether I might be avoiding the assembly process…?
Banafsiga – Violets
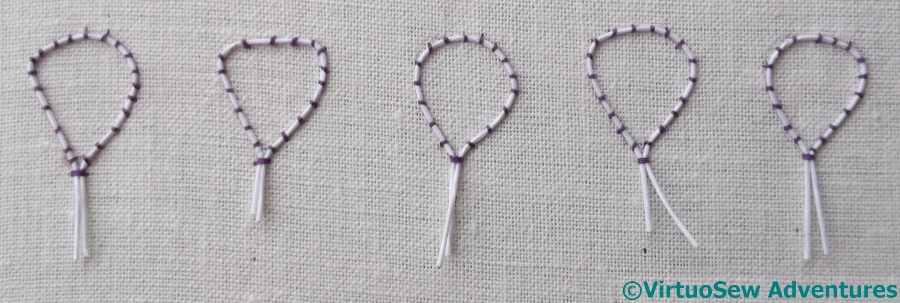
First Petals Wired
In her book, Mary Chubb describes the sort of frustrating experience that many language learners will recognise, in which a word completely useless for present practical purposes somehow sticks in the mind, while the immediately useful and necessary words just don’t. In her case, she says that while the Arabic word for “bread” required constant effort to remember, for some reason the word for “violet”, transliterated in her book as “banafsiga”, in her words “perched, fragrantly and effortlessly in my brain from the start“.
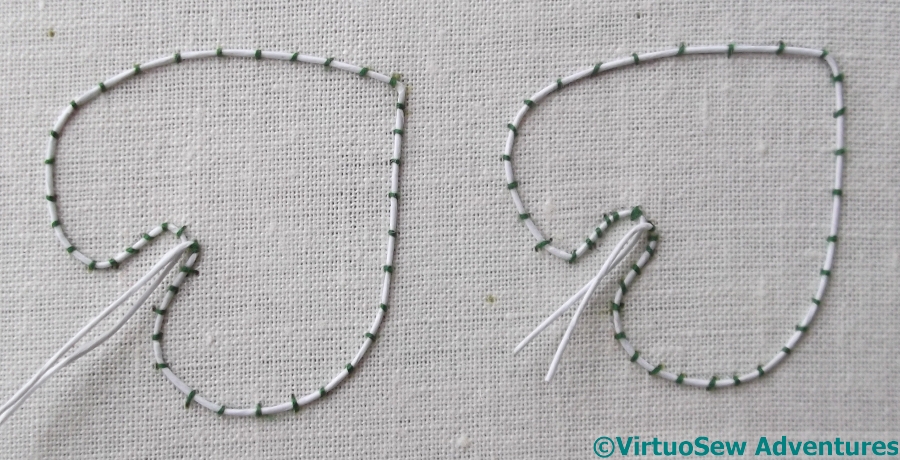
First Leaves Wired
Naturally, I’m going to have to do some violets to represent the experience, and I’ve decided to do them in stumpwork. I’ve done a little raised embroidery – I suppose those fellows Loading The Felucca count, and there’s always the Kiwi – but wired stumpwork is new. I won’t claim to be approaching it full of trepidation, because no-one would believe me, but I certainly have no idea which bits I will find easy and which I will find hard.
First Filled Petal
Actually, as it turned out, the first difficulty lay in working out what a violet should look like. I wanted the simple, old-fashioned violets that Mary, brought up in the early twentieth century, might have known, and my image sources online kept on introducing African Violets, which apparently aren’t the same thing at all.
In the end, following a suggestion from a Twitter friend, I went rummaging on the RHS website, and found a complete rundown on viola odorata, which told me it has five petals, heart-shaped leaves, and is “mat-forming”, which I take to mean it spreads out rather than up. I don’t know how many flowers or leaves my bunch will have in it, so I’m expecting to do more than I need and pick the best.
Edge Covered
I’m using ordinary stranded cotton on this occasion (“Gosh“, I hear you cry, “What happened to all the eccentric yarns you use?“, to which I reply, “There’s paper-covered wire in there – what more do you want?“), and in this first flower, I’m going to use two strands for the embroidery. If I think it looks a bit chunky, I can always move on to single strand for subsequent flowers.
Thus far, I’m rather enjoying it. I may yet move on from these violets to the wired needlelace rose I saw in a Needlecraft magazine twenty-five years ago, and never got around to…
The Camberwell Panel – Eight
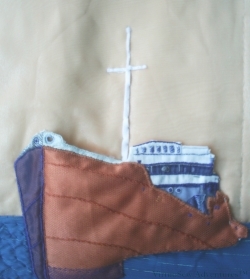
Stepping the Mast
While I was attaching the hull, I was also looking at my references on Stumpwork, or Raised Work. The headache that had been looming all the way through to this point was, How Shall I Do The Mast?
I tried to cover straws with thread or find narrow pieces of plastic or wood, and all of the attempts looked clunky and un-seaman-like. I thought about trying to use stitching – either satin stitch or lines of stem stitching, but in the end decided that these elements needed to be smooth and relatively featureless, whereas the stitching in the piece is entirely to create detail. When I thought a bit harder, it seemed to me that the mast and spar weren’t mere “details” and that there would be a rather jarring effect if I created them using a “detail” technique, rather as though they’d been magnified, or something like that.
In the end I decided to continue using only fabric in the piece. This meant a slightly more difficult process, as the mast and spar are narrow and need to be rounded, but it also maintains the integrity of the design as a purely fabric appliqué.
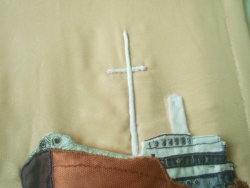
Mast Close Up
So: the mast and spar were padded with slivers of felt and covered with narrow cotton tape. This made the ends slightly tricky (the tape kept trying to fray), but provided a clean edge on either side of the spars.
I also attached the padding for the funnel to the background. Both of these needed to be attached before the entire slip for the hull and superstructure were entirely caught down, but at the same time I couldn’t be sure of the placements (wretched shrinkage!) until I had the slip in place.
Trying Stumpwork
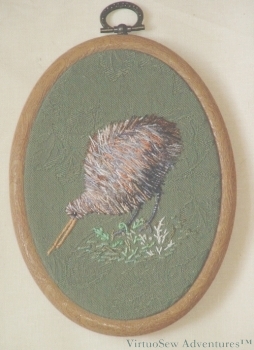
Kiwi In Stumpwork
As I’ve already mentioned, almost every embroidery technique I have done has been learnt from a book, or just developed by guesswork based upon something I have read.
In this case, I had been reading about 17th Century stumpwork, and had just returned from a half-business trip, half-holiday in New Zealand. And I had some rather gorgeous overdyed silk threads and wanted to experiment with them!
The body is worked in layers of straight stitches, using several different colours of the overdyed silks. I worked a slip, slightly smaller than the body, on a separate piece of fabric, then applied that piece over some padding, and used more straight stitches to cover the join – very thoroughly!
The legs and the beak are both worked by stitching very closely over a trailing thread of soft cotton. The background fabric is a sturdy cotton damask upholstery fabric, so the close stitchery did no harm. The ground is worked using still more straight stitches, with scroll stitch, coral stitch and fern stitch to create the fragmentary undergrowth.
This was intended just as a piece of fun, but I was happy enough with the outcome to mount it in a flexihoop frame. I’ve bought a couple of books on Stumpwork since I stitched this, but I don’t know that I would have thought of doing the Kiwi this way if I had read the books first.