
Tag: stitches
Grape Hyacinths, 2
Having completed all the greenery and removed the satin stitch flowers, I had to put new flowers in. Naturally, that didn’t happen first time, either!
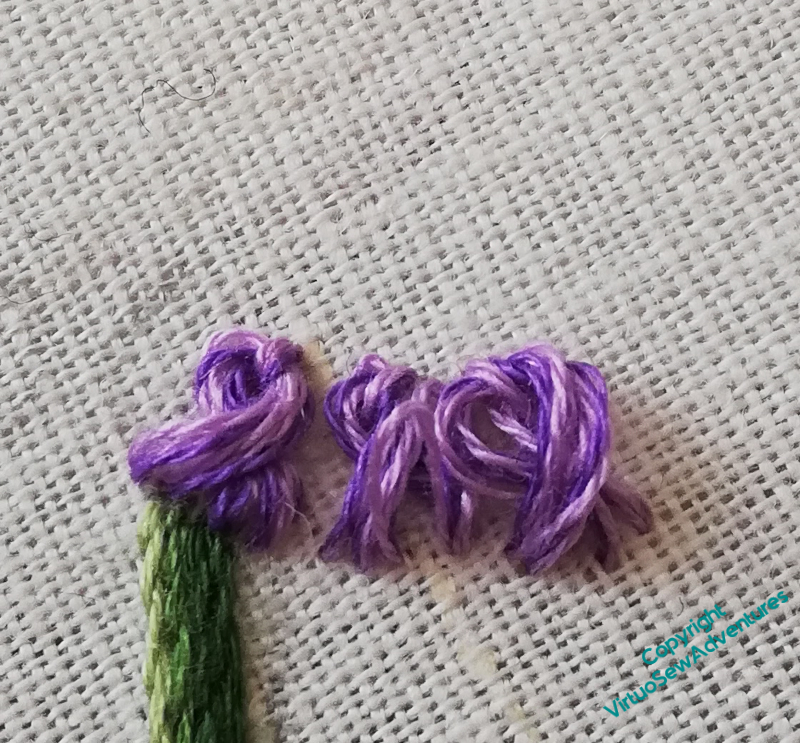
This was my first attempt at the individual flowers on the grape hyacinth flower heads – twisted chain stitches using several different coloured strands of stranded cotton.
I wanted to try something raised, to contrast with the flatness of the stems and leaves, but this, slightly full, version of twisted chain hasn’t really worked. It looks far too heavy for a spring flower!
Out it came, and I tried again.
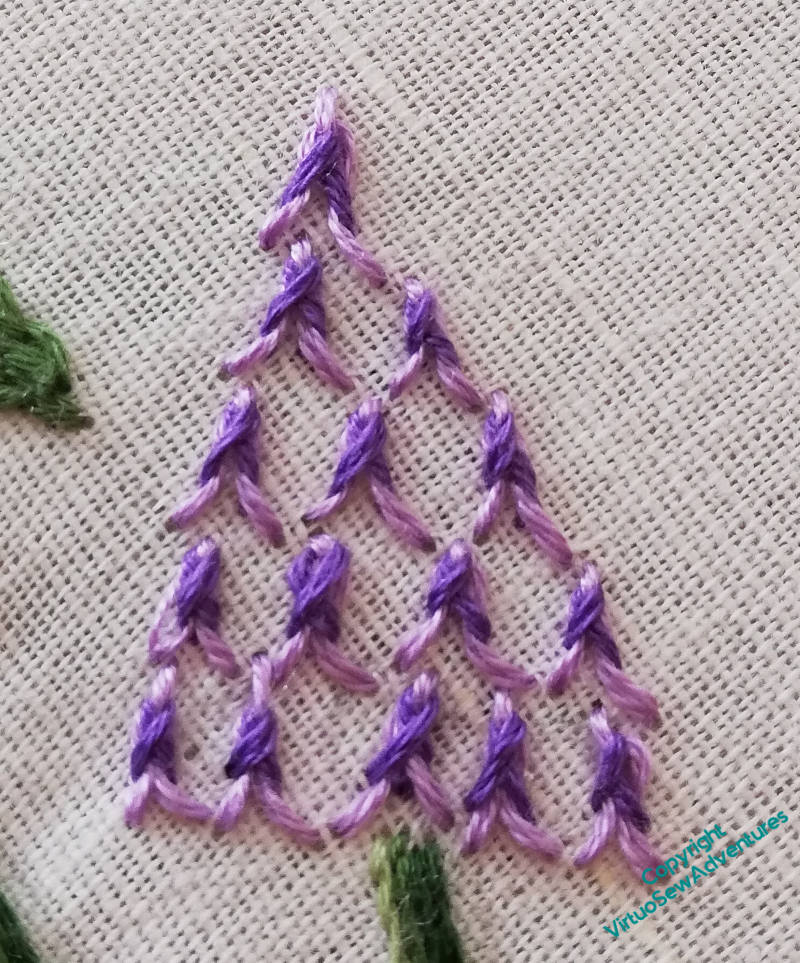
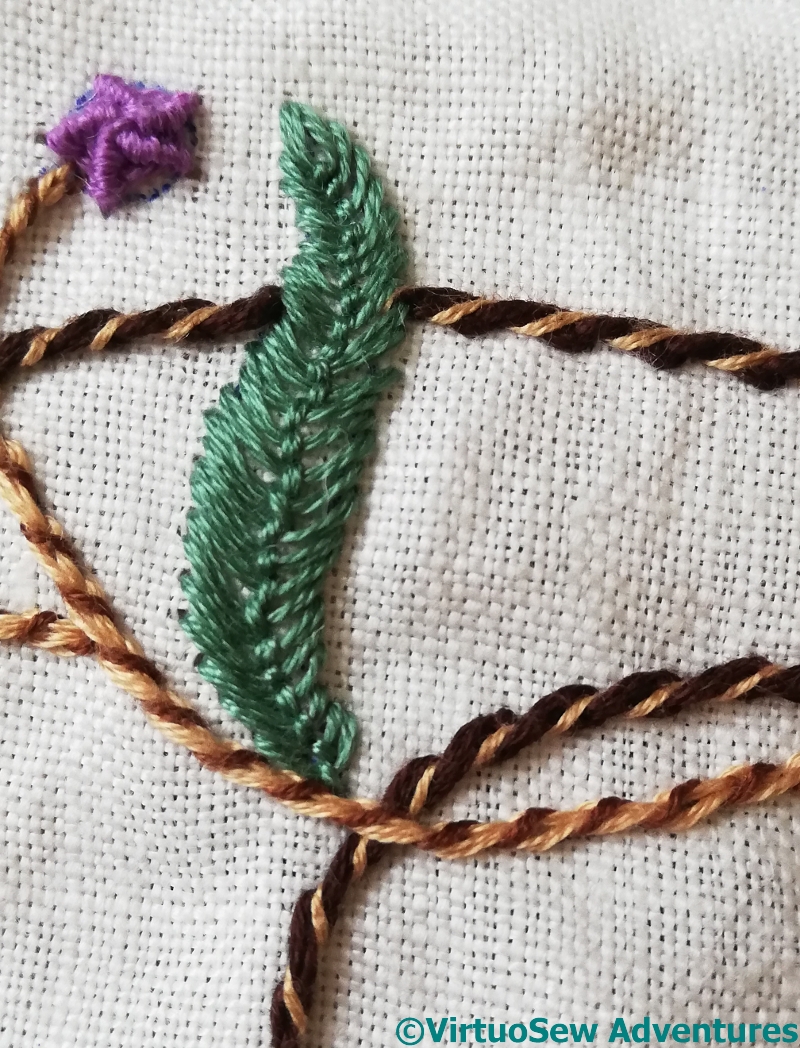
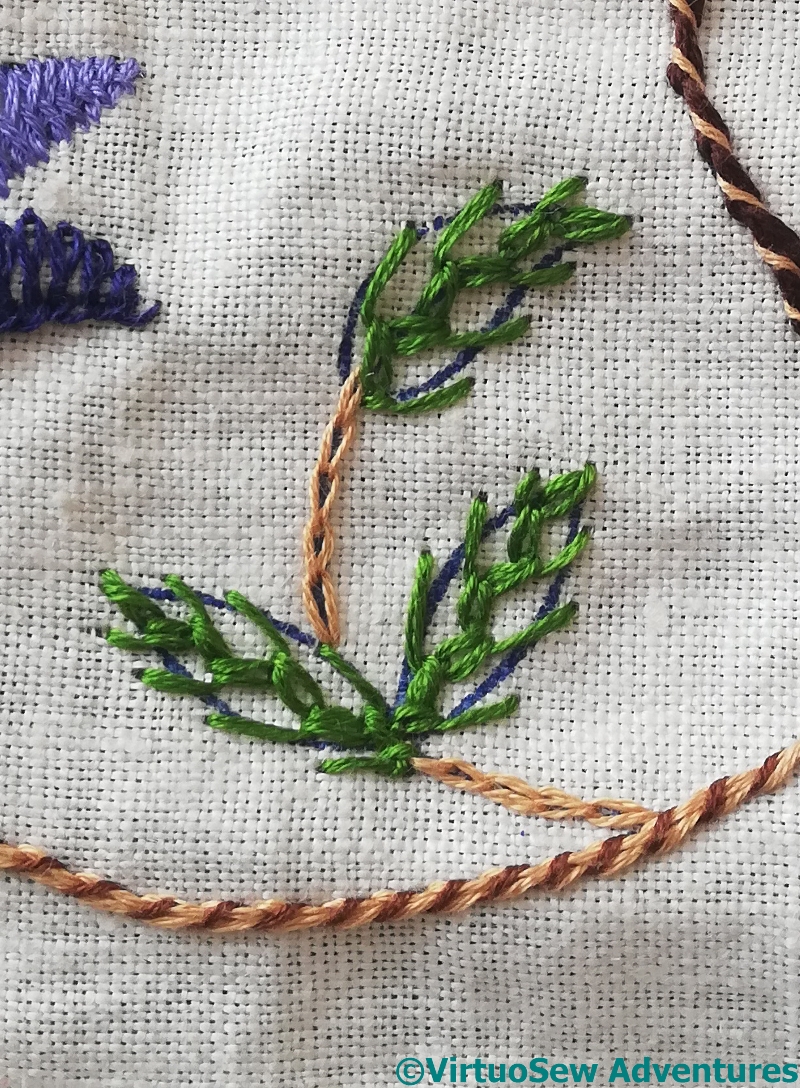
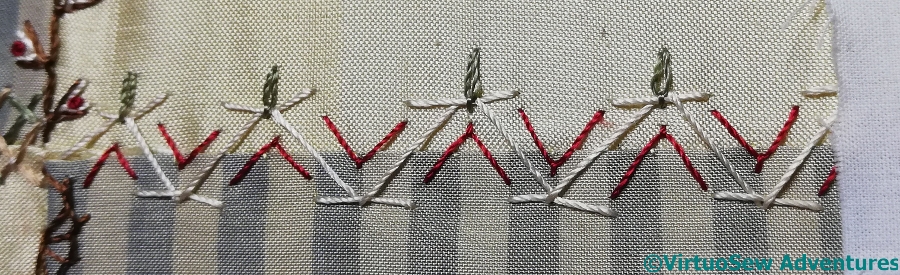
And for my second try, I may have invented another stitch. Again!
This is Fly Stitch topped with Twisted Chain Stitch. What I wanted to achieve was the slight sense of a ruffled skirt at the bottom of the individual bells, and this certainly works well enough for me to keep going, using this stitch, at least until I have a better idea!
All that admitted, I felt I’d ended up with too great a space between the stitches, and of course, I don’t want to try to fit more in, in case I lose the ruffles (as it were!). So I have filled in the gaps with single detached chain stitches.
Of course, I may yet come back and do somethign entirely different. but I decided at this point to leave this in place and continue my experiments!
The next SlowTV Stitchery is now live. Episode 36 tackles the difficulties of the canvas, Reynard the Fox provides a distraction, and there is some tackling of quandaries by changing tack..
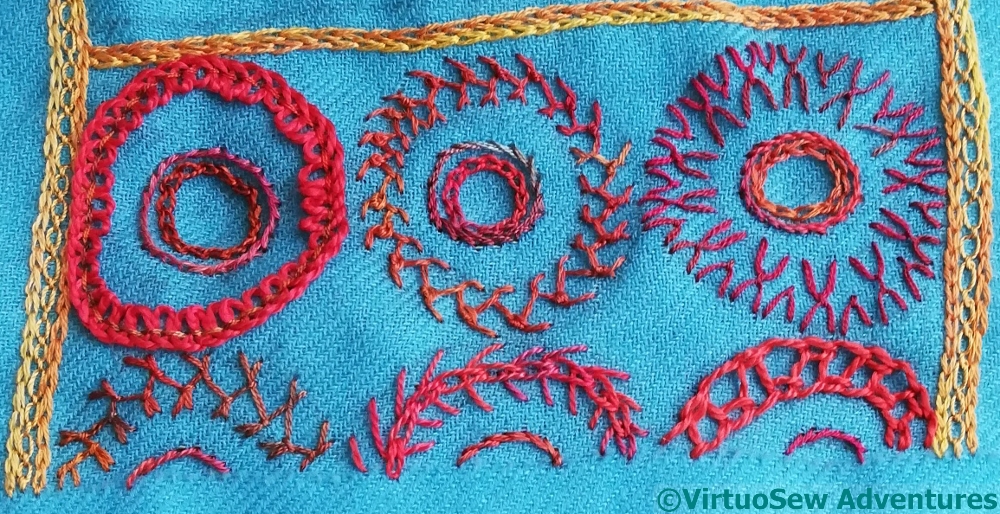
Still more progress on the tablecloth
It’s arguable that I’ve created a sampler rather than a tablecloth, but as I’ve got closer to finishing it and laid it on the floor to look for any missing bits, it’s looking cheerful, and that is really all I ask of it.
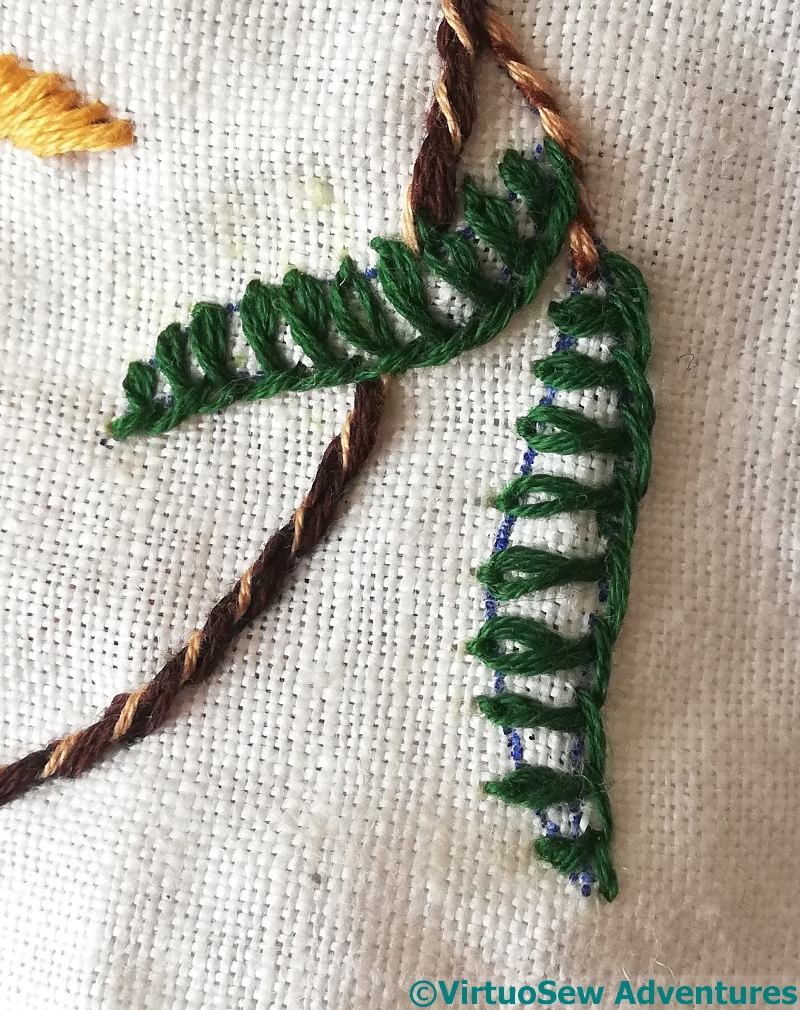
Mountmellick Thorn Stitch is an old friend, strongly textured but contained. It’s not entirely straightforward to shape it to the leaf shape of the design, but I think it works rather well!
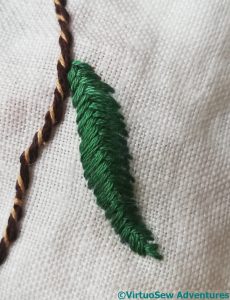
Nested Fly Stitch is another old friend, although one I’m not on such good terms with as some others. In the dim and distant past I worked two 2-foot high trees in Nested Fly Stitch (on the Persian Fantasy Screen) and they drove me nearly demented! However, it does create a solid coverage that isn’t fishbone stitch or satin stitch, and I wanted to make sure that the various leaves varied in coverage and tone. This is the “Heavy” end of the scale!
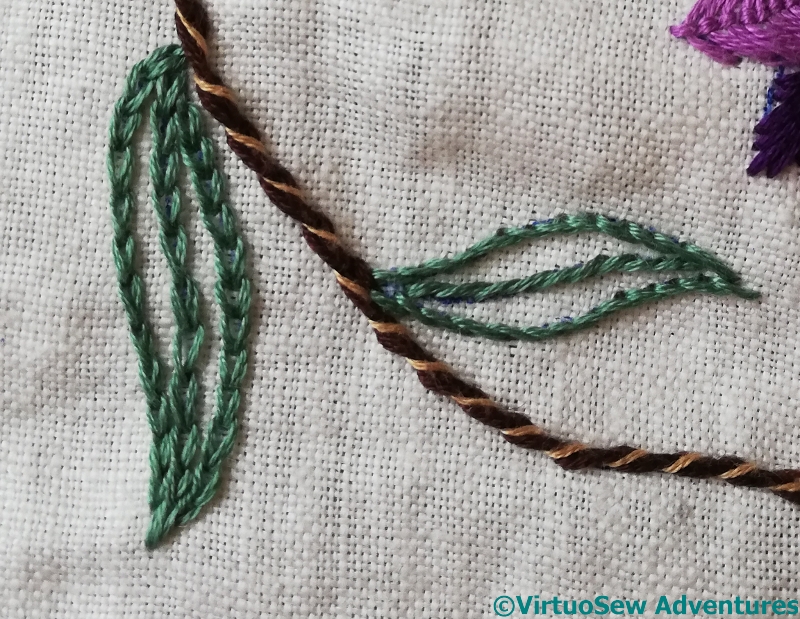
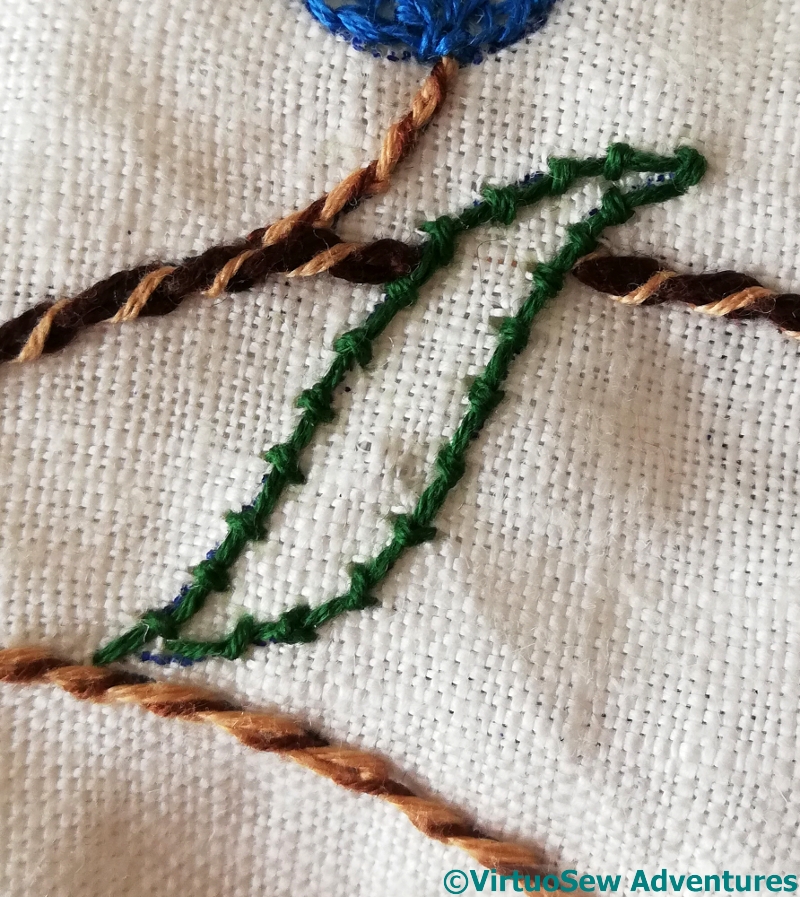
And this is the “Light” end of the scale – just outlines, in stem or chain stitch. These flow beautifully around curves, of course, and are really good for organic shapes, but I do need to remind myself that I don’t have to use obscure stitches all the time, and I’m allowed to choose the obvious ones occasionally!
The next episode – Episode Seventeen – of SlowTVStitchery is now up, and concerns mainly the little girls and some planning of Nefertiti..
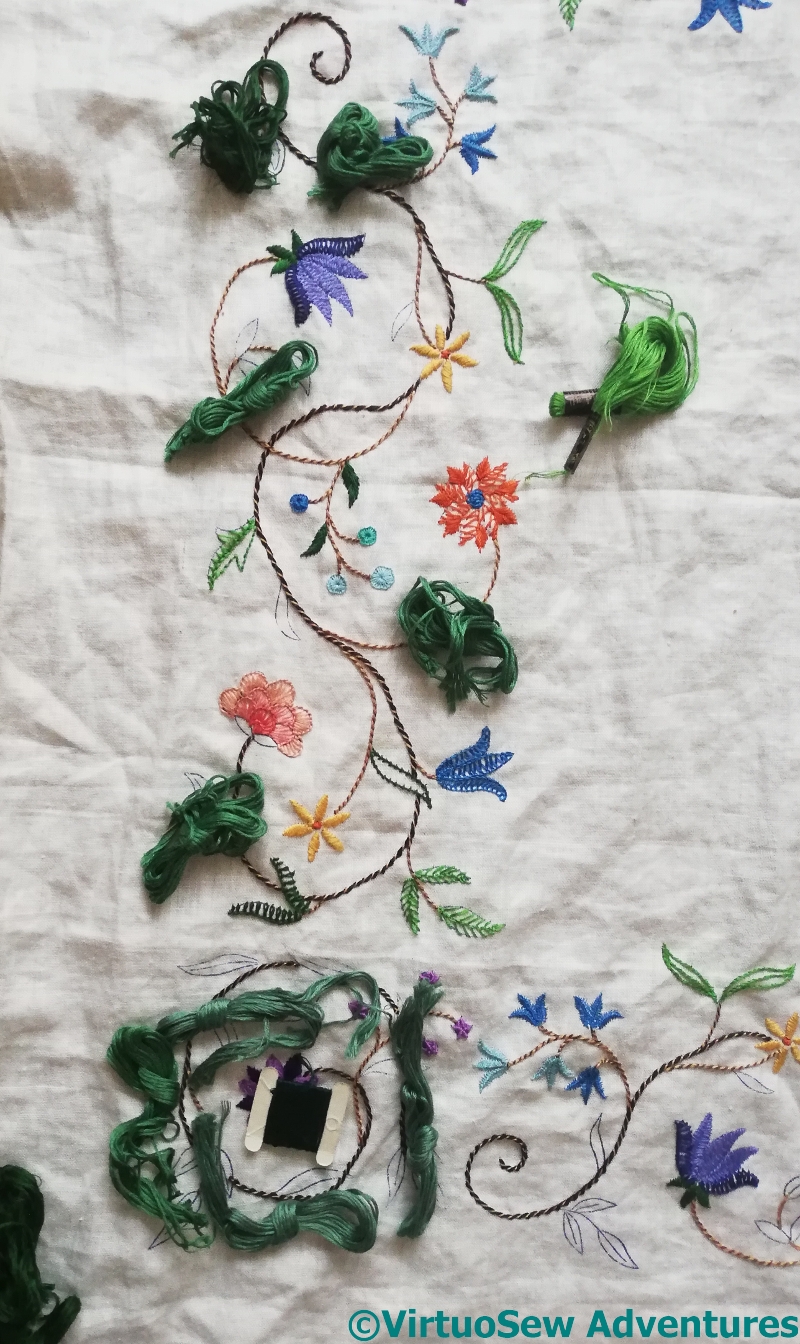
More progress on the tablecloth
Each time I decide how to do a particular element, I do all four appearances. I decided on this very early on, because I knew that working a whole side and then copying it three times would drive me absolutely mad!
Raised fishbone stitch creates a nicely embossed effect, providing a good contrast with all the open stitches I’ve used. It requires a bit of concentration – this is a little raggier than I’d like – but at this point, I want the wretched tablecloth done, so I’m likely to just move on..
I’ve been looking at other embroidery styles of late – one can’t be wallowing in gold all the time, and one of these days I will be able to think of doing something else – and I’ve been reminded of just how effective groupings of blanket stitch or buttonhole stitch can be. This is the simplest variant I could think of, but I must remember that simple stitches like blanket stitch offer endless possibilities for variation..
One of the attractions of surface embroidery is the possibility for stitches to evolve themselves into being. I’m calling this one “Feathered Zig Zag Chain Stitch”. I can’t believe I’ve invented it, but neither can I remember having seen it before, and I think it works rather well. It certainly flowed familiarly off the needle, like an old friend.
The photograph has reminded me, however, that I need to finish whipping my chain stitch stems!
And new in SlowTVStitchery, Episode Thirteen is now up. In which, at long last, a Decision is made….
Progress on a project long in abeyance
You may recall this tablecloth, which I won in a job lot of things in an auction on eBay, a long time ago. I regarded it as my “traveling project” for a while, but didn’t travel much, or when I got there, found I couldn’t settle to it, and it’s been lingering and hanging over my head rather. It may well be that the current situation will give me the opportunity to get it finished. It will make a change from the details of the Amarna Family Group!
So, since I’d forgotten what I’d planned (or if I’d planned!), I laid it out on the floor and played around with skeins of cotton, to see what I could come up with.
The way I’ve worked on the tablecloth is that as I’ve what to do with each motif, I’ve worked each instance, and that way the whole tablecloth advances at once.
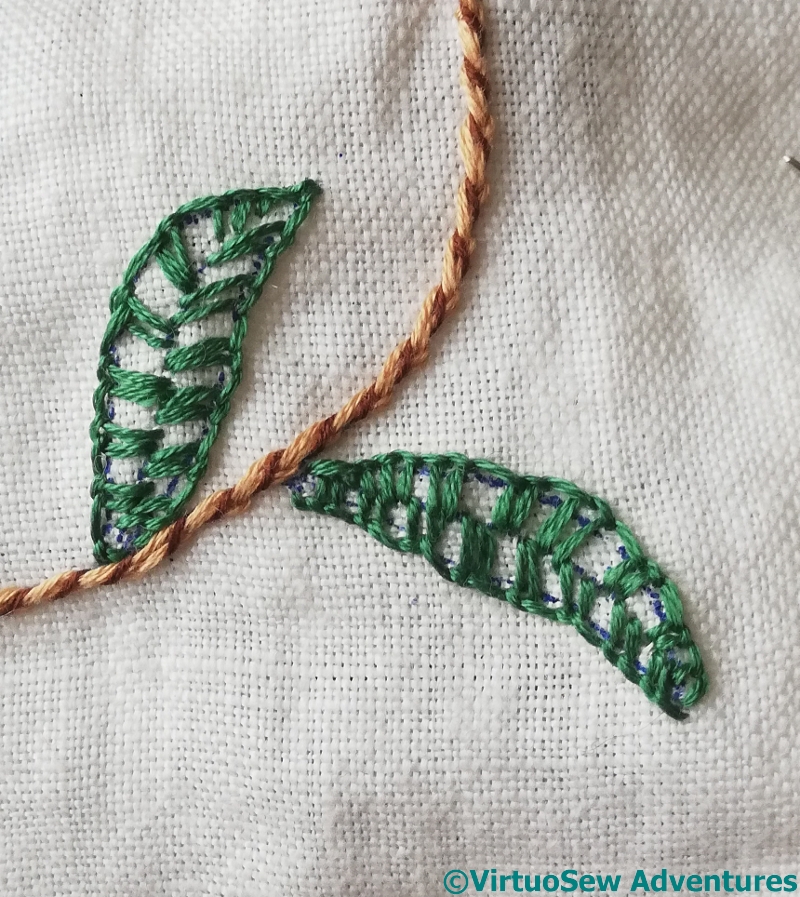
The Basque Stitch of these leaves is rather more spaced out than in the previous appearance of that stitch in the tablecloth – spacing, as well as scale, plays a part in altering the appearance and emphasis of a stitch.
Coral Stitch is nice and simple. Such a nice rest…
Yes, I know the concept of or nué is simple, but the execution isn’t, believe me!
And, speaking of or nué, Episode 12 of SlowTVStitchery is up! Do go and have a quiet half hour with me…
A backing for the Robin (in progress!)
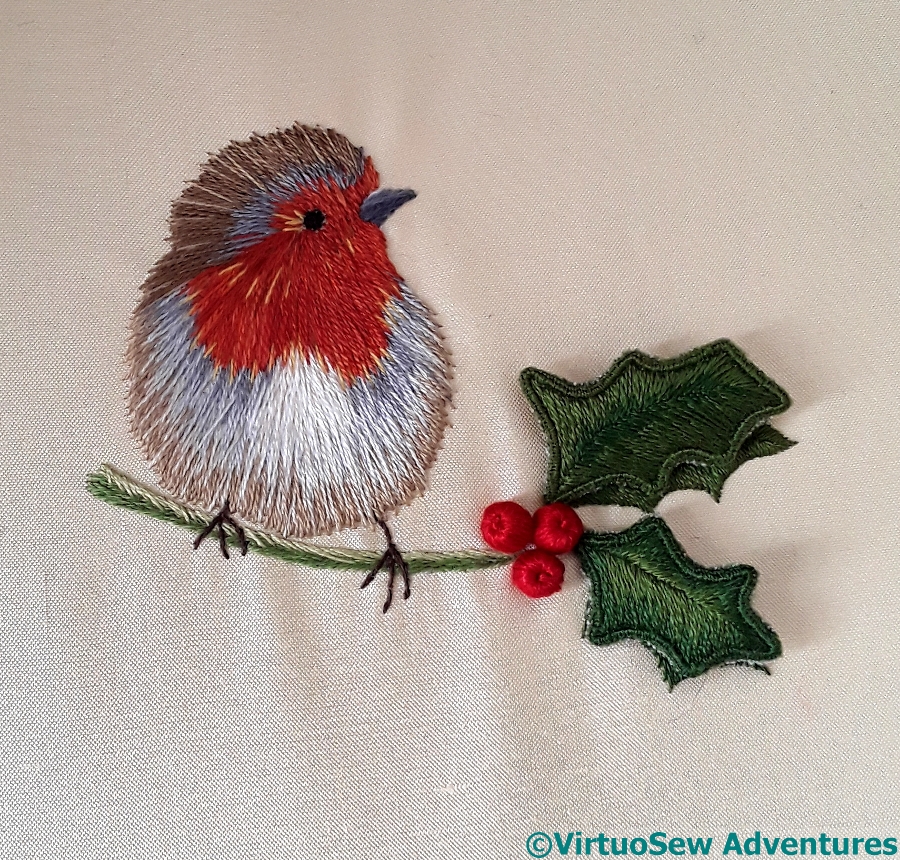
You may vaguely recall the little robin with stumpwork holly that I worked a couple of years ago. I mounted him on a circle of card and then didn’t make any more progress..
But I have now!
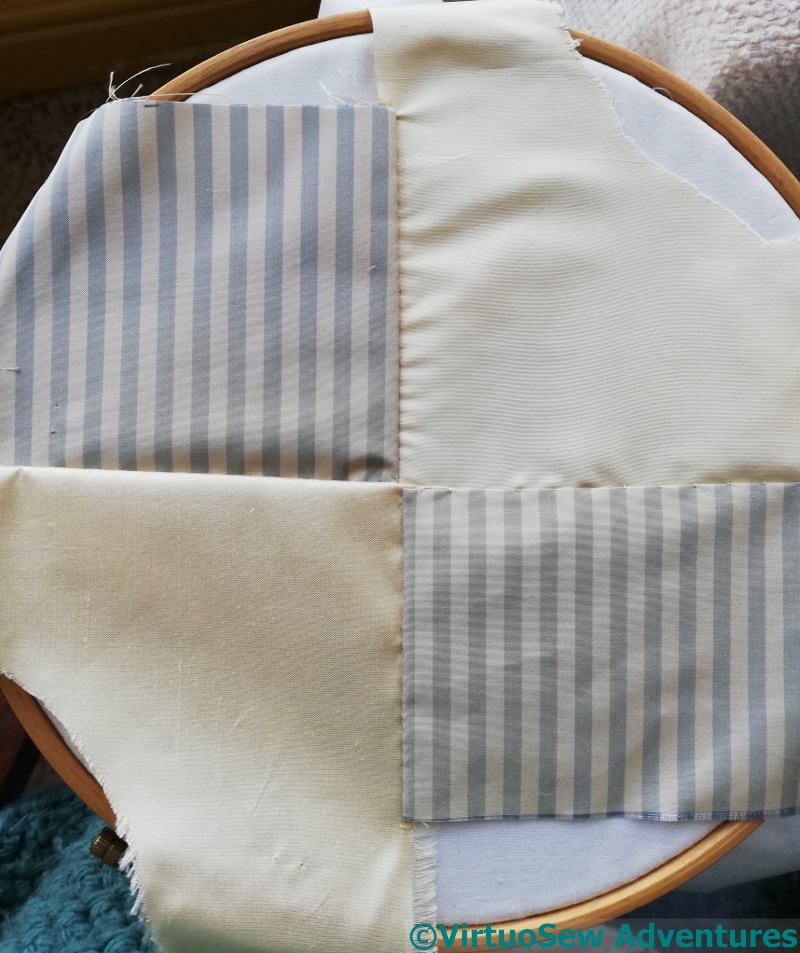
I’m using leftover fragments of silk from various Thistle Threads courses to do a rather tame crazy patchwork circle to cover the padding for the back, and then he can hang or be propped in a corner somewhere, looking cheery. I’ve settled on a simple quadrant arrangement, so I have four seams to deal with.
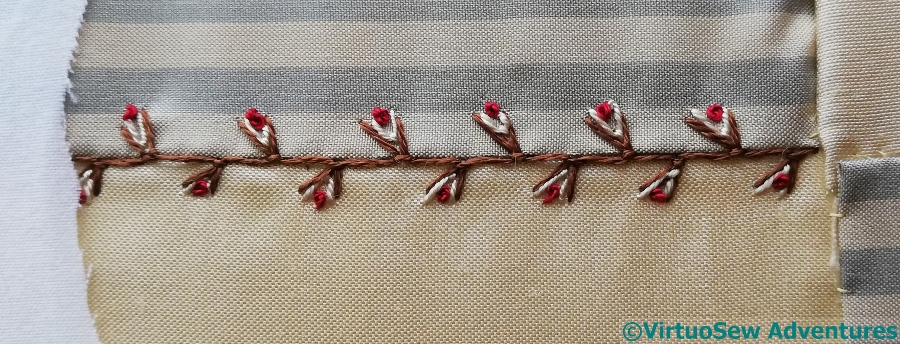
I said, when I found “Floral Feather Stitch” that I’d be using it again, and here it is, tweaked and embellished with a Fly stitch and a French Knot to emphasize the “floral” element. I really like this stitch – a simple, but extremely effective variation. Or maybe a stitcher’s “mash-up”!
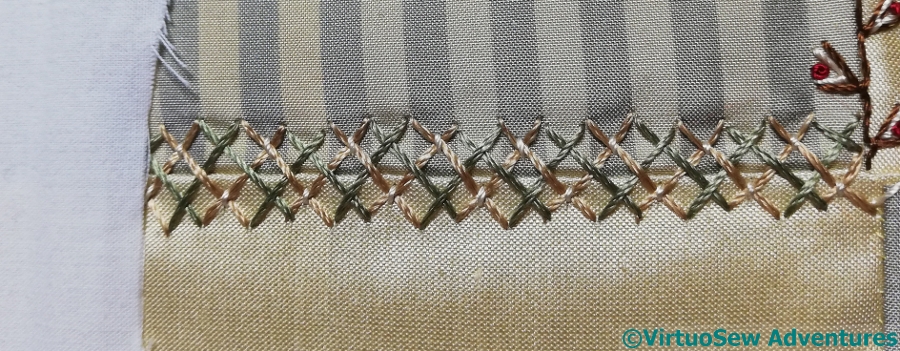
The second uses Interlaced Herringbone Stitch, with the second pass interwoven with the first and then tied down with short straight stitches. This one is maybe a little monolithic, but the first one is so simple, I didn’t want to unbalance the appearance with anything broader.
The third is Chevron Stitch, embellished with alternating Fly Stitches and Detached Chain Stitches on the “top” edge. This one went a little ragged, but I still think it works.
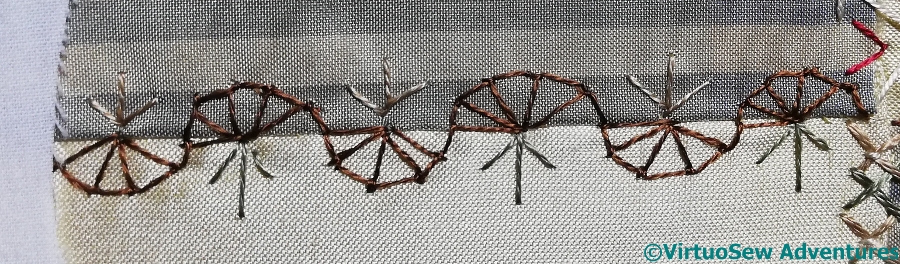
The final one has alternating Half Buttonhole Wheels with Straight Stitches filling the gaps. Again, this could have been expanded and extended, but I thought there was quite enough for the purpose!
Nefertiti Shawl – partial panels
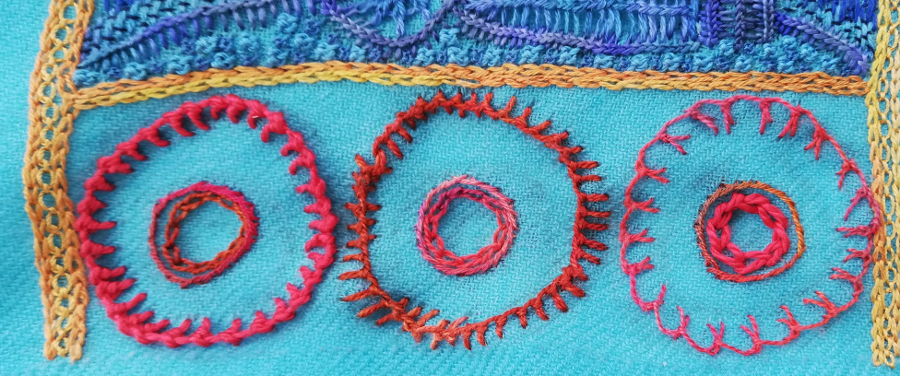
There are partial red panels at the edges of the Shawl, and as I want the colours to run the whole way across, clearly I have to stitch them. While I was mulling over the blue panels and the green ones, I carried on with those partial panels.
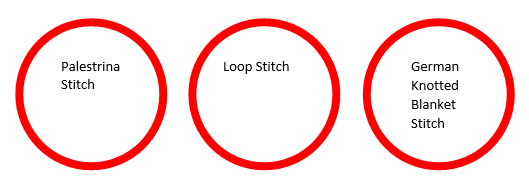
The central circles in all cases are in chain stitch and stem stitch, but I wanted a variety of effects in the main circles. That wasn’t as easy to achieve as you might think, for all my extensive repertoire of stitches! I found “German Knotted Blanket Stitch” in Barbara Snook’s “Embroidery Stitches”, and Palestrina and Loop Stitch are old friends, but by this point I’d managed to rack my brain into remembering most of those..
I was beginning to be at my wits end for stitches, and spent some time rummaging in Edith John’s “Creative Stitches” and “New Stitches for Embroidery”. Many of them would be easier in a slightly stiffer thread at a slightly larger scale, so I find myself wondering what Miss John devised her stitches for.
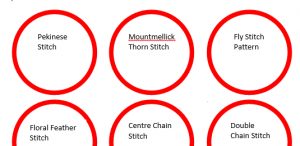
The full circles here are in stitches which are old friends, but the partial circles are some of hers. Floral Feather is a feather stitch with an upside down blanket stitch beside it, and I quite fell in love with it. I’ll be looking for another opportunity to use that one!.
Centre Chain stitch alternates single chain with fly stitch, starting each chain stitch within the previous one. That might be a way to vary textures with Wheatear Stitch, while still keeping the overall pattern. And Double Chain Stitch places a chain stitch and an open chain stitch side by side, alternating the ordering to create a checked effect.
Same design, different stitches
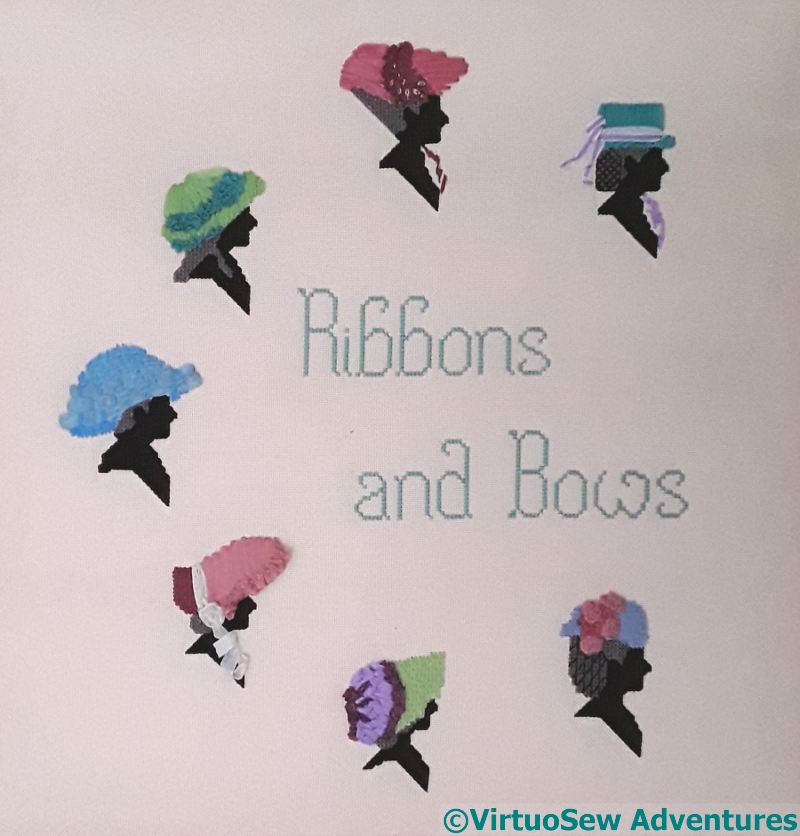
Ribbons And Bows
I’ve been rummaging in a variety of boxes, because with “Leaving the Tyne, 1915” finished and on display, and two “Dreams of Amarna” pieces in a good state, I feel as though I have a bit of mental space and time to consider, not just the progress on the Dreams of Amarna, but also any other half-thought-through bits and pieces I may find.
I’m not sure whether that is going to be true, but I live in hope! These “bits and pieces” are particularly obscure and particularly hard to find something to do with.
Amy
These two Lovely Ladies were part of an exploration of stitch ideas and silhouettes, originally with the idea that they might become teaching pieces. They originate with a sampler of cross stitch and ribbonwork silhouettes I devised in “DevaStitch Designs” days.
When I thought of teaching, I extended the idea by enlarging the heads, and playing with stitchery to replace the ribbonwork. However, I’m not much of a teacher at the best of times, and when I asked a few people, I was told that the second version, with silk georgette layered to create the impression of the silhouette, would be daunting for beginners, and uninteresting for improvers.
Ouch.
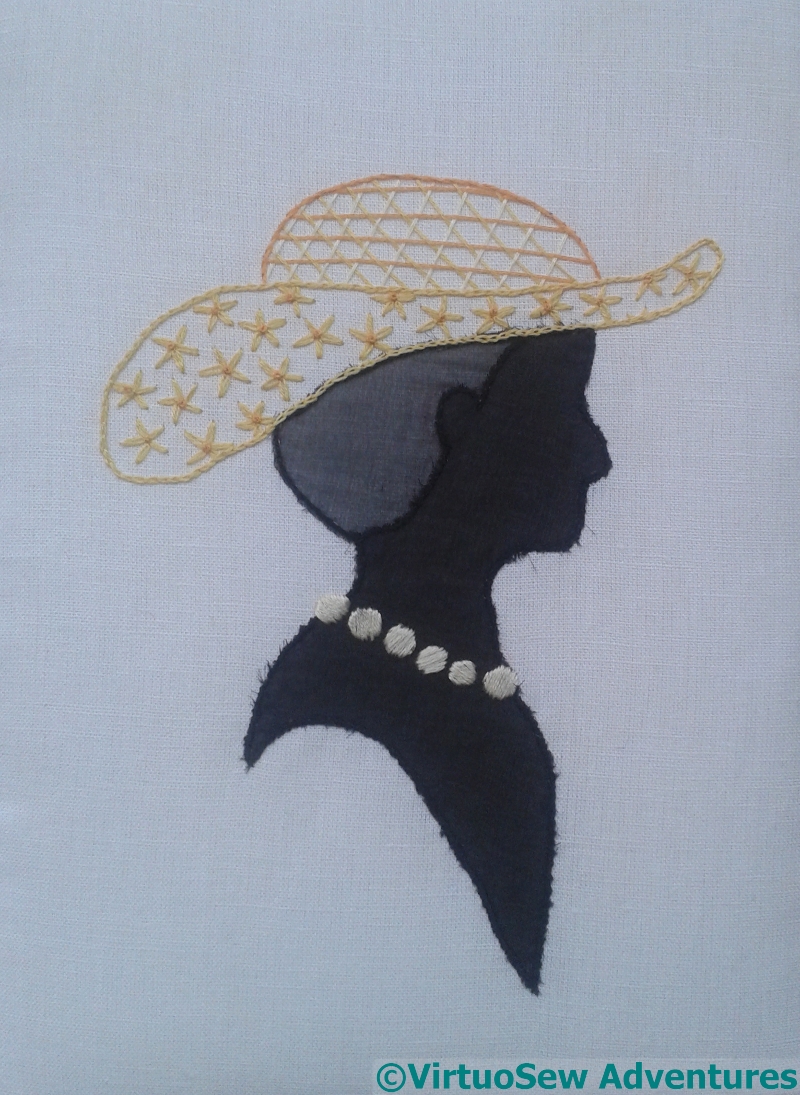
Annis
So I’m still trying to work out what to do with them. I rather enjoyed doing the silk georgette (it’s held down with back stitch, then chain stitch, and then satin stitched over the top!), and it certainly makes the bead necklace stand out nicely. The two parts of the hat provide clear, distinct shapes to outline and fill with stitched patterns.
I still have some ideas for a lady in the cloche hat that I’m dying to put into action, but at the moment I have no good excuse to do so!
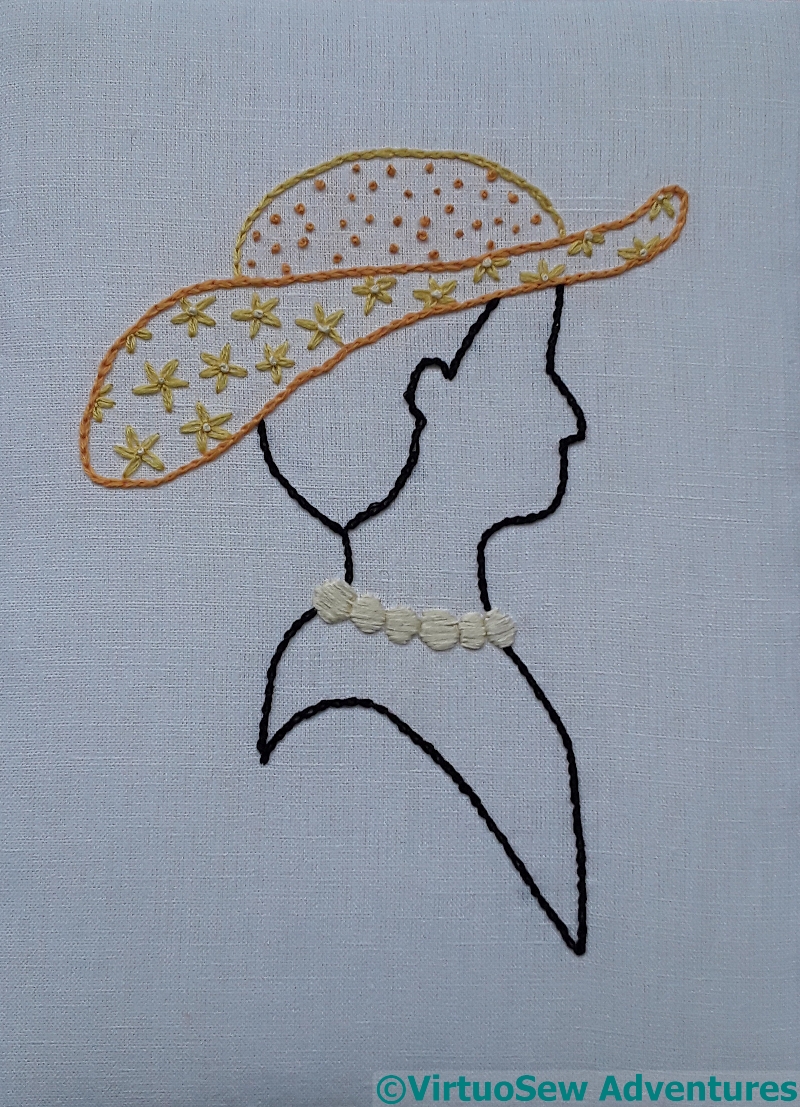
From Watercolour to Embroidery
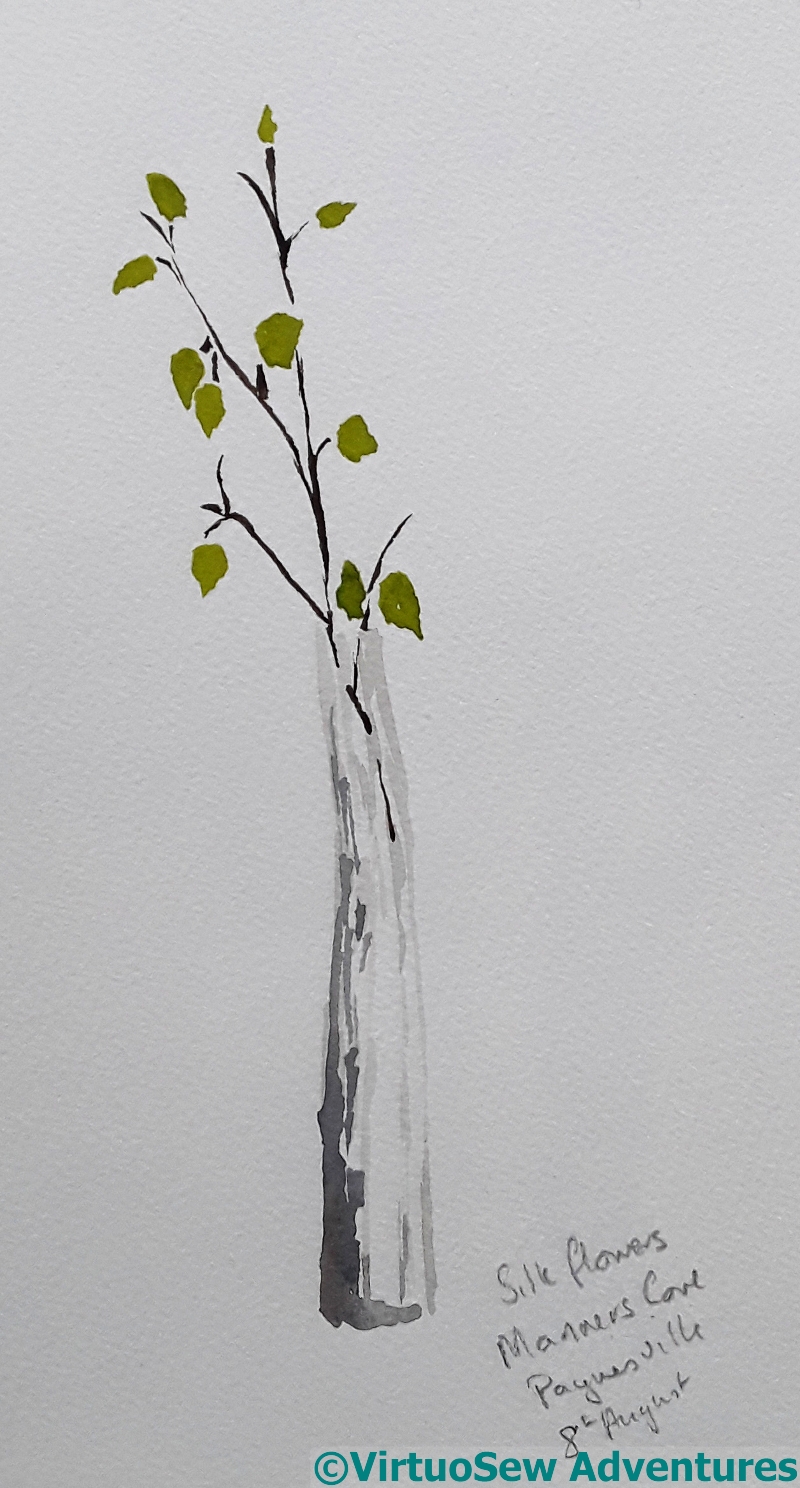
Watercolour : Silk Flowers at Paynesville
This vase of flowers was on the table in a motel room we stayed in, many years ago. For some reason they caught my eye, and for our whole stay – which was full of activity and outings – I wanted to paint them. But we were never in the room for long enough during the daytime.
Finally, on the morning we were going to leave, I got out my paints, sat down, stared very hard, and painted this. I’ve noticed that if I really want to paint something, it often works much better than paintings I’ve done because I want to practise painting.
I don’t think I even bothered to take a photograph. Everything I wanted to remember about the vase is in the painting.
When we got home, however, it seemed to me that the painting offered possibilities as the basis for a simple embroidery.
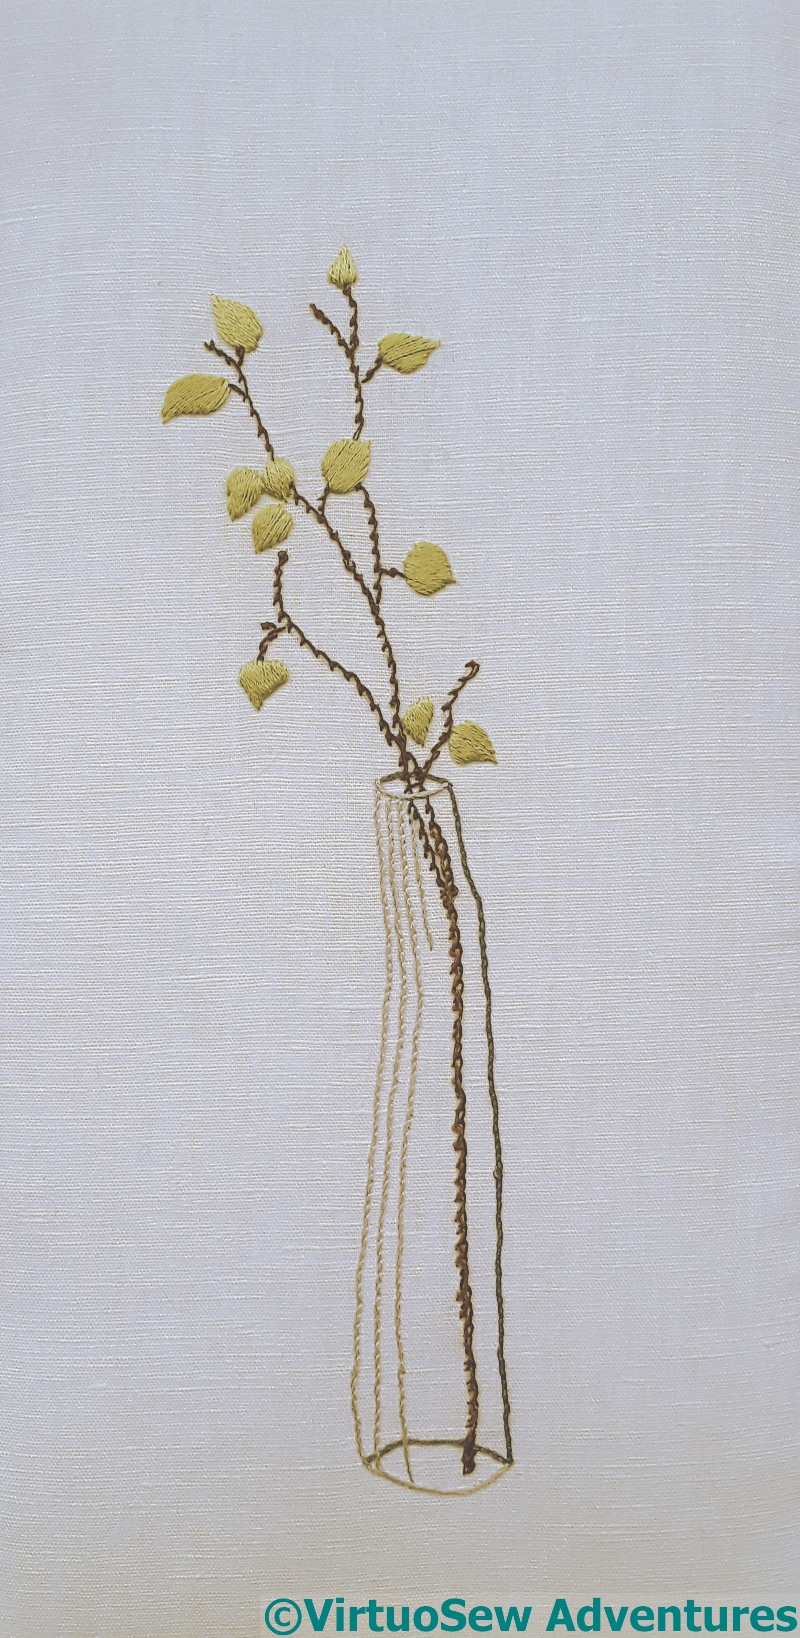
Embroidery based on the watercolour
A very simple embroidery, but, as you see, making use of a variety of stitches.
The vase was textured glass, not clear, and I represented that using lines of coral stitch among the stem stitch. I didn’t work it more densely, because I wanted it to have a certain lightness of touch.
The twigs were very rough and twiggy, so I used scroll stitch.
Finally, the simple shapes of the flowers were best represented using my neatest and most careful satin stitch. All I really wanted from them was the colour.
I haven’t the vaguest idea what to do with the embroidery, so I’ve laced it over a board to keep it tidy. But I thought you might be interested to see one of my very rarest stories – I know other designers often do detailed watercolours of their designs, but it’s not how I work. More often, I have a rough idea in my head, and work on each element while I’m planning the details of the next, waiting for the piece to tell me what it wants.
This has turned out well, but I’m still slightly bewildered that it happened at all!
A Lovely Teacloth

One Corner Of Teacloth
This teacloth was worked by my mother as a schoolgirl.
The design came from a transfer, and there was another girl in her class that was working the same one. With rather a difference. Her flowers were all lazy daisy stitch, and anything else was stem stitch, apart from the edges, and she got the whole thing finished in a term.
Needless to state, as her mother’s daughter, and with the spectre of Miss Hunter in the background, my mother wasn’t going to use a stitch with “lazy” in the name.
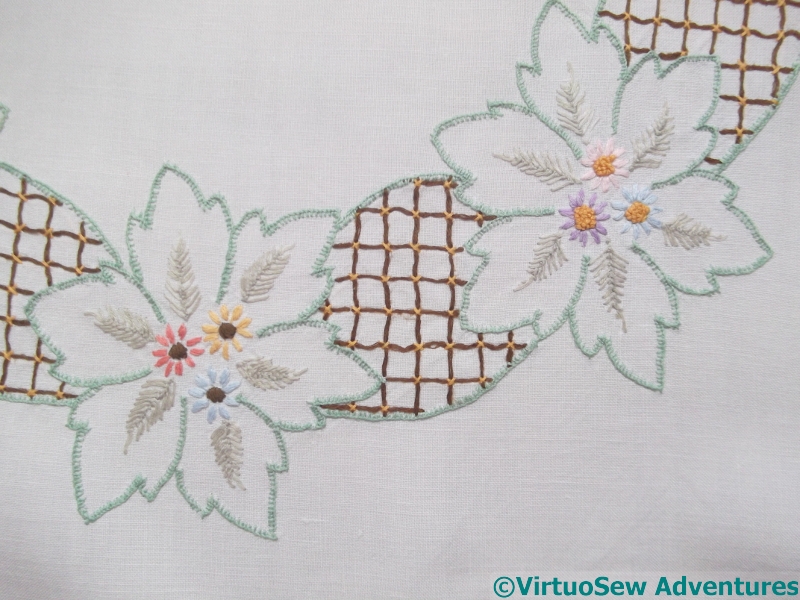
Central Ring
She did all the edges in blanket stitch – which with my recent experience with the Azorean Cutwork has me extremely impressed. It takes so long to make any noticeable progress with it!
The leaves are all in feather stitch, and they’re beautifully shaped, and the flowers are satin stitch – very neat satin stitch, which again is one of my least favourite stitches, and one I only do neatly in short bursts and with something else to do in between!
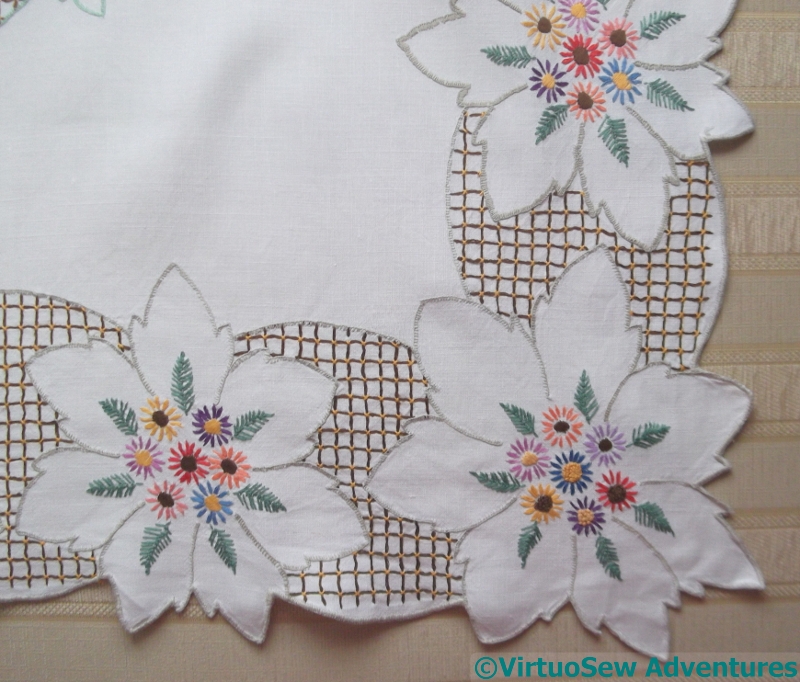
Detail Of Corner
Of course, my mother didn’t get her teacloth done in a single term – but her teacher was so impressed with what was finished that she took it home and handwashed and pressed the completed corner to put in in the end of term exhibition.
In spite of the fact that I very much doubt whether the teacher had contributed anything at all to my mother’s skill in the matter!
Favourite Summer Suit
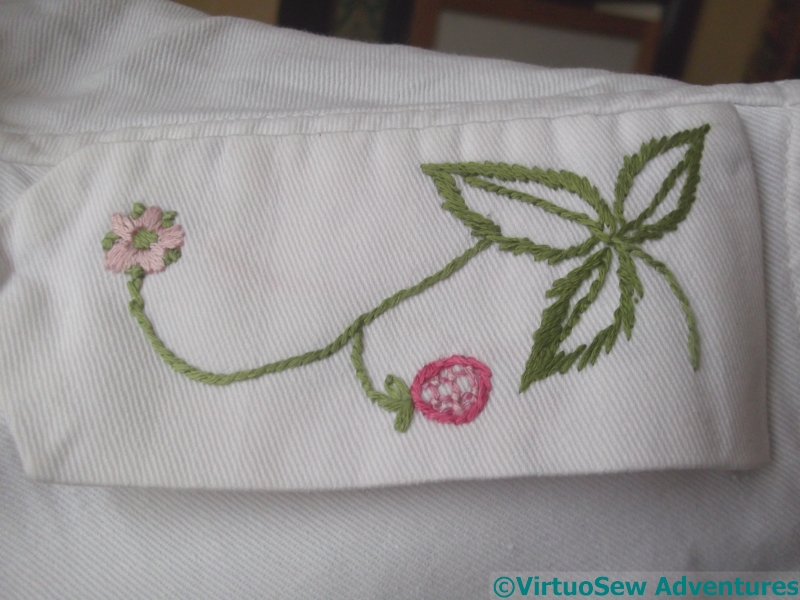
Epaulette of the Strawberry Suit
When the summer comes, some women turn to shorts and vest tops, some go for swishy skirts and gypsy-boho tops. I have a third option – to turn to my grandfather’s old tropical uniforms, which are in lovely sturdy cotton drill softened by all those years of washing, and very nearly indestructible. I’ve dyed two sets, and painted paisley patterns on one of those, but I’m completely outclassed by my mother, who embroidered one set when I was a child.
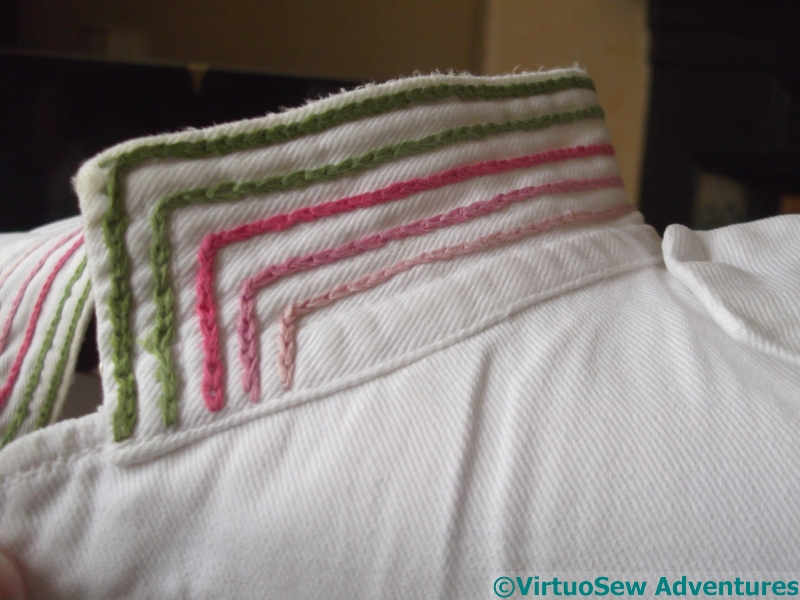
Collar Details
The designs are based upon very stylised strawberries, strawberry leaves, and flowers. The jacket has short sleeves, epaulettes, and a standing collar, decorated with rows of chain stitch using all the colours used elsewhere in the design. The usual uniform buttons were replaced with vibrant pink mother-of-pearl effect buttons, which make the whole thing markedly more frivolous-looking..
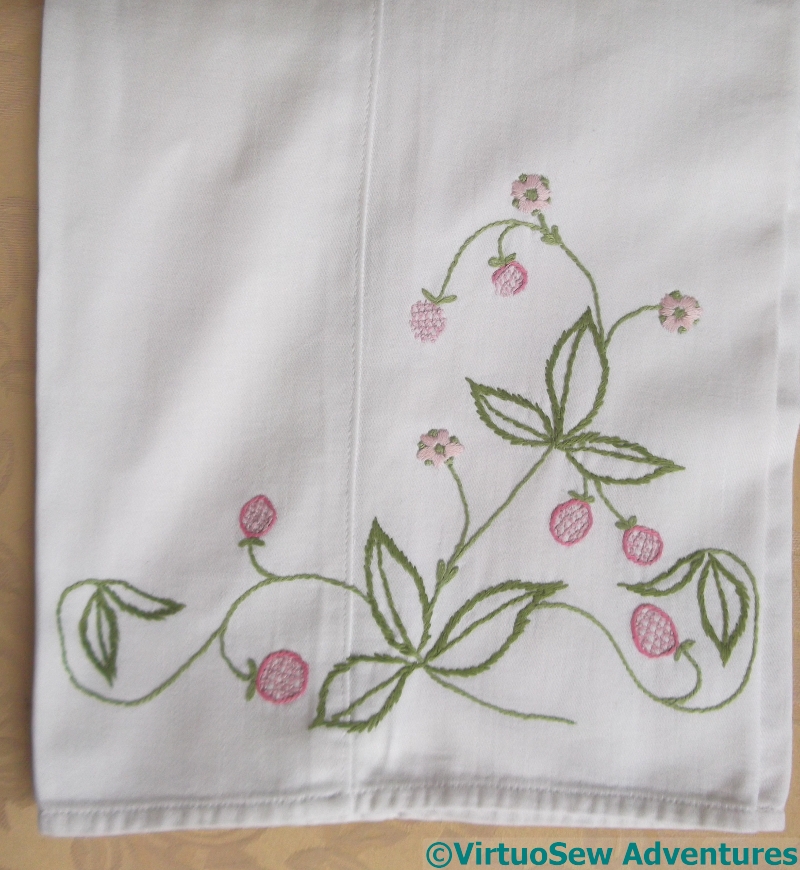
Trouser Embroidery
Most of the embroidery is near the hem of the trousers. The strawberries are worked in trellis couching, and the rest of the embroidery is in stem or satin stitch.
I have memories of thinking my Mam looked fabulous in it when I was a child – so much so that I wrestled it from her a few years ago, and feel fabulous myself, every time I wear it.
What I don’t recall is what my Grandfather thought of the transformation…