
Tag: Felt
And still more on the Little Jacket
I spent quite some time solemnly Holly Braiding my way all around the jacket, over seams, over itself, even in a couple of cases over the felt. There will also be tendrils in the same yarn, which will pull out the colour variation and reduce the slightly spotty look – which is much less evident in real life, oddly.
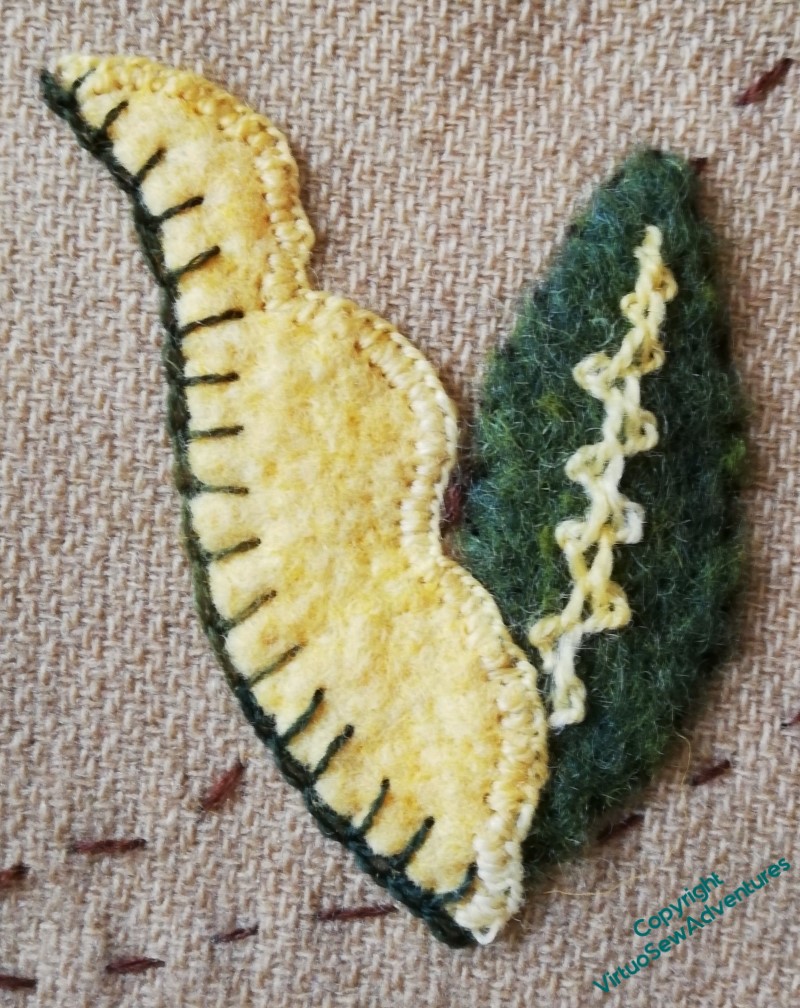
The two different stranded silks I used on these leaves help, too, of course. Up and down buttonhole stitch on the top leaf, with the paired uprights worked in a V-shape, and in the lower leaf, closed feather stitch. I do wonder whether a bit more contrast may be needed, but I think that can wait until the whole thing is finished, and I can see what, if anything, wants more help.
The frilly flower (heaven knows what it was intended to be!) provided a good deal of scope, too. The green stitch over the yellow felt came from Edith John – she calls it Tied Cretan Stitch. The yellow stitching is another one of hers, a pattern of feather stitches, but it doesn’t respond well to the curve and looks so unlike the drawing I now can’t find which it is. The inner edge is tied down with coral stitch in an extremely lively rayon yarn that nearly drove me mad, and I’ve reused one of the variegated yarns from the leaf above to help pull things together.
I’m enjoying myself enormously, but I am not always coming up with something you could call a “textbook example”!
This one shows some of the stitching over stitching that’s been going on as well. I put the stem in first, and then worked the alternating feather stitch and cable chain stitch spikes over the top. I’ve also used rosette chain stitch again. It’s a usefully intricate and intriguing stitch which has some of the practical characteristics of blanket stitch.
More progress on the Little Jacket
I decided that I was going to work all the major stems in one of the Braid Stitches, so I spent quite a bit of time revisiting Plaited Braid Stitch, the ordinary Braid Stitch, and others. For a while that was a little painful.
First of all, I was reminded that these stitches don’t stay in your hands the way (say) Feather Stitch does, and then secondly I was reminded that they are very thread-hungry. It’s (almost) all on the front, where you get the benefit of it, but metres get swallowed up in short order. And I knew there would be metres of whatever-stitch-I-chose. My stash doesn’t run to that sort of length, but having performed a few experiments, I realised that sock yarn would be perfectly useable, given the fabric I’m working on.
I finally chose to work Holly Braid Stitch, which I experimented with in 2014 when I was working on the Glittering Nightcap. I’d found it in Jacqui Carey’s book “Elizabethan Stitches”, and after some struggles it had worked pretty well. This time I tied myself in so many knots with it that I asked for help in the Historic Hand Embroidery group on fb, only to find that very few people had attempted it. However, those who did were very helpful, and several very intrigued people asked me could I video it if I got it to work…
So I have. What you see here is probably not enough to learn the stitch from without also following Jacqui’s diagrams and instructions, but I think it helps with the “workflow” of the stitch, which is not well represented in those diagrams, I suspect purely because, as a braidmaker, she thinks differently about the way a stitch works.
Once I had the stitch down pat, I bought a rather gorgeous sock yarn (Woodland Fire from The Yarn Gallery), and whenever I wasn’t sure about the details I wanted to add to a flower or leaf, I just kept on with the stems..
And on. And on!
And now, Episode 72 of Slow TV Stitchery is now live, in which we encounter difficulties in working a pattern backwards, experiment with French Knots, and recall “Leaving the Tyne”.
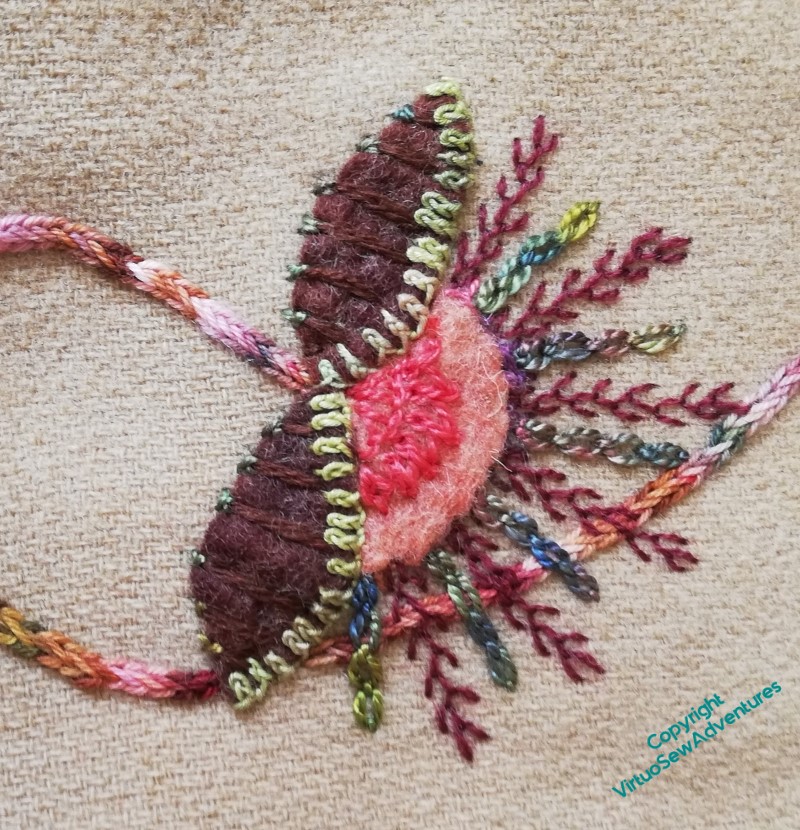
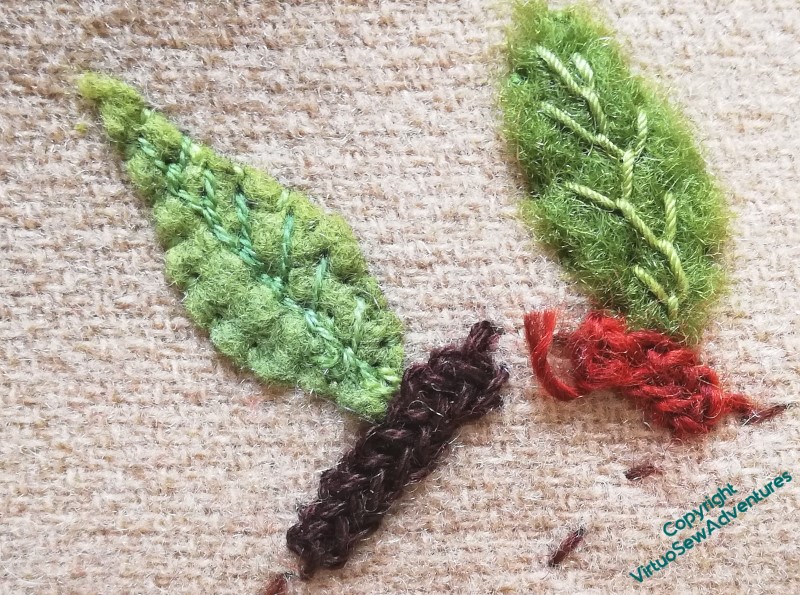
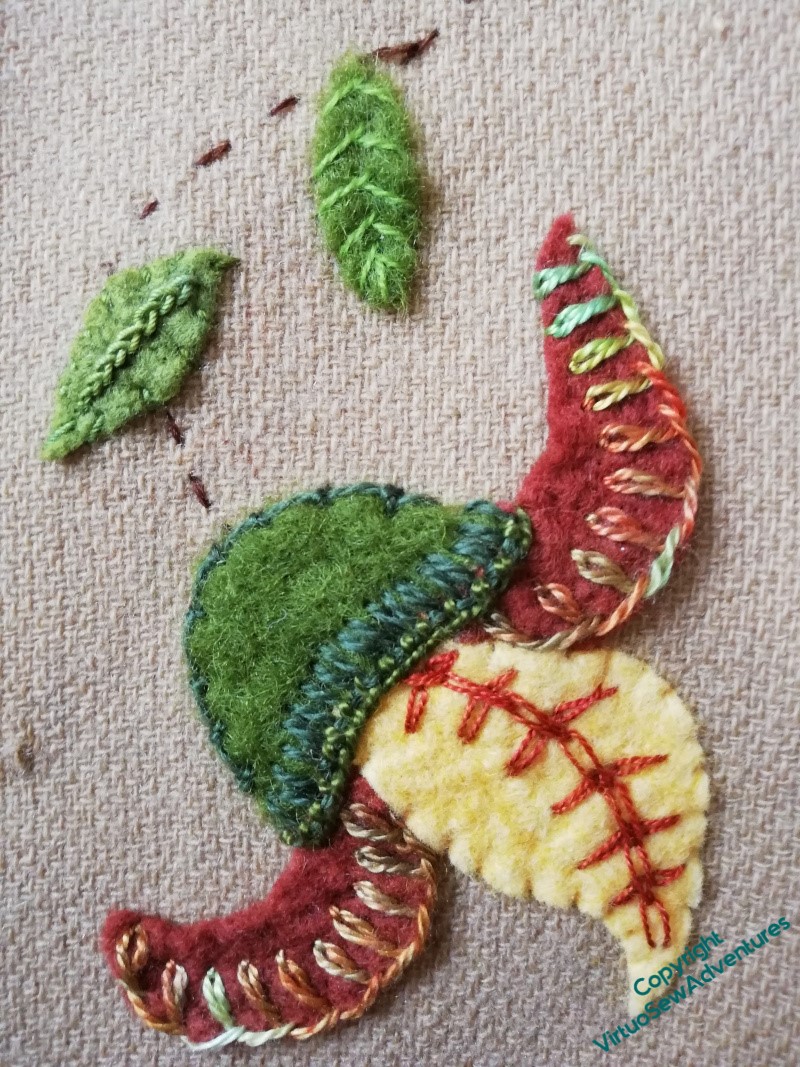
Some foliage on the Little Jacket
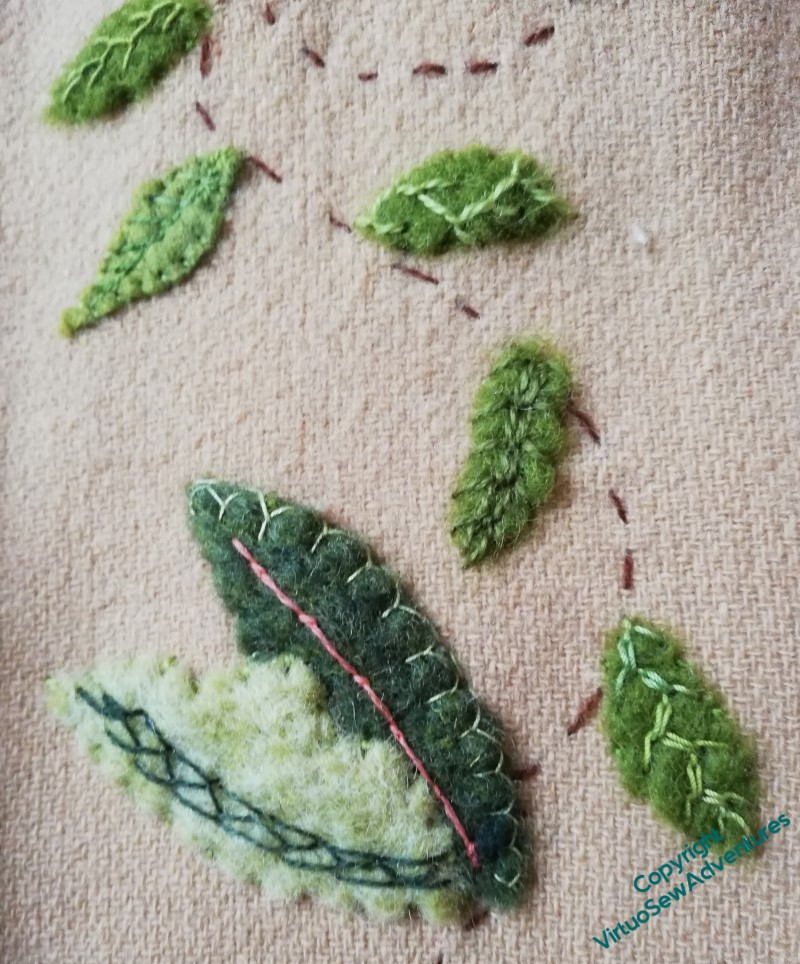
I’m varying the stitching as much as possible, but certain stitches rather lend themselves to certain roles, so there is a certain amount of reoccurrance. Here there are Half Cretan Stitch, Closed Feather Stitch, Feathered ZigZag Chain Stitch (more than once), and Wheatear Stitch.
I’m mostly putting green on green with the leaves, so that although there is variation, it isn’t too striking, and there will be moments of quiet in among all the proliferation of colour and form.
That said, some of the leaf groups demand a bit of counterchange – the dark and light green above, and the dark green and yellow in the next picture. In that case I’ve enhanced the counterchange with close blanket stitch on the yellow inner edge, to make it a bit crisper, yellow Spanish Knotted Feather Stitch on the dark green (I love that combination, it just sings!) and a dark green Mountmellick stitch on the outer edge of the yellow.
I don’t feel obliged to stitch down the felt to the same degree in all cases, but the needlefelting doesn’t have the same effect on the slightly closer, marbled felt, so I’ve often been holding it down with small stitches at the edge. Feather stitch is a conventional stitch for leaves, recalling vein patterns, but equally, I can choose to recall the vein pattern in one half of the leaf and not in others, as here (Chained Blanket Stitch, since you ask!).
I’m planning to do all the stems in some form of braid stitch, so you also see some rather unsatisfactory experiments here!
In other news, I am up to Episode 70 in SlowTV Stitchery, which discusses George Augustus Palgreen Blacktower, Tanya Bentham’s book on Opus Anglicanum, and offers some thoughts about framing..
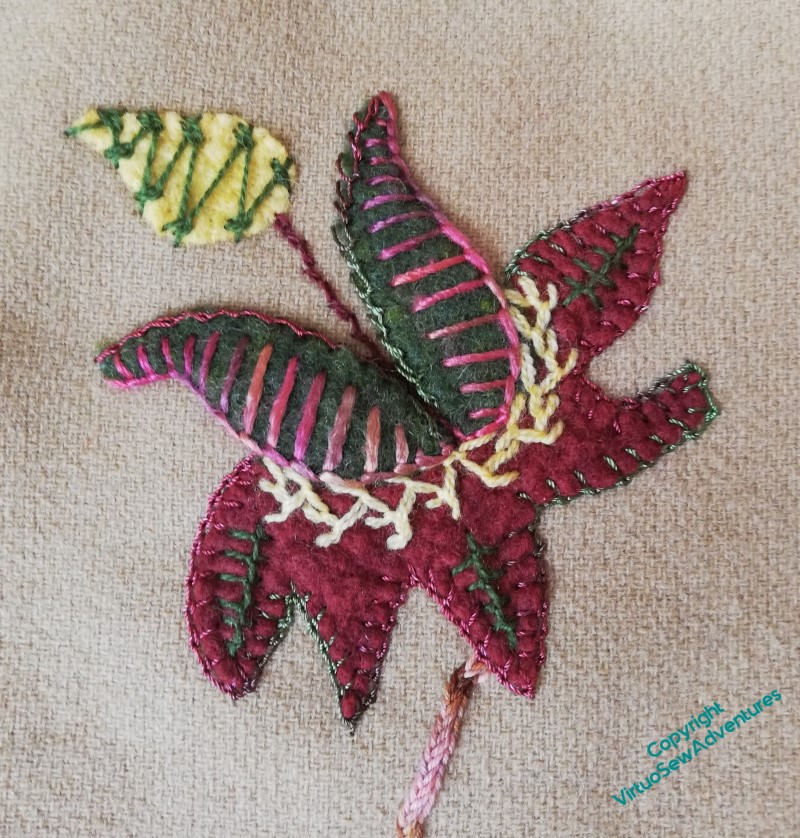
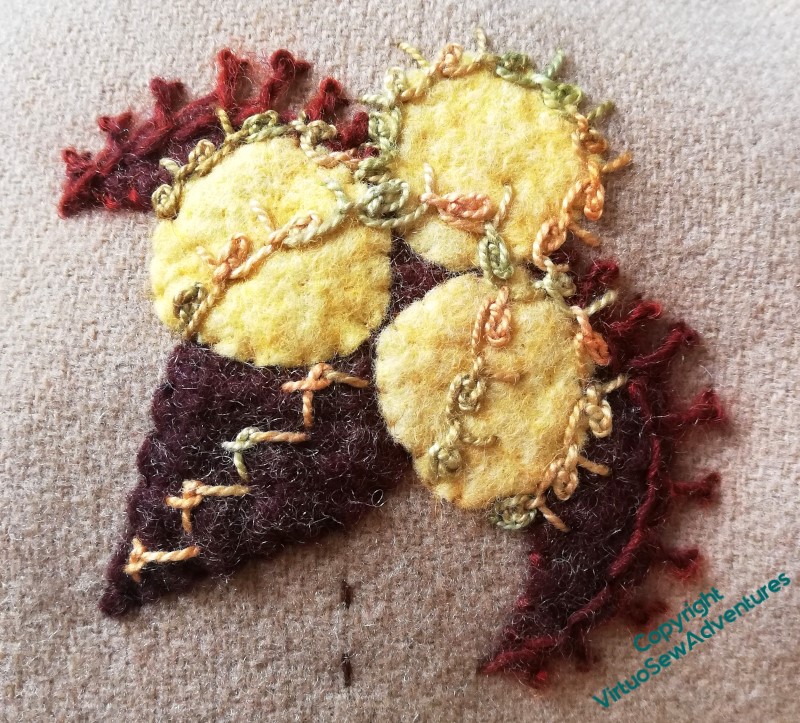
More elements on The Little Jacket
I’m using a lot of variagated threads, of course, and leaving stranded threads un-separated. Furthermore, since all washability is clearly lost here, I’m picking thread for colour and texture, rathere than paying attention to the fibre or considering colourfastness. I can, after all, replace the stitching with something else if I need to!
Basque Stitch edges the brown petals here, and triple chain stitch forms the spine of the yellow one. If you click on the picture to enlarge it, you will see that the green calyx is held around the edge with coral stitch and then a blanket stitch which is highlighted with detached buttonhole in a pearl cotton.
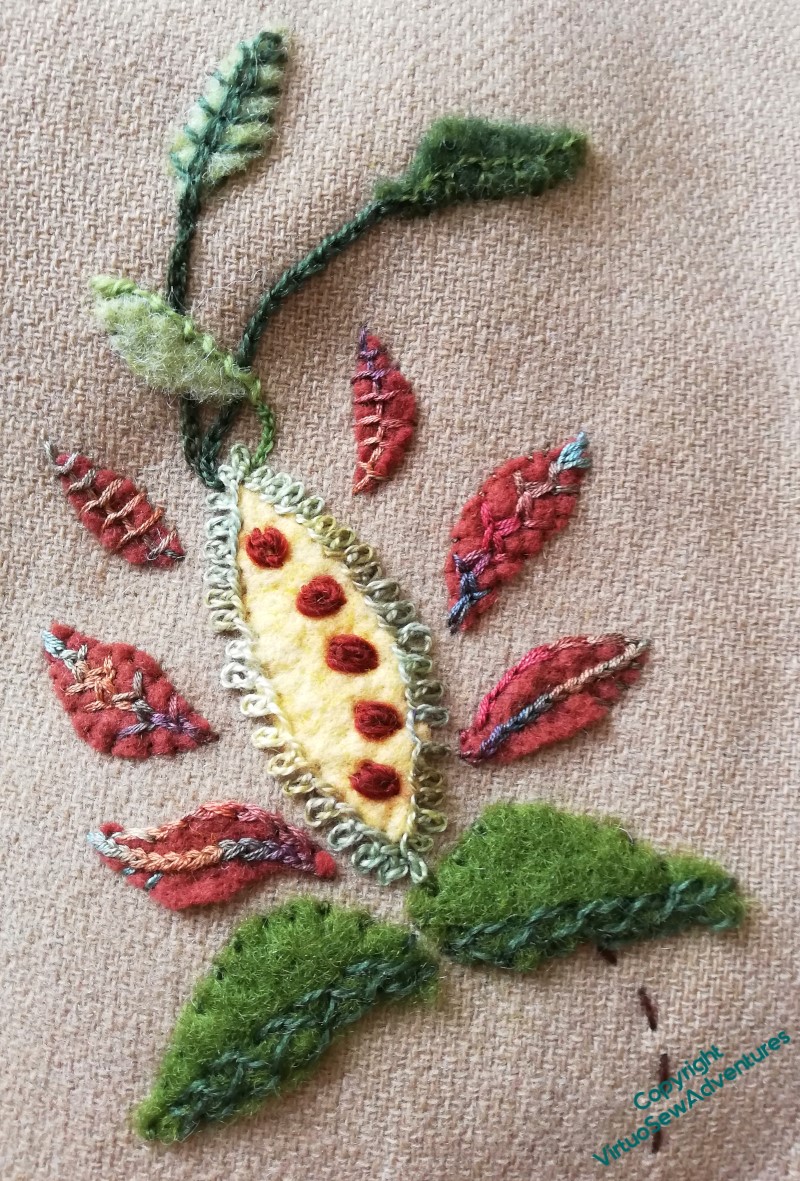
I’m really very pleased with how this element has turned out, although I may choose to lighten the stems on the leaves at the top, once I have everything in place and know what I have to balance of the overall impression.
I’ve looked quickly through the posts for the Coat of Many Flowers, and I was much more definite about stitching all around almost every shape for that, except the small teal leaves. For this one, I seem to be stitching a lot more veins and spines, or edging only one side of a piece. If I become anxious about pieces coming away, I can always add some stitches!
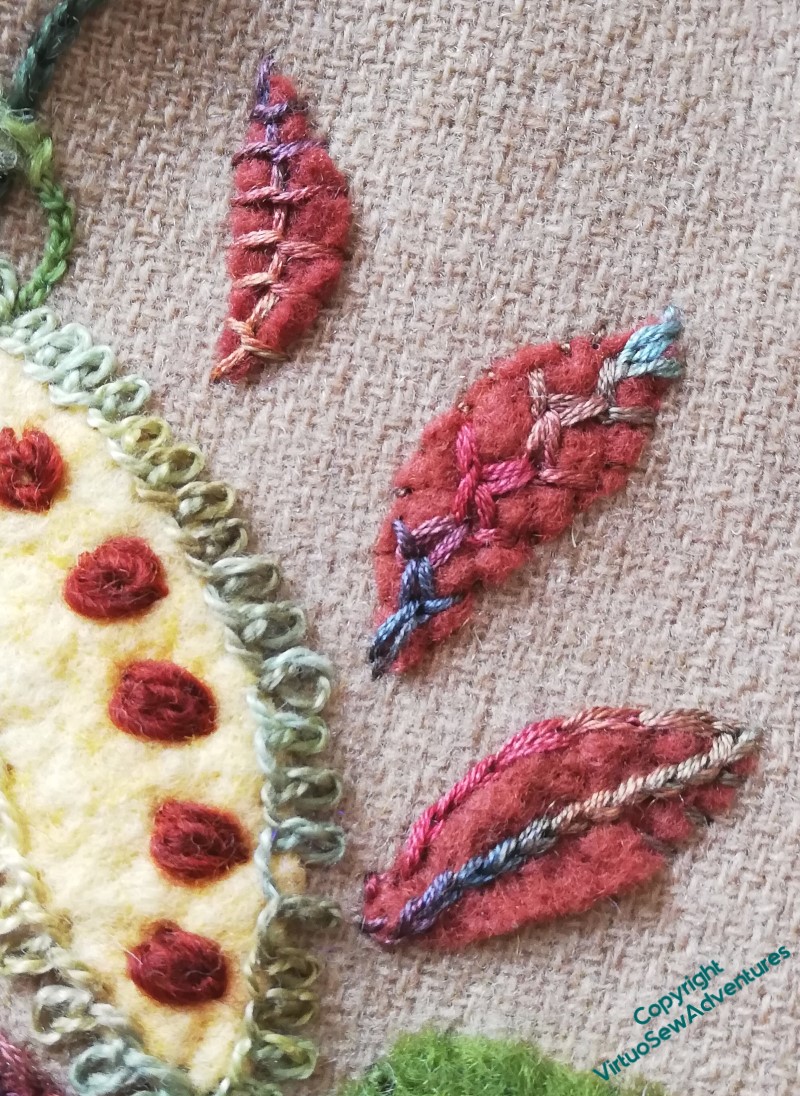
This element was more floral in previous incarnations, but here, I think it has drifted more in the direction of a seedhead. The “seeds” are isolated oyster stitches in sock yarn!
I unified the brown petals by using the same thread to embellish each, but made them more interesting by using different sitches. I’m particularly taken with the feathered zigzag chain on the middle one. The other change, compared with the Coat of Many Flowers, is to have turned some of the edging stitches around: last time, when I used rosette chain stitch, it was more like blanket stitch, with the “vertical” stitches pointing in to the centre of the shape.
And now, Episode 68 of SlowTV Stitchery is live. In which I discuss the alarming adventure of a Watermill Stitchery, remind myself to include the slips when I finally assess the success of Swirl Stitch (not yet, alas), and note that the skill of choosing the order in which to experiment is unheralded and undervalued.
Getting Started on the Little Jacket
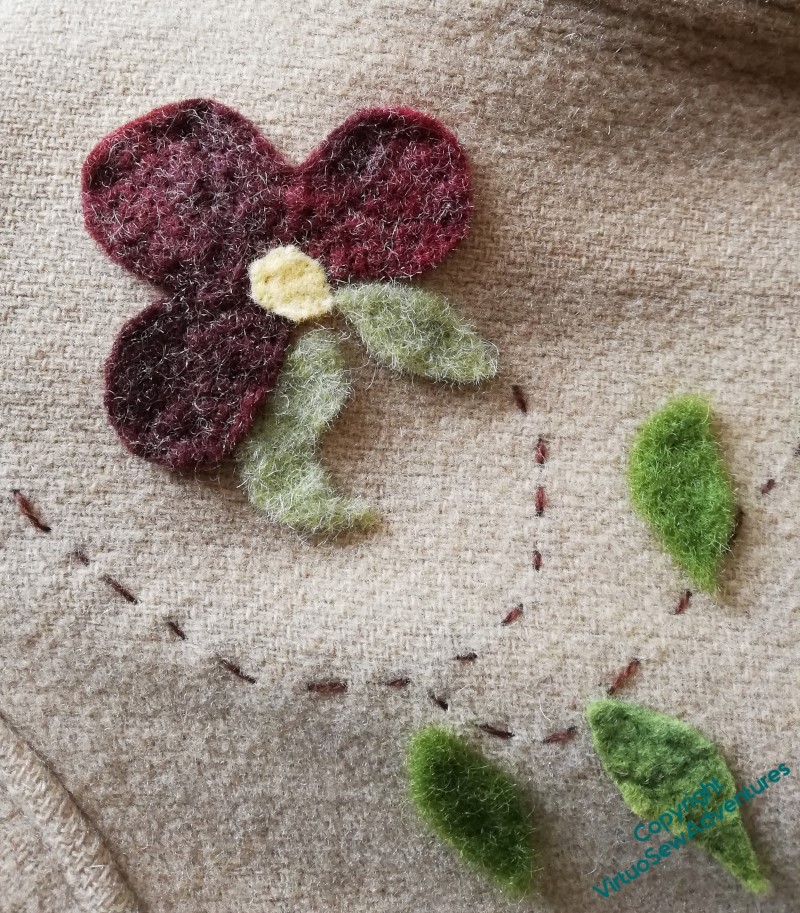
The basic technique I’m using for the Little Jacket is the same as I used for the Coat of Many Flowers, so the block colour comes from pieces of felt cut to shape. Most of them are the light and lofty felts I use with my embellisher, but this dark brown is slightly denser and more variable in colour. The variations aren’t as clear in photos as they are in real life, and I have a faint hope that if I wear it enough some of the lighter colours will fade a little more than the dark ones, and pull out the contrast a bit more.

This is the first of the motifs I worked on. A long-legged variation on chain stitch on the central petal is set off by neat paired blanket stitch edgings on the outer petals. I’ve decided that the yellow is to be an accent colour, and I’ve ensured that I have small bits of it it scattered across the whole jacket. In this case I’ve not used contrast colours to stitch it down. I’m not sure about the whipped blanket stitch on the lower half, but I needed something to contrast with the single twisted chain stitches on the uper half, and I don’t think I will continue unhappy with it once the whole jacket is finished.
By contrast, I’m not at all happy with this one, and I don’t know what to do with it.
I like the crested chain edging on the brown petals, and I like the odd combination of rosette chain and blanket stitch in the yellow-green pearl cotton, but not how I’ve placed it or the effect it is creating. The stitch running in a spine down the lower brown petal is called “Wing Stitch” in the book I found it in, and again, I like it, but not what it is doing here.
I can see some unpicking in my future!
However, episode 66 of SlowTV Stitchery is now live, in which we consider the state of progress on Tynemouth Priory and plans for the sea, learn from Granny Weatherwax, and start planning more Watermill Stitcheries.
More Upcycling – a little jacket
This little edge-to-edge woollen jacket was inherited from a great aunt. She was much smaller than me (I’m not tall, but my great aunts were all tiny!) so, among other things, she’d turned up the sleeves to create cuffs, which has resulted in rather unattractive, and potential life-limiting (for the garment) wear patterns. Naturally, I’m not in favour of that. Nor do I especially cherish the look of me in unadorned beige, especially since the arrival of my “corona wings”, which otherwise I rather like. So the jacket is going to be jazzed up.
In fact, it probably won’t know what’s hit it, by the time I’ve finished!
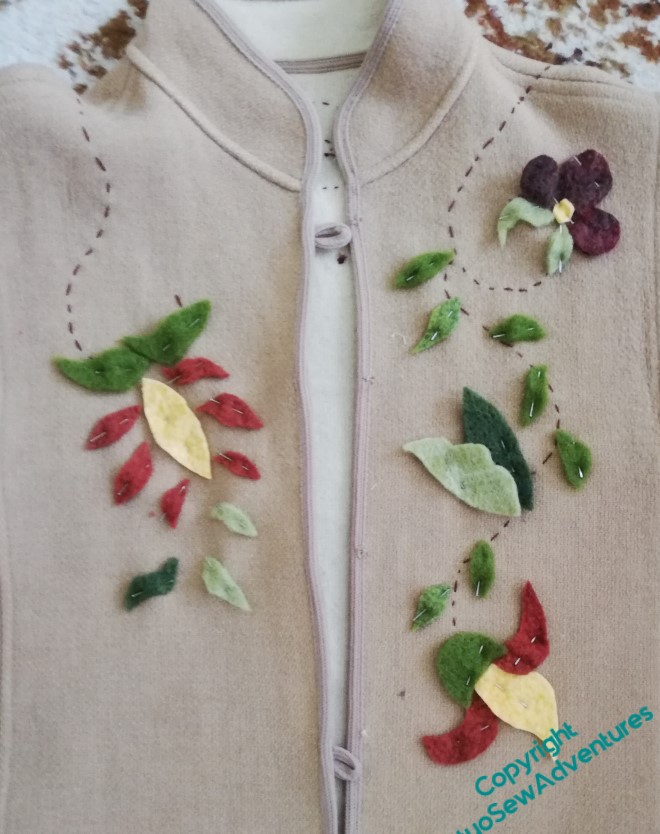
I am returning to the motifs from Grandmama’s tablecloth, which I also used on the Coat of Many Colours and the Jacobean Firescreen, so at least some of what you see over the next few posts will be familiar, but whereas the design for the Coat of Many Colours stretched across the skirt of the coat, the design here trails over the shoulders and down the arms.
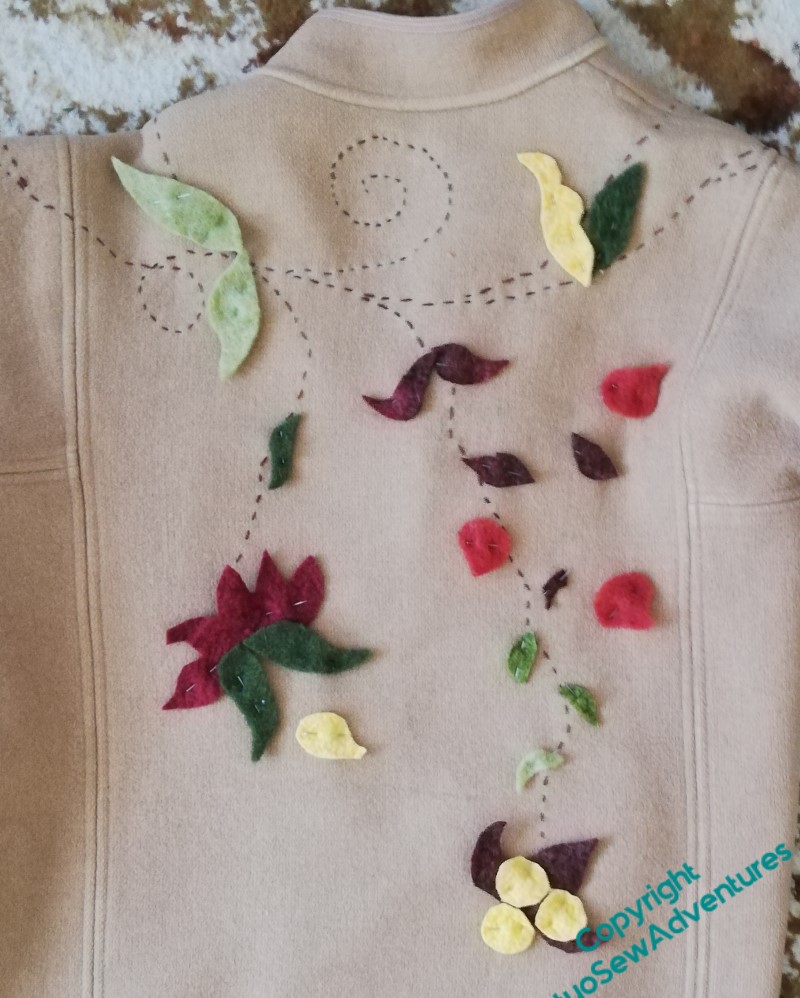
And whereas the design for the Coat of Many Flowers was planned in advance, with some care, the design for this one was put together in a series of adventures. First, my mother put the jacket on and I drew trailing stems around and over the jacket. Then I tacked them in with a single strand of Appletons Crewel Wool (then I won’t need to take them out!) and pinned cut out paper patterns of the motifs in their place.
Then the paper cutouts were replaced with felt cut outs. You can see from this picture of the back that I missed out some necessary stems here..
I wonder whether it’s luxuriant enough?
Meanwhile, in other news – Episode 64 of Slow TV Stitchery is now live, in which we discuss Impressionism in stitches and an Announcement is made..
Some early (very early!) experiments for the Vision Of Placidus – Part Two
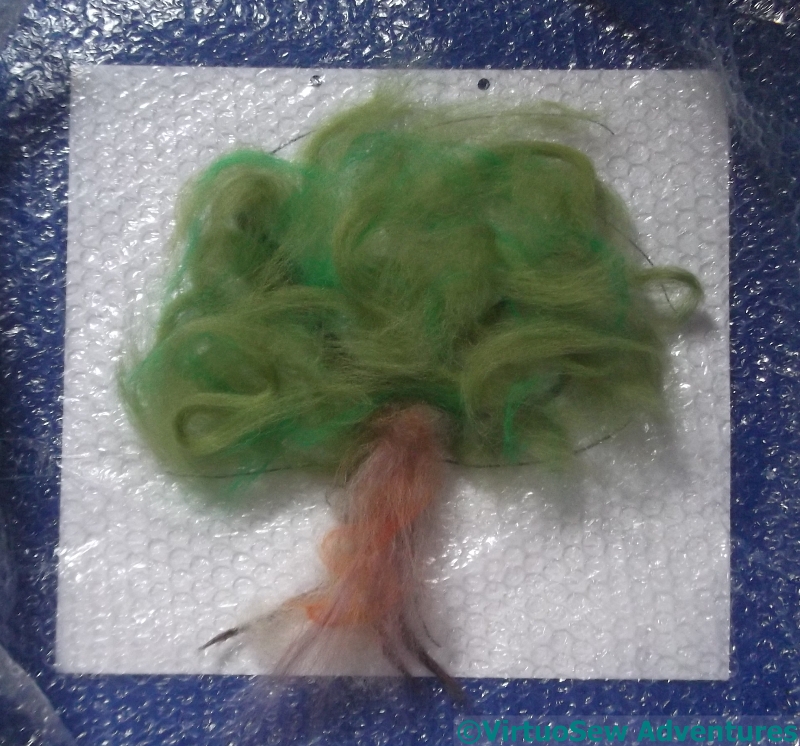
First wet felted tree
Once everything had dried, I could sit back and look at my trees.
This is the first one I did. It used some multicoloured merino in the trunk, and two greens from the beginners felting kit I bought on eBay a while back. They’re not very nice greens, but all I’m doing is investigating the technique.
There are only two or three layers of wool in this one, which means there are gaps in the felt, and the junction of the trunk and the canopy is a bit flimsy. Gaps in the felt for the canopy are no problem at all – they would help to add depth to the finished piece. Since everything will be caught down (somehow – I don’t yet know how!), strong, dense felt isn’t really the aim here.
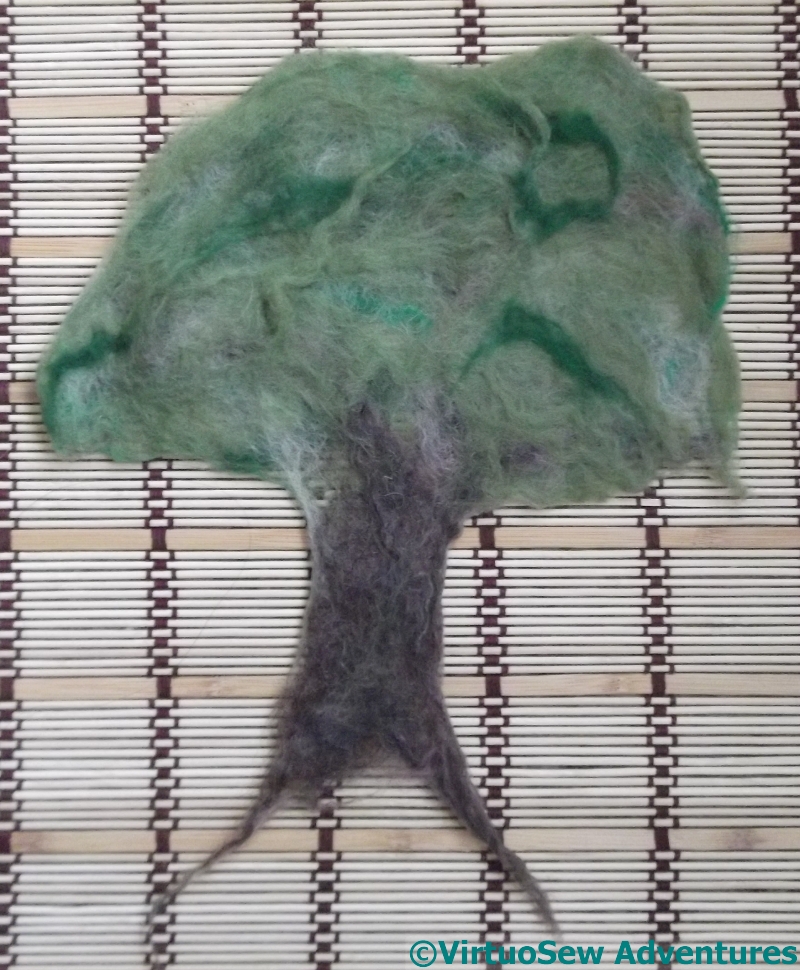
Second experimental tree
The second experiment had the addition of some short staple (that is, short fibre length), very crinkly wool. I was hoping it would result in greater shrinkage, which it has a little. It also produced a greater variety of shades in the canopy, lightening and interrupting that rather dull green. This may have promise, and the felt itself seems a little more stable and would be easier to stitch into.
Since the fibres are rubbed and soaped and rolled, and generally beaten up, it’s not surprising that the effects of trying to place the fibre colours to create a particular appearance is, to put it mildly, an inexact science. I wonder whether I could combine needle-felting with wet-felting to make the results more controllable?
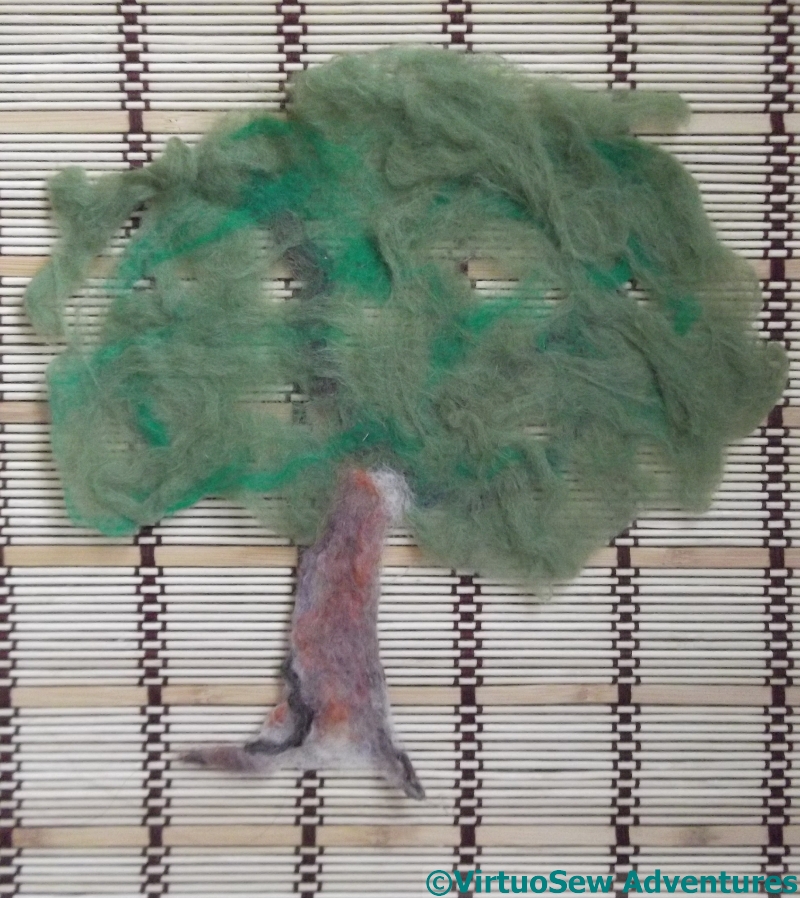
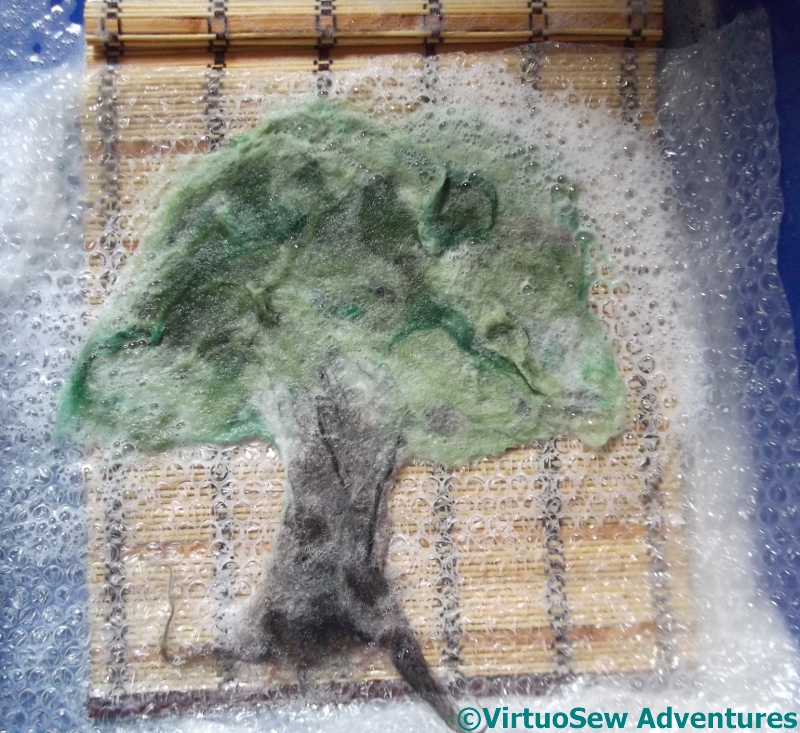
Third experiment, with yarn
In the final experiment, I added crocheted chains and some tangles of yarn as well. Some parts of the chain didn’t felt in quite as well as I might have hoped, but with more crocheted chain and a better understanding of how to felt it in more thoroughly, it might produce a very good effect.
My semi-spun yarn on the trunk has worked, though, and looks even better in real life, although, again, what it needs is the courage of my convictions and rather more of the same.
So, not a completely unsuccessful experiment, and certainly a good basis for further experiments, perhaps with added stitching…
Some early (very early!) experiments for the Vision Of Placidus – Part One
Experiment One
I’ve been struggling with a sore and stiff shoulder for some months now. It’s made me reluctant to go back to Eve In The Garden of Eden because at this stage she demands perseverance in a single, small stitch for the gold groundwork. The Head of Nefertiti has involved more variety, and earlier signs of progress, while the canvaswork is perfect for evenings.
However, my shoulder is beginning to ease and I’m feeling more willing to experiment. So I had a very entertaining morning last week (it was on Instagram and Twitter) having a go at something I saw on someone’s blog a few months ago and thought might have possibilities for the underlayer of my planned Vision of Placidus panel. If what you see looks familiar, please let me know and I will gladly edit the post to give credit!
Wetted Out
Now, the Placidus panel is going to be about five foot by four foot, so even using some of the chunky threads I am happy to use (… and may even spin for the purpose!), it will take quite some effort to cover it. So I thought maybe I could wet felt some rough elements – trees, rocks, clouds, the stream, which could then be applied and tweaked, improved and generally titivated with stitchery.
In the absence of a real – waterproofed! – studio, therefore, I was to be found squatting on the kitchen floor, using a Lakeland Limited tray for cleaning oven shelves to contain the splashes and soap. I must have looked distinctly odd, but I’m accustomed to that!
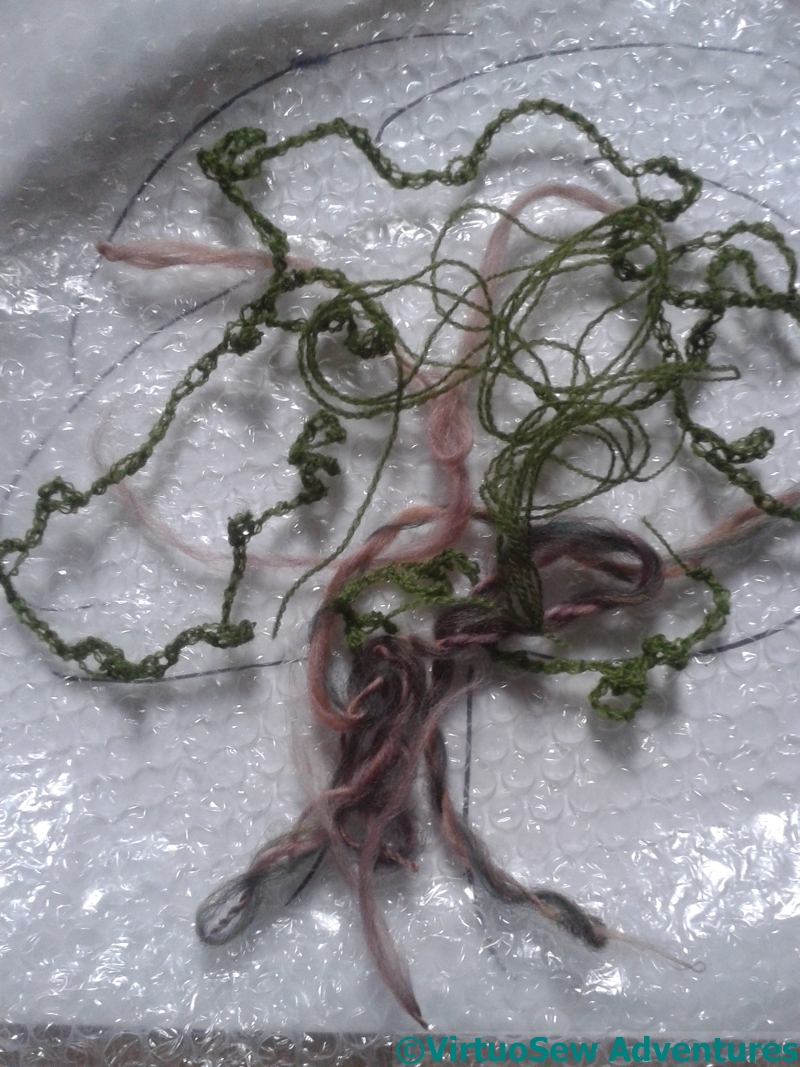
Experiment 3 – First Layer
In the case of the final experiment ( I did three), I rummaged for some fine crewel wool and made a crochet chain, with some very slapdash and freeform loops added in, and laid that down first, with a tangle of leftover yarn.
I also fished out my spindle and had a go at spinning and doubling some wool to create a different effect on the trunk. That didn’t work too well – the yarn kept unspinning itself. My shoulder isn’t up to a concerted attempt to crack spinning, so I made do with what I’d got, and backed it with various other wools to hold it together.
At this point – creaking slightly in the lower back – I decided to stop, rinse everything off, and let my trees dry before going any further. .