
Tag: experiments
The Crane – playing with silken thread, Part Two
Japanese Crane Design
Here is the Crane design, finished and ready to be mounted for display.
I picked a wooden pot from Framecraft Ltd. People who have been stitching for a long time may remember them as “Framecraft Miniatures”, and they were always a good source of silk gauze and other supplies for people interested in furnishing dolls’ houses. They also supply a huge variety of other items with spaces for inserting embroidery – you might remember my Homage To The Opal, if you’ve been reading my blog for a while.

View Of Crane Pot
Framecraft supply a plastic cover to protect the embroidery, but as my cousin isn’t the type of person to maul a piece of embroidery with sticky fingers, I decided she would probably prefer to see the embroidery properly. They also supply padding, but it is a light foam, and I substituted two layers of a very fine cotton wadding instead. The cotton wadding has a bit more substance to it, and created a nice firm dome, which looks much better when the embroidery is displayed without a plastic cover.

Crane In Place
The colour changes and textural stitches keep the design from looking too stiff, but because the silk thread has a slightly matte appearance it looks soft and doesn’t dazzle the eye.
When my cousin took it home, she strolled around her house asking the Crane where he wanted to live. He chose the bedside table in the spare room, where his colours talk nicely with the wallpaper and the bedspread, and the wooden pot echoes the dark wooden bedhead and wardrobe.
The Crane – playing with silken thread, Part One
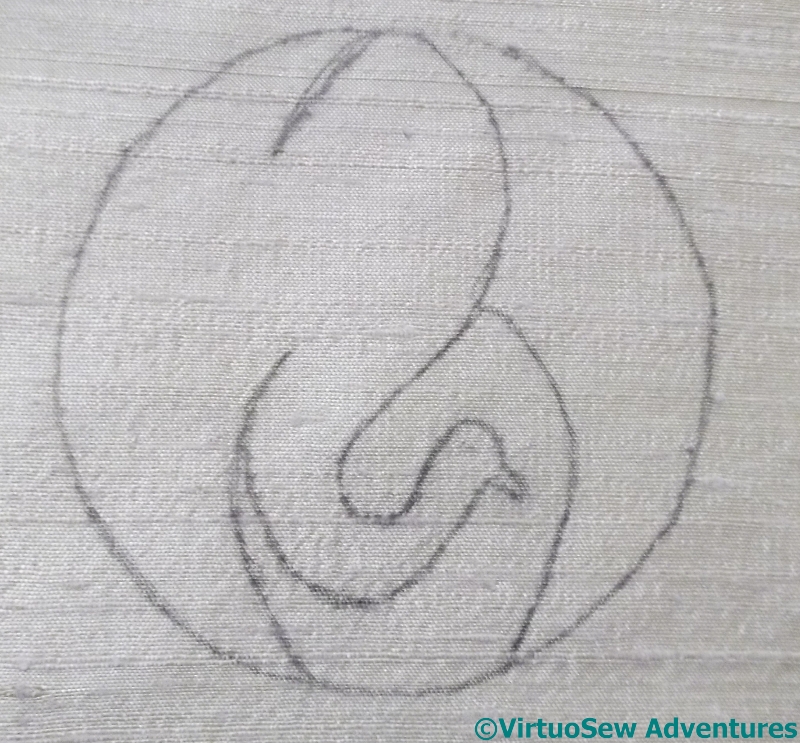
Japanese Bird
I decided to make a “Useful Pot For Putting Things In”, as Winnie-The-Pooh would have called it, for my cousin for Christmas. In fact, I cheated and merely embroidered a design for a lid!
I found the motif in the Japanese section of “Pattern Motifs: A Sourcebook” by Graham Leslie McCallum. I think it’s a crane. The design is very pared-down, and I thought it would make a good way to show off some of the superfine silk thread from Stef Francis, maybe even an excuse to use some more unusual stitches to see how the threads show them off.
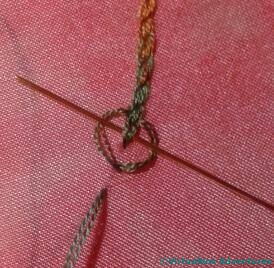
Hungarian Braided Chain Stitch
Those of you who follow me on Twitter may recall that I tweeted this picture of the stitch I eventually chose to use. It’s called Hungarian Braided Chain, and I found it in one of those books by Edith John that I mentioned when I began embellishing the Circles Skirt. If you think of it as Heavy Chain with the needle weaving over and under the threads as shown here, you will get the idea.
I’m very taken with the stitch, in fact. It creates a fascinating textured line, and colour changes in an over-dyed thread bring it to life even more. I can imagine using it in plain thread as an indication of braid on clothing, or ropes on a ship, or even simply in side-by-side rows to create a textured effect.
This is the first – so far unfinished version, in superfine silk on silk habotai. The relatively short colour changes in this thread create subtle changes from stitch to stitch, emphasizing the structural patterning and texture. When the destined pot arrived I decided the combination looked altogether too hot and bothered, and went rummaging in my stash again…

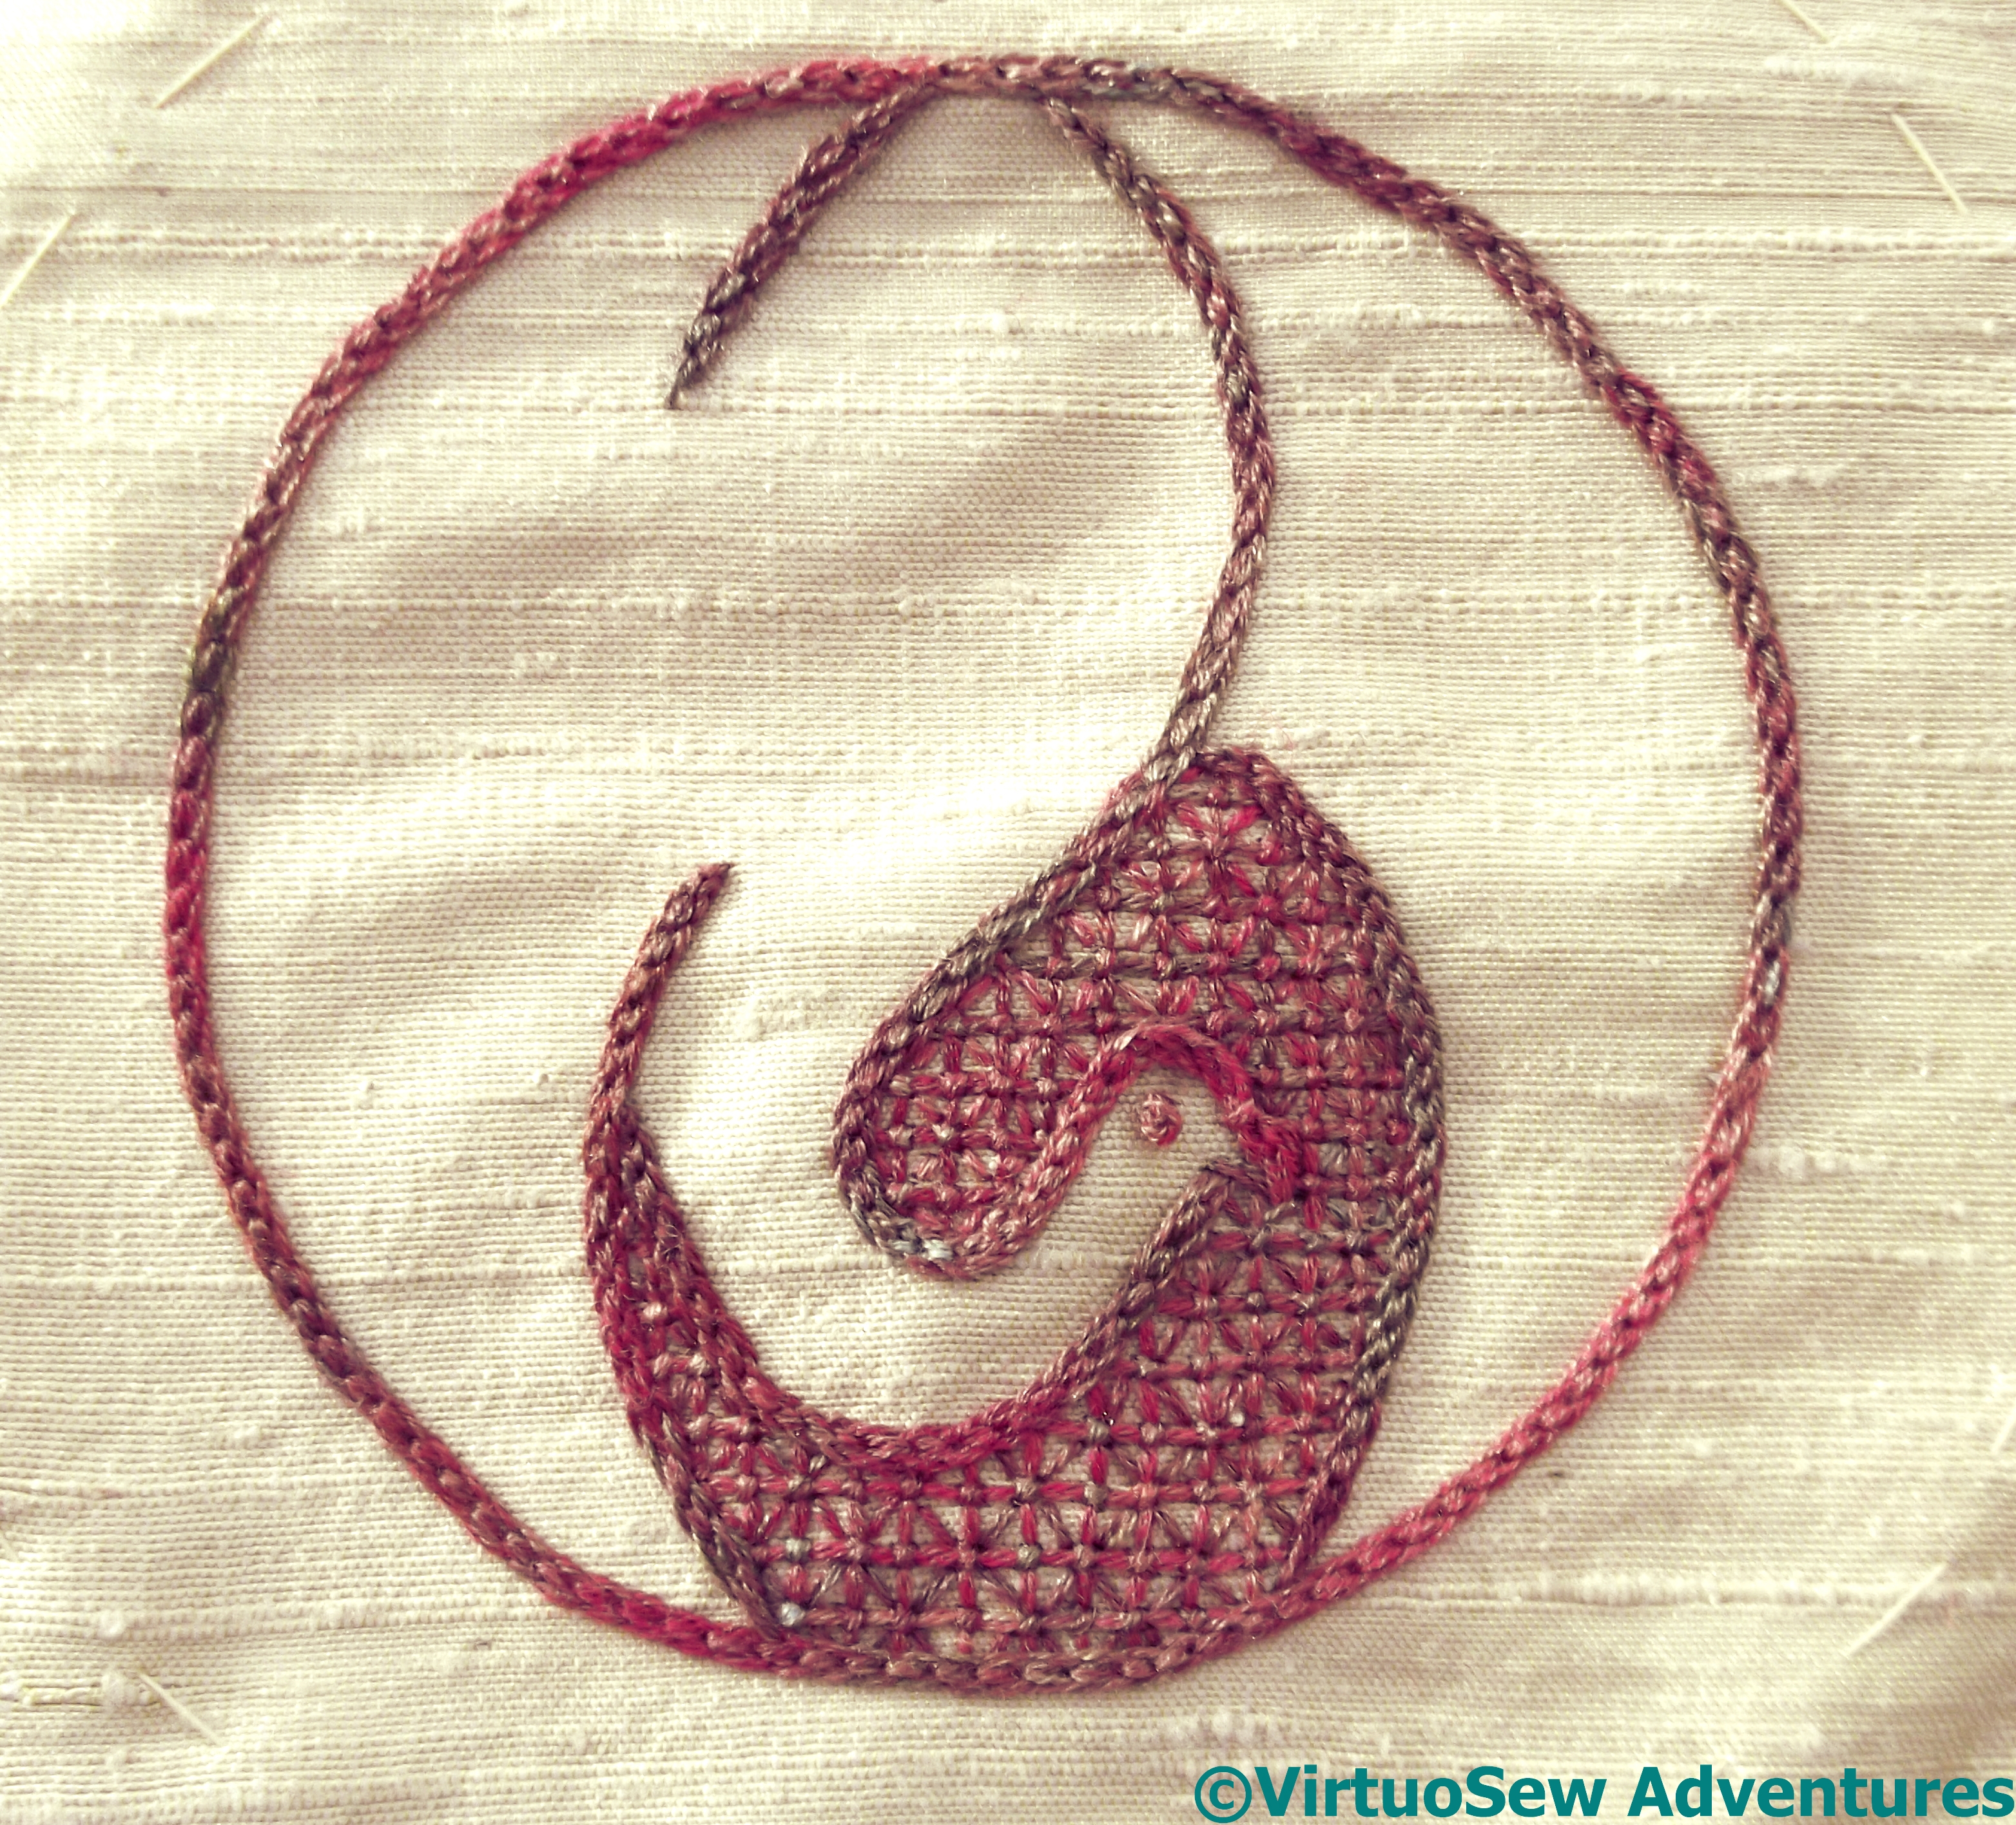
Close Up Of Stitching On The Crane
The fabric I finally chose is a rough dupion from The Silk Route, in a golden cream colour which is extraordinarily difficult to photograph, and I picked a slightly different silk thread, more restricted in colour range. Using four strands of thread produced a lovely cable-like appearance, which you will see if you open the photo at full size.
The dark section of the design, behind the bird’s head, I worked in a dense version of trellis stitch, with horizontal, vertical, and diagonal lies all tied down with tiny cross stitches. Even working in a hoop or frame, trellis stitch cane be a bit of a challenge to stitch, but I made it in the end!
A Pulled Work Sampler – Second Installment
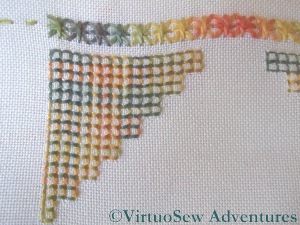
Pulled Work Detail 3
Pulled Work Detail 4
There are so many pulled work stitches that I was in more danger of running out of patience than of running out of stitches.
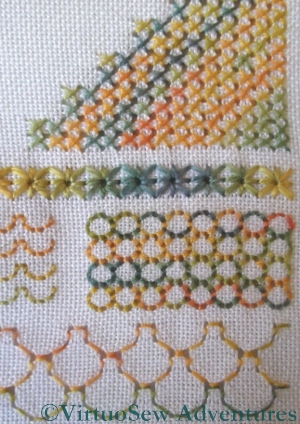
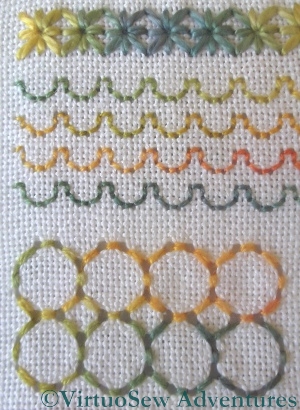
Star Stitches in the heavier thread create a strong horizontal divider, with the colour change rippling across the fabric.
Then I worked two pulled work stitches each at two different scales. One of the patterns creates something a little like festooned curtains, another creates the effect of a tiled roof. Although I worked this many years ago, this playing with scale is something that, when I was doing the Tudor and Stuart Goldwork Masterclass, I came to realise was a very important element of stitch choice and effect.
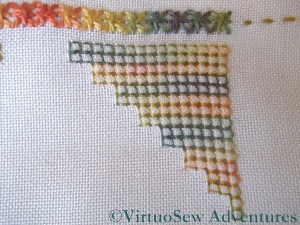
Pulled Work Detail 6
Pulled Work Detail 5
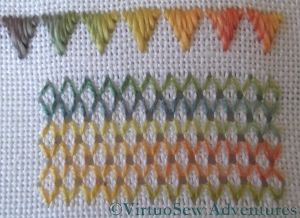
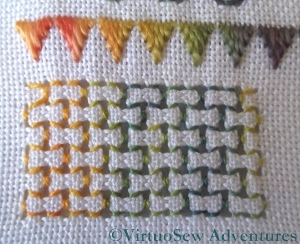
Again the heavier thread made a good divider, this time a dagged edge straight out of medieval heraldry, and then Wave Stitch ( the right- hand picture – possibly not pulled tightly enough!) and a brick pattern follow on.
I still cannot recall what I had in mind when I started this piece, except, perhaps, that I wanted to use the citrus-coloured thread for something. I think that if I were to start this again, I would work a narrower sampler and start by working the pulled stitches in a fine self-coloured thread. It seems to me now tht the pattern of spaces might be more interesting, in fact, than the stitches themselves.
A Pulled Work Sampler – First Installment
Pulled Thread Sampler
All my regular readers will know that while I’m very keen on experimenting with techniques that are new to me, I’m not so good at finishing what I’ve started.
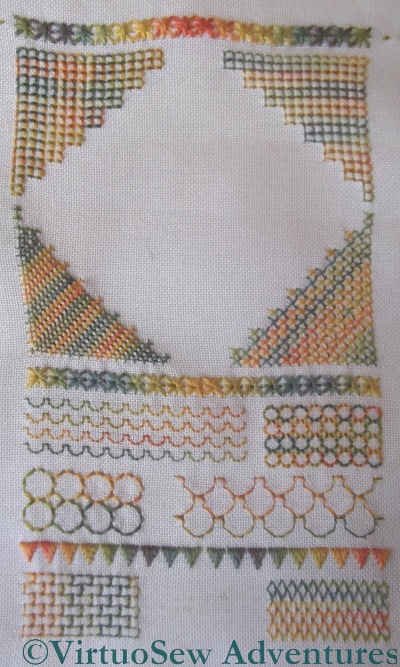
I found this panel when I opened a box in the office that I’ve been ignoring for a while. I can’t even remember how long ago I started it, and you can see that although I worked it on a frame, it’s got somewhat out of shape while it’s been rolled up, because of the varying tension up and down the length of it. There’s less variation across the width, which strikes me as strange since I’m sure I used a roller frame, and didn’t tension the weftwise direction!
The sampler is worked using another pair of Caron Collection threads, the fine Wildflowers, and heavier Watercolours, in a bright orange and green overdye. I love the texture and colours of these threads, and they highlight the stitches beautifully. The fabric itself is Jobelan, which is a regular even-weave fabric, perhaps not quite sufficiently widely-sett for pulled work to show to its best advantage.
Pulled Work Detail 1 – Four Sided Stitch
It occurs to me as I look at the photos that pulled work can be done with two different effects in mind – one using the pattern of stitches to create the effect, and the other using a much finer, self-coloured thread, creating the effect with the pattern of holes left by pulling the fabric threads together. Something else to try!
Pulled Work Detail 2 – Four Sided Stitch Again?
After beginning with a row of Star Stitches in the heavier thread, the first corner of the square panel is in Four Sided Stitch. What puzzles me about this is that the second section seems to be in the same stitch, whereas the two lower corners differ. It seems to me that this was a genuine sampler – I was making it up as I went along!
Another of Grandmama’s Experiments
 Grandmama joined the Women’s Institute at some point, and went on many of their craft courses of one sort or another. When I found this collage, I also found one of her notebooks with notes from some of those courses, which I hope will enlighten me about how she approached them. When I get around to transcribing them, that is. It is one of those tasks that always gets put off to a more convenient time!
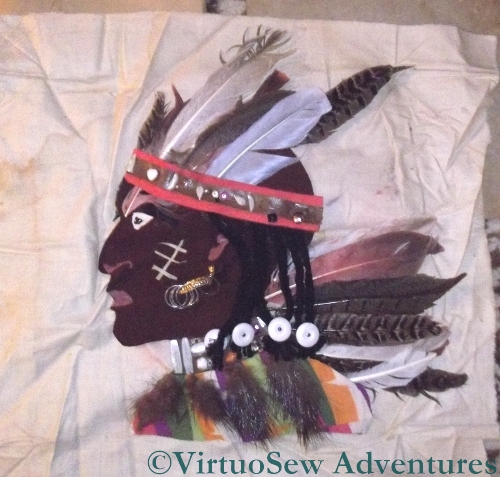
I’m especially curious about this one. I’d never seen it before – a collage of an Indian’s Head. A fictional one, I imagine. In fact the question I find myself asking about this is “Why?”. Most of it is glued rather than stitched, which I rather imagine would have gone somewhat against the grain with Grandmama. It also has the slightly slapdash feel that my own work has when I’m feeling out-of-sorts about being forced to do something I dislike or consider uninteresting. Maybe the notes will tell me more.
However, I was highly entertained when I realised that the ornaments on the end of the Indian’s braids were trouser buttons from my Grandfather’s Tropical uniform – it’s a good thing he’d retired by then!
Developing confidence in satin stitch
It may not seem as though much has been going on with the Lotus Fragment, apart from satin stitch, but I have in fact been learning a lot, and experimenting rather a lot too.
Choosing a background stitch
To begin with, I was intending to use a couching stitch for the blue background of the image. This is partly because I keep forgetting that the final Dreams of Amarna panels are not intended to be worn or leaned upon. The stitches would need to be quite long, which is contrary to my ingrained instinct to keep stitches short in order to make the finished article reasonably hard-wearing. But then, stitched on silk, using silk, it was never going to land in the washing machine!
After my short class with Midori Matsushima, I had a little more confidence in my satin stitch, and so I worked one side of the fragment in satin stitch and the other in Bokhara Couching, and then sat back and looked at them. Satin Stitch won, hands down. The flat silk spreads beautifully to help blend the stitches, and the reflectance of the silk filaments creates an almost radiant effect. So that small section of couching has been unpicked, and replaced in short order! In fact, the satin stitch fairly galloped away once I got settled and gained some facility with my mellor.
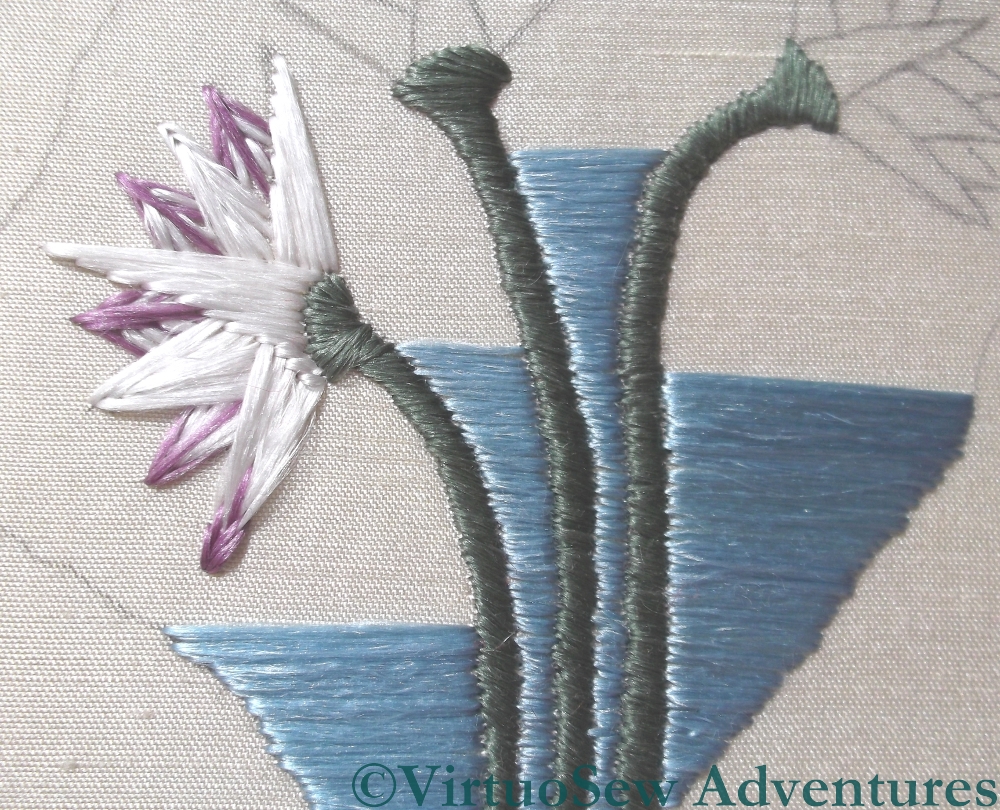
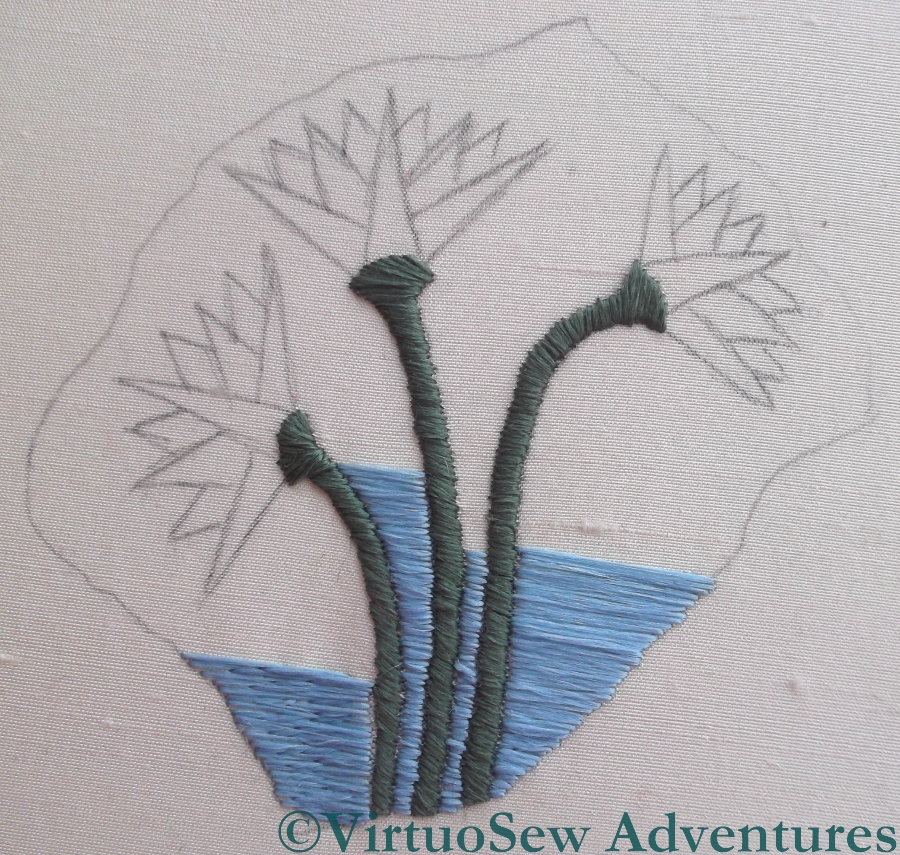
Lotus Flower Experiments
The lotus flowers themselves are giving me a little more trouble. As you can see in the second photograph, I have been trying various ways of stitching them. My challenge is that Mary Chubb describes the originals as “faintly lilac-tipped”, and so my experiments have two goals, not just one: I want to find the most effective way to use the silk to represent the lotus flowers, but at the same time it has to be a way that lets me tip the petals in the lilac without creating a clumsy effect.
The earlier petals use stitches that come to a point at the tips of the petals, crossing under a central stitch that seeks to smooth those tips. I am not happy with this – it looks clumsy and heavy, even though it makes adding in the lilac stitches fairly easy.
The later stitches use a more classical satin stitch, with the longest stitch on one long side of the petal, and shortening stitches creating the other side. This is better, and I think will be improved if I take all of the experiments out and then begin again, with the long stitch on the central axis of the petal and shorter ones to the side.
However, the challenge of creating the effect of the lilac tips remains. I want to blend the lilac and white stitches into one another, and for the life of me I can’t see how to achieve it, or even whether to stitch the lilac first or the white!
An Experiment in Screen Printing
My current plan for the Dreams of Amarna panels is to overlay the embroidered panels with gauze panels screen printed with the heads of Akhenaten and Nefertiti, and since the panels would be hard to store safely and out of the way while I do the embroidery I have always intended to do the screen printing last of all.
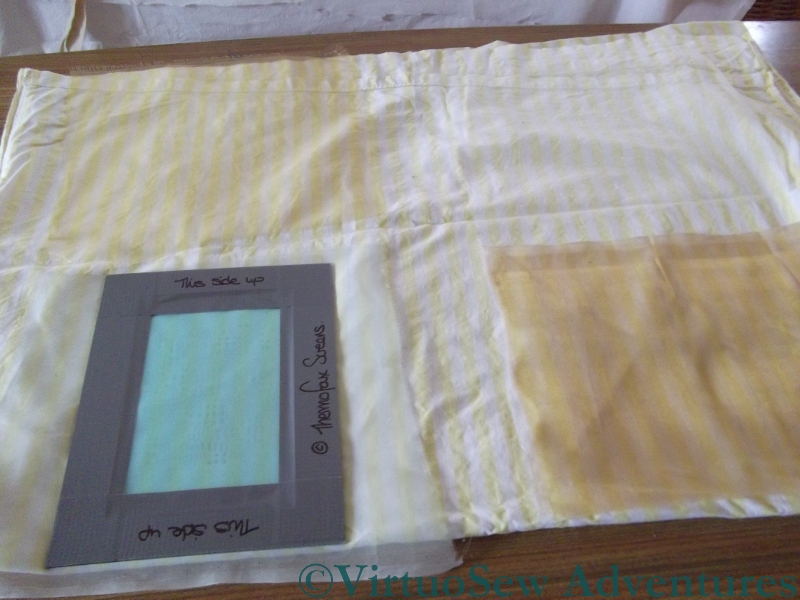
Preparing my screen printing tests
Then, as I mentioned when I was beginning on the Lotus Fragment, I had a Dreadful Thought. What if the gauze killed all the colour in the embroidery? Would it be possible simply to brighten the colours of the embroidery (which would also involve abandoning nearly everything I have done so far) or would I be able to find a suitable fabric? Obviously some early experimentation would be required… Fortunately, “Creative Stitches and Hobbycrafts” happened shortly after my Thought!
I found the stand for Thermofax Screens, and explained what I wanted to do. When I explained that the image I intended to print (in the end) would be of the style of an old-style newspaper print, the lady’s face cleared. Yes, she said, it would certainly be possible to print onto gauze, and when I eventually get to the appropriate stage, it would be possible for them to prepare screens for me based on images I provided. She also said that I should experiment with fabrics, but that synthetic gauzes were likely to prove more transparent than natural fibres. So I bought a starter kit and a screen that had some of the characteristics I expect my final images to have, and got ready to experiment.
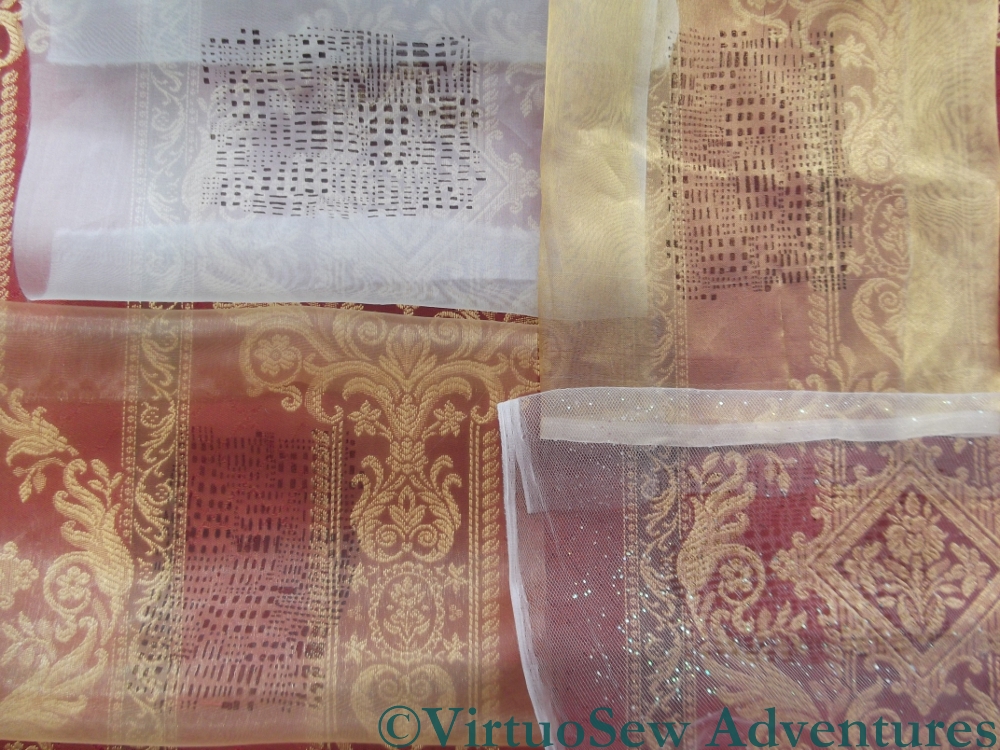
Gazing Through Gauzes
The photo shows, from top left, clockwise: Silk organza, Silk Tissue, Synthetic Diamond Mesh Net, and a Synthetic gauze.
I’ve overlaid them over a strongly patterned upholstery fabric, and it’s clear that the bottom two are going to be better bets. The silk organza all but obliterates the upholstery material, so embroidery is going to stand no chance, and the silk tissue is only slightly more transparent.
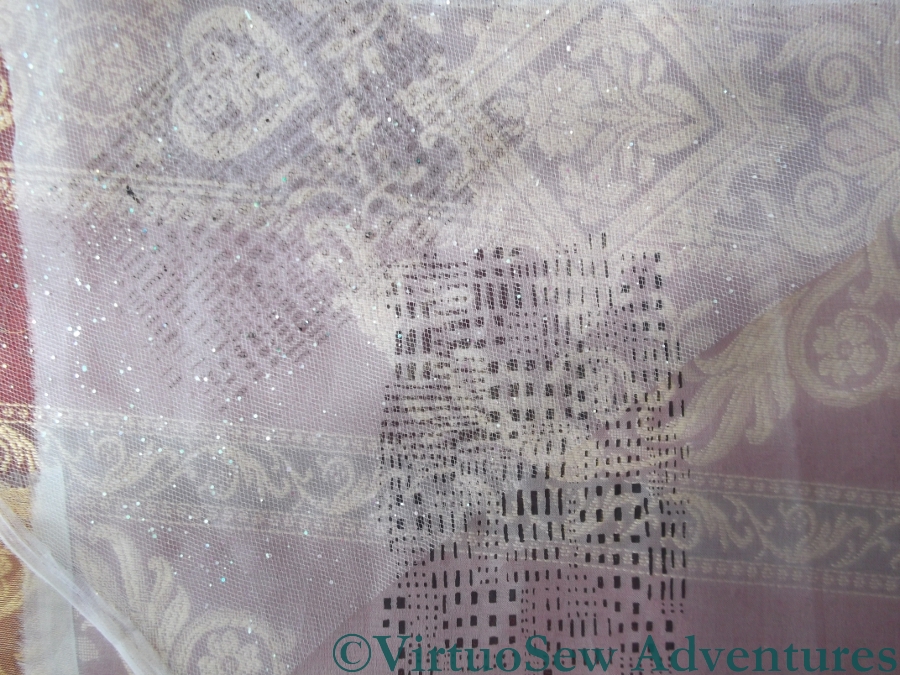
Diamond Net and Silk Organza
This photo shows the contrast between the heaviest and lightest of the fabrics I have tested. The silk organza took up most of the ink that passed though the screen, and the design shows up clearly, but it reduces the fabric underneath it almost to a pattern of light and dark, with very little colour. By contrast, the diamond net has to be laid over the organza before the print shows up at all, as you will see if you look at the middle picture at full size.
To be absolutely certain, I will need to set up some of the embroidery as I intend to display it, and then hang the gauzes about an inch in front, but as an early indication, I think this gives me enough to go on that I can feel reassured. There are suitable fabrics for my purposes, and basic single colour printing is no harder than I remember from university.
I can set my worries aside and continue embroidering – just so long as I bear my ultimate plans in mind!
Happy Holidays – The Sea Tractor At Burgh Island (part two)
The Sea Edge
Continuing the Saga of the Sea Tractor…
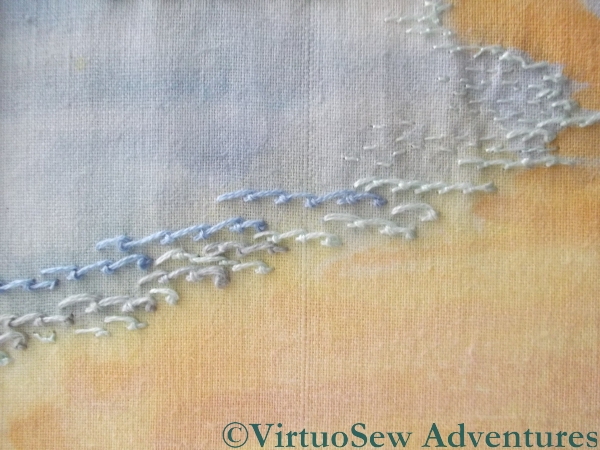
I worked the sea edge in short lengths of scroll stitch in close pastel blues. The idea was to create the sense of the ripples at the edge as a wave settles and flows back down the beach – but only on one side of the sandy bar that leads out to the island. I wanted to create the sense of a prevailing wind that came at an angle so that the waves would be more noticeable on one side than the other.
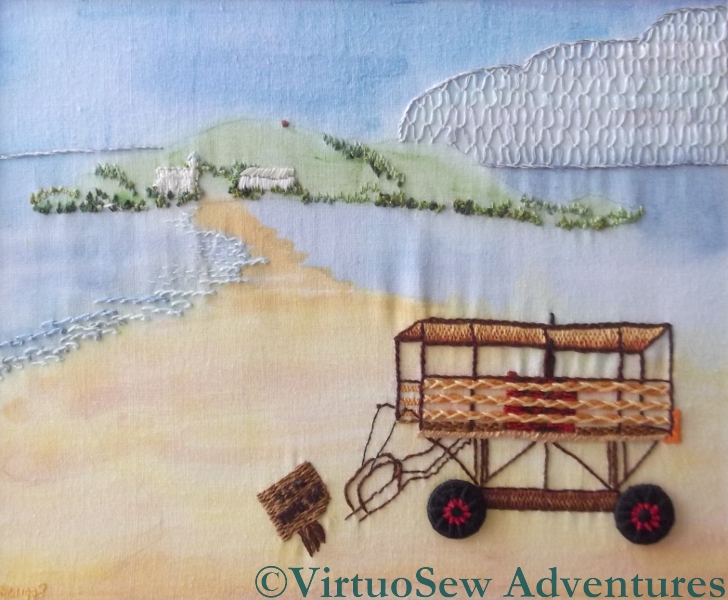
Cloud, island, and sea suitably depicted, I could leap in and render the Sea Tractor in all its outlandish and spindly glory.

The Sea Tractor
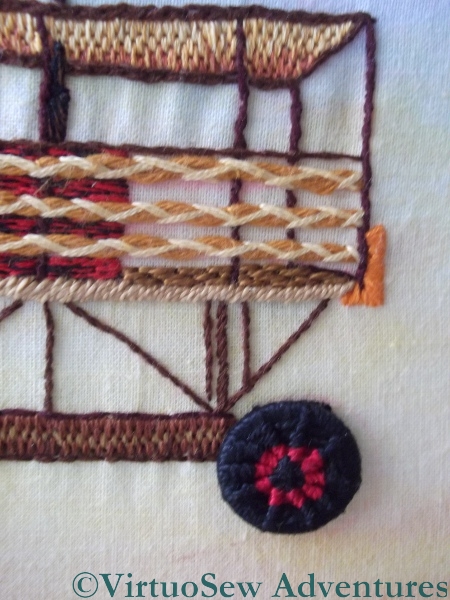
The Sea Tractor was great fun to do. I worked bi-coloured Dorset Buttons for the wheels, to evoke the painted metal hubs – pretty ambitious for my second and third Dorset Buttons ever!
The canopy and the base of the chassis seem to be in Brick Stitch, the main structural elements are either stem stitch or back stitch – the latter in particular for the terrifyingly spindly steps. Notice, by the way, that the steps themselves didn’t actually make it into the embroidered version. I wish I could say that was to emphasie the spindliness – that would be why I would do that now – but I have a strong suspicion that it was really either forgetfulness, or simply not being able to get the angles quite right.
Detail Of Sea Tractor
I used heathered stranded cotton (red and black) for the engine-mounting, and ordinary black for the exhaust pipe that goes up through the roof.
The planks that create the side barriers were a bit of a challenge. In the end I settled on two long stitches in one colour, couched down in herringbone stitch in a lighter colour. I think they make pretty convincing planks, and looking at the detail, I even added the bumper at the back.
I didn’t include the barriers of the back or far side of the sea tractor, but I do recall thinking about that point. Even a painter – even a photo-realist painter – has to edit their image to make sure that it “reads” properly. Often this is a matter of making sure that the colours of things in the background recede sufficiently, but sometimes that isn’t enough. In this case I decided that adding those details would make the Sea Tractor even harder to work out, and discretion would be the better part of valour.
There really wasn’t enough stitching on this piece to qualify for a needlework competition, but I enjoyed working it!
Happy Holidays – The Sea Tractor at Burgh Island (part one)
The Sea Tractor At Burgh Island
This piece was intended as an entry in a competition run by “Needlecraft” Magazine about 25 years ago. The brief was to recreate “A Holiday Memory”, and as it happened, that year we had had a great adventure – a ride on the Sea Tractor at Burgh Island in Devon.
“Needlecraft” had also run an article shortly before, describing and teaching Dorset Buttons, and they seemed perfect for the Sea Tractor’s wheels. Since time was short and the complexity of the Sea Tractor likely to be time-consuming, I also experimented with a painted background on my cotton fabric.
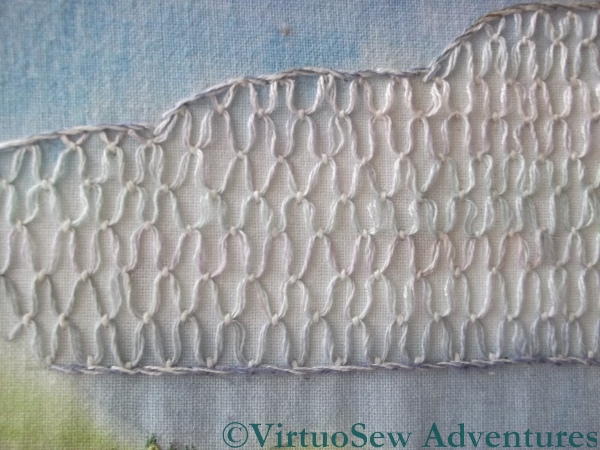
The Cloud Stitch Cloud
In retrospect, the painted background isn’t hugely successful, and it doesn’t have enough stitchery to qualify for high marks in an embroidery competition, but I enjoyed adding those details I did create, and so often in these early pieces, you can see “Rachel-Now” and her ideas prefigured in the stitch choices of “Rachel-Then”.
Looking at it now, I might have done better to work the cloud filling smaller, in white rather than pastels, over a painted base, and without outlining it. Still when you consider that the whole thing was an experiment….!
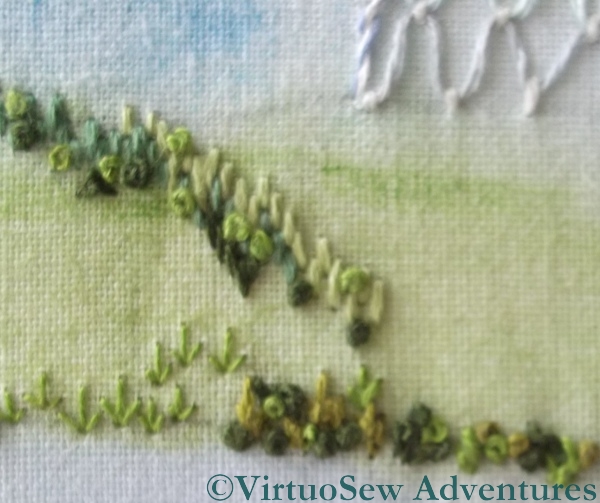
Hillside Stitch Details
The hillside details involved a lot of different stitches in lots of different greens. There are straight stitches, French Knots, chain stitches, and arrowhead stitches (upside down to look like shrubs). Again, if I were to work this now, there would be a great deal more stitchery in it, but I suspect that the combination of lack of time, and a disinclination to work areas of repetitive stitching led me to stop before I should have done.
What I can’t, now, recall, is whether I was pleased with it at the time. I’ve had it propped up in my living room since I rediscovered it, and I’m very tempted to crop it to show just the Sea Tractor itself – which would at least afford me the opportunity to re-block the piece and get rid of the ripples!
Making It Up As I Went Along – The Big Reveal
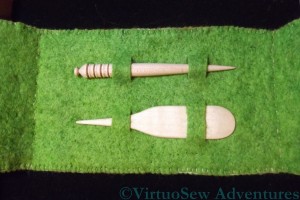
Stiletto And Mellor
The last time you saw the case I planned for the wooden mellor and stiletto, I’d cut the slits and described how I finished assembling it, using chain stitch down each spine, and blanket stitch around the edge.
When I put the tools in place, though, the whole thing seemed rather flimsy, somehow. I wracked my brains for a bit, and then thought that maybe if I were to needlefelt the layers together, it would give it a little more body.
I have a needlefelting tool with five needles in a single holder, so I fished it out, and stared at it pensively for a while. Fortunately it has a plastic guard around the needles, so I left the tools in place, and needlefelted around them. From both sides.
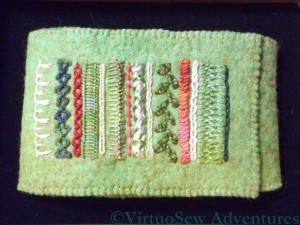
Finished Piece
Then I took out the tools, and felted between the loops so that the fabric behind the tools would stay in place and only the loops themselves would be free of the backing.
Finally, I needlefelted around the edge of the sampler panel and across all of the back, so that the whole case would have the same sense of solidity.
Here is the finished piece. You can zoom in on the picture to get a better view of the stitches, and the needlefelting that gives the piece its body.
I’m very pleased with how it turned out, and I hope my cousin will have many opportunities to use it, and will find the sampler panel inspiring and intriguing.