Cactus Extension Design 1
By this time I had run out of the fabric I used for the screen, and I was beginning to realize that if I wanted to continue to embroider in this sort of style I would need to find another suitable fabric. I’d enjoyed the Persian Fantasy so much that I didn’t want to do that…
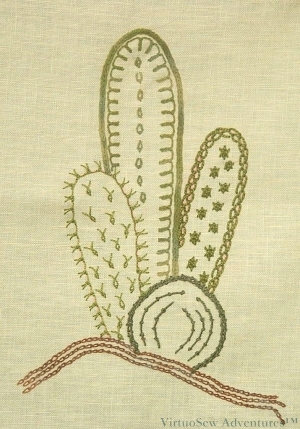
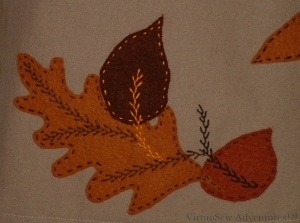
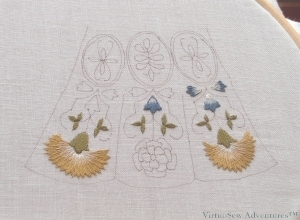
So I designed two clusters of cacti, to use in experiments. The designs were inspired by the cacti in the Persian Fantasy, but not actually like them, and I worked them on a plain 28count linen intended for counted cross stitch.
I used chain and feather stitches, ornamental blanket stitches, and some isolated stitches as well, all to create variety and and texture. The designs themselves are very minimal, so all the interest in them lies in the combinations of the threads and the stitches.
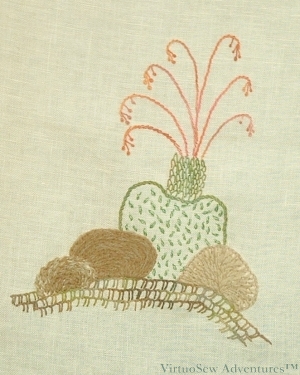
Cactus Extension Design 2
It wasn’t easy – I wanted to use some of the ornamental stitches I had used in the original piece, but the fabric/thread combinations were very frustrating to work with. The linen threads were too closely set and rigidly finished to respond forgivingly to some of the heavier threads, but they did at least provide me with more opportunity for experimentation. Even if my conclusion had to be that I had to find another sort of fabric for this sort of embroidery!
The rocks in the second design were worked using wool as that provides a different quality of matte effect to the effect of a matte cotton.
"Thou" completed around 2000, inspired by the Persian Fantasy
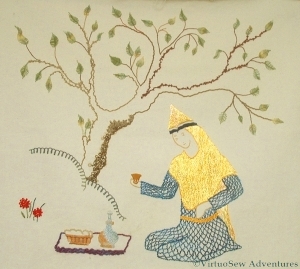
The Persian Fantasy Screen was such fun that I wanted to do some more embroidery in the same style. First of all, it was clear from the original colours that the Prince on Panel One was the same on Panel Four, so I had to create a companion for him, the “Thou” of the text:
A loaf of bread, a flask of wine,
And thou beside me
Singing in the wilderness
And wilderness were paradise enow
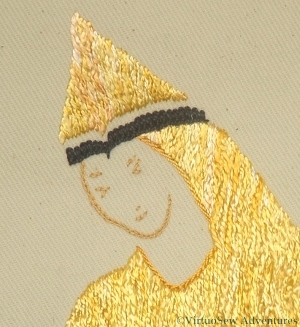
I had some help from my mother on this one.. We used the illustrations in her copy of the Rubaiyat to help us with the lady’s costume and to find a different sort of tree for her to sit under. The pictures were from ancient Persian silk paintings, so I hoped that our prince and his partner would recognise one another. I used the same technique for the tree – couched chenille, boucle and loop yarns, and simple shapes for the leaves, although in this case the leaves also used a variegated yarn. I also used a similar idea for the lady’s outfit as I had for the prince, choosing an openwork filling stitch (in this case, Cloud Filling Stitch) for the tunic, and something more solid for the headcovering.
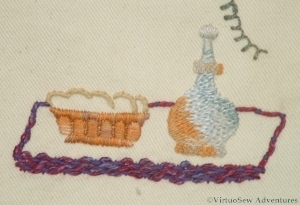
Her Picnic
Again, the dishes for the picnic included lustreware, this time a bowl full of bread. This time the lustreware was worked in overdyed stranded cotton. There was also a flask using similar colours to the prince’s lustreware, but worked this time in variegated cottons. The little table (or rug – I never quite decided what it was!) that the picnic is placed on was edged with a complicated couched braid, using an even more complicated textural thread. I can’t for the life of me recall where I bought it, but I do recall that the only possible way to use it was by couching it!
The Lady's Head
A loose rayon, worked in a sort of halfway stitch between Bokhara couching and Romanian couching, created the lady’s glowing veil, and her headband was worked in braid stitch to give a suitable ornate and luxurious appearance.
I’m not sure that I would use these stitches or threads now. I remember the untwisted rayon was difficult to stitch, very flyaway and prone to catching on my hoop, my fingers, my nails (even though I keep them short) and anything else within range. It looks lovely now it’s done, of course. . .
After a lot of thought, puzzlement, and general head-scratching, I decided to produce two panels.
The embroidery will be worked on linen, and mounted on board, and in front of each embroidered panel will hang a gauze panel. The gauze will be screen-printed with the most familiar images of Akhenaten and Nefertiti, in a pale “faded” colour. The idea is to reflect the dominance of the historical personages in the work of the archaeologists, who try to interpret what they discover in the ground to tell us more about the historical life of the place itself, and to provide an echo in fabric of Mary Chubb’s own imaginative response to the site.
The linen panels will be made up of several sections. The main sections, in a sandy colour, will be embroidered mainly in monochrome. One panel is to show the map of the site, and the other will provide the links between the work in the office in London and the work in Egypt – sketches of the office building, a steamer, and maybe the Pyramids (visited when they paused in Cairo).
Around these panels smaller panels will be attached, embroidered with representations of some of the finds, with pictures of the excavation, and with any other illustrations I can gather together.
All this came together in a rush, a couple of years ago, when I was helping my cousin to clear out our Great Aunt’s house after her death. You can’t talk about banks and inventories all the time, and the final idea just happened to come together as I began to describe my nagging Project. It deserves the capital letter, don’t you think – ten years, I’ve been thinking about it, maybe more!
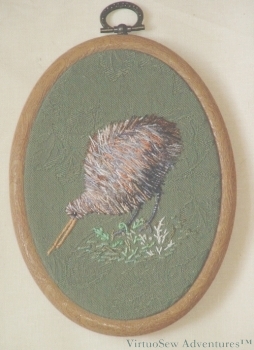
Kiwi In Stumpwork
As I’ve already mentioned, almost every embroidery technique I have done has been learnt from a book, or just developed by guesswork based upon something I have read.
In this case, I had been reading about 17th Century stumpwork, and had just returned from a half-business trip, half-holiday in New Zealand. And I had some rather gorgeous overdyed silk threads and wanted to experiment with them!
The body is worked in layers of straight stitches, using several different colours of the overdyed silks. I worked a slip, slightly smaller than the body, on a separate piece of fabric, then applied that piece over some padding, and used more straight stitches to cover the join – very thoroughly!
The legs and the beak are both worked by stitching very closely over a trailing thread of soft cotton. The background fabric is a sturdy cotton damask upholstery fabric, so the close stitchery did no harm. The ground is worked using still more straight stitches, with scroll stitch, coral stitch and fern stitch to create the fragmentary undergrowth.
This was intended just as a piece of fun, but I was happy enough with the outcome to mount it in a flexihoop frame. I’ve bought a couple of books on Stumpwork since I stitched this, but I don’t know that I would have thought of doing the Kiwi this way if I had read the books first.
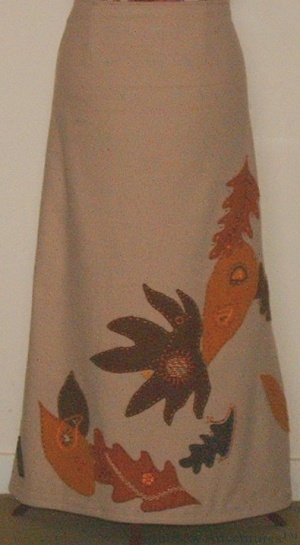
Autumn Leaves Skirt
I made this skirt last winter, and originally needlefelted the leaves onto the fabric. However, after a winter’s wear, and after looking at a good few blogs over the summer, I thought I could do better.
I took some ideas from some of SharonB’s Pintangle posts on seam treatments, fished some additional inspiration from a host of other blogs (wish I’d taken notes, now – I want to find some of them again!) and then proceeded to some adventures in embellishment.
It occurred to me that there was no need to keep within the leaf shapes, or even to add embellishment that resembled leaf characteristics in any way, so paisley shapes, spiders web wheels and trailing lines of feather stitch showed up all over the place.
I started off by sewing around the edges of all the leaf shapes in ordinary running stitch, and originally I had intended to stop there. However, when I did, it looked a little half-hearted, and I’m never that, so Something Had To Be Done!
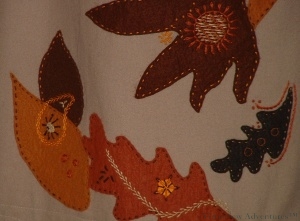
First Skirt Detail
There’s a trail of French knots across the largest leaf, which has a circle of Rosette Chain on it, surrounding a disc of an interlaced filling stitch in three different colours.
I also realised (about halfway through!) that I didn’t have to keep the embellishment only on the applied fabric, so the skirt fabric acquired stem stitch lines with French knot finials, a spiders web wheel, and more French knots.
Second Skirt Detail
It is all worked in six strands of stranded cotton, un-separated to maintain a sort of cohesion. I chose colours that were fairly close to the colours of the felt leaf shapes, but working in the opposite direction, as it were, so dark felt was running-stitched in light stranded cotton.
All this on a skirt I originally made purely because I wanted a long winter skirt to cut the draughts in the office!
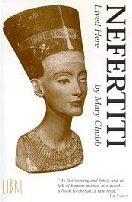
Cover for the book "Nefertiti Lived Here", by Mary Chubb
This is turning into a very big project, and there will be several posts with no embroidery in them. I will try to intersperse them with other projects too!
A good many years ago, I read a book called Nefertiti Lived Here, by Mary Chubb. It describes the author’s own experiences as Secretary to the Excavation in el-Amarna in the 1930s. Sounds as dry as the desert around the dig? Wrong. The book reads as well as a novel, and the characters of the archaeologists (led by the charismatic JDS Pendlebury), and some of the excavators, are beautifully described. The site itself, the Heretic Pharaoh and his beautiful wife Nefertiti, also become characters, and even for a non-Egyptologist, the book is entirely enchanting. I re-read it frequently.
As Mary Chubb was studying sculpture at the time she joined the expedition, it is perhaps not surprising that some of the artefacts they discovered are so vividly described or that the changes in Egyptian art in that period should have made such an impact on her, and through her on her readers.
Given my interest in embroidery, perhaps it is not surprising, either, that Mary Chubb’s fascination with Egyptian art should plant the germ of an idea for an embroidery…
Only a germ, unfortunately. It has taken years of thinking in the occasional idle moment for the idea to take sufficient shape that I could begin to consider the materials to use or the form it would finally take. In the meantime, Mary Chubb has died (at the august age of 99, in 2003 – Times Obituary ) so my early wish to show her what she has inspired has fallen by the wayside.
But that is no reason not to do it!
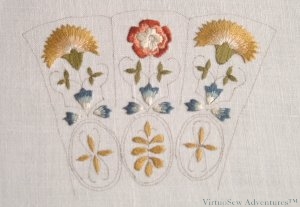
Floral Glove Needlecase Kit - Silk Work Done
I’ve finished the silk work on the Needlecase Kit!
The new stand has been working well – it is very adjustable, so I can make it suit wherever I am sitting, and the magnifying glass has been very helpful too. The only slight hitch with the magnifier is that stitching away at magnification becomes normal and then when finishing off threads at normal vision, I get slightly spooked to realise how small the stitching is!
As I have said, I am not really a fan of satin stitch and long and short stitch, perhaps because I am self-taught. Both of these stitches look simple, but are difficult to execute well, and so are very dispiriting for someone learning from books, with no-one to give hints and tips for excellence. How I long to have had a Miss Hunter to help me!
Actually, the instructions that Tricia Wilson prepared for the course are very nearly as good as having her beside you. They are copiously illustrated with very high resolution photos, so that it becomes a matter of seeking to make the view through the magnifier match the printout.
I’m even coming to think I may enjoy satin and long and short stitch, in small doses!
The kit included whole spools of the silk thread, so I have plenty left to play with. I’m not expecting to go so quickly with the goldwork, but the instructions come nicely spaced out so there will be time to take stock and work on other projects as well.
Finally Finished, Mounted and Up On The Wall
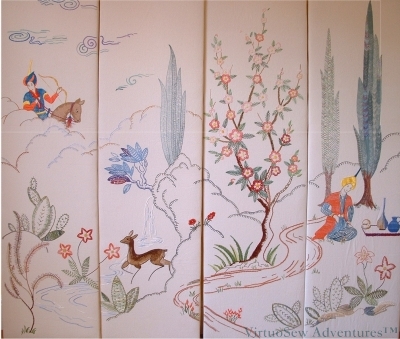
As far as I recall, I spent one month each on the first two panels, and then two months on the third, and three months on the final panel. I only embroidered in the evenings when I got back from work, probably not more than a couple of hours each night.
The closely packed fly stitches forming the poplar trees are largely responsible for the length of time the final panel took. I’m not the most patient person and I was nearly at screaming point with fly stitch by the time I had finished them!
The panels are mounted over padded wooden frames. I couldn’t find suitable two-way hinges to make a folding screen (and if I’m honest, we don’t have anywhere where such a thing would be useful!) so I simply hung them on the dining room wall. I don’t think anyone who has come for dinner has ever failed to comment!
Floral Glove Needlecase - Beginning To Stitch
So, here is my progress so far. I’ve ended up buying a floor standing frame with a clamp so I have it ready to hand and don’t have to hold the frame, and I have bought a magnifier on a clamp as well. I’ve not had them up and running for long enough to comment on whether they really help!
There will be some goldwork in the later stages, but the first month concentrates on the silk embroidery. I’ve never used silk thread before, but it’s a lovely thread to stitch with. The thread is six strands and separable, like stranded cotton, but the resemblance ends there. The silk thread is supple, soft and shiny, and while not being difficult to work, doesn’t feel as lifeless as cotton sometimes does.
The first scare was to read the instructions and discover that the chrysanthemums were to be outlined in stitches about a millimetre long. Eeek! Then again, long and short stitch is not my favourite way to fill a shape. I admire the silk shading one sees at Royal School of Needlework shows, but it doesn’t fire me with a desire to emulate it. Still, Grandmama could do it (I shall photograph some of her embroidery and blog about it later), so I really think I should have a stab at learning.
I’m running a little behind, because of deadlines in other work, but when I get a combination of an afternoon of good sunlight and time to stitch, I become a very happy girl!
There was so much going on that I consciously reused yarns, colours or stitches across the four panels in order to maintain some semblance of order. In fact as I moved on to each panel I would lay the completed ones side by side on the living room floor and scramble around putting piles of coloured threads on them. It must have looked highly comical, but my parents (I was still living with them when I embroidered these panels) were kind enough not to laugh. Besides, as long as it works…!
Crags worked in Caron Collection "Storm" (I think!)
I chose to use one of the Caron Collection threads for the basic outlines of the closer landscape, using Up and Down Blanket Stitch, my favourite blanket stitch variation. I’ve done a bit of hunting because it’s one of the more obscure variations and finally found it at the bottom of Sharon B’s Stitch Dictionary page on blanket stitch variations. For the further landscape or clouds (I never did quite work out what they were), I used a different colour range but the same stitch.
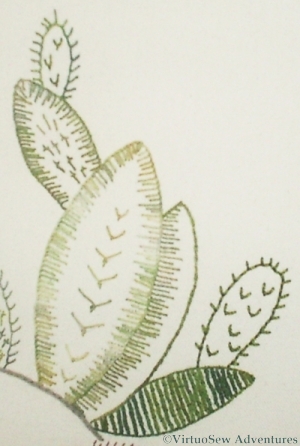
Some of the Cactus Plants
The cacti were worked in a variety of stitches, partly based on the lines of the original transfer, but then extrapolated as the stitches and threads suggested themselves. Although I did use several variegated threads in the flowers and the cacti, most of them are pearl-cotton types, and there is a certain unity provided by the use of the same set of threads wherever those forms appear. There are fly stitches, feather stitches, blanket stitches and sword stitches in this small section. I’ve diagrammed Sword Stitch at the end of this post.
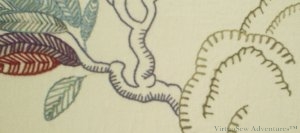
Large flowers with leaves worked in Chained Feather Stitch
The leaves for the largest flowers were worked using chained feather stitch – I had never worked it before and thought it looked fun. I caught down the long connecting stitches with a single strand of cotton, and was delighted to realise that that gave me the effect of a shadowy vein – one of those serendipitous effects that one cannot foresee, but only rejoice in.
The large flowers had centres of Whipped Spiders Web stitch and the outlines were worked in Rosette Chain stitch. The stems were simply a very heavy rayon cord, couched in place. They may well have been the most straightforward element of the entire four panels!

Sword Edging, or Sword Stitch
I couldn’t find a diagram of Sword Stitch on the internet anywhere so I spent a bit of time with a vector drawing package and Barbara Snook’s “Embroidery Stitches”, published by Batsford in 1963. I’ve redrawn the diagrams, changing them slightly where I thought the original used a strange order. When working a row, she seems to recommend working from right to left. The only other advice she gives is that the longest arm should point downwards – clearly that is the blade of the sword.
