
Category: General Embroidery
A Closer Look at Modern Goldwork – Five
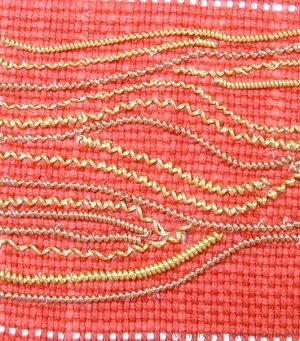
Bark Effect
For this panel, Tracy told us to think of tree bark and then to use stretched and unstretched pearl purl of different weights couched to create a bark pattern of light and heavy lines.
I really enjoyed this for some reason. The pearl purl is stiff and springy, and doesn’t feel as fragile as some of the other metallic materials.
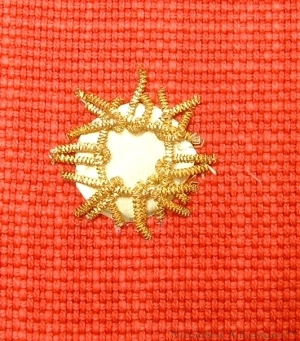
Shisha Variation
The second panel shows an adaptation of shisha work. The “mirror” is in fact a circle cut from a piece of metal foil, and the “stitches” holding it in place are made using check purl. This looks clumsier than I would have liked. Partly, no doubt, because it is not an easy technique even with the standard materials, and I leapt straight in with non-standard materials. Partly also, I think, because having decided to do this I should then have picked a finer purl to use for the “stitches”. It might have been easier to achieve the effect I want if I had thought through my choice of materials. I recall also that the metal foil was flexible and tricky to keep in place while I worked the “stitches” over it.
Note to self: Next time, try the standard technique using the classic materials before making life more difficult for yourself!
I think it is fair to say we all had a wonderful time on the course. Never having worked with metallic threads before, I think the Modern Goldwork course provided an entertaining introduction, whereas it is possible that going straight into classic goldwork might have proved a little scary!
A Closer Look at Modern Goldwork – Four
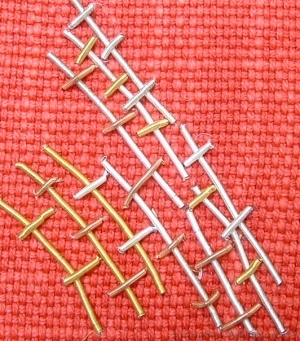
Burden Stitch
The next two panels show contrasting materials and techniques.
This first panel is using purl to create the pattern of “burden stitch“. This can be more or less closely spaced, and while I worked it as a very open, rough texture, it would be possible to use it to create the impression of basket weave. I’ve used Burden Stitch before, but only in thread.
I’ve used Smooth Purl here, threaded on the needle like a bead – which is fairly hair-raising when the bead in question is a floppy tube about three inches long which could easily be damaged and allow the needle through prematurely!
This next panel shows a classic, straightforward couching of imitation Jap gold, worked as a simple doodle.

Couched Gold
I rather like the effect of this – rather like the old idea of “taking a line for a walk” that is one way of creating the basis for an abstract painting.
It also provides a gentle introduction into the method of couching that can be extended and formalised to create or nue.
As such, I have plans for using this technique and its variants on the Amarna panels!
Tudor and Stuart Goldwork Masterclass – the first two Goldwork Stitches
I’ve not come near finishing the silk work on the Spot Sampler, so I am going to do some practising first. The fabric is a heavy plain weave, about 16 threads to the inch. Compared with the linen for the actual piece it is almost like binca! I chose it to give me some chance to see what I was doing and to count the threads if it proved necessary for the stitches. It wasn’t really for the first two, but I did so anyway!
Reverse Chain Stitch
Reverse Chain Stitches
This produces, to all appearances, simple chain stitch, but it doesn’t involve the “scooping” motion used when working in the hand and seems somewhat easier to control.
I’ve done it both over three and over two threads.
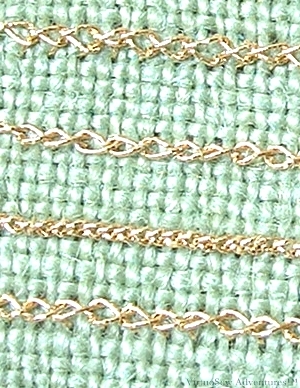
Reverse Twisted Chain Stitch
Reverse Twisted Chain Stitch
Again, the resulting appearance is of simple twisted chain but the stitch is worked backwards, I think this reduces the chances for the gold thread to snag on itself, which certainly helps.
As shown in the original diagram, it is worked over a grid in effect, of two threads by two. After doing that fairly easily I decided to play a bit.
So I worked several variants, over two by four, two by one, one by one, and two by two.
The one by one was quite a challenge, but I am pleased that I have an impression of the changes in appearance effected by the different stitches.
A Closer Look at Modern Goldwork – Three
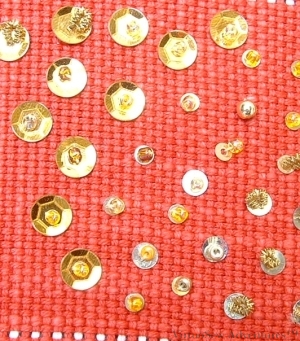
Sequins
We used a wide range of different materials and techniques, so the course provided exactly what I wanted – an guided overview of both.
Tracy pointed out that you don’t need to use beads to sew sequins down. These two panels therefore show some of the variants she suggested.
The first panel shows sequins caught with beads and with short lengths of purl used as beads, with both sequins and beads differing in size and colour.
The second panel shows sequins couched down with sections of check purl, irregularly spaced and grouped. There are additional beads and sequins added to increase the range of textures that appear.
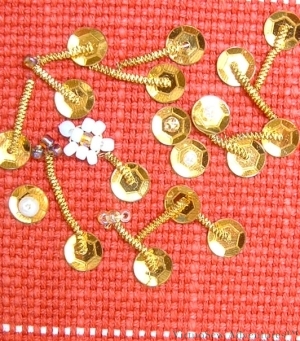
Tied Down With Check Purl
It’s probably very easy to tell from looking at these that, for all my embroidery has a somewhat improvisatory quality, I’m not entirely comfortable in situations where the work has to be completely freeform. I like to have a structure underlying my improvisations.
Also, at present, neither of these techniques is asking to be used in the Amarna panels or anything else I have in mind. I’ll think of something, no doubt, but in the meantime this is simply one for the notebook.
More on the Masterclass
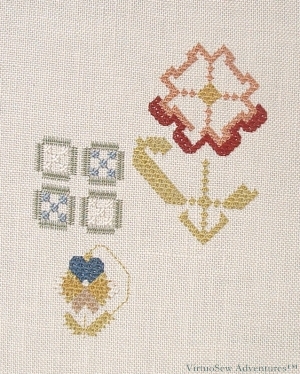
Making Progress on the Queen Stitches
I’m making progress on the Tudor and Stuart Goldwork Masterclass. As I mentioned, I was a little anxious when I realised how much counted work was involved, but I am developing techniques to cope. Since the designs are large and simple, rather than being full of subtle shading, it is actually fairly easy to decide by eye where the next stitch goes. I count twice to place a new motif correctly, but then just do what seems right.
The other decision I have made is to help convince myself I am making progress – so here, instead of finishing the leaves, I’ve started on the flower. It gives me a better idea of the extent of the design – this is the top right hand corner – and I needed the reassurance!
Megan has produced a fantastic round-up of links and resources about Queen Stitch over at Elmsley Rose – well worth following up, as each different description contributes to developing a technique for working the stitch.
I am planning to set up another frame with a piece of cloth to practice the goldwork stitches on, since some of them will need it, but for the moment I am trying to apply some discipline to my stitchery…!
Floral Glove Needlecase – The Finishing Kit
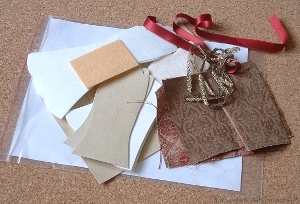
Finishing Kit for the Floral Glove Needlecase
Another gentle thump through the letterbox and the Finishing Kit for the Floral Glove Needlecase has arrived.
Neatly die-cut pieces of card, interfacing, and fabric, lengths of ribbon and lace… It all looks rather promising, doesn’t it!
The first thing I need to do (I’ve looked at the instructions online but not quite got as far as printing them out) is to embellish the ribbon with gold thread and spangles. I am learning from this project that the layering of intricate detail and embellishment can be hugely successful; even when you think something is as ornate as it needs to be, sometimes it looks better with more.
That doesn’t work with fashion – I remember coming across this some years ago. Even now I survey myself critically in the mirror before going out, to see whether I need to remove an accessory. And this is a link to the picture referred to in the post.
Planning The Golden Fleece
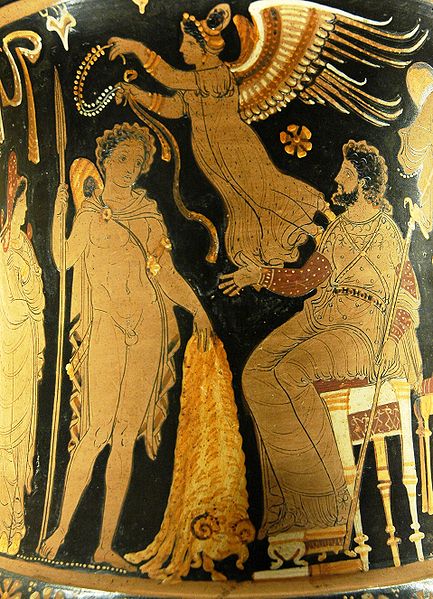
Jason bringing the Fleece to Pelias. Photo by Jastrow (2006) Public Domain Licence
I know Janice suggested I should finish the Dreams of Amarna before getting wound up in The Golden Fleece, but I had a long train journey recently, and started idly thinking about the idea.
So:
Obviously, the scene to do is the one where Medea takes Jason into the grove where the Fleece is kept.. Lots of twisted branches and tree trunks, the sun sinking low in the west, and the Fleece glimmering in the light of the torches.
The first design challenge that occurs to me is that the Fleece will over dominate the picture if I am not careful with all that textured, gleaming gold. On the other hand, gold looks better with a dark, rich coloured background, so I can’t just settle for a daytime scene.
I can ease the problem slightly by dressing Jason and Medea in their best clothes, with rich colours and gold details, and perhaps rather than sunset, have it in moonlight (cue a silver kid moon!), with a line of torches to indicate the approach to the grove.
If I make sure that the Fleece has several shades of gold in it, that may also settle it more happily into place as only part of the panel..
There are several books I can use for reference – Tim Severin built a replica of the Argo and sailed and rowed from Greece to Georgia, which is where Colchis is thought to have been. Robert Graves wrote on the subject. I’ll have little trouble finding other references, either. We’re back to myths, legends, and archaeology…
Grandmama’s Embroidery – Two
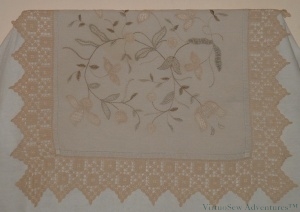
Grandmama's Tea Cloth in needle lace and filet crochet
Grandmama made a lovely linen tablecloth in white-on-white needlelace, but as I couldn’t get any sort of photograph of it, I photographed this small teacloth in ecru shades instead. I think this might have been a practice piece, not in the sense of learning a new skill so much as in the sense of trying it to see whether she enjoyed the technique. I now wonder – in the light of “Stitching for Victory” – whether this was another wartime project, and the various shades of ecru were all that was available.
It looks prettier in real life than in the photograph. I used some of the motifs as inspiration when I designed the Jacobean Firescreen.
Grandmama worked the filet crochet border as well. We have a couple of teacloths with Filet crochet edgings she worked using Mary Card designs. There’s also a crochet lace teacloth that was going to be a bedspread – it is the only occasion that any of us know of, in which Grandmama failed to finish what she started! I’ll try to find the photo of that and scan it to put it up another time.
Scattered around the family, there are also examples of canvaswork, stitched rugs (two quite large ones and a small mat, which is in our hallway), tablecloths, napkins and bedlinen, and a footstool (two footstools, actually!). Not to mention assorted knitwear (I still have, and wear with pride and glee, an intarsia sweater she knitted for me when I was eighteen), and some crocheted work.
She also tried a sort of pressed metalwork, drying flowers and foliage, and Heaven knows what else.
I’ve been told I “collect skills”. Where do you think I inherited that from?
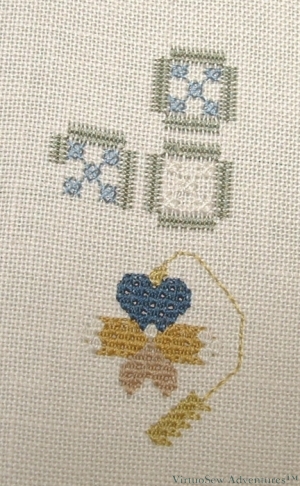
Godmothers and Goddaughters

The embroidered teacloth that took three generations to complete!
This heavily embroidered teacloth was begun by my Great Aunt. She either became weary of it or simply felt it she didn’t have time to do it, and she passed it on to her god-daughter.
Who in turn, finished all but a small bit, when she ran out of suitable stranded cotton to do some of the curlicues. And then she passed it on to her god-daughter – me!
I worked something out for the curlicues, and finished the embroidery. And then – Surprise!
I’m reading a book at the moment called Stitching for Victory. It is a fascinating account of the contribution of fabric and stitch to the war effort. It covers tents and uniforms, the Utility mark, Maskelyne‘s misleading camps in the desert, Make Do And Mend. It describes ideas for refashioning and remodelling garments, and repurposing blankets, parachutes and darning wool.
Imagine my surprise when I turned a page among the colour plates and found myself face to face with a teacloth embroidered in a familiar pattern. … It turns out that it was a Penelope kit, and was among those used in rehabilitation of injured soldiers during and after the War!
Beginning the Tudor and Stuart Goldwork Masterclass
Starting the Spot Sampler
So now I am beginning to do the silk embroidery for the next Thistle Threads Online University Course, the Tudor and Stuart Goldwork Masterclass.
More gorgeous Au Ver A Soie silk thread to play with!
Furthermore, some new stitches! I’m not keen on counted work, so when I saw a chart in the instructions, my heart sank. Then I read the instructions and realised it was going to be a bit more fun than I had thought…
So, most of the silk stitching is to be in Queen Stitch, which I think I have done in canvaswork before, but never at this scale, and never changing its orientation or doing half queen stitches. The square motifs are bordered in Roman Stitch with Rice Stitch in the middle. Apparently in the historical pieces, Queen Stitches are often treated almost as pulled work, creating a lacy pattern of holes between the stitches. It’s quite difficult to pull tight enough, but as you can see from the navy blue petal, I’m beginning to get the hang of it.
The great attraction of this course for me is that we will have animations to show us the complex gold thread stitches that are the main focus of the course. At the end of the course, we’ll get a CD of these animations, so if I forget how to do one, I will be able to learn it again. Furthermore, some of Tricia’s recent posts on The Embroiderer’s Story mention that she has discovered some new stitches during her research trip and she is hoping to add them as a bonus!