
About Rachel
View all posts by Rachel
First Voluntary Project – Fifth Installment
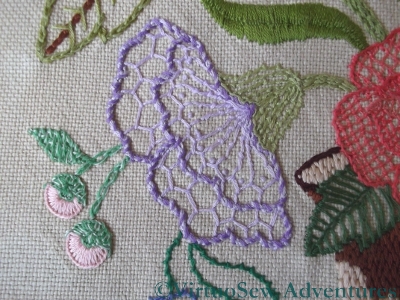
Cretan Chrysanthemum
This chrysanthemum is outlined, like the other, in Whipped Stem Stitch, but in this case the filling is Cretan Stitch, quite widely spaced. I rather like the slightly rippling effect this creates, but the stitches perhaps needed to be just a little more closely packed to make the ripple a bit stronger. The calyx is rows of coral stitch, and the stems of those strange little buds are the very first appearance in my work of one of my favourite stitches – Cable Chain Stitch.
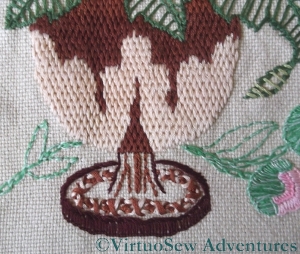
Brick Stitch Vase
The vase is worked in Brick Stitch, and since the fabric is a heavy square weave it was easy to do as a counted stitch – easier than when I worked the Prince’s Steed in the Persian Fantasy!
The foot of the vase is in closely-packed blanket stitch, and the ornamentation is Whipped Chain Stitch. I think if I were to be working it like this now, I would continue the brick stitch down the stem of the vase and leave out the whipped chain. But after all, it was my first solo project…
Naturally this won’t be going on display anywhere, but it’s been fascinating to revisit it, and try to remember what I chose and why. There wasn’t much of the why, but I’ve enjoyed looking at my experiments, anyway!
Worth A Visit – The Jersey Occupation Tapestry
Planning Panel
Regular readers will know that I like large projects for myself; it won’t have been so obvious that I am interested in community or group projects as well. Not just the stitching, but the inspiration, organisation, management and quality control necessary to bring such projects to a successful conclusion.
And make no mistake – quality control can be a serious issue. Often you will hear it suggested that volunteers can’t be expected to do good work, or that, because they are volunteers, anything they produce, however sloppy, should be accepted with enthusiasm and gratitude.
Well, I’m sorry, but I don’t agree. Volunteers should be expected to want to do well, and to practise to make sure that they do.
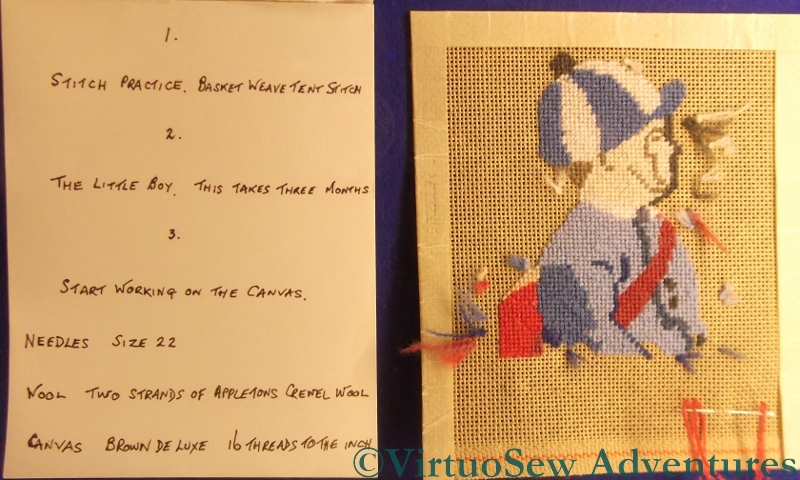
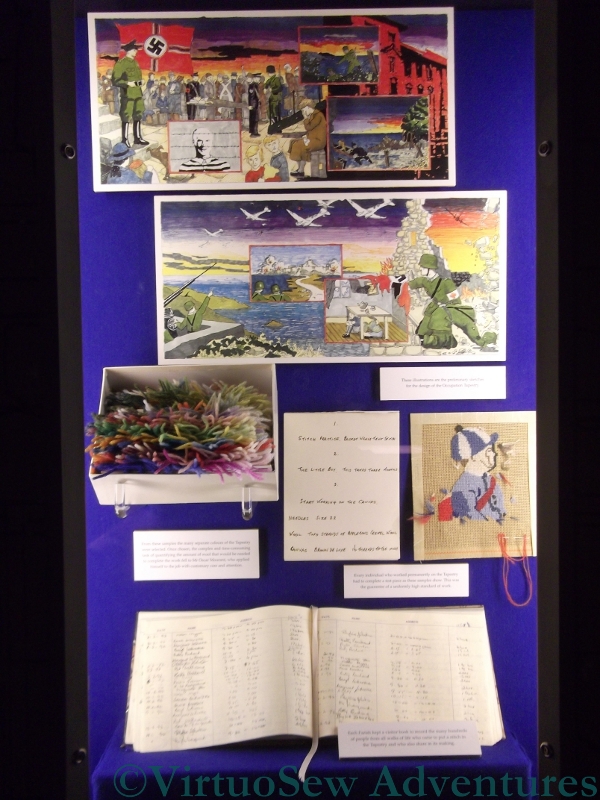
Stitch Practice
The volunteers who stitched the Jersey Occupation Tapestry were asked to stitch sample pieces before starting on the real thing. The twelve panels of the Tapestry are worked entirely in Basketweave Tent stitch, which is an easy stitch – but that very simplicity means that there are no textural variations available to hide variations in technique. So all the stitching had to be right. And it was.
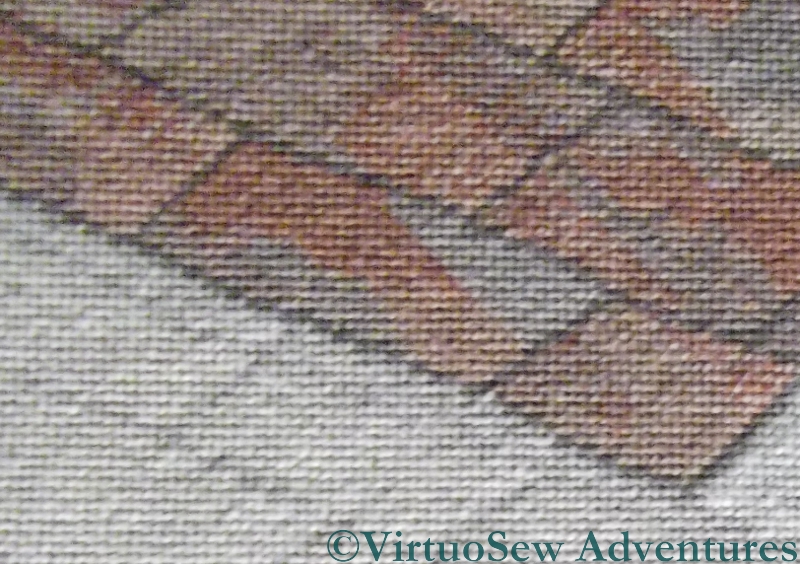
Detail Of Paving
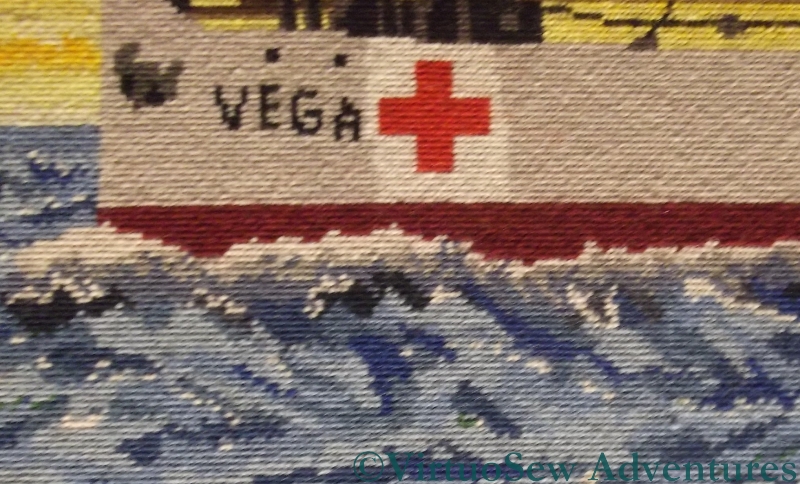
Red Cross Ship Vega And the Sea
The panels were designed by a curator at Jersey Heritage, who then drew out the designs on canvas and marked the thread colours for each element. In the case of seas, skies and such sections, he suggested a range of colours and allowed the stitchers to use their own artistic skills to bring those elements to life. If you look at the photos, I think you’ll agree that his faith in them has been triumphantly justified.
The Jersey Occupation Tapestry Gallery is part of the Maritime Museum in St Helier, and was worked to commemorate the Liberation of the Channel Islands in 1945. Unlike some textile galleries, they don’t mind photographs being taken, although as the panels are displayed behind glass, flashes would be counterproductive as well as unpopular! The display includes some details about Albert Bedane, and a video about the making of the tapestry. Some of the stitchers were children on the island during the Occupation, and some of their memories are included in the designs.
Altogether I had a fascinating time, and can recommend it highly!
Another Needlework Nibble – the Butterfly Pinpad
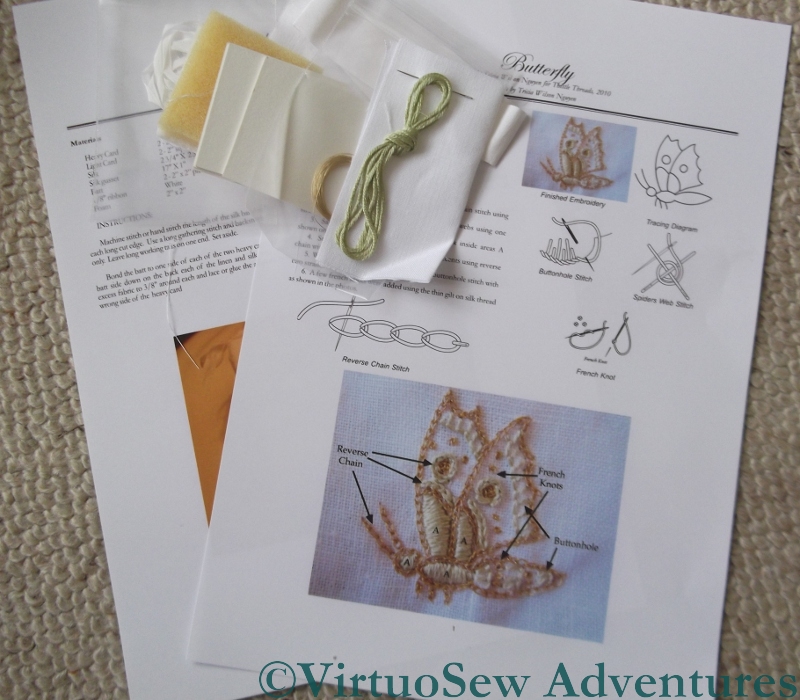
The Butterfly Nibble, instructions and materials
There is yet another Needlework Nibble available from Thistle Threads! This involves a particularly fine gold thread, and some stranded silk.
This one is a tiny butterfly, outlined in gold, highlighted in pale green silk, and then finished as a pinpad. I have discovered in the past two years that I really enjoy working these little pieces, and they are a great way to find out about different threads, stitches or techniques without being entirely overwhelmed by the scale of the project.
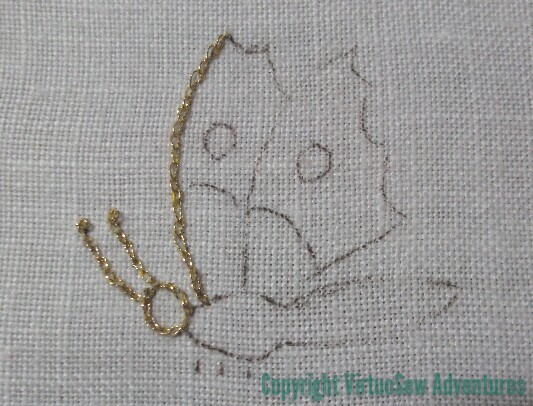
Beginning The Butterfly Pinpad
I’m suffering from tennis elbow at the moment (owing to the housework, not the embroidery!), so I am particularly interested in smaller projects that allow me to make visible progress in short spans of time. I thought that this might be one of them, but actually the stitches are so hair-raisingly small that I’m no longer sure that is the case.
The stitches are only a couple of millimetres long, and with my arm in its present state, what you see here is the result of two half-hour sessions!
Crock of Gold Hoard – Those Wretched Shadows!

All Unpicked
When you last saw the Crock of Gold Hoard (here), it included some highly unsatisfactory shadows, and my mother and myself had pounding headaches and crossed eyes from deciphering the original photograph.
It took several hours of frustrating, painstaking unpicking, aided by tweezers, but I managed, and then started on the ground while I pondered the shadows. There are some sticks or something on the ground, and I want the ground to look sandy and speckled so I’m going to use seed stitches to create the sandy, gravelly look.
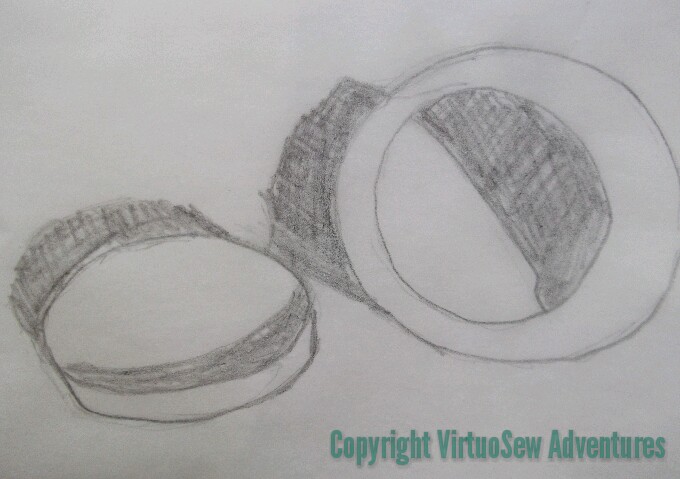
Simplified Shadows
There followed still more headscratching, sketching and puzzling (including experiments with photo-editing and watermarking on my tablet computer – that’s why there are two different copyright notices in this post!),
This example isn’t quite right – the shadow of the pot isn’t long enough, but it does demonstrate quite clearly that I’ve decided to simplify the shadows very considerably.
Shadows drawn in chalk
Since I’m removing the archaelogist and his hands, as well as the confusing shadow of the post which is out of the picture, I’ve decided I might as well simplify as many of the other shapes as I can. As I’ve said before, I’m not a needlepainter, and I’m not aiming for complete realism. Still, getting the shadows right will do much to make the design seem realistic enough.
I’m sure the detail of the shadows will change, but I’ve now drawn in an outline of those simplified shadows in chalk. I’ve even remembered that the pot has shoulders and a raised rim.
Crock of Gold Hoard – Problems with Shadows
Trialling Shadows
I mentioned in my last post that I was somewhat troubled by the question of the shadows that I need to have in this picture to “anchor” the Crock and its lid in space. Since the silk I used for the Crock has a sheen, my original idea was to try to find a matte thread to help keep the shadows in the background.
Another Trial
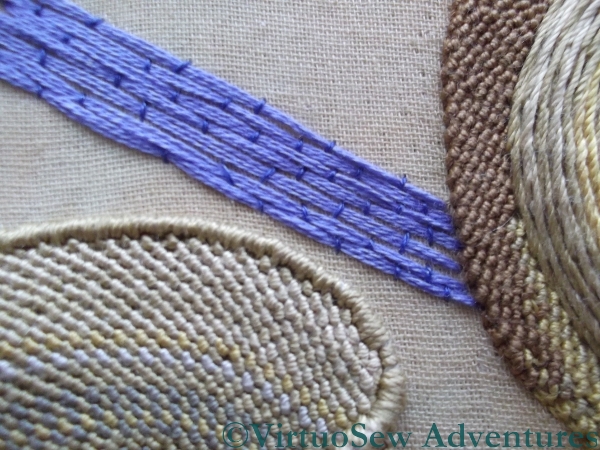
I had three dark, “shadowy” colours in a linen thread, and tried those first. I wasn’t happy either with the colours (too dull and drab for shadows cast by an Egyptian sun) or the texture (rough and scratchy), so I tried a soft lilac-y blue stranded cotton, couched down with a darker blue. That was better, but not really dark enough.
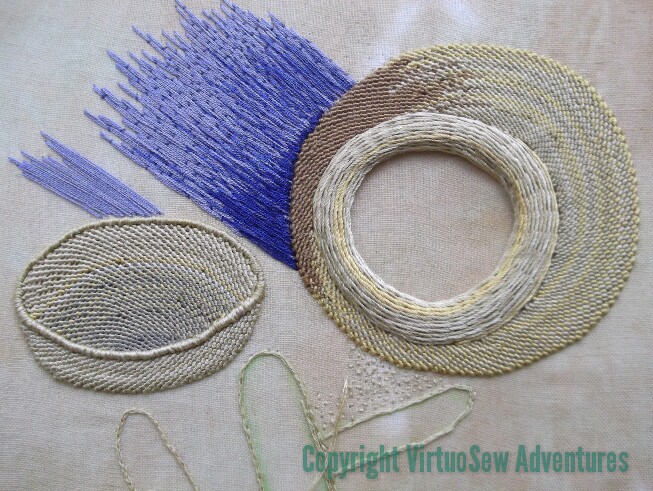
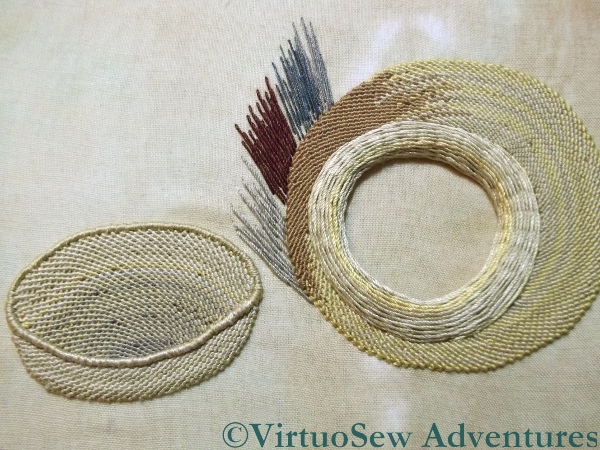
Wrong Shadows In Stitch
So this on the left was my next attempt. I like the shading effect and depth of colour that I’ve managed to achieve, but I can already tell that the shape of the shadow is absolutely wrong.
So I packed it up, and took my problems to my mother, who is an artist, and has a much more practised analytical eye than I have.
At which point, we realised that the shadows were rather more difficult even than I’d thought.
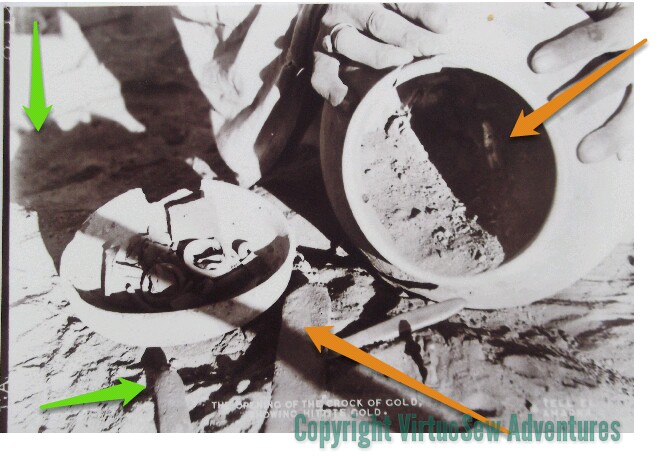
Difficult Shadows
A lot more difficult! The amber arrows indicate (approximately) what appear to be two conflicting light sources. Since the ground appears to be uneven, this must be a photo taken on site during the excavation. The vertical green arrow in the top left corner is pointing at a shadow which is clearly of something on top of a pole somewhere out of the picture. The other green arrow points to shadows show that the ground underneath the lid isn’t as even as a careless glance would at first suggest.
I’ve got a lot of unpicking to do!
Crock of Gold Hoard – Working the Rim of the Crock itself

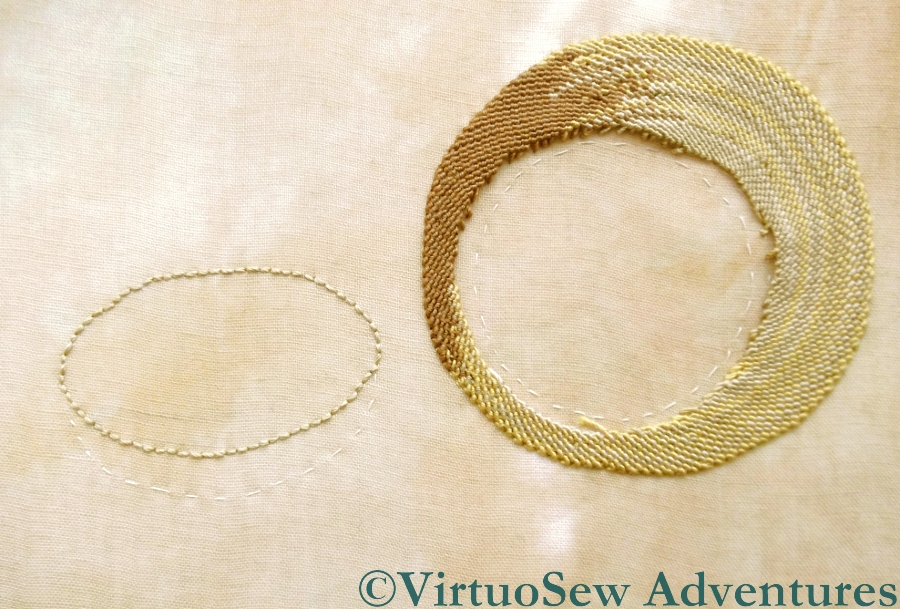
Foundation Stitches on the Rim of the Crock
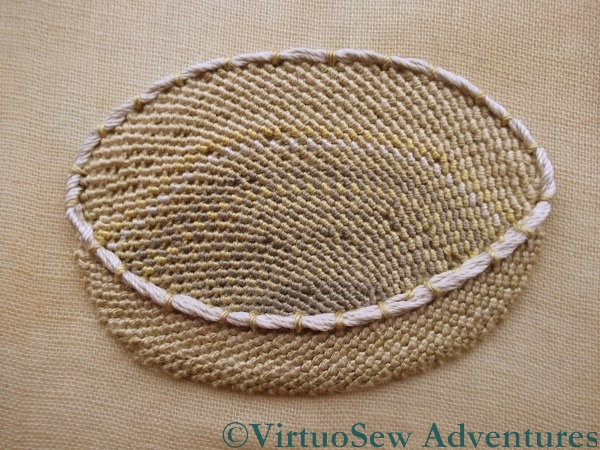
After much cogitation, I decided to work stem stitch band around the rim of the Crock of Gold. It seemed to me that that this might create the right combination of a rounded shape and a smooth line around the rim. Although satin stitch worked beautifully for the much narrower rim of the lid, I was sure that it would lead the eye wrongly in this case. In fact if you look at the foundation stitches for the stem stitch band, I think that confirms my suspicion.

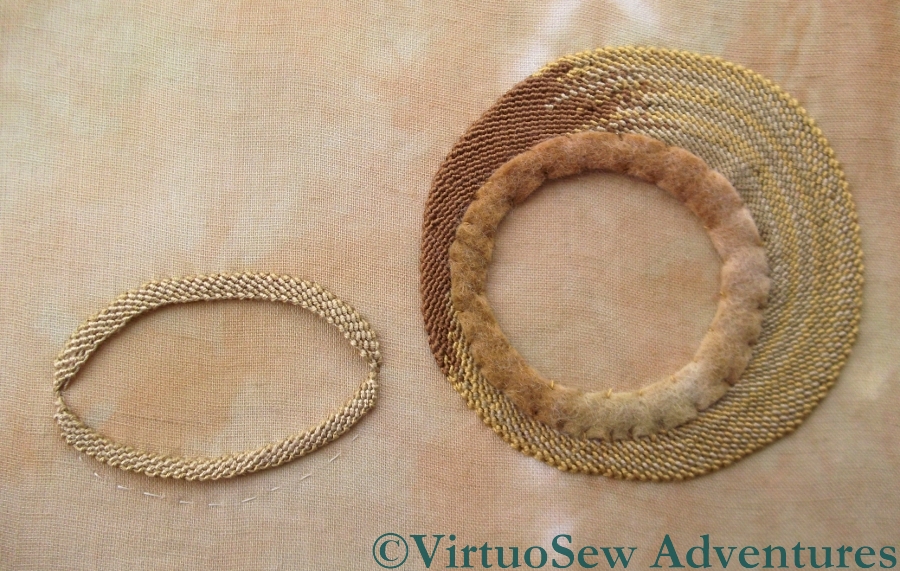
Rim of the Crock in Close Up – Stem Stitch Band
The choice of stitch also meant that by changing colours as I worked the stem stitch over the foundation, I could keep the sense of movement that I feel recalls a hand-made pot. Had I worked the rim in satin stitches, changing colours would have created a rather blocky effect – fine when I come to re-create some of the geometric patterns the Egyptians used, not so good for a plain and undecorated earthenware pot!
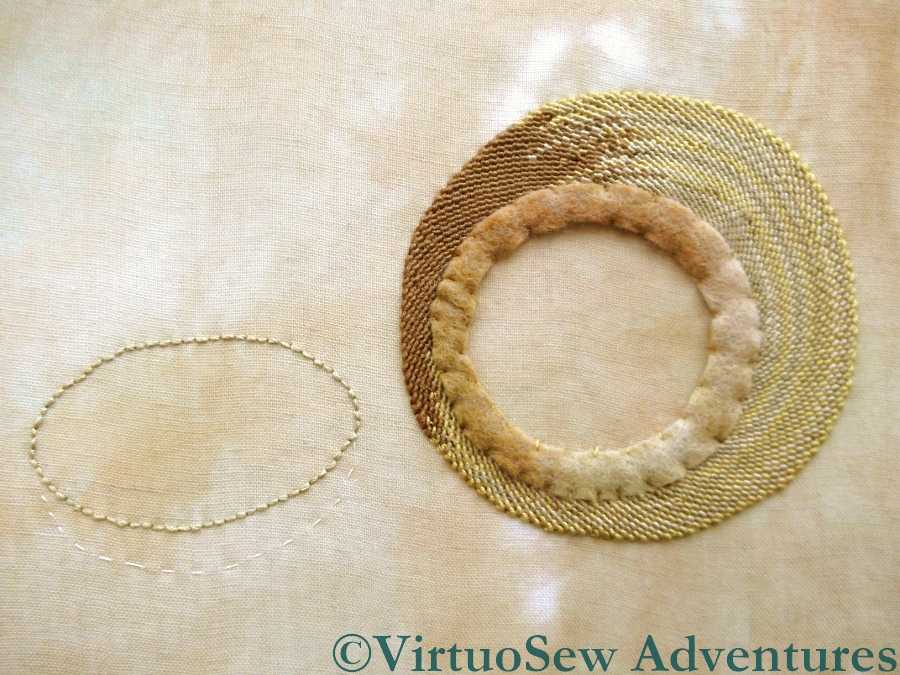
I had a momentary wobble as I began to work the rows as the stitches seemed not to be packing together, and I kept catching my needle on the felt, but gradually as I added more rows of stitching I realised that it was working.
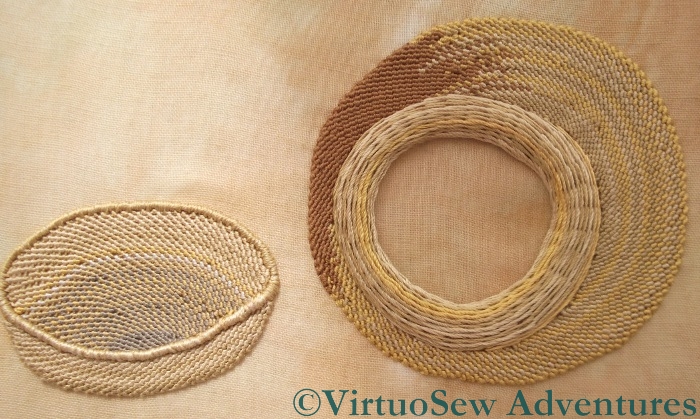
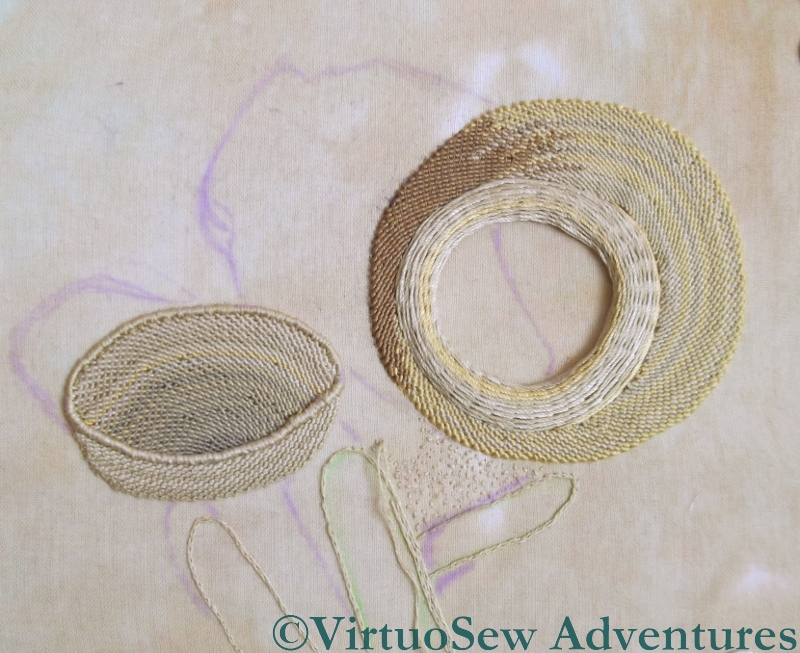
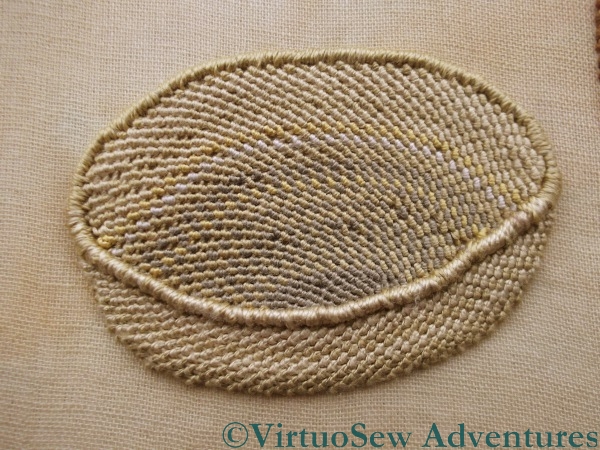
Both Rims Done
Now I have the rims done, I need to do the shadows, and I’ve not quite worked out how, as yet.
Still, thus far, the Crock of Gold is working pretty well. I think the raised effect of the rims will help to keep the chipwork visually contained, and that will be important, as there’s the potential for chipwork to draw the eye too much.
Glittering Nightcap – Month Three Done
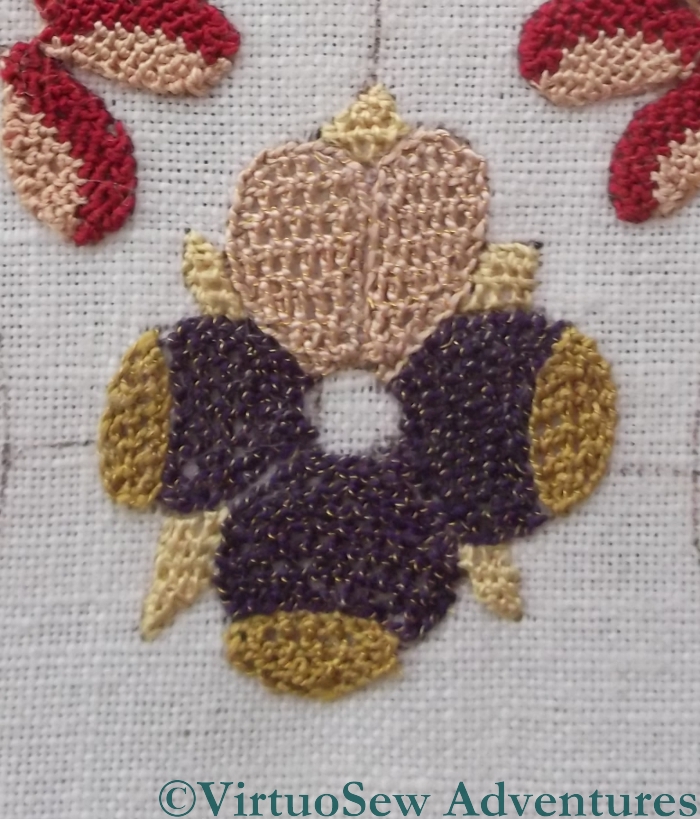
Pansy From Month Three
This month, because I’m working the main body of the cap first and then intend to turn over and work the rim, has been a little thin of activity. I’ve really no excuse for it taking so long except that I’ve become very taken up with the Dreams of Amarna. The work on the main part of the cap this month has been only two pansies, worked in detached buttonhole stitch using the Gilt Sylke Twist, with straw-coloured calyxes worked in Soie Perlee.
The other half of Month Three – two pomegranates on the rim – will have to wait until I turn the fabric over. Next month’s activity involves two Tudor Roses and a positive plethora of different leaves in various combinations of Soie Perlee.

Month Three Done
This picture shows one of the two pairs of sections that will make up the finished Nightcap. As you can see, there are still large gaps in the pattern, but it is gradually filling in, and Month Four actually completes the embroidery. Months Five and Six concern the finishing of the embroidery to create the nightcap and the silk-brocaded stand for it.
The Fragment of Tile That Started It All

Drafting the Lotus Flowers

Coloured Draft 1
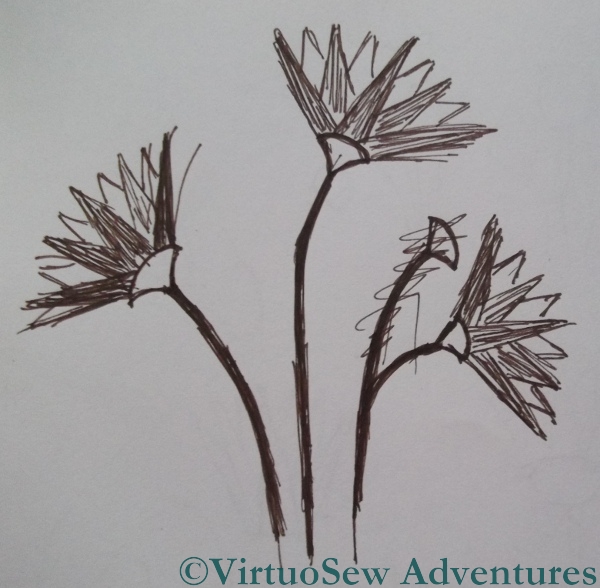
At the beginning of her book “Nefertiti Lived Here“, which is the inspiration for my “Dreams of Amarna” project, Mary Chubb describes a fragment of glazed tile she found at the bottom of a case full of excavation plans one wet and miserable February morning. That fragment, a genuine artifact from the excavations being undertaken far away in Egypt by her employer, the Egypt Exploration Society, ignited in her a hunger to go to Egypt and see for herself. Her description is so lyrical and vivid, I can’t possibly fail to include a representation in my panels:
The background was an incredible, adorable, hedgesparrow blue, the glazing just high enough to give it the same shell-like glowing quality. Against this grew three lotus flowers; the slender curling stems just firm enough to hold up the swaying heads of the flowers, faintly lilac-tipped within their dream-green, fanshaped sepals.
First Definite Draft
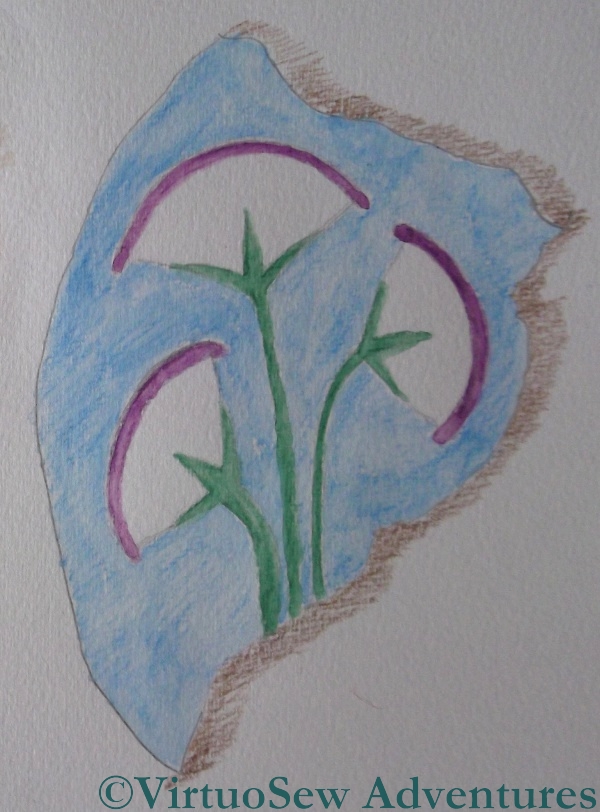
Coloured Draft 2
Unfortunately, she doesn’t include a photo, or a drawing, or even an accession number for the find so I can track it down for myself, so I’ve had to devise my own!
I’ve been looking through my reference books and photos to find out how the lotus flower was depicted in ancient Egypt, and I’ve found that there seem to be two versions, one with individual petals, and one a little simpler and more stylised. I suspect that the more complex version is more likely to be Amarna-period, so it’s a pity that my second coloured draft worked out better!
When I’ve settled on my design for the lotus flowers – and remember that these are only my first thoughts – I will need to work out how I can represent the broken edges of the tile, and even what shape to make the fragment. I may yet find myself finding a surplus tile and breaking it to see what happens.
Or would that be taking research too far?
Crock of Gold Hoard – Working the Rim of the Lid
Trellis Stitch Finished
While continuing to work the eccentric spiral trellis stitch for the lid, I’ve been thinking about the rims.
Before I move on, though, this picture shows how I’ve tried to introduce darker colours inside the lid to create an impression that it is hollow.
I think it’s worked, too!
Padding Lid Rim
It’s clear that I’m not going to be able to use the same techniques for both rims, since one is so much wider than the other. I used felt for the rim of the crock itself, and four lengths of silk thread twisted together to put some padding on the lid rim. As much as anything else, this is to create a visual sense of depth when I put in the chipwork. Even without the padding covered, this works pretty well.
Lid Rim Done
However, with the padding covered with satin stitch, it looks altogether better. Working the satin stitch was something of a trial, because I have a layer of calico, a layer of turban cotton, and then the edge of the trellis stitch to deal with. I’ve varied the colours around the rim to create some sense of depth and highlight.
I’ve realised while I’ve been working on this that the next serious challenge on this piece is going to be working out how to put the shadows in. As it stands, it is interesting, but not visually satisfying, because the crock and the lid seem to be floating in mid-air. They need to be brought back to earth, preferably without a crash!
More on the Crock of Gold Hoard
Asymmetric Spiral Trellis
I’ve been making progress on the Crock of Gold Hoard. Quite a lot of progress, in fact. Working spiral trellis stitch in such a way as to leave an asymmetric gap in the middle was a rather odd experience! If you click on the picture to look at it at full size you will see that some of the crossover points where I changed colour break the spiral a little, but in fact I think the effect is working reasonably well.
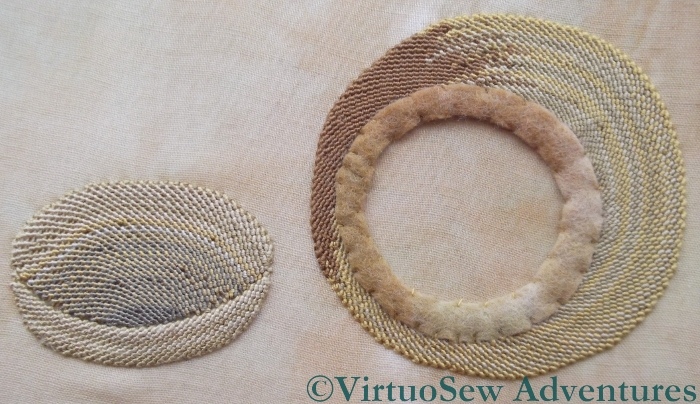
Padding For The Rim
I decided not to pad this version of the Crock – although who knows what other versions I may try? – but I did feel that padding the rim would help to put the chipwork in the right context when I do it. I happened to have some variegated felt that toned nicely, so I’ve cut two hoops of it and stacked them to form the padding for the rim. It has the added benefit of concealing the raggy edges of the spiral trellis stitch, and should help the rim to stand out a little against the main body of the Crock.
Making A Start On The Dish
What I’ve yet to decide is how I shall work the rim, so for now I have set the problem to one side while I work on the dish that was used for a lid. In this case the spiral trellis is worked on the inside of one half of the backstitch foundation and the outside of the other. This may seem another eccentric variation, but bear with me – I have my reasons! I want to maintain the continuous slant in a single direction, which I feel better reflects the texture of a hand made pot, whereas the zig zag effect of trellis worked back and forth across a shape (look at any close up in Month Two of the Glittering NightCap) doesn’t feel quite the right. I grant you that it’s another tiny detail that may not really effect the overall impression, but if I’ve learnt anything in the last few years from Thistle Threads and others, it’s that small details do count.