
Tag: New Techniques
Christus Natus Est – Second Stage
Christus Natus Est on Calico
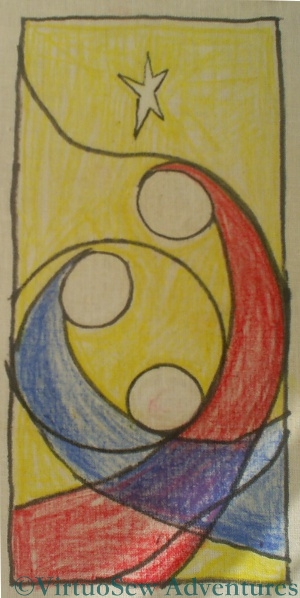
The first step is to simplify the design, so that it becomes an embroidery design rather than a painting. I’ve transferred the simplified design using fabric crayons, and used a fabric pen to outline the sections. The design is about three inches by eight, which seems very large now I look at it, but I felt that if I tried to work it too small I risked multiplying the difficulties already inherent in learning a new technique.
The additional lines are contours for the gold threads, which I am going to couch down following the technique described in All that Glitters, by Alison Cole.
Thanks to some help and advice from Golden Hinde I’ve got the right sort of gold thread – an entire spool of it! I just hope one spool is enough…
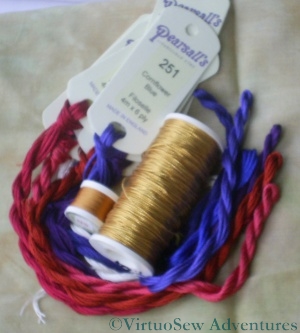
Pearsalls Silk and Gold Jap For Christus Natus Est
I’ve decided to use Pearsall’s Filoselle Silk. As I am not sure how much of the gold will be covered by silk, I’ve only purchased one skein of each colour.
Regular readers will have gathered by now that there is a lot of guesswork involved in my embroidery! I suspect that changes between dyelots won’t matter too much when I am after an impression of rich and changeable colour.
Christus Natus Est – Introduction

Christus Natus Est, by Steve Williamson
A couple of years ago, my mother painted an absolute cracker of a painting – a semi abstract Nativity, which she entitled Christus Natus Est (Christ in Born). At the time it occurred to me that it might make a good design for an embroidery, and now I have decided on the style I am going to use – or nué.
Obviously I am going to change it somewhat, since the techniques of embroidery and oil painting are so different. For one thing, the background of closely spaced gold threads will be striking, effective, and rather reminiscent of an icon. So rather than covering the gold with coloured silk, the background will be left clear. Also, I don’t think I can hope to create the same subtlety of colour in the figures, so I will use only two or three shades of each colour.
Classic or nué uses straight rows of gold, but in her book All That Glitters, Alison Cole suggests spiralling and curving lines, so I am going to try that.
The first stage is to work out precisely how I am going to simplify the design and transfer that to the backing fabric. As none of it will be seen, I can simply use calico, and colour it with fabric paints.
Then I have to plan the placement of the spiral and curving lines. The obvious thing to do is to centre the circle on the Christ-child, but I think that is too obvious and will make a rather stiff design. Instead I will use a larger circle, centred between the Child and His Mother.
The original painting was one metre by one and a half, and clearly I won’t be embroidering it that big – it is going to be more like three inches by eight!
Floral Glove Needlecase – beginning the Finishing Process
Floral Glove Needlecase - Gold Lace added
I’ve been prevaricating on the finishing process for the Floral Glove Needlecase, because it will involve glue, and I’m clumsy with that sort of thing.
I’ve worked very hard on the embroidery, I’m quite pleased with most of it, and I don’t want to fall at the last hurdle!
Finally, however (largely because I’ve been blogging about it and felt I should finish what I started!) I’ve screwed my courage to the sticking point, printed out the instructions and promised myself I would read everything twice before starting any stage of it.
That’s one of the effects I hoped blogging would achieve – providing encouragement to finish things properly. So I think we can count that as a success, can’t we!
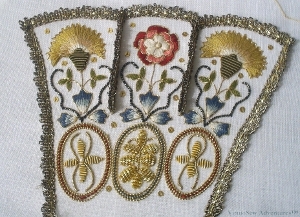
What you see here is stage one of the fifth month’s instructions – adding the gold lace to the edge and around the tabs. This has actually been fairly simple, in that the lace has loops on the straight edge, and the whole thing is done with a single length. No joining ends to worry about, just making sure that the lace is neatly attached along the line, carefully controlled at the corners, and back-to-back on the lines separating the tabs.
I’m pleased with this. In real life it has a lovely sparkle and – yet again – the addition of further embellishment seems to have brought it to life even more.
Beginning the Tudor and Stuart Goldwork Masterclass
Starting the Spot Sampler
So now I am beginning to do the silk embroidery for the next Thistle Threads Online University Course, the Tudor and Stuart Goldwork Masterclass.
More gorgeous Au Ver A Soie silk thread to play with!
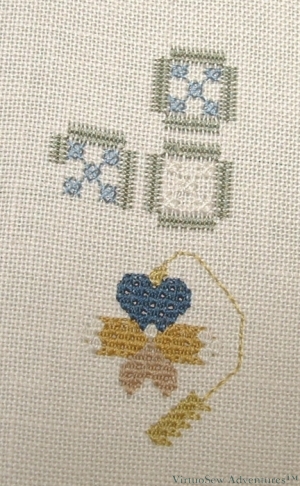
Furthermore, some new stitches! I’m not keen on counted work, so when I saw a chart in the instructions, my heart sank. Then I read the instructions and realised it was going to be a bit more fun than I had thought…
So, most of the silk stitching is to be in Queen Stitch, which I think I have done in canvaswork before, but never at this scale, and never changing its orientation or doing half queen stitches. The square motifs are bordered in Roman Stitch with Rice Stitch in the middle. Apparently in the historical pieces, Queen Stitches are often treated almost as pulled work, creating a lacy pattern of holes between the stitches. It’s quite difficult to pull tight enough, but as you can see from the navy blue petal, I’m beginning to get the hang of it.
The great attraction of this course for me is that we will have animations to show us the complex gold thread stitches that are the main focus of the course. At the end of the course, we’ll get a CD of these animations, so if I forget how to do one, I will be able to learn it again. Furthermore, some of Tricia’s recent posts on The Embroiderer’s Story mention that she has discovered some new stitches during her research trip and she is hoping to add them as a bonus!
Trying Stumpwork
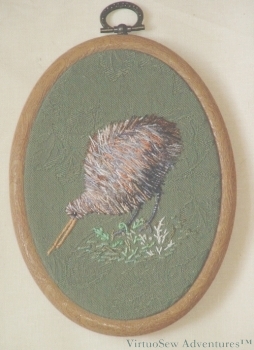
Kiwi In Stumpwork
As I’ve already mentioned, almost every embroidery technique I have done has been learnt from a book, or just developed by guesswork based upon something I have read.
In this case, I had been reading about 17th Century stumpwork, and had just returned from a half-business trip, half-holiday in New Zealand. And I had some rather gorgeous overdyed silk threads and wanted to experiment with them!
The body is worked in layers of straight stitches, using several different colours of the overdyed silks. I worked a slip, slightly smaller than the body, on a separate piece of fabric, then applied that piece over some padding, and used more straight stitches to cover the join – very thoroughly!
The legs and the beak are both worked by stitching very closely over a trailing thread of soft cotton. The background fabric is a sturdy cotton damask upholstery fabric, so the close stitchery did no harm. The ground is worked using still more straight stitches, with scroll stitch, coral stitch and fern stitch to create the fragmentary undergrowth.
This was intended just as a piece of fun, but I was happy enough with the outcome to mount it in a flexihoop frame. I’ve bought a couple of books on Stumpwork since I stitched this, but I don’t know that I would have thought of doing the Kiwi this way if I had read the books first.
Floral Glove Needlecase Kit – Silk Work Finished!
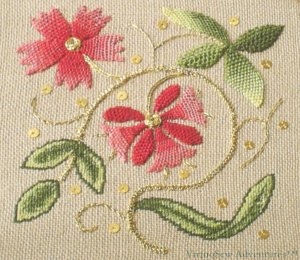
Floral Glove Needlecase Kit - Silk Work Done
I’ve finished the silk work on the Needlecase Kit!
The new stand has been working well – it is very adjustable, so I can make it suit wherever I am sitting, and the magnifying glass has been very helpful too. The only slight hitch with the magnifier is that stitching away at magnification becomes normal and then when finishing off threads at normal vision, I get slightly spooked to realise how small the stitching is!
As I have said, I am not really a fan of satin stitch and long and short stitch, perhaps because I am self-taught. Both of these stitches look simple, but are difficult to execute well, and so are very dispiriting for someone learning from books, with no-one to give hints and tips for excellence. How I long to have had a Miss Hunter to help me!
Actually, the instructions that Tricia Wilson prepared for the course are very nearly as good as having her beside you. They are copiously illustrated with very high resolution photos, so that it becomes a matter of seeking to make the view through the magnifier match the printout.
I’m even coming to think I may enjoy satin and long and short stitch, in small doses!
The kit included whole spools of the silk thread, so I have plenty left to play with. I’m not expecting to go so quickly with the goldwork, but the instructions come nicely spaced out so there will be time to take stock and work on other projects as well.
Squeaks with Excitement!
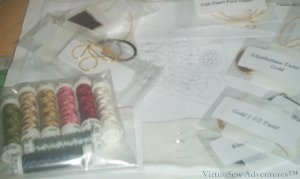
Floral Glove Course Kit
There was a gentle thud of a parcel through the letter box yesterday.
And Oh Frabjous Day, the Floral Glove Needlecase Course Kit has arrived!
What with hair-raising weather (in the UK and the US) and a much more popular course than the organisers anticipated (a great problem to have!) it has taken a little longer than anticipated for my kit to arrive. We’ve been kept very well informed, but of course once a parcel is in the system there is nothing anyone can do to speed it up…
It was worth the wait! There’s an intriguing variety of speciality metal threads, and some rather gorgeous looking silk. I’m planning to read all the instructions at least twice before even looking for a hoop – I’d like to do a good job on this, and I rarely use silks or metal threads at present.
A Class Piece Finished!
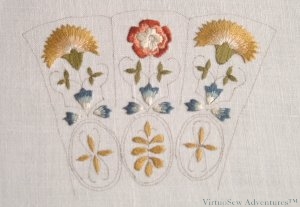
Class Piece from the Elizabeth Embroidery Course
In October last year I went up to Durham for a weekend course in Elizabethan Embroidery with Tracy Franklin. She provided us with a kit of materials, including the design ready-traced onto a coarsely-woven canvas-like fabric fused to a muslin backing, and a good deal of tuition, advice, and demonstration, all fairly easy to see because there were only twelve of us on the course.
The leaves in the lower section of the design are worked in tent stitch, and here the challenge was to create the right shaded effect on the leaves. Tracy showed us some photographs of original Elizabethan embroidery so that we could see what they did then. Tent stitch is not really one of my favourite stitches, but making up the shaded pattern as I went along was much more fun.
Then we moved on to Corded Single Brussels Stitch. I’ve found a whole list of the needlelace stitches in this family here at Lacemakers Lace. This also seems to be a stitch much used in the Plimoth Jacket (story told in full on the Thistle threads blog), and it’s fairly straightforward, although made trickier in this case because we were using two plies of stranded cotton. That produced some more even blending of colours because we could mix colours in the needle, but it’s a bit more difficult to keep tidy because you have to make sure that both plies are picked up in each stitch.
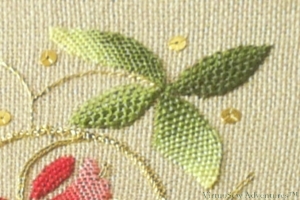
Detail of the Class Piece
You can see in this shot that I played around with my Corded Brussels stitch. Two of the leaves are shaded and worked conventionally, from tip to stem. The other two are worked longways, from the centre outwards, producing a marked vein. You see what I mean about having fun with it?
The main stem was supposed to be worked in Plaited Braid Stitch. Now, I can do Braid Stitch – just ( I have to keep the book open all the time while I do it!) – but so far I’ve not nailed Plaited Braid Stitch. In the interests of finishing the piece, releasing the frame, and starting on the project that has been nagging me for the past ten years or so, I’ve done the stem in the ordinary Braid Stitch, and filed Plaited Braid Stitch under “Must Try Harder”.
I’m not the only one. Mary Corbet posted about the stitch last year, and a quick Google shows that there’s more than one stitch out there called plaited braid stitch – just to make things more difficult. And there is a description of the stitch on this page as well.
Still, now this is finished – if not entirely according to the original plan! – I can find a box top to mount it in, and move on…