
Tag: Akhenaten
Mounting Akhenaten – Part Two
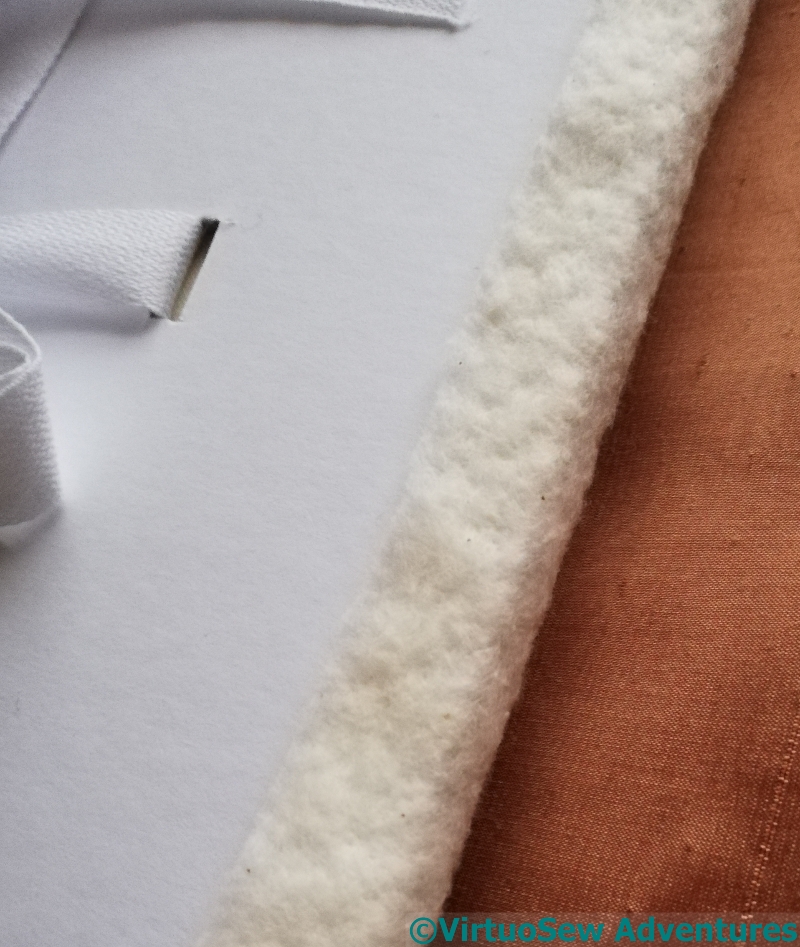
Now, if your memory reaches back to the beginning of Akhenaten (no surprise if it doesn’t – that was in 2017!), you may recall that at the very beginning there were four layers – the calico, polyester wadding, light cotton padding, and then the silk. The first stage was then to outline Akhenaten and cut away all of the light polyester padding that wasn’t behind him.
So once the calico was laced into place, the next layer to be dealt with was the cotton padding. The eagle eyed may have noted that there’s a new piece of card here. That’s because this card has slots in to carry cotton tape. I’m intending to lace the finished panel to the middle of a larger fabric covered panel, and these tapes will help to support the weight. I hope. This is not a method of mounting I’ve ever seen before, and I’m making it up as I go along!
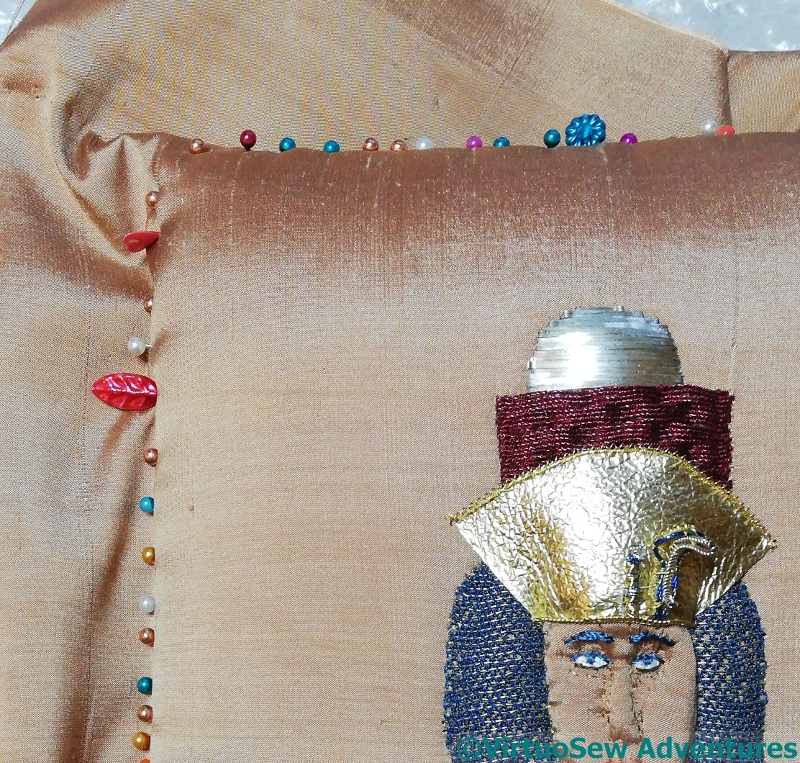
Then I pinned the silk into place, carefully, and not too tightly. Once I’d finished that, I turned over the whole thing and breathed a sigh of relief – the uraeus is still undamaged!
Then I wrapped him in acid-free tissue paper and put him away in a box. There are two reasons for this – firstly, because fibres and fabrics, particularly delicate ones, don’t like prolonged manipulation (yes, honestly, fibre in spinning mills is often left to “relax” between processes!), and secondly, because I’m still thinking about the details of the next stage.
The next stage is to fix the silk in place, and I’m still trying to work out how to do that without tangling with the cotton tape. I may decide to use double-sided sticky tape, but that is more likely to degrade and give way than lacing, and I really don’t want to do this job twice!
Mounting Akhenaten – Part One
Akhenaten has been glaring at me autocratically (well, that’s in character, at least!) from the far side of the living room ever since I finished him, and I decided he needed to be off the frame and hidden away for a while. At the moment, I’m rather out of love with him, not even sure he’s come close to my original conception. I need to hide him away so that I can move on Other Things.
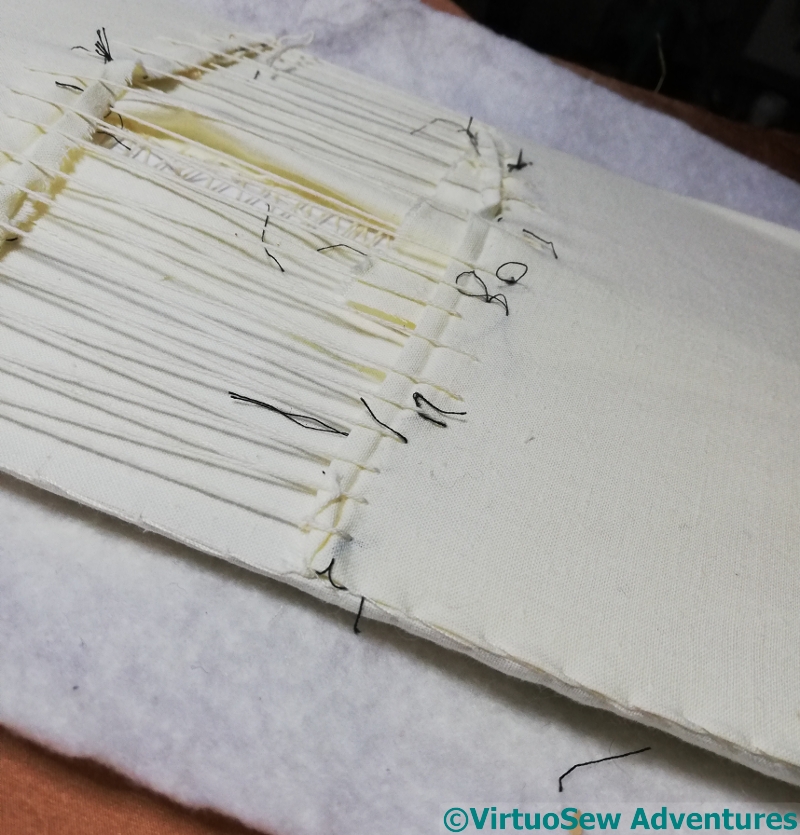
I took this photo just before I cut the thread holding the fabric in place, and you can see from the shadows just how strongly raised some elements are.
I think he’s looking pretty anxious about what lies ahead, as well!

I don’t think Akhenaten can possibly be as anxious as I am. We have a phrase in our house – “exporting stress”. There was a lot of that going on. In fact, I banished The Australian from the room lest I prove contagious!
However, I read, a little while ago, of using layers of bubble wrap to protect a raised piece while mounting, with holes or popped bubbles to alter the amount of padding so that the most highly-raised elements don’t also suffer the highest pressure. Considering the fragility of the uraeus, that’s important.
So I decided to give that a try. I’ll report when the whole process is finished!
And it’s going to be quite a process, because there are three layers of fabric to wrangle, and I’m not going to frame him under glass, so the mounting is going to be on display, at least to a degree.
I’ve started by lacing the long sides of the calico supporting layer, quite closely, to spread out the tension, and then the short sides. These were spread out a bit more, and I also stitched the edges of the folded-up short sections to the calico sides.
Colossus of Akhenaten
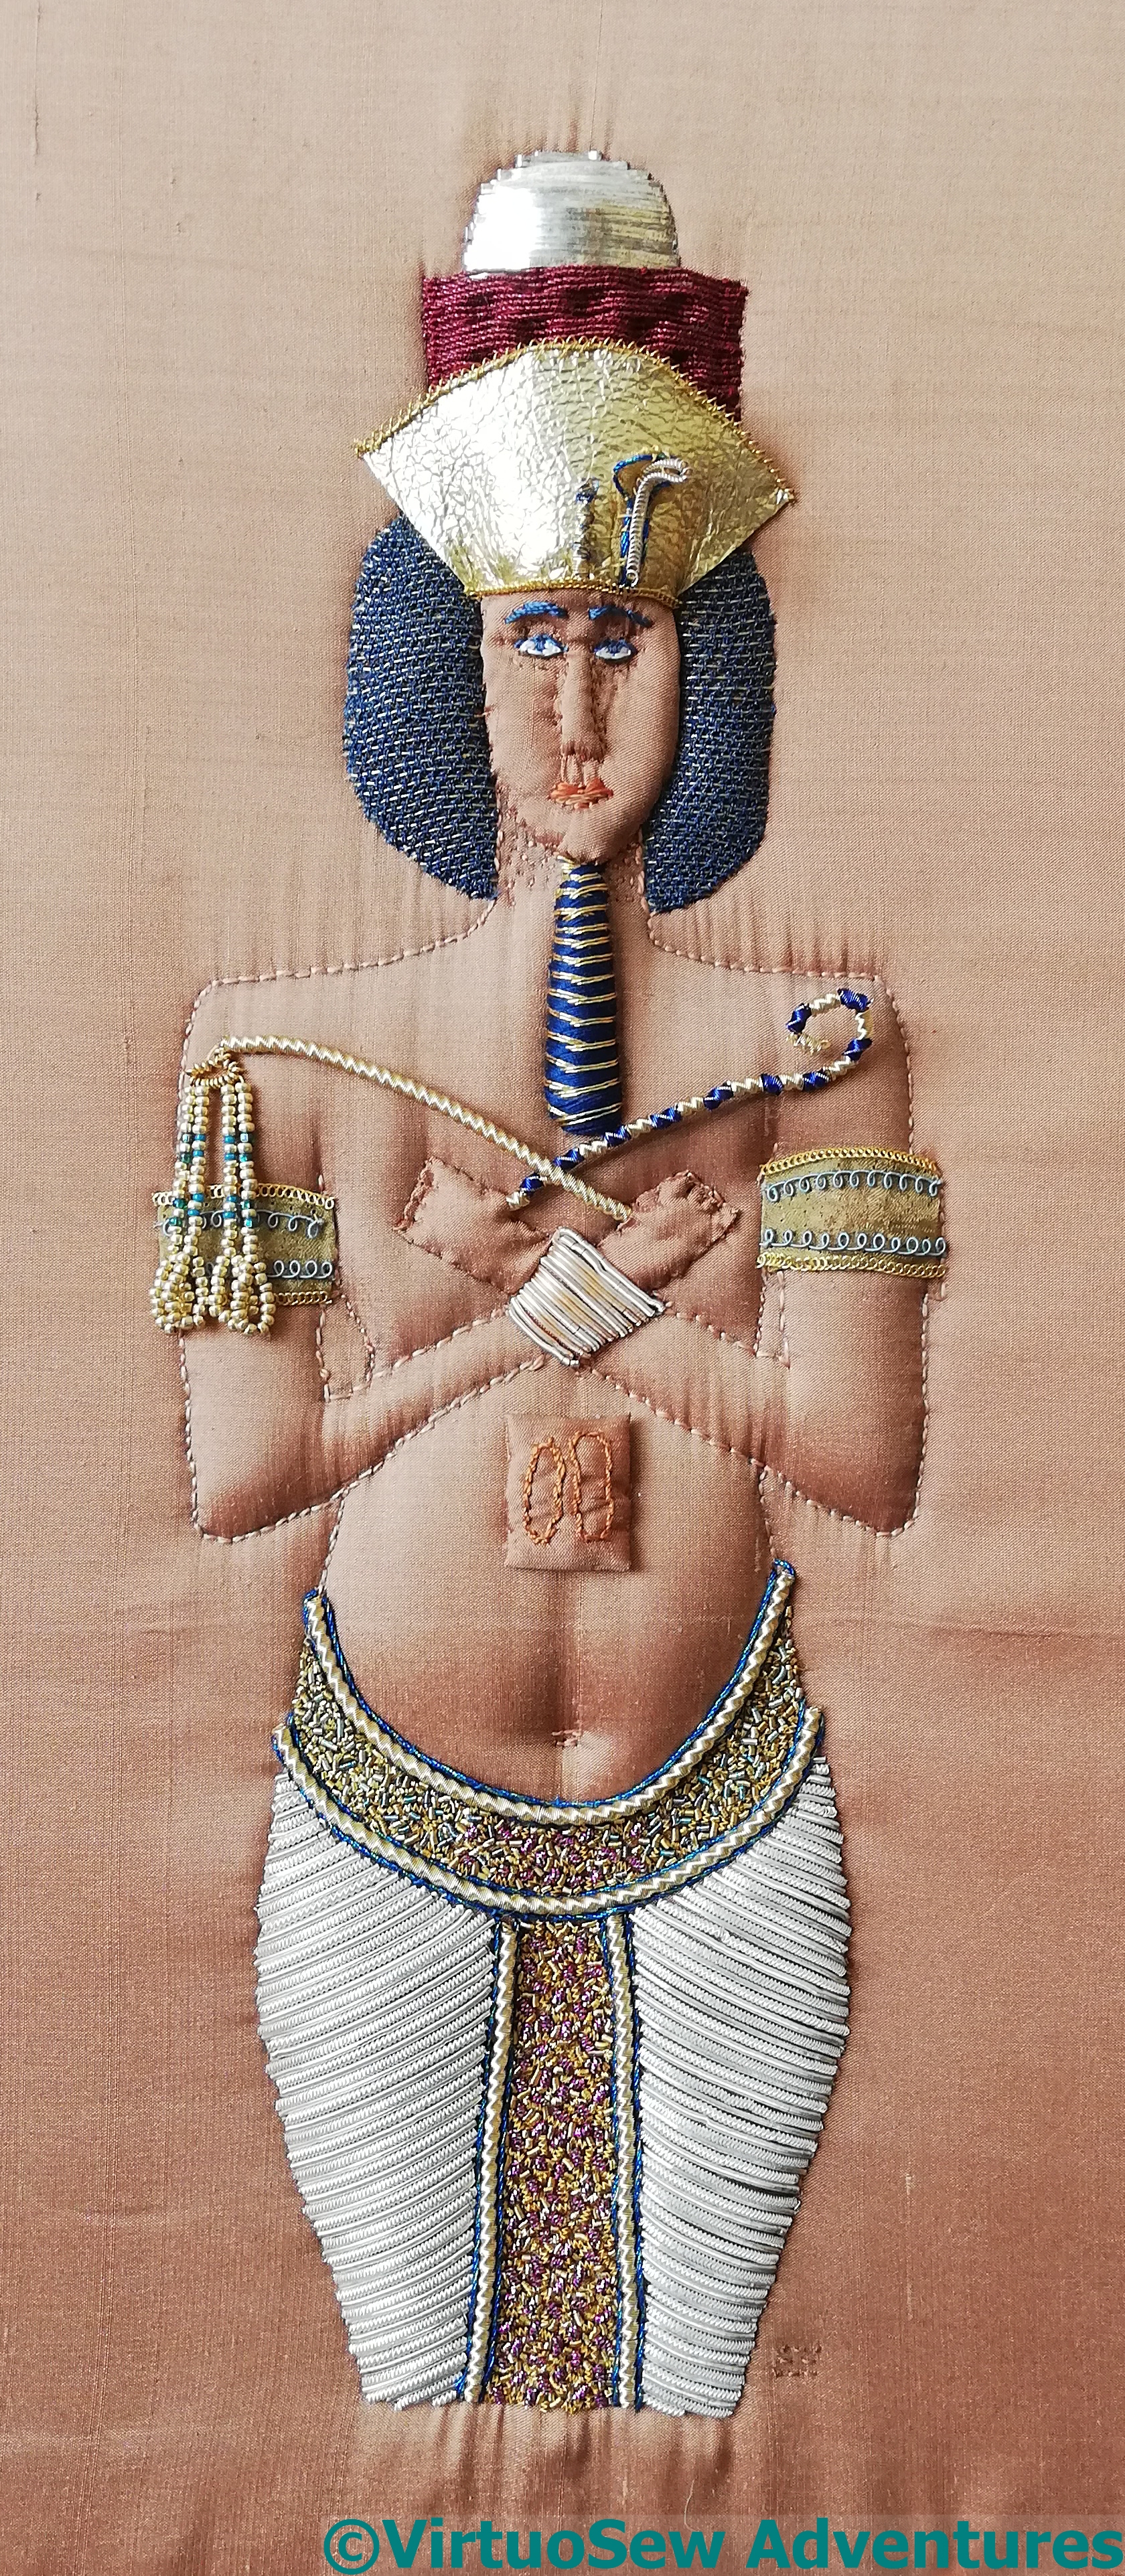
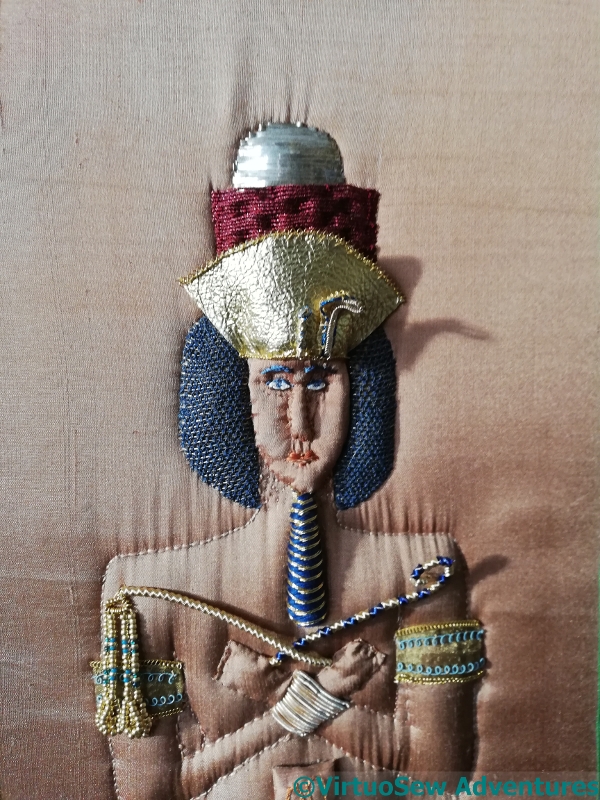
The Colossus of Akhenaten, in a combination of trapunto quilting and goldwork, is now finished.
A few last details
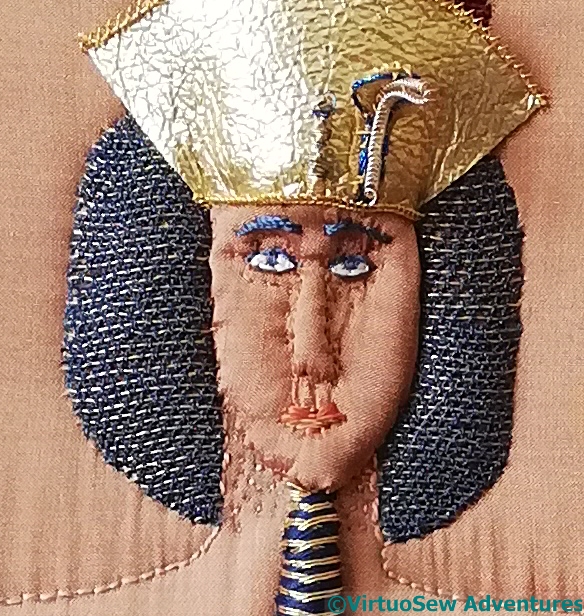
I added a few extra details, to sculpt the face a bit more – tiny stitches in silk, broadening and deepening the eye sockets, altering the shape around the nose, adding more stitches attaching the face.
In fact, to make sure the silk was fine enough, I twisted it myself from a spool of Japanese silk bought for the purpose. I think I ended up with three twisted threads from one length.
The gold kid of the headdress now has an upper edge trim as well. That would have been much easier to do if I could have done it before attaching the kid to the head!
As I was looking over the whole thing, it occurred to me that Akhenaten’s hands weren’t convincingly grasping his crook and flail. Fixing that wasn’t hard in theory – new hands cut from the edge of the silk, padded with padding from the edge of the piece, and attached with more hand-twisted silk thread.
In practice, it took several attempts before I was at all happy with the result, and I could be seen contemplating my own closed fist thoughtfully at various points in the process. Which doesn’t always help as much as you might think, when the aim is something slightly different to a realistic representation….!
However, I now think he’s probably as finished as I can make him. As I wrote to a friend: I may have doubts about detail, but I think Akhenaten is now as good as my current level of skill will allow. I hope someone will take him off my hands before I get good enough to shudder every time I look at him!
More of Akhenaten’s Accessories
I feel as though I’ve spent as much time on Akhenaten’s accessories as I did on the silver purl loincloth, and tied myself in as many knots as I did when I was doing his wig!
I do hope he starts to approve of my efforts again soon…
When last seen, I was content with the crook, done in alternating blue and gold wire rope, strung on a former made of fuse wire, but I was expressing doubt about the flail.
The gold purl and silk wrapped purl was too frail, and this version, using gold wire rope, was visually too heavy, and much too springy. So I knew that something else would have to be devised, and racked my brains repeatedly for ideas.
The ideas finally came late one night, and – too drowsy to wake up properly and write notes – I fell asleep hoping I wouldn’t have forgotten in the morning.
Fortunately, I hadn’t!
I’m assured that the word for the parts of a flail that flail is “swipple”, which sounds too outrageously appropriate not to make use of.
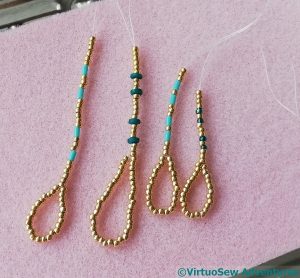
The various turquoise beads came from a friend on Instagram, who saw my wrestlings with the armlets and offered some treasures from her stash to assist. After several trials, I settled on a combination of gold and coloured beads, and a particular length of loop.
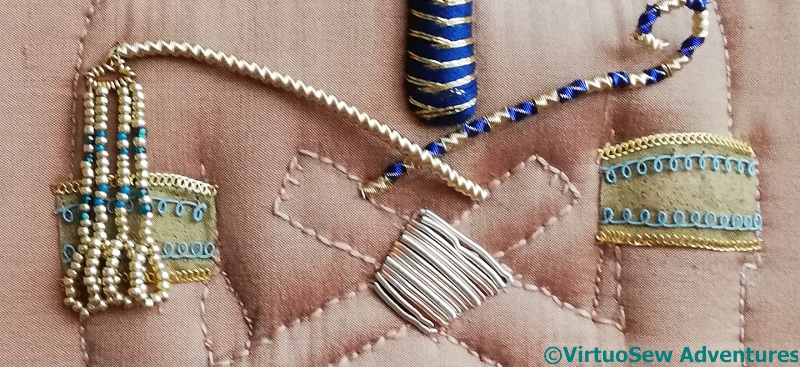
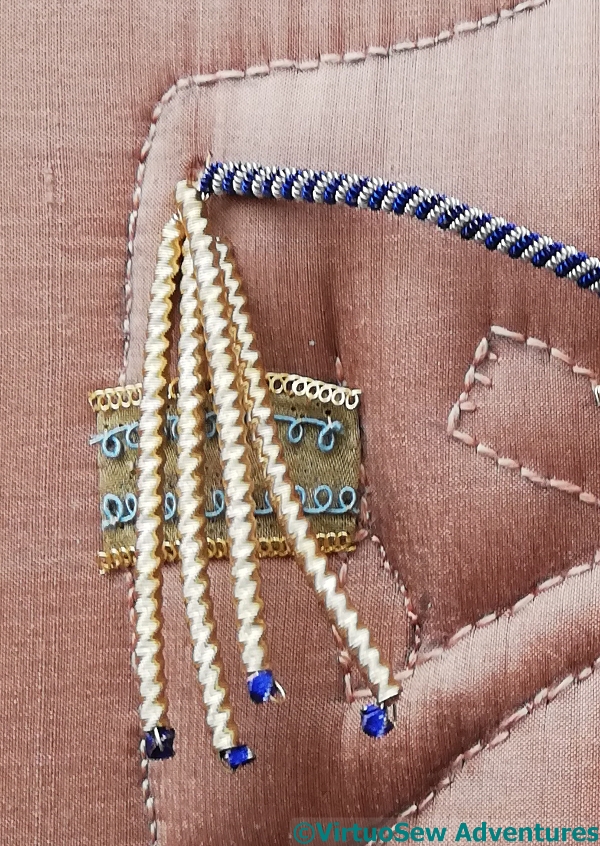
The finished flail has a handle of gold wire rope, a head of gold pearl purl, and four strung bead swipples. In fact, the inner two swipples have different coloured beads to the outer two. This is part of the layering of detail I’m trying to develop with Akhenaten, to help with the impression of rich gorgeousness I want to convey. It might be barely noticeable (although more so in real life), but it will break up what might otherwise look a bit monolithic.
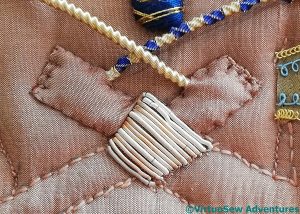
I’ve taken the same approach with the wristlet, which uses silver rough purl (leftover from the loincloth) in combination with a pale pinkish rough purl. Anything single-coloured was too obvious and argumentative, especially as it’s placed right in the centre of his chest, but when I left it out entirely, that looked worse!
Akhenaten’s Armlets
You may recall that I had some trouble with the armlets the first time I was working on them. Now, as I’ve come back to Akhenaten again, I’ve decided that the gold kid I’d settled on isn’t at all right. Off it came, and after some puzzling, I attached the brass mesh instead.
Only to decide that no, that looks dull, doesn’t capture the effect I’m after, and even edged with a flattened gold spiral, doesn’t stand out enough against the silk.

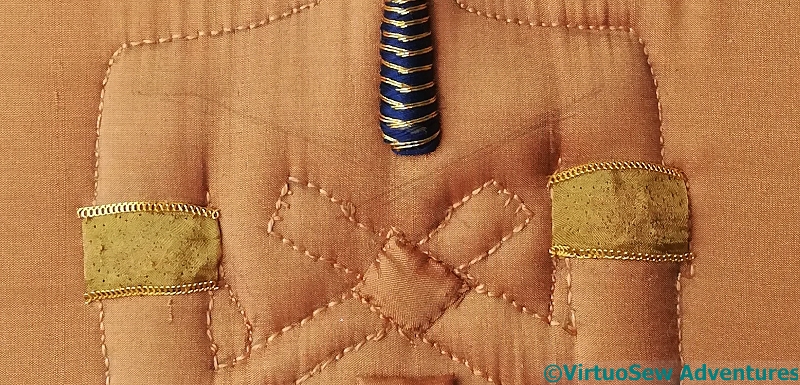
My next thought was to do some patterned chipwork. I chose a rather gorgeous, very ancient-Egyptian-looking blue, and a sort of diagonal basketweave pattern which is not a million miles removed from some of the patterns I have seen on ancient pieces.
The blue did at least help the silk to show something like true colour, but when I looked at the whole piece, I found the blue too bright, and the pattern altogether too much of a good thing.
I thought that was strange. The alternating directions should have echoed the beard and helped the two sit nicely together, and there is so much personality in the silver purl loincloth that you would have thought nothing could have been too much!
Then I had a thought – the kit for the Stuart Silk Purl Flower contained some bonus silk-wrapped wires and purls, and fortuitously, when slightly overstretched, there was just enough of one of the turquoise ones to do top and bottom on each armlet.
At this point I decided, somewhat tentatively, that maybe I’d got this bit right, or at least right enough to move on.
Akhenaten’s Headress Rethought – stage two
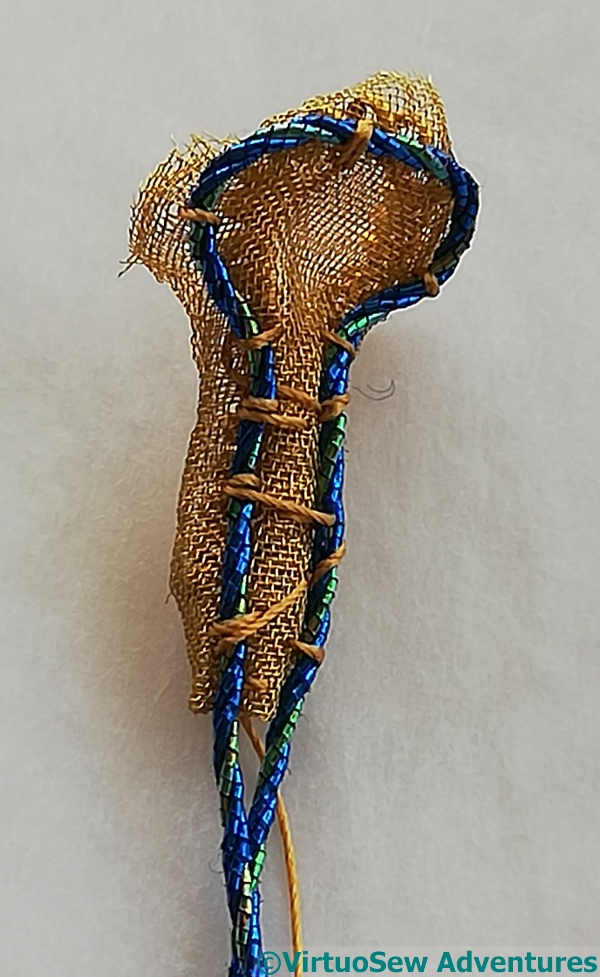
Having decided that all those delicious manipulations of brass mesh weren’t going to help in this case, I cut out the shape of the cobra’s hood from the brass mesh, (not getting too close, in case I cut the thread attaching it!).
At this point I realised it wasn’t quite strong enough, and attached the bent piece of pearl purl from the first attempt to the back in order to provide more support.
Bending back the brass mesh helped to conceal the supporting pearl purl – although whether anyone will be able to notice it is a moot point!
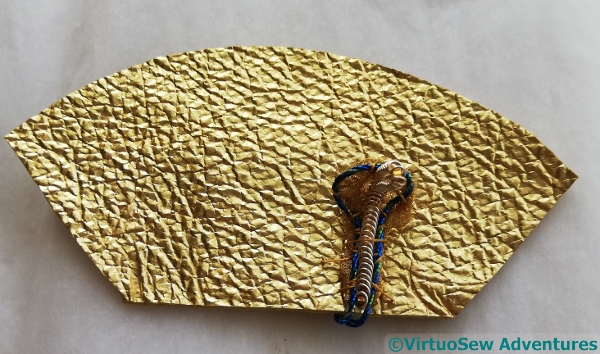
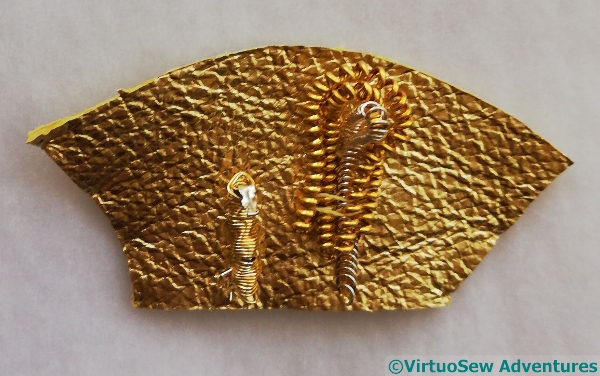
The final stage of the cobra was to attach the same piece of silver spiral with gold band to take the place of the snake himself, in front of the hood and to a new piece of gold kid. This time I looked again at some pictures of cobras, and made sure the hood was set back a little from where the mouth would be.
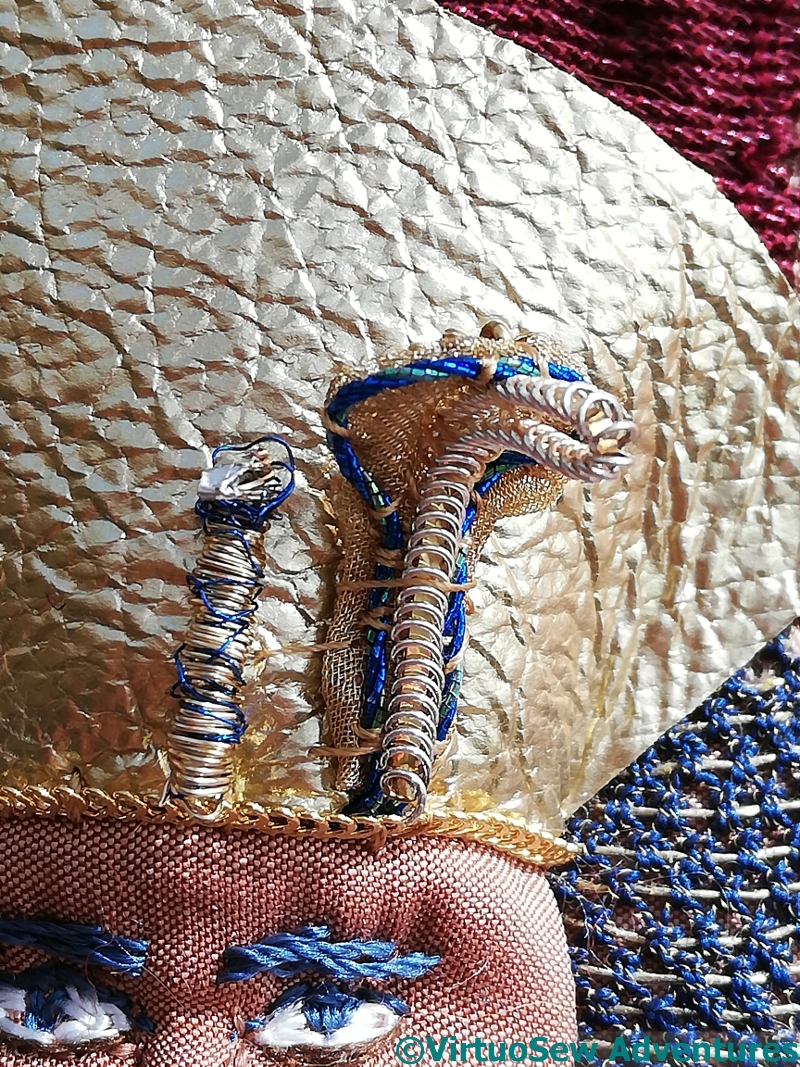
I used the same “vulture’s head” as last time, but helped it to stand out slightly by winding some blue wire from a tiny bit of blue purl around the large gold rope I used for the vulture’s neck. You can see how small it is, but it’s surprising how much difference it makes to the final effect!
Once I’d attached the gold kid, I could cover the bottom edge with gold spiral, and then trim the upper edge to create the shape I wanted. This is the stage you see here. However, I then decided that the upper edge needed a trim, so at some point I must tie myself in knots to attach some sort of trimming to a curved shape stretched over a padded base.
Wish me luck!
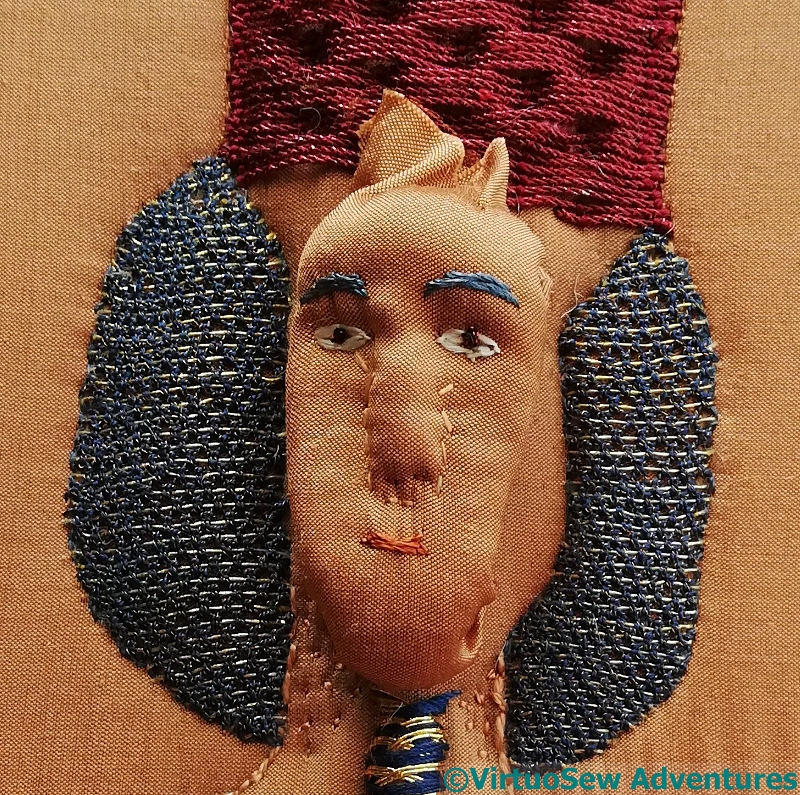
Akhenaten’s Headdress, Rethought
Of course, I had to take off the gold headdress when I decided to make another attempt (and another, and another!) at the face. Then, when I looked at it again, with my new version of the face in place, and still more new ideas swirling around in my head, I decided that it wasn’t quite right, either in shape or in conception, and needed a little more help…
First of all, I think the first piece of gold kid I cut was the wrong shape, but secondly, and more interestingly, the cobra doesn’t really stand out against the gold kid, so I decided to try again.
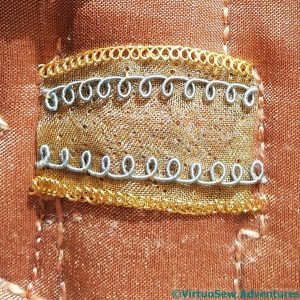
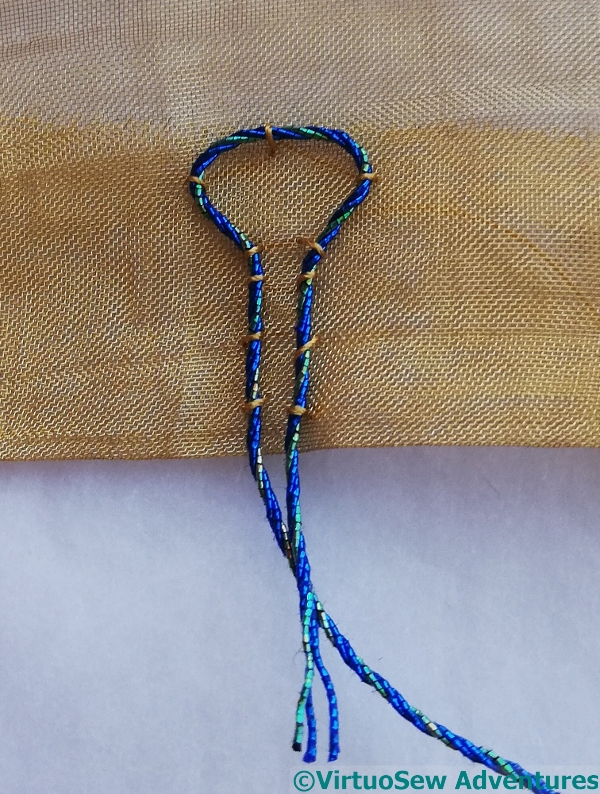
So I began by folding a piece of brass mesh and attaching to it a loop of the same blue twist I used to emphasize the edging of the belt. I had thought that this might be rather tricky, but the brass mesh is fine enough to take stitching without too much trouble.
At this point I should probably say that from the base to the top of the loop here is no more than a centimetre. This is all very small and very fiddly indeed!
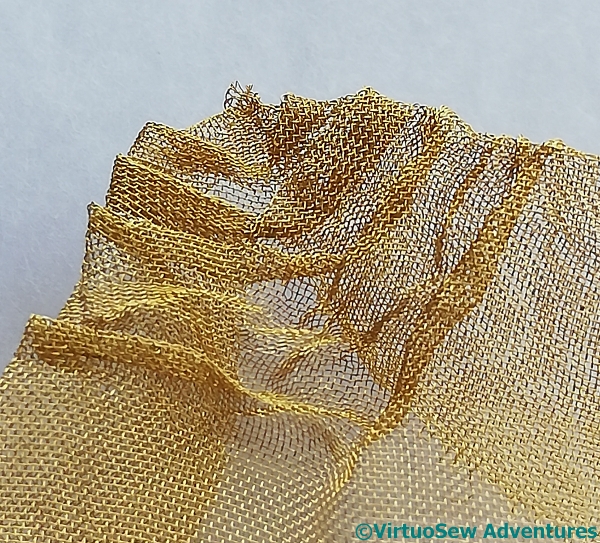
Manipulating Brass Mesh 1 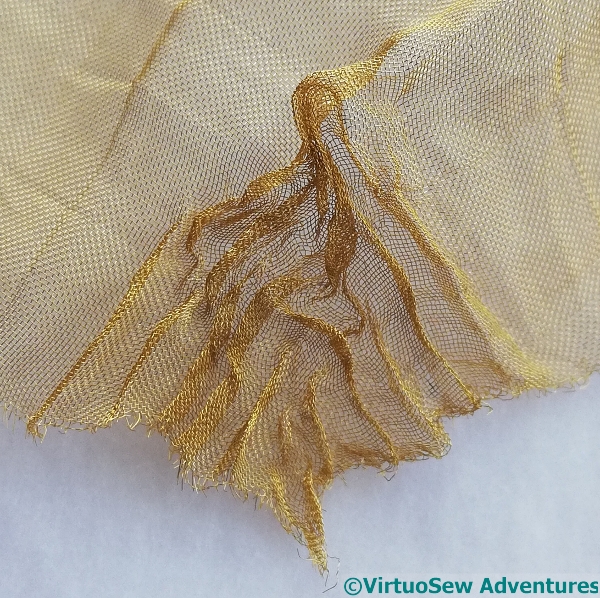
Manipulating Brass Mesh 2
I also experimented with some pleating and crinkling of the brass mesh. I like the various effects, and I’d love to fit them in somewhere, but unfortunately I couldn’t quite work out how to make them work in this context.
The whole piece is so striking that I am finding it particularly difficult with the last little details, because they need to have enough personality not to be overwhelmed, but I don’t want the final piece to feel “spotty”. The eye needs somewhere to rest occasionally, rather than zooming frantically in all directions!
Akhenaten’s Face – Yet Again

Having found the last attempt didn’t result in quite what I was aiming for, I tried a new approach.
This time I took the outline of the face from the main piece, and needlefelted around it to get the shape to fit. Then I tried to get the features in place again, but having learnt from last time, I tried to leave the felt padding a little softer so as to be a bit easier to embroider. When I was trying the wet-felted versions to be further needlefelted, I used several different wools to see whether it made a difference, but with my level of inexperience, it didn’t, so this time I just used the first that came to hand.

Then I stretched silk over the top and began to stitch again.
When I tweeted this picture in a frustrated I’ve-had-enough-of-him pause, one of my friends replied “It’s Cassandra O’Brien!”. Which gave me a much-needed giggle – although I have a lowering feeling that Akhenaten and Cassandra might have got along quite well. Not necessarily the most admirable of people, either of them.
And don’t my lovely copper/rose-gold headed pins disappear beautifully against the fabric!
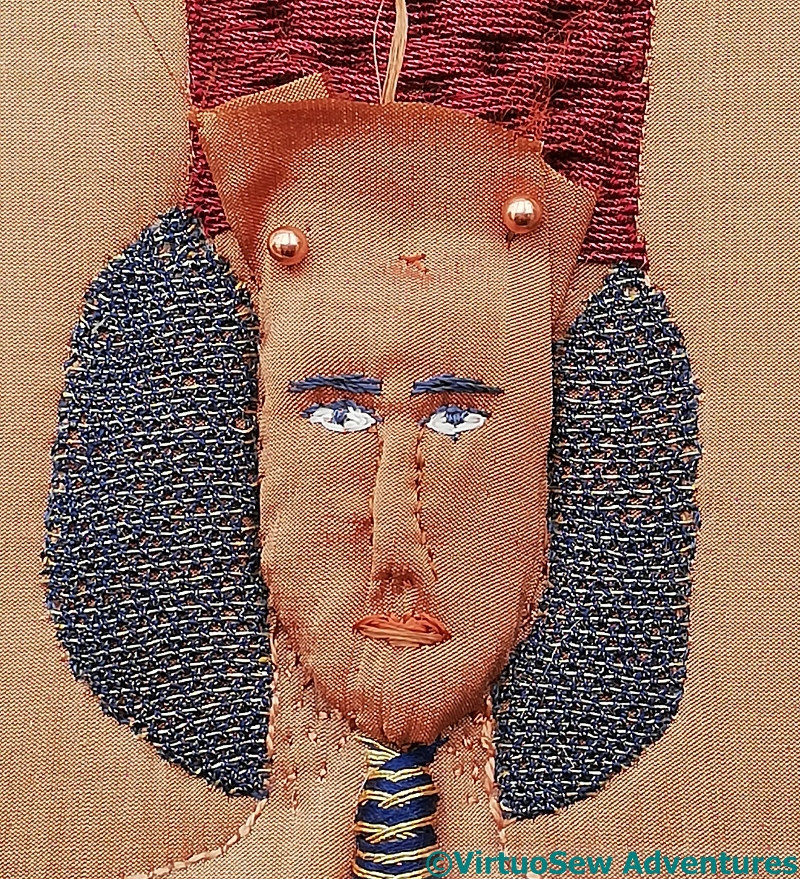
This looks rather better, I think.
I would have been happier if I could have made the brow heavier, and the nose more forward, but by now I feel I’m entering a world of diminishing returns, and may even start to make negative progress, which would be disheartening to say the least.
Now to see how this face copes with all the fuss of headdress and accessories…
Akhenaten’s Face – Again
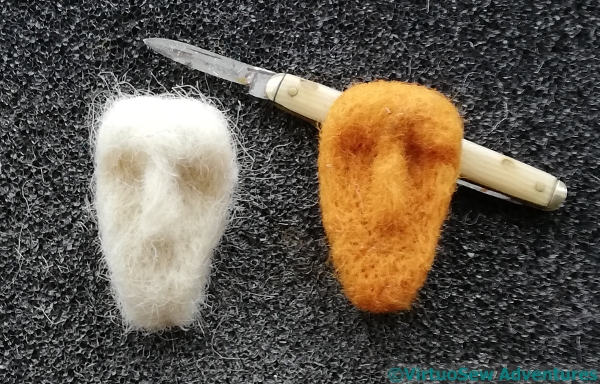
As you may recall, my last attempt at a face for Akhenaten wasn’t entirely successful, so I started again… This time I needlefelted the shapes very fiercely (which I enjoyed more than I expected to!) until they were quite solid and strongly shaped, only to discover that they were far too deep and I had to saw off the back half with a penknife!
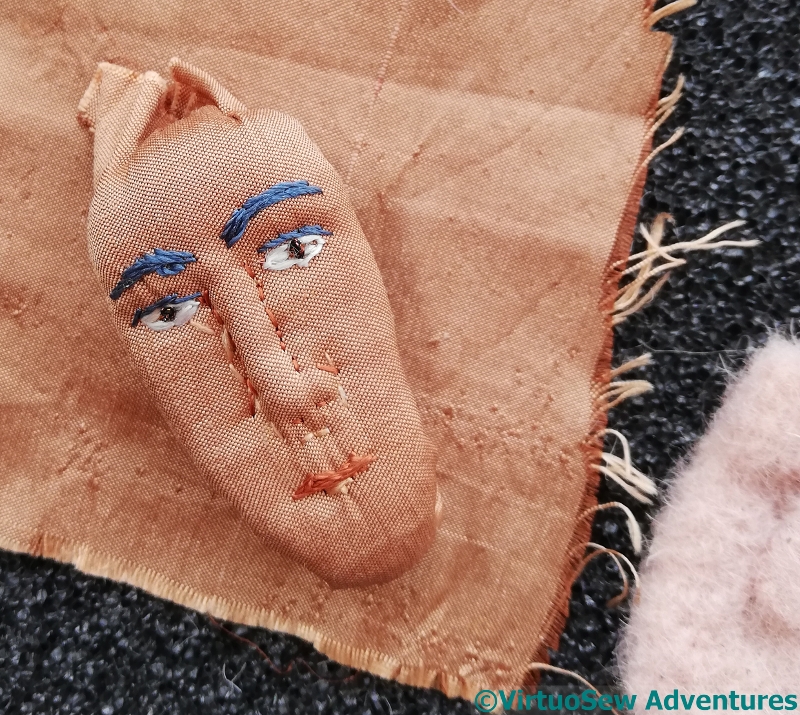
Then I stretched another fragment of silk over the top and worked the features.
When you consider how deep the eyesockets are in the felt, I’m a bit surprised that the eyes on this version don’t appear more deep-set, but he does have nice heavy brows, and the rest of the features aren’t too bad..
The face is also as narrow as it appears in that purple watercolour from a couple of weeks ago, so I felt quite optimistic when I turned back to the frame he sits on.
However, you can’t say that this face is much better than the apoplectic trumpeter – it has turned out by far too narrow for the space left for it, and I suspect that the detached buttonhole stitch with return used for the wig has done too much damage to the fabric to take it out.
So this is not the one to use, and I have to try again.
Again!