
Tag: Learning Stitches
Tudor and Stuart Goldwork Masterclass – Month Thirteen
I’ve not really been making as much progress with the silkwork on the Masterclass Sampler and Tudor Pincushion as I would like. The weather has been cold and overcast, making my best stitching spot for natural light a chilly and uninviting place. Artificial light produces a confusing glimmer on metal threads, so unless it is a particularly easy stitch, I tend not to use metal threads in the evening.
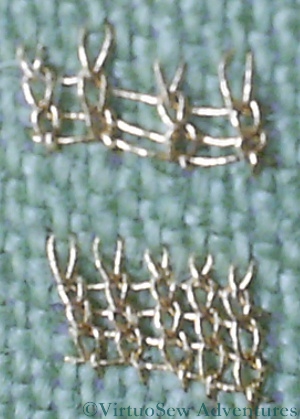
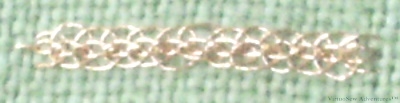
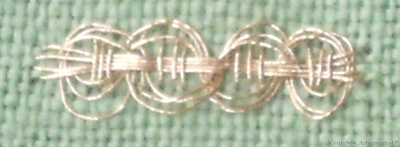
I’ve been more or less keeping up with my practice stitching, however, and this month’s stitches are Cable Chain Stitch, and Knot Stitch (also known as Braid Stitch). I enjoyed these very much, as I already know them both, and it was good to be able to add them to the practice cloth and remind myself of my repertoire.
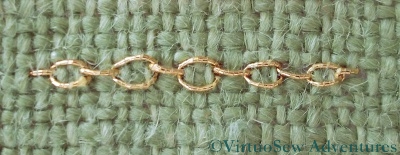
Cable Chain Stitch
Cable chain is my absolute favourite of the chain stitches, and pops up in all sorts of projects. I used it in the Jacobean Firescreen that I’ve used as my header picture, and the Jacobean Work panel that I’ve yet to find a use for, and on the dorsal fin of the Experimental Seahorse. I’ve even used it on the Map of Amarna, in the Compass Rose. I think that it looks its best using a fairly heavy round thread, so on my practice cloth the gold is somewhat out of scale with the fabric
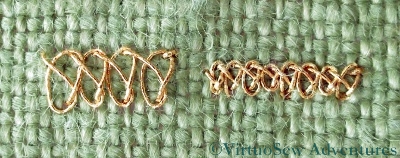
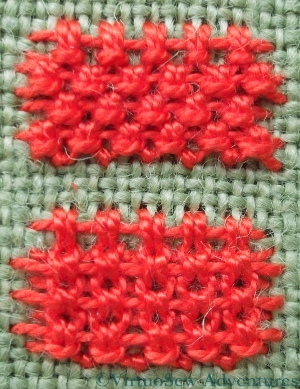
Braid Or Knot Stitch
Braid or Knot Stitch (not the terrifying Plaited Braid Stitch that I haven’t got to grips with yet!) is another favourite. I used it to create the Prince’s bow in the first of the Persian Fantasy Panels. I also used it for the ice cream cone part of the logo on the Frolicking Teddies Cot Blanket. I worked the stitch at two different scales, so you can see it looks a little loopy and untidy over four threads, but neatly ornate over two.
Tudor and Stuart Goldwork Masterclass – Month Twelve Goldwork Stitches
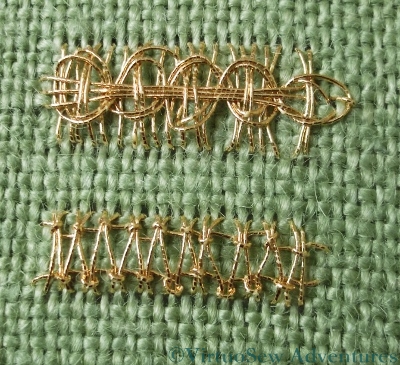
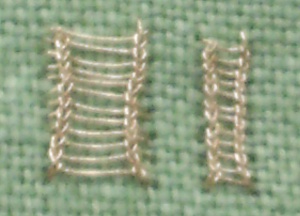
The two stitches this month are stitches I think I have seen used as needle-lace stitches, but whereas I’m most used to seeing variants of Blanket Stitch used in needle-lace, these are worked using Up-and-Down Blanket Stitch.
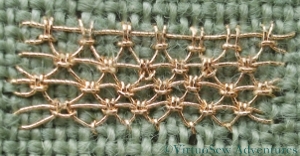
Up And Down Blanket Stitch - Alternating
As it happens, the Up-and-Down variant is one of my favourite stitches, so I sat down rather gleefully to have a go. This is the first of the variations, Alternating Up-and-Down Blanket Stitch, which produce a rather open, netlike appearance on my practice cloth, not much resembling the example in the instructions.
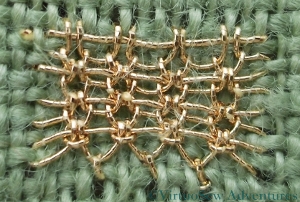
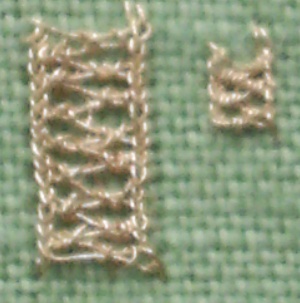
Up And Down Blanket Stitch With Return
The second stitch was Up And Down Blanket Stitch With Return. In this case the seconfd row of stitches goes into the tie of the Up And Down Blanket Stitch, creating a ribbed effect something like the welts on a sweater. It also rather conceals that same distinctive tie stitch, rather camouflaging the stitch that forms its basis. I’m very impressed that Tricia managed to “reverse-engineer” these stitches, as some of them are rather less than clear to work out!
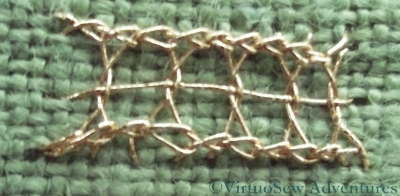
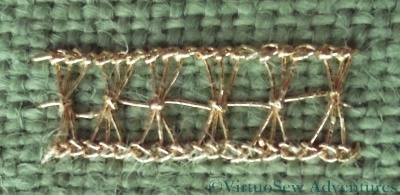
Both Stitches In Pearl Cotton
Naturally, my practise cloth version in the gold thread suffers from the problems of scale I’ve already discussed, but as well as that I find when I look at the photographs that in a couple of cases I have done a pair of buttonhole stitches instead of an Up-and-Down Blanket Stitch. I defy anyone to work that out at the normal scale of these stitches, but I’m actually quite surprised that I didn’t notice at the time, since the short loop at the base of up-and-down buttonhole stitch does tend to twist when worked as a needle-lace stitch instead of a fabric stitch!
These versions worked in pearl cotton show much more clearly the heavily textured fabric that these stitches form when worked at the correct scale.
Tudor and Stuart Master Class – Month Eleven
Month 11 Goldwork Stitches
So while I continue with the silkwork for the Spot Sampler and the Tudor Pincushion, here are the two new stitches for Month 11 of the course.
The two stitches are Guilloche on Ladder Stitch, and Hemstitch on Ladder Stitch. In both cases I have cheated and just worked a panel of straight stitch bars as the foundation. This is because I wanted to get a firm grip on the structure of the stitch, rather than spending my time on working the foundation.
As the stitches become more multi-phase and more complex, the green doodle cloth is becoming a less suitable foundation. While it makes things easier by making the stitches larger when using the counted diagrams for them, it also makes things more difficult by making the stitches larger! I find that I am having difficulty in getting tension and stitch length neat and correct – in fact, you can probably see that from the rather floppy loops on the Guilloche Stitch Of course when I come to work on the real fabric using the real gold and silver threads, this problem should be much reduced, but I think I will find myself using a stiletto or a laying tool to try to keep the thread under rather closer control, even so.
Tudor and Stuart Masterclass – Month Ten
Interlaced On Ladder Stitch
The two stitches in Month Ten of the course are both based on Ladder Stitch foundations. You can see here that something went a little squiffy with the foundation for the Interlaced stitch. I ran out of thread in the needle and in bringing the new thread in, I didn’t keep the the tension quite right. It wasn’t clear until I took the photo with the macro lens, and cropped it to size. As it is only a practise, I shan’t lose any sleep over it – I’ll just make a mental note that Tension Matters.
The interlacing is just like the sort of interlacing I am familiar with from drawn thread work – I’ve not done it before, but it is a style I’m familiar with seeing and a construction I can understand. It would be quicker to practise the interlacing on a foundation of straight stitches, but I suspect (if only I had got the stitching right) the Ladder Stitch would create a more stable basis.
Wheatsheaf On Ladder Stitch
The second stitch worked on the Ladder Stitch foundation is another I recognise from drawn thread work. This is a wheatsheaf-style stitch. Other variants might include a knot instead of a mere wrap, or include two rows of interlacing in the same style. One of the advantages of this course is that it is pulling together many of the techniques I have seen before, but never had the opportunity to do.
It has also given me permission to “play”. I’m enjoying that!
Tudor and Stuart Goldwork Masterclass – Month Nine
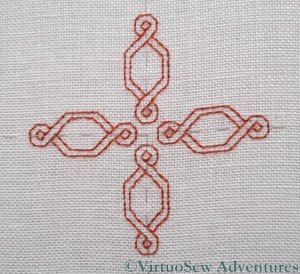
Tudor Pincushion - Stage One
It’s been rather chilly of late, and I couldn’t quite face sitting in the window working on the Spot Sampler, so I spent some time mounting the Tudor Pincushion on a bar frame, and started working on it.
The first thing I did was to part-colour the chart. I’ve never been comfortable with charts, and it’s easier to orientate myself if I have at least some elements coloured in to act as guides. Specifically, I have to colour them in myself, because I’m no happier with printed colour charts than printed black and white charts. I think that colouring the chart myself helps me to understand how the design is put together, and then I find it easier to stitch.
I’ve also tacked the centre lines in. This is something I rarely do – generally I just find the centre, work whatever is over it and then count from that. In this case, there’s no stitching at the absolute centre – not until I start on the metal thread work, anyway – so I made sure that the centre point was marked, at least for the first stage of outlining.
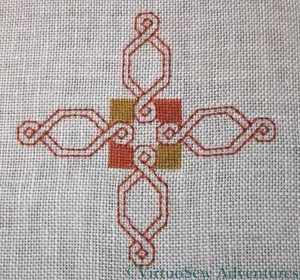
Tudor Pincushion - Stage Two
In fact, as you can see, I’ve already taken out the tacking. At least, I’ve left it in at the edges, but now I’ve got all four of the central outlined motifs in, and worked the first set of tent stitch blocks, everything else can be counted relative to the nearest landmark point that is already stitched.
Since the silk stitching is either in tent stitch or back stitch, it’s not difficult to do, although as it is on a very fine linen – 38 or 40 hpi (holes per inch), I think – I’ve been very glad of my magnifying spectacles!
Tudor and Stuart Goldwork Masterclass Stitches – Month Eight
Ladder Stitch
This month Tricia’s History and Analysis section includes a description from the animator of how he approaches animating the stitches. It’s very painstaking work, and as the first thing he does is to follow the instructions just as we are, he is going to end the course with the same repertoire of exotic stitches as we have!
The first of this month’s stitches is Ladder stitch. Like last month’s Ceylon Stitch, this is a stitch I have worked before; in fact it’s very like Ceylon Stitch in structure as well. I can change the width of the stitch, but not the vertical scale, so my two versions here look very similar. With the rather stiff gold thread, the stitch becomes rather a trial when worked with long “rungs”, so I enjoyed it more when I worked it in a narrower space.
ZigZag Embellished LadderStitch
The second stitch is an embellishment of Ladder Stitch, using a ZigZag whipping. I had trouble with this stitch because I simply couldn’t bring myself to pull the whipping tight, so it tangled and tied itself up, and nearly tied me up with it. As the shorter version shows, once I sorted myself out, the stitch sorted itself out too.
My problem is that I’m very aware of the way the thread is made, and concerned that the wrapping of metallic foil will be broken if I pull too tight. It isn’t really a problem, as the overall effect of the thread usually masks any slight breaks, but try telling yourself that when you’re tangled up in an expensive thread you don’t want to waste!
Tudor and Stuart Goldwork Masterclass Stitches – Month Seven
Ceylon Stitch
I’ve not been making as much progress on the silk work for the Spot Sampler as I would have liked, recently. Still, I have managed to have a go at the Month Seven stitches, Diagonal Half Guilloche Stitch and Ceylon Stitch. As always, I have done them at two different scales.
I’ve worked Ceylon Stitch before, although certainly not using a metallic thread. It produces something that looks a little like knitting. I suspect it will be easier if I use a stiletto to control the thread. I know I have one somewhere, so I’ll look it out before I try this one again. I think I used it as a needlelace stitch before, and that, of course, used a simple round cotton thread.

Diagonal Half Guilloche Stitch
I think the Diagonal Half Guilloche Stitch has possibilities for some of my other projects. It looks very like one of the braids sometimes used to edge upholstery, and might also make a good filigree necklace for the Amarna panels. It will be important to pick the right scale of thread and fabric, as you can see in the picture here, but at least when I have been working at the large scale it has been easy to see where the needle is supposed to be. This hasn’t been one of the most complex stitches, but I’m glad that I have chosen to work practice versions of all these stitches before I work them on the sampler or the pincushions!
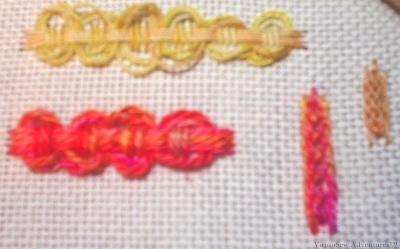
Tudor and Stuart MasterClass Stitches – Month Six Stitches
Last time, I found the stitches rather tricky in the gold thread and tried them in pearl cotton afterwards to see whether that made them easier. I’m not sure it did, as a matter of fact, but it did show me that the relative scale of fabric and thread would also influence not only the appearance of the stitch, but also the experience of stitching it.
Cross Shaped Guilloche Stitch in pearl cotton
So this time I started with pearl cotton. I can’t say it was markedly easier, especially the Cross Shaped Guilloche Stitch Variation. This time I think the thread was too heavy for the stitch at the scale permitted by the fabric, and furthermore it turns out that both of my practice cloths may be plain weaves, but they are not in fact proper evenweave fabrics, even if they look as though they should be.
I counted very carefully, but somehow it looks as though it should be enclosed in a rectangle and not in a square. It also looks rather a tangle!
Guilloche Stitch Variation in pearl cotton
The Guilloche Stitch Variation here is in fact the one I have seen in some of my books on embroidery stitches, although those have been somewhat simplified by comparison. Still, I can imagine using it to create a braid effect, and I’m sure that I will think of something to use the cross-shaped variation for, once I’ve had a bit more of a play, and tried to find the right scale of thread to fabric.
Month Six Stitches In Gold Thread
So, finally, here are the stitches in the gold thread. It’s harder than you might think to keep the thread in order, and in the end I decided to make a virtue of my difficulties and in the Guilloche Stitch variation I’ve got two of the sections showing a close, tight version of the wraps, while the other three are looser and more loopy.
In the Cross Shaped Variation, again I thought I had counted carefully, but again it didn’t come out quite square. I think I might try again but doing the stages in a different order so see whether that helps me in any way. I also found myself, in spite of all my efforts and in spite of having the instructions beside me, getting the thread wraps weaving over where they should have gone under and under where they should have gone over.
More practice needed, that’s for sure!
In fact, it occurs to me that there is a lot to be said for practising each of the stitches on the actual cloth before putting it in place on the sampler. Just as a final check. . .
Tudor and Stuart Goldwork – Month Five Stitches
As I’ve mentioned, while I continue to persevere with the silkwork (there is a limit to how long I can stitch such fine work, even with the magnifier), I’m practising the goldwork stitches on a separate cloth. I don’t want the silk catching on metal threads while I’m working it, so the best way to avoid the problem is to do no metal thread work until the silk is finished. However, I couldn’t bring myself to ignore all the interesting stitches we are promised – hence the practice cloth.
Reverse Chain With Buttonhole Edging
I can see potential to use the Reverse Chain with Buttonhole Edging in the Amarna panels, since it creates a very complex impression when seen at real size, while not being all that difficult to stitch. It looks a lot like a braid or a filagree, so might be used to represent the necklaces that the Pharaoh gave to favoured courtiers at the Window of Appearances.
Guilloche Stitch
Guilloche stitch was an entirely different matter. It didn’t seem to matter what I tried, I couldn’t keep the crossing places of the final stage neatly under the long straight stitches, and the loops wouldn’t stay neat. In fact I even had a go in cotton threads, as you can see below.
Stitches Tried In Mercerised Cotton and Pearl Cotton
The yellow is a mercerised cotton, while the orange is a fairly heavy pearl cotton. The Guilloche stitch seemed to work better in the heavy pearl cotton, which makes me wonder whether it is simply a matter of scale. The bulk of the pearl cotton makes the stitch so much more compact, whereas the gold thread on the practice cloth is much too fine for the spacing of the stitches. Note that the Reverse Chain with Buttonhole Edging looks much more braid-like with the finer, mercerised thread, where the pearl cotton almost looks like a different stitch. All of these stitches should also be easier when I’m working on the real piece which is resting on a floor frame. I’ll be able to use both hands to control the thread if necessary!
Tudor and Stuart Goldwork Masterclass – Month Four Stitches
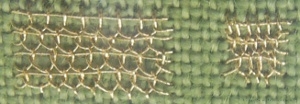
Detached Buttonhole With Return
While I continue to persevere with the silkwork, I am trying to keep up with the new stitches, practising on a separate cloth. In the case of the Detached Buttonhole stitch with Return, I think you can see that the fabric and the thread are not well matched, and so the structure is correct, but the appearance is not. The stitch should be much more closely worked, giving the impression of a fabric, not of a net. It’s tricky to be sure that the gold thread doesn’t kink back on itself in working this stitch, although this may be easier when I’m working on the real thing, using a slate frame on a stand, and therefore have both hands free to control the thread!
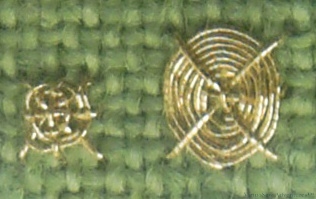
Eight Spoked Wheel
This second stitch is an Eight Spoked Flat Spider’s Web. It is very similar to the one in last month’s pair of stitches, but uses a foundation composed of a cross and an upright cross. I suspect it will be rather more stable than the four-legged version.
These “spot” stitches may come in very handy when I start thinking about some elements of the Amarna Panels.
I’m using a single type of thread for all these practise stitches. I don’t want to confuse myself with problems that may relate to an unfamiliar thread when I am already dealing with unfamiliar stitches! Still, already when I look down the row of stitches I’ve already tried, I see ideas for further experiments and even for applications of the stitches. This is what I hoped for when I joined the course, so I’m very happy with how it is going!