
Tag: Dreams of Amarna
Working on Nefertiti’s Cartouche – 3
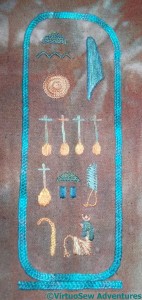
Cartouche Finished
I did a lot of staring balefully.
I picked out a whole selection of threads, looked at them, and dismissed them. Partly, it must be said, because I had decided, after all, to use Plaited Braid Stitch, and that uses a lot of thread. I wasn’t sure that I even had enough of some of my choices!
In the end, I decided to use an overdyed pearl cotton in a sort of faience colour. Years ago, my mother managed plaited braid stitch using stranded cotton, but I tend to feel that that is making life unnecessarily difficult, so stranded threads or floppy threads were removed from consideration as soon as I had settled on the stitch…
I must say, I hadn’t expected to find the stitch getting narrower as I became more practised. I had to deliberately broaden the stitch as I got nearer to the start so I had some chance of joining the ends neatly.
Can You See The Join?
And I really don’t think I did too badly – in fact, if it weren’t for the colour change, I think the join would be rather hard to spot!
And by the way – the dreaded Plaited Braid Stitch is no longer dreaded!
Working on Nefertiti’s Cartouche – 2
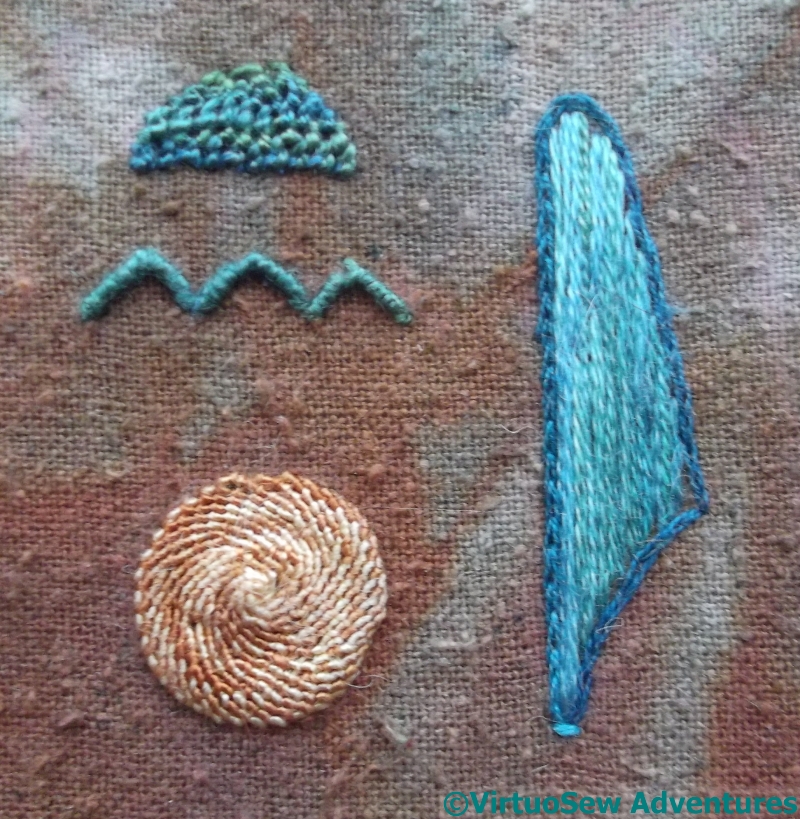
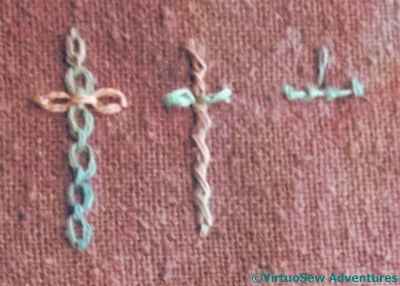
Top Block
After I’d finished the spiral trellis stitch circle, I had some doubts about it. Maybe it wasn’t strong enough, maybe the texture clouded the impression of the shape, maybe it even killed the colour. I’ve decided – with continuing reservations! – to keep it for now. I like the effect, and the knotted texture contrasts nicely with the long and short stitch beside it. If it can’t live with its companions when I’ve finished the piece, I will be in a better position to work out how to replace it.
The zigzag is about as simple as it could be – straight stitches, tightly whipped – and the half-circle, like the one in the lower section, is detached buttonhole stitch.
Needs A Border
So far, so good.
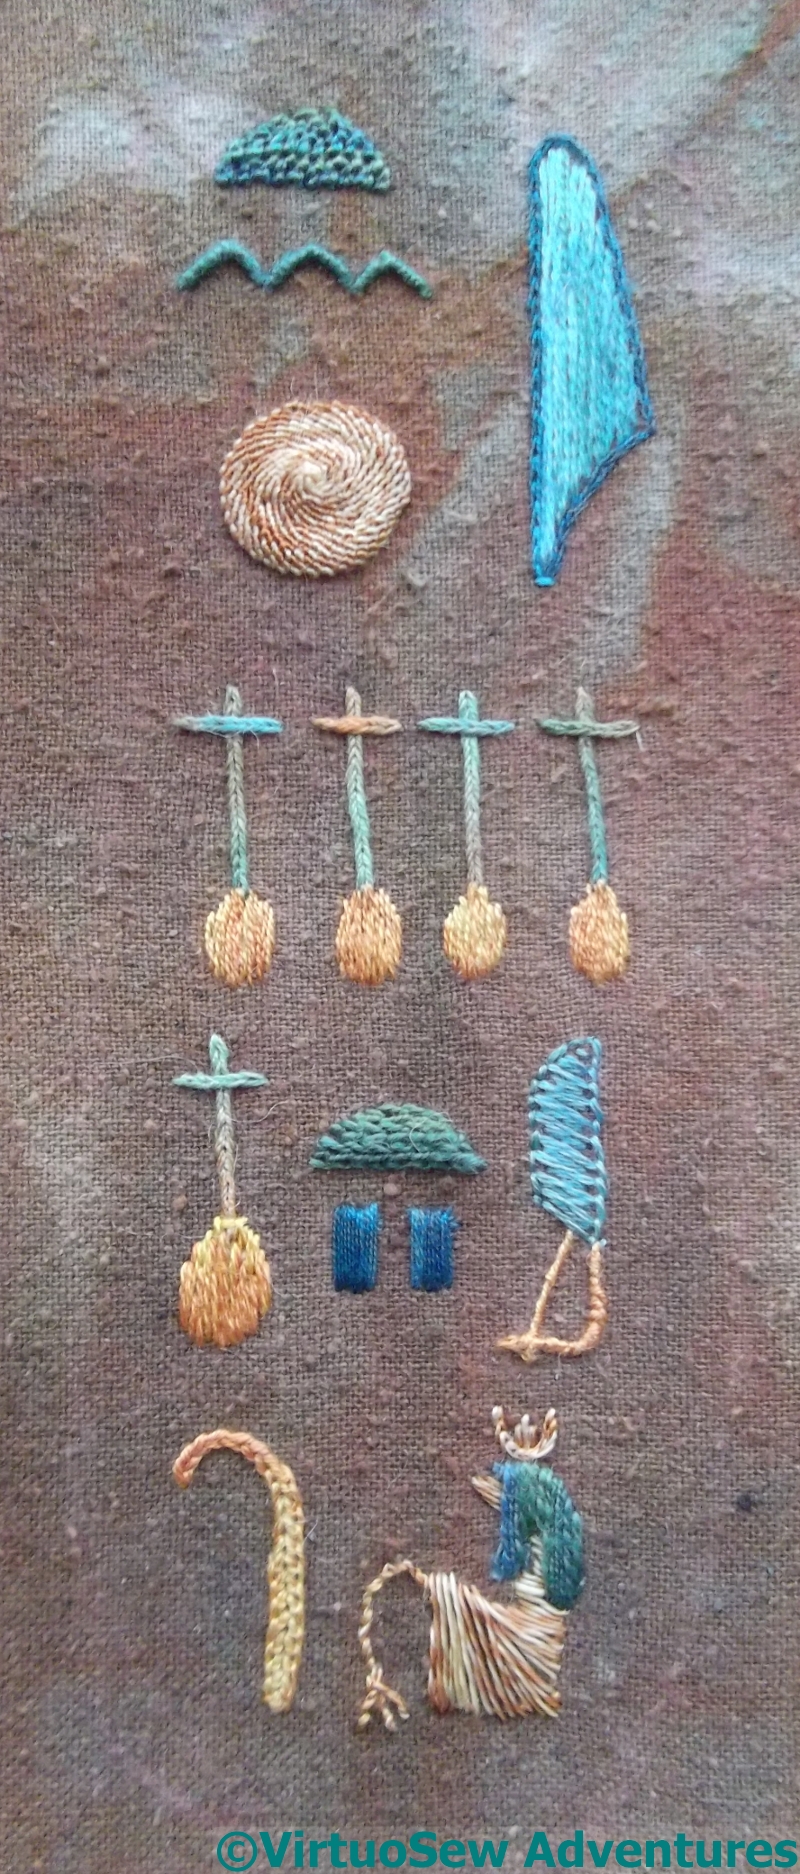
All the individual hieroglyphs have been worked, and I think the colour balance has turned out pretty well.
However, cartouches have borders, and the border is giving me a raging headache!
I had thought of working the border in Plaited Braid Stitch, in a copper or gold, or maybe couching down a knitted ribbon. Maybe a border in some other stitch, in blue-green?
So far, every thread I’ve tried has either disappeared into the background, or made itself altogether too obtrusive. I can see myself staring balefully at it for weeks, so in the meantime I am going to tack guidelines for the eventual border (in silk, what else?) and hope that inspiration dawns…
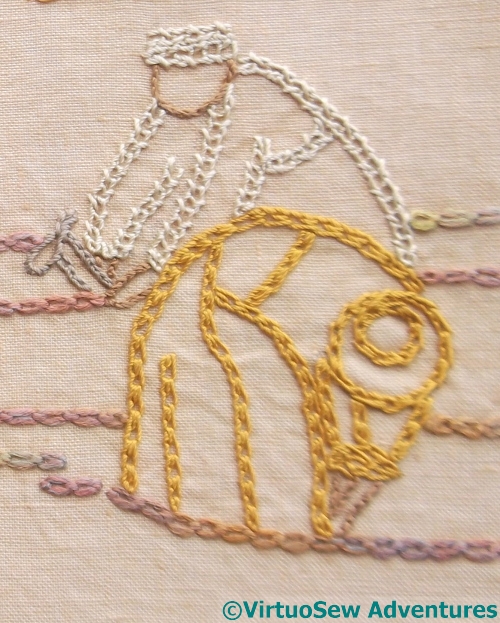
Working on Nefertiti’s Cartouche – 1
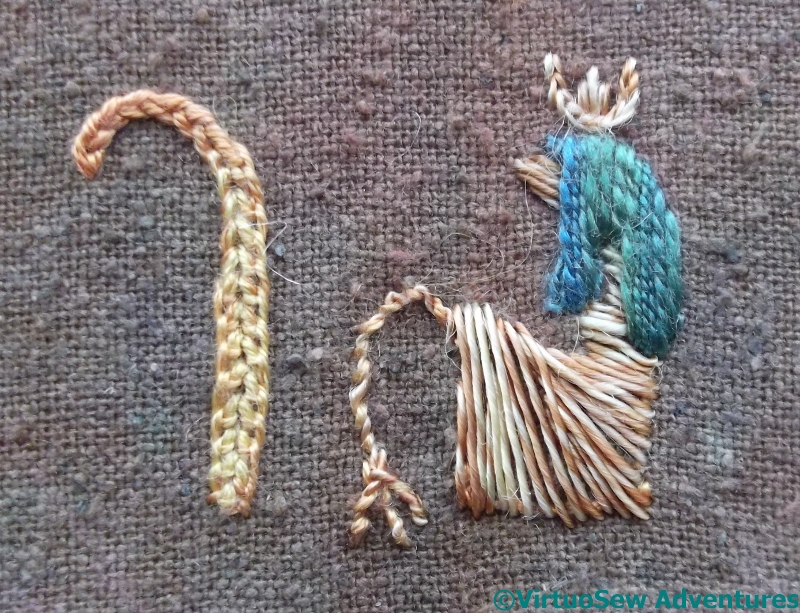
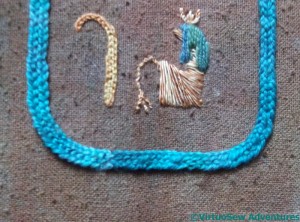
Lower Block
I need to learn to believe in myself more. As I was stitching this little seated figure, I was really very doubtful about it. I was twisting the sandy silk filament for every stitch, and it was being difficult, and looking rather odd and clunky.
Then I added the wig, in a variegated – and slightly slubby – silk perle, and suddenly I’m completely captivated!
The walking-stick like thing is a row of chain stitch with detached buttonhole stitch added to broaden the shaft. I think that works rather nicely, too.
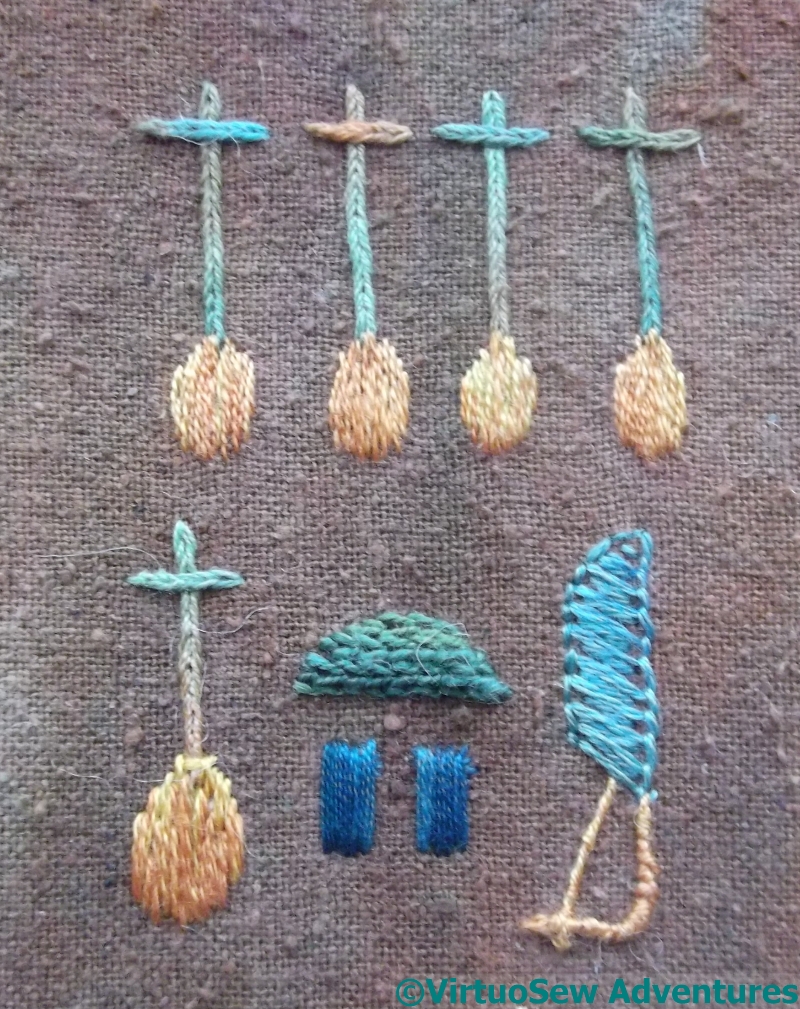
Middle Block
False Start
There was a slight false start with the row of spoon-like things. After I did the bottom row of this pair, ending with a crossed spoon in heavy chain stitch and long and short stitch, I wondered whether perhaps I should vary the stitches in the row above. An experiment in that direction soon proved me wrong, though!
The two little blocks started out as closed herringbone stitch, but that looked scrappy and a bit twisted. I left the closed herringbone stitch in place, and covered it with satin stitch, breathing a sigh of relief when it worked.
The fabric is the same as I used for the Faience Hippopotamus, and it’s frightfully difficult to photograph. No matter what I do, the colour careers around the spectrum, and the grey, overcast days aren’t helping, either.
Nor is it especially easy to stitch on. It doesn’t look like a loose weave, but it behaves like one, even though I’ve supported it with a piece of calico. Stitches that I like using are proving unsuccessful and behaving oddly. All in all, although I’m enjoying it, it feels most peculiar!
The Cartouche of Nefertiti
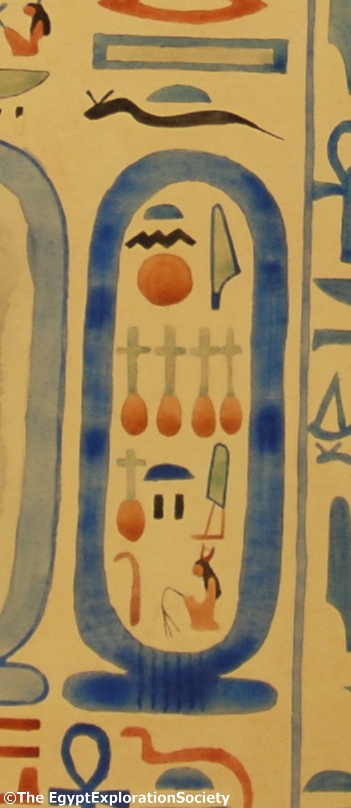
Cartouche of Nefertiti (Copyright The Egypt Exploration Society)
Akhenaten and his Great Royal Wife Nefertiti are prominent characters in Mary Chubb’s imaginative response to the city they built, so I feel they need to appear more than once in the embroidery as well. The trick is to balance the story of the archaeology and the archaeologists with the story of the ancient inhabitants..
The gauze overlays I plan will give the sense of the Pharoah and his Great Royal Wife brooding over their city, but among other things I want to include their cartouches.
A few weeks ago, I attended an evening lecture about woven patterns discovered by Howard Carter in Tutankhamun’s tomb (more on that another time!) at the Egypt Exploration Society, and spoke briefly with the Director, Chris Naunton, who has been very helpful to my research in the past. I mentioned that I would like to do at least one set of cartouches in colour. There was a thoughtful pause, then he said “I think I have the very thing – send me an email to make sure I don’t forget, but it is just a matter of finding the file!”
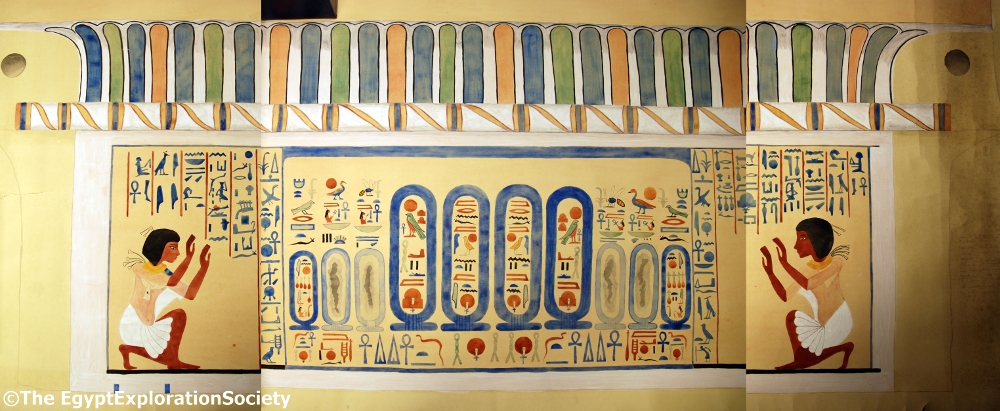
Drawing of Hatiay’s Lintel
by
Hilda Pendlebury
(Copyright The Egypt Exploration Society)
I hadn’t even arrived home the next day when an email showed up in my inbox. The image showed a composite of watercolours by Hilda Pendlebury, depicting Hatiay’s Lintel. This was a carved and painted door-lintel discovered in the very season Mary was writing about, and what’s more, mentioned at some length in the book. It was both archaeologically and historically interesting (two of the cartouches were scratched out in antiquity), as well as providing a challenge to transport, being large, heavy, and because of the embellishment rather fragile.
My current thought is that I will work a version of the cartouche of Nefertiti, either in cottons or silks, either directly on the pale faience coloured linen or maybe on the fabric I used for the Faience Hippopotamus, which would help to balance him slightly. I’ve been reassured that I won’t give any Egyptologists apoplexy if I tweak the colours slightly….!
The Faience Necklace
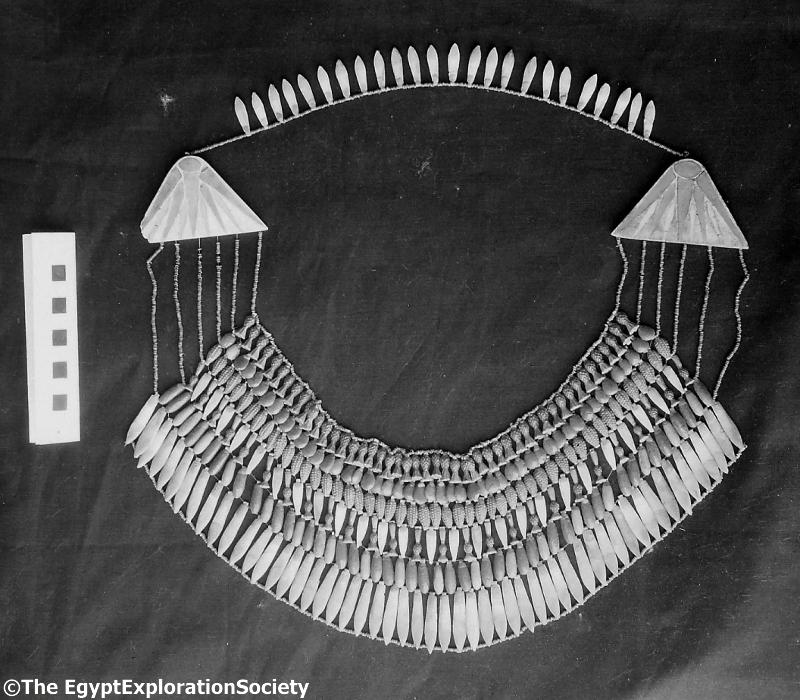
Faience Necklace
(Copyright The Egypt Exploration Society)
After Mary Chubb had her moment of epiphany with the tile fragment I reinvented for The Fragment of Tile That Started It All in that Bloomsbury basement, she returned to the office, and her first task was to re-type a recently-arrived Director’s report, since it arrived in no state for publication (“Typed on camelback in a sandstorm“, as she described it).
The first item described in that (shockingly mis-typed) report is a necklace of faience, made using rows and rows of faience shapes in different colours, shaped to depict fruits, leaves, and flowers.
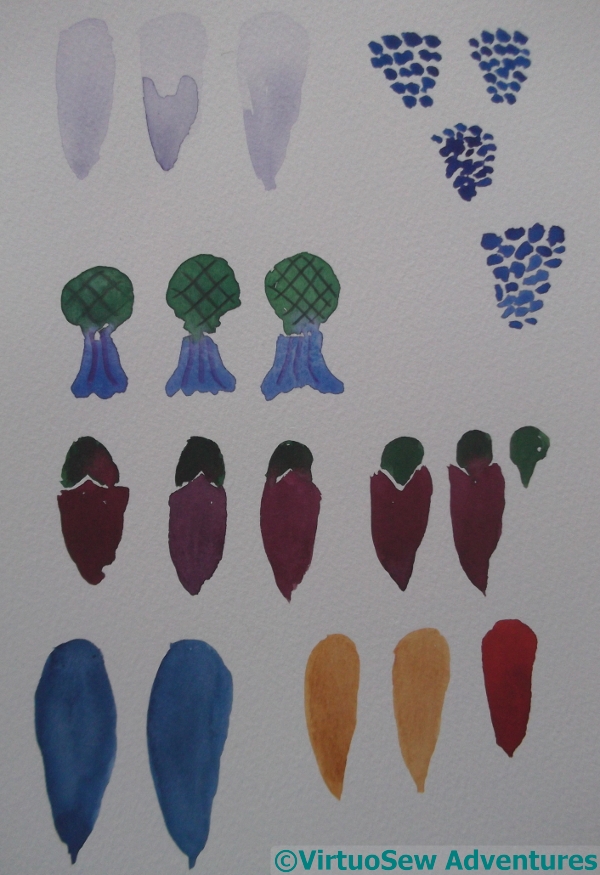
Watercolours of the Faience shapes
Naturally, I want to embroider a piece that will recall that necklace. Equally, as you can see in the photograph, if I were to attempt to embroider the whole thing, it would either have to be huge, or it will risk being tiny, cramped, and not doing justice to the enchantment she describes.
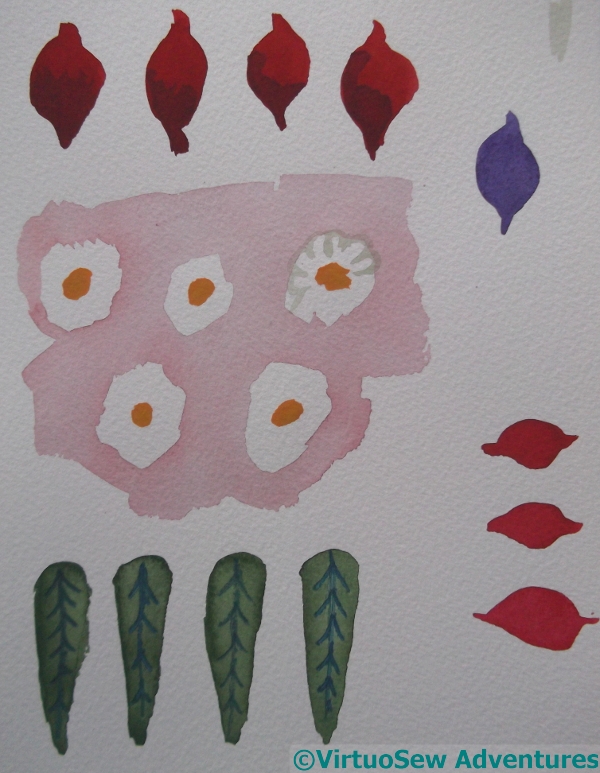
More Watercolours of the Faience shapes
So I have decided that I am going to create a design that shows only a segment of the necklace. So far that has been hard to do.
I have tried several draftings and redraftings, and these watercolour fragments are the beginnings of the fourth (or is it the fifth?) attempt to devise something reasonable. I am trying to learn the shapes of the various elements – lotus petals, bunches of grapes, cornflowers, dates, palm leaves.
What happens next is for another time. I may well be back once more to primary school, cutting out and sticking down pieces of paper.
I’m so keen to use all my shiniest threads to depict the faience that I’m becoming very short-tempered with myself…!
The opening salvo
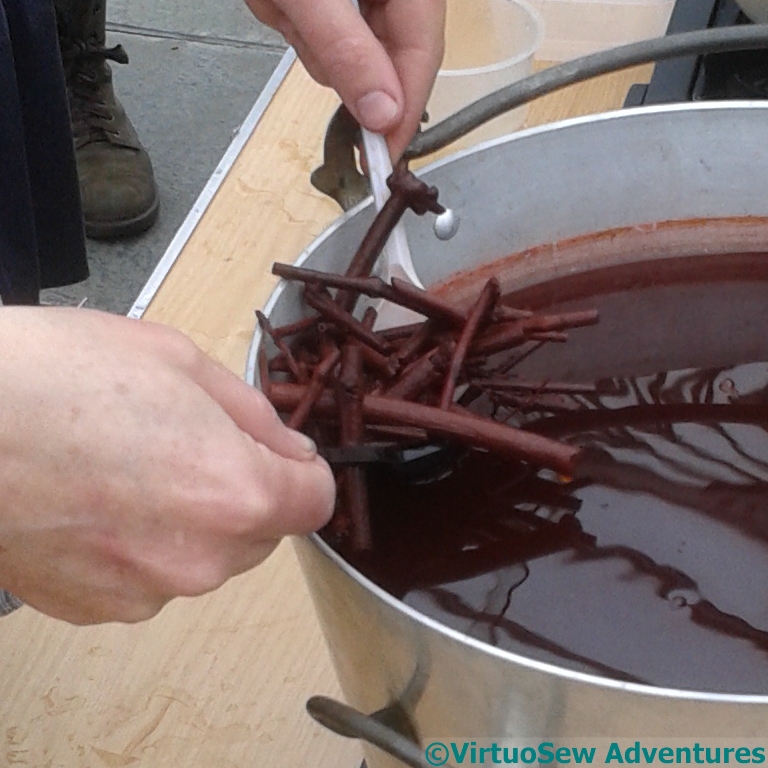
Madder Root
Out Of The Bath
I did study the techniques of dyeing and printing during my degree course, but that was industrial printing and dyeing, on a vast scale and using chemical dyes. Using natural dyes and working on a smaller scale will be a whole new adventure. It isn’t as consistent, but then that is the charm of it.

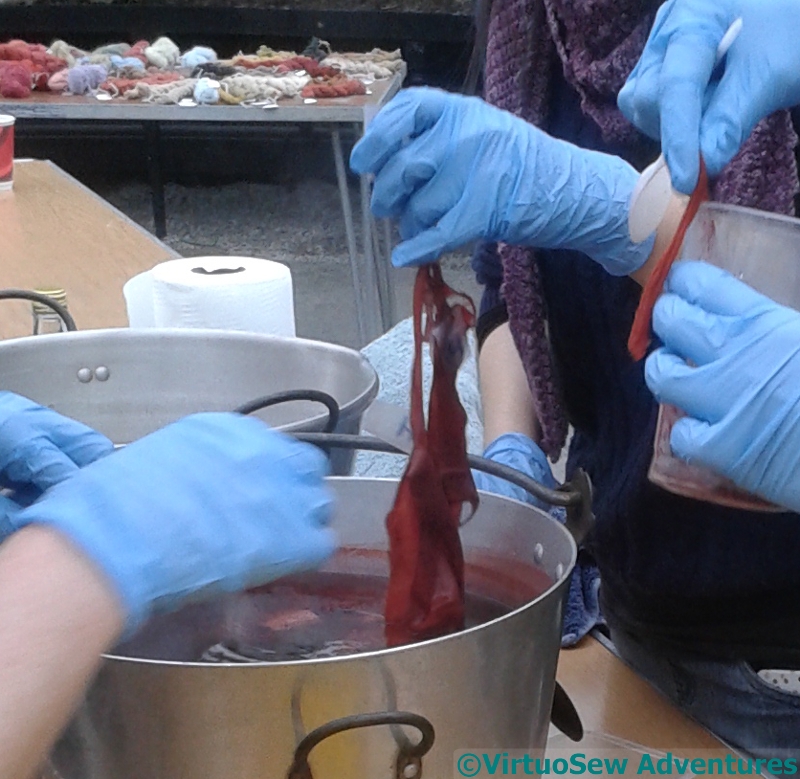
25 Shades of Madder On Silk
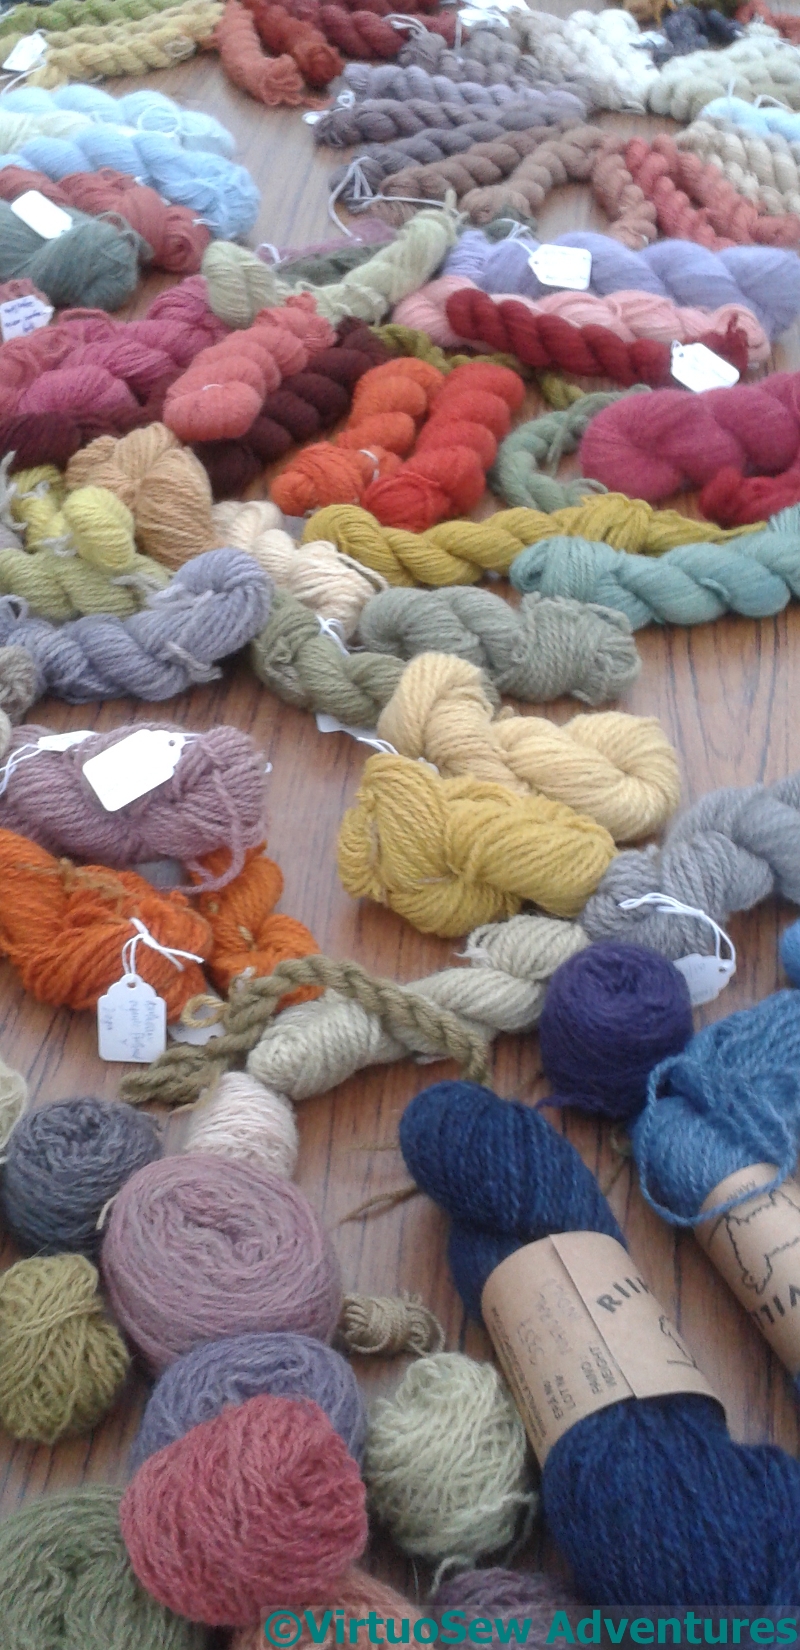
A Welter of Wonderful Wool
So off I went, rummaging through the interwebs for an introduction to natural dyeing and finally found it via Twitter, in a workshop entitled “Twenty Five Shades Of Madder” in the Glasgow Botanic Gardens given by Julia Billings of Woollenflower. It was fascinating, and gave me much to think about.
Mind you, I might have given Julia and all the other lovely ladies on the course something to think about as well, because I had my quotation from Pliny in my notebook to explain what an embroiderer was doing at a workshop, run by a knitter and attended largely by knitters.

25 Shades of Madder On Wool
It did more than explain – everyone’s imagination went into overdrive! The idea of multicoloured fabric coming out of a single dyebath clearly enchants everyone, not just me!
We even had a walk through the Gardens looking for plants that yield dyes. There are a lot of them – more than you might think!, and mordants (pre-dyebath treatments) and modifiers (post-dyebath treatments) make a lot of difference as well.
So now, I have a list of books and DVDs to look at, and suggestions of other people to get in contact with or research – and someone to ask for help if it all gets too much (thanks, Jules!)
Planning Adventures in Dyeing…

Egyptian Patterns
When I was working on my Master’s Degree, I came across this reference to dyeing in Egypt, as described by Pliny the Elder in his “Natural History”:
In Egypt, too, they employ a very remarkable process for the colouring of tissues. After pressing the material, which is white at first, they saturate it, not with colours, but with mordants that are calculated to absorb colour. This done, the tissues, still unchanged in appearance, are plunged into a cauldron of boiling dye, and are removed the next moment fully coloured.
It is a singular fact, too, that although the dye in the pan is of one uniform colour, the material when taken out of it is of various colours, according to the nature of the mordants that have been respectively applied to it: these colours, too, will never wash out.
Thus the dye-pan, which under ordinary circumstances, no doubt, would have made but one colour of several, if coloured tissues had been put into it, is here made to yield several colours from a single dye. At the same moment that it dyes the tissues, it boils in the colour; and it is the fact, that material which has been thus submitted to the action of fire becomes stouter and more serviceable for wear, than it would have been if it had not been subjected to the process.
Now, Pliny the Elder was writing long after Akhenaten’s time, indeed after Egypt became part of the Roman Empire, but plant dyes were already known in 18th Dynasty Egypt, so I am going to assume that mordanting was also known.
I simply have to try this!
I’m not going to try to use Egyptian plant dyes – I think it will be quite challenging enough as it is – but I need to do some research to discover what colours can be obtained by different mordants from a single dyestuff, then work out how to apply the mordant in patterns in such a way as to ensure that it works.
And then do it. It would make a fabulous video, wouldn’t it, dipping a white cloth into a vat and getting multicoloured cloth out again!
So, where had I got to…?
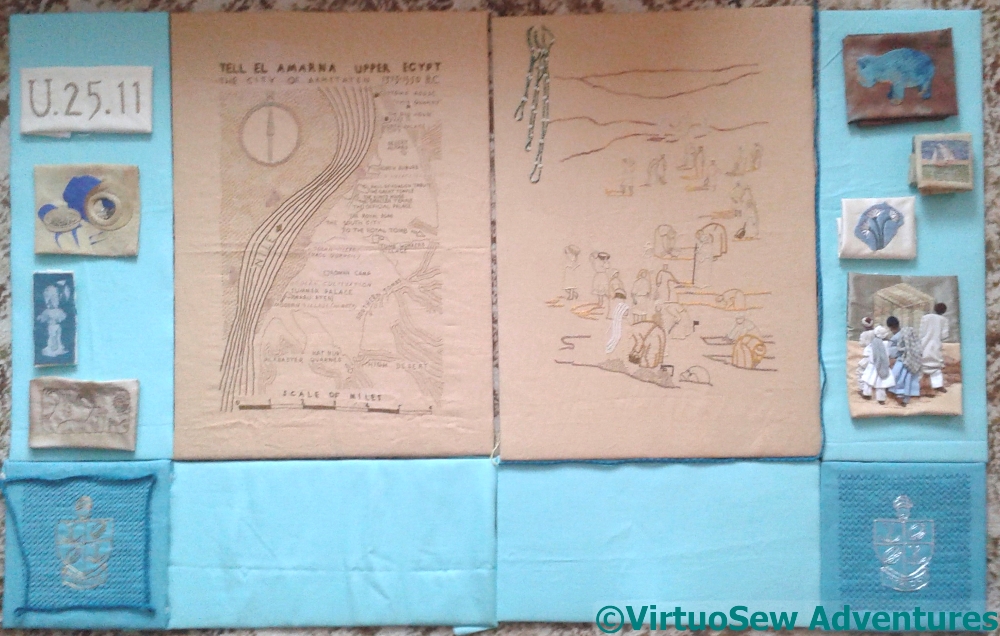
Layout Trial
Once I’d finished the View of the Excavation, I thought it would be a good idea to see whether the whole Dreams of Amarna project was even remotely on the right track, so I got some mount board cut, and taped the Map and the Excavation around their boards, the two Crests around theirs, and then cut some of the pale turquoise linen for the rectangles around the edge. Then I burrowed into my box of the finished patches and bits – including a couple of yards of kumihimo braid and some beading – and started trying to arrange them to see whether it was going to work.
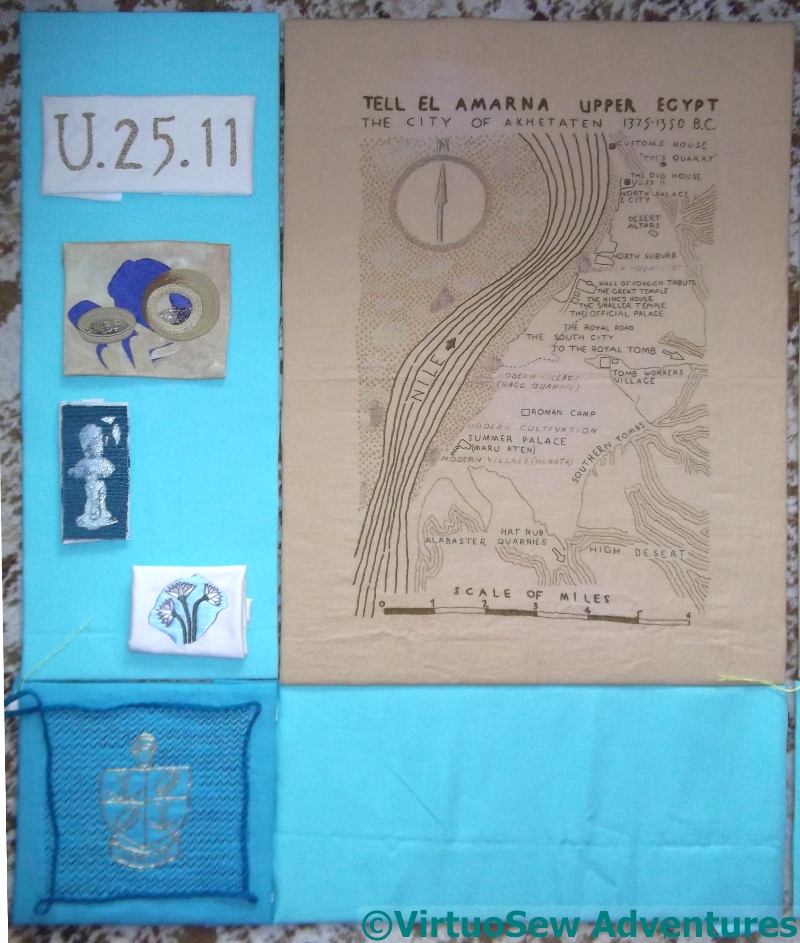
Panel One
I think it may be working! The colour blocks work beautifully, although the arrangement of the patches I arrived at for the picture above is better than the one in these.
I need to find somewhere else to use the purple-blue of the shadow on the Crock of Gold patch, and the dark fabric behind the Faience Hippotamus.
The Kumihimo braid was intended to frame the Crest for the Dig panels, but I think it works better in the second panel when I used it to edge the Excavation. So I guess I have to braid some more!
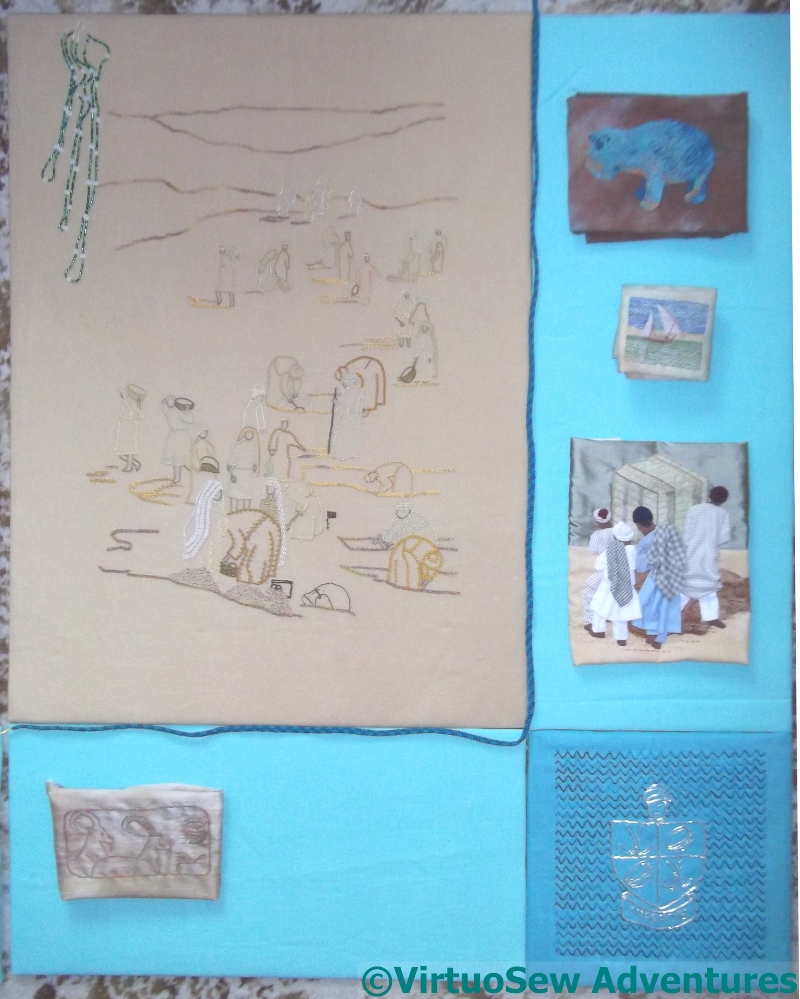
Panel Two
I do think I need to put some texture in to the background of the Excavation. It will help to balance the texture in the Map, and it will create a bit more variation in colour.
Loading the Felucca looks good, and makes a great punctuation mark. The Daisy Beads – well, that’s not the final arrangement – I just need to work out what will be.
And I need to go back to my notebook of ideas, and pick some more patches to do.
However, I do think it is going to look good.
Eventually!
The View of the Excavation Finished…
Foreground Group
The last group took a lot of stitching, restitching, unpicking and restitching. I couldn’t seem to get any of it right, and there are one or two bits I’m still not 100% sure about, even now…
The pale figure, bending over beside the little flag is in Spanish Knotted Feather Stitch, and the nearer bending figure is in Mountmellick Stitch. I was surprised that it was quite so hard to find suitably broad line stitches for the purpose; when you’re looking for characterful narrow stitches, you can only find broad ones, and when you’re looking for broad ones, by some strange alchemy only narrow ones catch your eye…
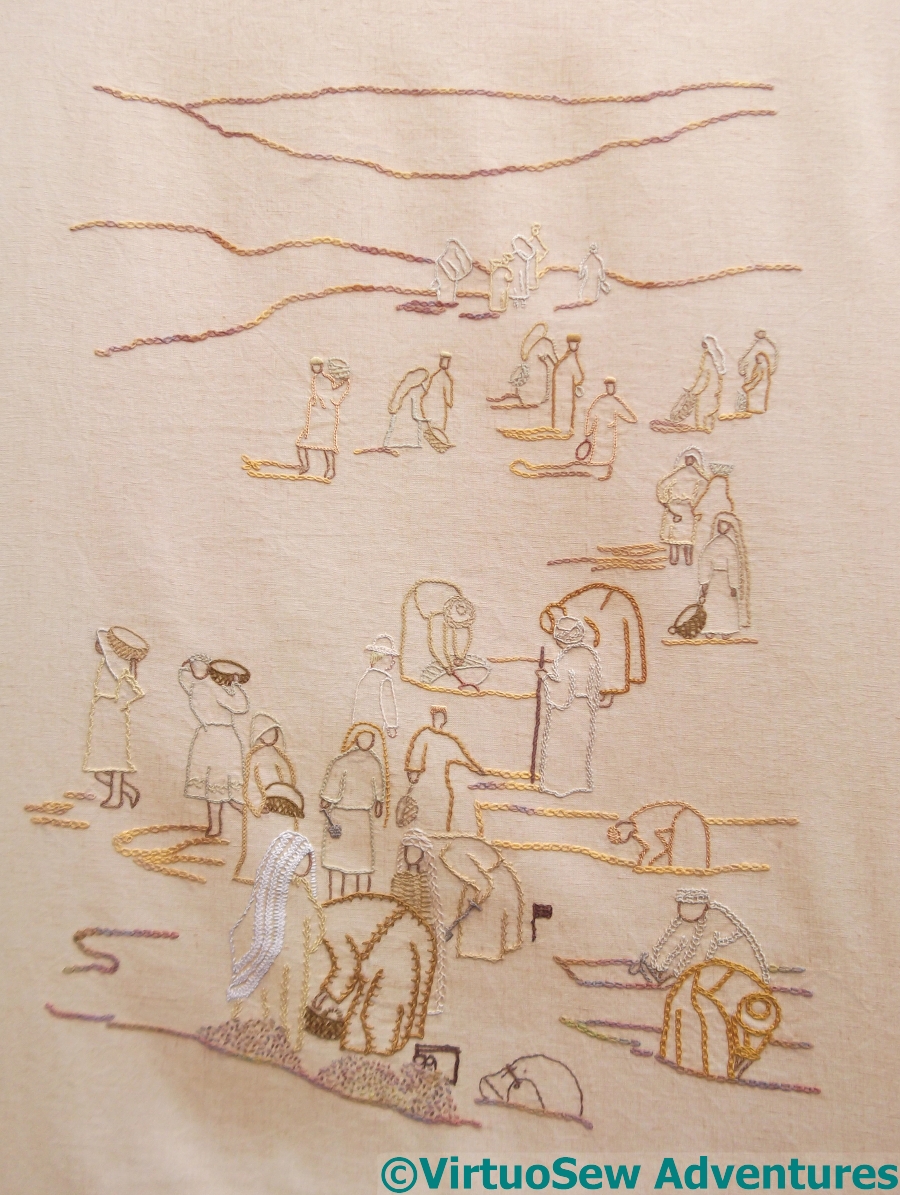
View Of The Excavation
The creamy white headscarf ran through Crested Chain Stitch (no!) and several stitches I hated so much I didn’t even record them, before I finally settled on three rows of Braid Stitch.
So at last, after much fiddling around, the View Of The Excavation is finished.
I’m fairly happy with it, actually. The trail of people into the distance creates a pleasing pattern, and I think that the alternation of the colours works well. Furthermore, as I wished, the Egyptian labourers and supervisors are the stars. There is a European, but he’s mostly concealed by the others.
There may be a few tweaks – not least I have yet to make sure that it works as a counterpoint to the Map of Amarna – but I think that at last it is finished for the time being!
Still More on the View of the Excavation

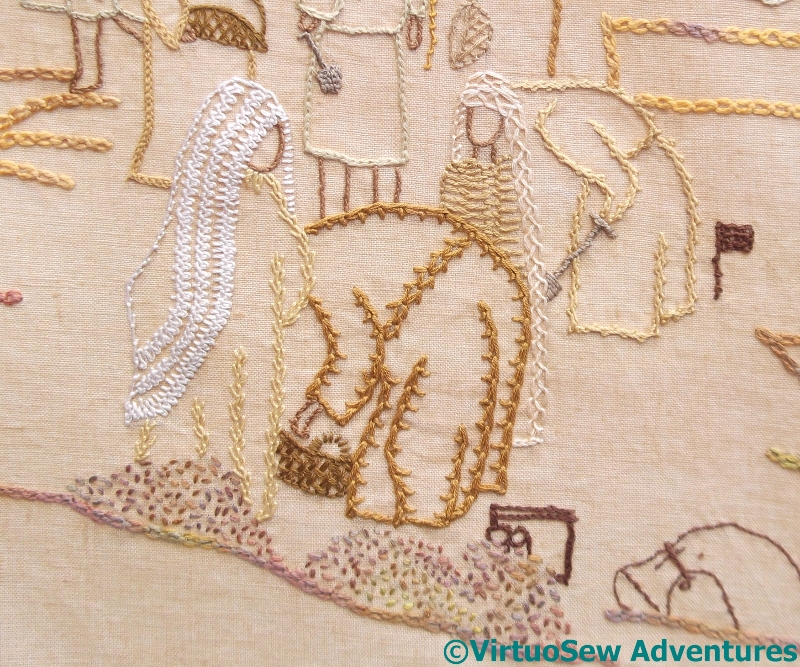
Supervising A Trench
As I got nearer the foreground figures, I tried to pick broader stitches, or at least stitches that were a bit more emphatic. This group was great fun to do, starting with the Gufti with his staff of office (Portuguese Knotted Stem!). The Gufti’s robe is Feather stitch, as are some of the twists of his headgear. I concentrated very hard on keeping the stitches even and close so that the “density” of the stitch would be maintained. The one in dark gold is in double interlaced back stitch, except for the top of the headgear, and the waistline – those are whipped backstitch. The other one is in one of the Elizabethan stitches from Jacquie Carey’s book.
I had fun with the supervising excavator – the brim of his solar topee is the Hungarian Braid chain, and I reversed the direction of the chain stitch for the peak of the crown. He’s also the only one with fair hair and pinkish skin, and I dressed him in a pale, tailored jacket.
The two at the front are another mixture of stranded silk, stranded cotton, and round silk thread. The golden veil is coral stitch, and the tunic below it is stranded silk chain stitch, and the dark golden tunic is stranded cotton and twisted chain stitch. I’m trying to make choices of stranded or round yarn that will suit the stitch.
Two Diggers
I worked these two diggers on World Embroidery Day – which I hadn’t even known existed until the day before, so I was very glad I was able to sit and stitch!
I went back to my Edith John books for these two. The front one is in Shell Chain stitch, which I first used on the Circle Skirt. I won’t say it’s a favourite, but I have rather taken to it, and it creates an interesting effect.
The one behind is a very peculiar stitch, a combination of twisted chain stitch and open chain stitch. It creates a very square appearance, with the twisted chain alternating from side to side of the open chain, and it is called, rather predictably, Open Twisted Chain Stitch.