
Tag: Research
Vision of Placidus – a project for the distant future…
")
Pisanello “Vision of St Eustace” (Image from Wikipedia)
Lately I have been re-reading a favourite book, “The Herb of Grace” by Elizabeth Goudge. In it, her fictional family discover in their house – a medieval Pilgrim Inn – an ancient fresco, depicting the conversion of Placidus. It is described as being very like Pisanello’s “Vision of St Eustace”, now in the National Gallery – Placidus changed his name when he converted to Christianity – but with the local wood and its animals forming the background. In fact, so enchanted was the fictional artist by the local wildlife that he filled every gap in the trees with animals, even putting land animals in the sky to fit them all in.
")
La Dame à la licorne. (Image from Wikipedia)
It is this element that appealed to me, as it is reminiscent in some ways of my favourite textile, in my favourite museum in all the world – La Dame à la licorne, in the Musée de Cluny in Paris. This is a set of medieval tapestries, depicting the mythological hunt for the unicorn, and the set is displayed in a circular room, with a set of steps down into it. When I first saw it, I sat down very suddenly on the steps, and didn’t move or speak for a good ten minutes, which gravely disconcerted my companion at the time. I’ve since dragged various friends and relations there, too, just to give myself another opportunity to visit the tapestries, not to mention visiting the Gobelins Manufactory in order to find out how such tapestries were made!
One day, I would like to create my own panel, linking La Dame à la licorne with the Vision of St Eustace. There are so many textures – the fur and feathers of the animals and birds, the splendid trappings of Placidus’ horse and his own clothes, the forest trees and flowers, and the rocky outcrop where the stag turned to face him. Just think of the wonderful variety of stitches and threads I could use!
More Amarna Research
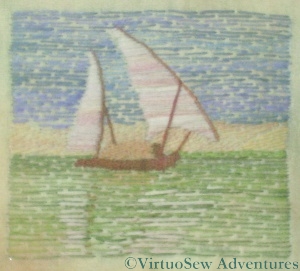
The Felucca
I did say, when I first began working on the “Dreams of Amarna” panels, that I did not intend to become an Egyptologist. I still don’t, but at the same time, my interest in the Egyptology of the thirties, and in what Mary Chubb might have known or had access to, has extended somewhat as I have discovered more.
Recently BBC4 showed a documentary called The Man Who Discovered Egypt, so of course I pricked up my ears. When I realised that the presenter was the current director of the Egypt Exploration Society, Dr Chris Naunton (@chrisnaunton for the Twitterers among you), and his subject was Flinders Petrie, I made absolutely sure to record the programme so I could watch at my leisure. It was fascinating, and I may very well get further ideas for scenes on my edge panels from looking at it again.
For those in the UK that missed it and are interested, the programme is being rebroadcast on Tues 15 May at 10pm, on BBC4.
As it happens, Chris Naunton was the first person I spoke to at the EES when I started my research, so I emailed to say how much I’d enjoyed the programme. He replied, and added that the digitisation of the archive (which gave me the original picture for the Felucca, above) has been continuing apace. The EES now has its own YouTube channel:
http://www.youtube.com/playlist?list=PL85556374907053C0&feature=plcp
Furthermore, some of the film shows JDS Pendlebury, the Director of Excavations in Mary Chubb’s time, not just working, but playing – organising a sports day for the worker’s children, having a spoof argument with colleagues – and, very importantly for me, there is film of an incident which is described in the book, of bringing back a heavily carved and coloured door-lintel from the site to the Expedition House. Whether I will be able to create a feasible embroidery design from that welter of imagery remains to be seen – but it will be really worth a try, won’t it!
An addition to my library
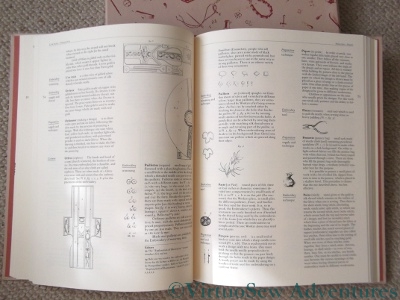
St Aubin - Glossary in "The Art of the Embroiderer"
Charles Germain de St Aubin was designer to Louis XV of France, and he wrote a famous work entitled “The Art of the Embroiderer”, which is much referenced among scholars of textiles of the period, but has proven tricky to track down. Not to mention, my grasp of seventeenth century technical French really isn’t up to scratch.
Now, however, I’ve got hold of a recent translation. The Los Angeles County Museum of Art commissioned a translation, and produced the resulting book splendidly, with colour plates of interesting relevant textiles from their collection (annotated by the curator) and a facsimile of the original work, all on good paper and properly bound and presented in a slipcase. I gloat quietly to myself every time I look at it!
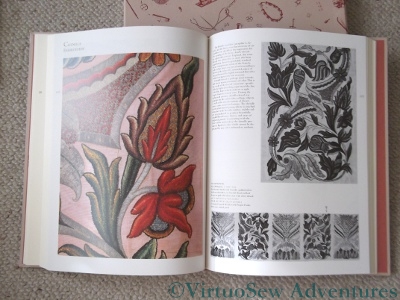
St Aubin - Colour Plate in "The Art of the Embroiderer"
The book is of interest to me because he talks of chenille embroidery, and implies that there are two known methods for making a chenille yarn, one of markedly poorer quality than the other. This is very strange, because until some time in the seventies you would have been told that there was only one way to make a chenille, and that the method St Aubin dismisses as being of poor quality. As far as I am aware no one has yet worked out quite what St Aubin meant, or what other technique he was referring to.
Wouldn’t it be wonderful to find out!
I am not alone. . .

Sir William Matthew Flinders Petrie (picture from Wikipedia)
I recently had a trip to London, when I managed to fit in a brief visit to The Petrie Museum of Egyptian Archaeology as part of my background research for the Dreams of Amarna panels. Sir William Matthew Flinders Petrie excavated at Amarna during the 1890s, finding and recording a fine painted pavement, since destroyed, of which Mary Chubb, who wrote the book which inspired the Dreams of Amarna project, would certainly have known. He also trained Howard Carter, whose discovery of Tutankhamun’s tomb sparked the Egyptological fever that took hold in Europe and indirectly provided the impetus for Mary’s career.
I arrived late in the day, and really didn’t have much time to look around, but I did tell the lady at the desk why I was interested, and was rather startled when she said “Oh, then there is something you must see!” and took me to see it. It turned out to be a modern tapestry, woven at the Ramses Wissa Wassef Art Centre in Saqqara (itself a place to set Egyptologists a-tingle) and named “Dahsur Lake” . The tapestry is very reminiscent of the Amarna style, full of life and colour, vigorous and joyful. The weavers produce their panels without sketches behind their looms, and I am astonished at what they have produced.
Clearly I am not alone in finding the art and story of Amarna inspiring. I wonder, will I produce something as good?
Dreams of Amarna – More Research
This weekend I went to the exhibition “Tutankhamun – His Tomb and His Treasures” at the Museum of Museums near Manchester’s Trafford Centre. Partly just for fun, and partly because Mary Chubb mentions the huge excitement over Howard Carter’s discovery of Tutankhamun’s tomb as some of the “social background”, if you will, in her book “Nefertiti Lived Here”. I was hoping to catch some of the flavour of that excitement as well…
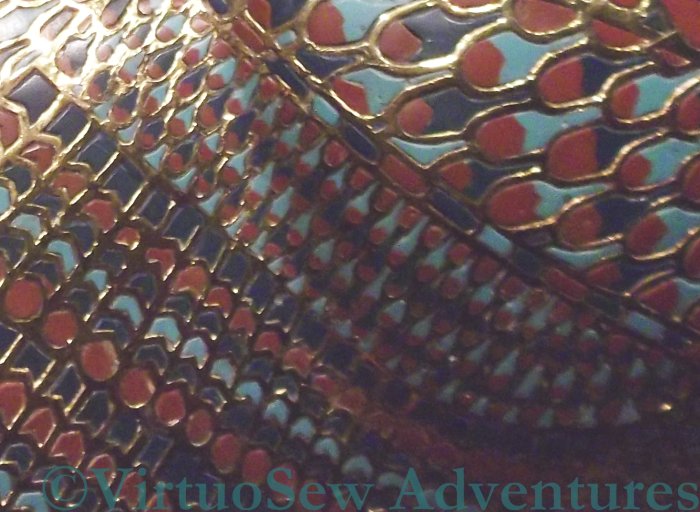
Cloisonne Feather Pattern on the Sarcophagus
It was an excellent exhibition. The usual introductory hall, with panels describing ancient Egypt and the development of Egyptology, but this one also included a reproduction of the Rosetta Stone. I knew that one of the languages was hieroglyphic and the other was Greek, but I hadn’t quite registered that the third was demotic, which was the “workday” script of ancient Egypt, as it were. Then there were films about Tutankhamun, and about Howard Carter, and then we turned a corner and found ourselves face to face with a reproduction of the antechamber of the tomb, just as Carter would have seen it. There is a British Museum page showing one of the original photos here. Except that doesn’t begin to give you any sense of the impact, because nearly every item is covered in gold. It speaks volumes for the self-discipline of Carter and his colleagues that the whole affair did not degenerate into a snatch and grab. I was too startled and overwhelmed to take a photo at this point, although non-flash photography was permitted.
Although I knew, of course, that the tomb contained a mixture of Amarna-period pieces and later pieces, I wasn’t aware that the cloisonné on the middle sarcophagus (close-up above) was an explicitly Amarna period design. So maybe I need to do a small patch using that pattern.
I took quite a lot of photos, which came out, on balance, much better than I expected them to, and may even turn out to be interesting and useful.
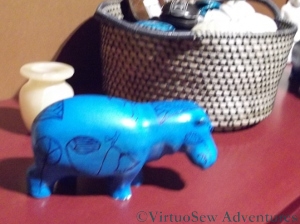
The Hippo In The Shop
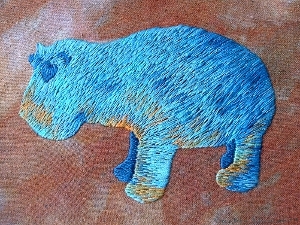
The Faience Hippo Finished
There was a short exhibition at the end which included some of Howard Carter’s watercolours – he was clearly a very fine archaeological artist and illustrator, and then we were sent out though the inevitable shop. Where I couldn’t fail to take one final photo…!
Dreams of Amarna – The Dig House Experiment
I’ve been thinking so hard about Amarna over the past two years that I have begun to get itchy fingers. So I thought I would try something… I don’t know whether this will find a place in the final pair of hangings, but it was time I started stitching!

Photo of the Dig House (courtesy of the Egypt Exploration Society)
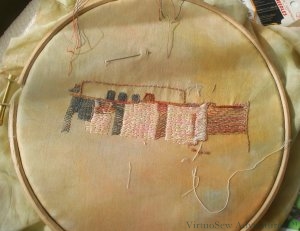
Mary Chubb comments in the book that the Expedition House is one of the houses of Akhenaten’s time, built back to roof level and then roofed, so of course I want to include it. The photograph I am using came from the Egypt Exploration Society, and I simply sketched a freehand outline of the Expedition House on the cotton with a quilter’s pencil and started stitching.
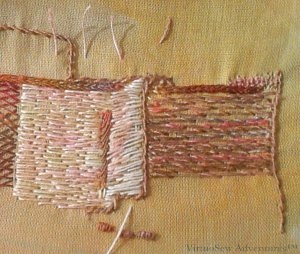
Dig House - Detail 1
In a sense what I am doing here is treating the original photograph as a pattern of dark, medium and light tones, and trying to recreate that tonal pattern. I hope that if the pattern in accurate enough, the whole piece will make visual sense as a representation in fabric and thread of the house that the members of the Expedition lived in.
The fabric and threads are by Stef Francis, the fabric a fine turban cotton, overdyed in sandy and stony colours, and the threads, stiff linens and cottons, a greyish blue and blues shading into dark reddish browns.
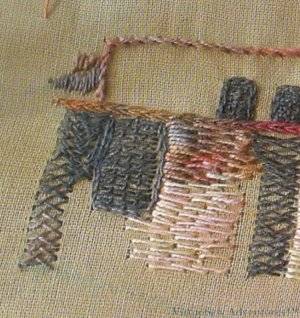
Dig House - Detail 2
The threads are really much too stiff to work as well as I’d hoped. They are difficult to control and need a more substantial fabric than I am using as a basis. They are also not quite the colours they seemed on the hank, so the overall colour impression is unanticipated.
The stitches include herringbone, stem stitch, chain stitch, couched filling, even a sort of brick stitch – all simple stitches, but this is an exploration of the image and not really of technique.
Experiment in stitching the dig house
This is very much an experiment as I’ve never worked with so sketchy (sorry!) a plan or so little on the fabric before when I’ve been working on something so relatively complex. It’s quite scary, but as I mentioned in a previous post, over the past couple of years I have also been learning to paint in watercolours, and I’ve discovered that in that medium I do much better when I don’t put too much on the paper before I start painting. Of course I get many fewer “successes” than if I were to draw in detail from a photograph, but it makes me observe more closely and take more pains.
At the moment I am not entirely happy with the way this is turning out. I was hoping to use the fabric as a mid tone, but the threads are not close enough in colour family for that to work, and so I am having to stitch more of the design than I would have liked. I should maybe try again using a different fabric, but in the meantime, persevere with this to see what else I can learn.
Dreams of Amarna – Working on ideas
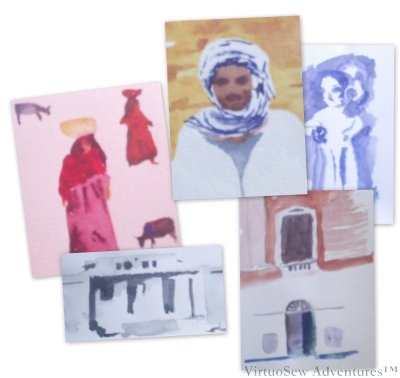
Collage of painted sketches for the Dreams of Amarna project
I’m still trying to think about and plan what to include, so I have been taking some of the photographs, and trying to produce paintings or drawings based on them.
This is serving a twofold purpose, as I have been developing my understanding of techniques, as well as learning how to distil the detail in the photographs. If it is important to simplify the sources in painting, it is more important in embroidery, where the effects created through stitch choice, thread choice, or the decision to raise the surface with padding also contribute to the final result.
The paintings aren’t particularly good, but that really isn’t the point of them, so I don’t mind. They aren’t finished pieces – I simply want to force myself to look at the photographic sources with an analytical eye. I hope then that it will come more naturally each time I find a bit I want to work on and embroider.
In fact as I look at this collage of paintings, I’m quite pleased. At least I have shown an appreciation of where the darks and the lights need to be, and those are what make a picture easy to understand.
Dreams of Amarna – Researching Techniques
I know that an embroidery which is “about” ancient Egypt – even if only indirectly – will have to include some gold and silver – not least, that same Crock of Gold hoard that caused so much consternation to the excavators when it was found (artefacts have a fairly limited and specialised market, while gold bars are much easier to sell, so there was some concern about security that would never have troubled the dig under ordinary circumstances).
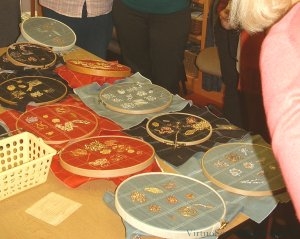
All our own work!
So the next step was a trip to Durham, for a two day course in Modern Goldwork, given by Tracy Franklin. I had a fascinating time. Tracy is an excellent teacher, and it was a real treat to be able to concentrate on learning something entirely new to me. The class had the bonus that Tracy had plenty of goldwork materials available for purchase, and my local embroidery shops don’t have any. Some of what I bought for my coursework was in fact for “Dreams of Amarna” instead!
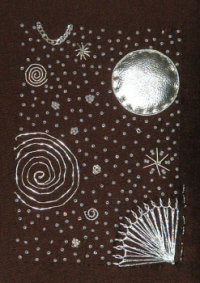
"Starbright", completed November 2008
When I returned, I worked a small panel as an attempt to consolidate my grasp on the techniques and the materials. I even included some padded silver kid leather, and the background is starred with beads.
I’m quite pleased with the panel, as I managed to use almost every technique we were taught. The base fabric was a tightly woven brown synthetic, which was rather trying to work with, but I wanted something very firm for this first solo attempt at goldwork.
I will need to use very different fabrics for Amarna, and I expect that trial and error will be much employed!
You might be able to see a line of stitching, running up the edge. That’s my “signature,” in Morse code. It’s much easier to do small and neatly than letters, and sometimes I manage to hide the signature in the design.
When I am creating an embroidered piece for someone else, I try to make sure that I also provide something about the design and the making of the work. Not just care instructions, but a description of the design choices and why I made them, or if I was working to a brief, a description of the influence of the brief on my approach to the work. Given my interest in history and archaeology, it’s perhaps not surprising that the idea of providing Something For The Archive rather appeals to me.
And on that score, and on behalf of those in the future who will be interested in embroidery – please, sign your work, date it, write about it. Just think how thrilled we always are to gain an insight into the work of designers and artisans of the past!
Dreams of Amarna – researching the ideas
As it happens my family has always had an interest both in archaeology, and in the history of art, so I started to look through our books to see whether I could find any reference material. I found a few things, but in truth, not enough to support the work I was trying to develop. That is scarcely surprising, really. The “Amarna Period” covers maybe thirty years. Ancient Egyptian civilisation lasted for several thousands of years! So I did the obvious thing – I contacted the Egypt Exploration Society, for whom Mary Chubb worked at the time of the dig, and asked whether they could help.
They could, and they did.
I spent a delightful (if wearing) afternoon in the library of the Society, and was even able to read and refer to the publications of the expedition, and then some months later received an email to tell me that the Society had been digitising its’ photographic archive and if I was interested, they would be happy to let me look through the archive for more source material.
Was I interested? Well, of course I was!
This time it was an entire morning, but then, the archive not only included the photographs of the finds and records of the excavation. There were pictures of the excavators at work, shots of the surrounding area, the felucca loaded with supplies… “Wonderful things!”, as Howard Carter said…
I know, I know – I haven’t set a stitch yet, but there’s so much to think about!
I also found an article about excavation organisation and methods, written by JDS Pendlebury (Director of the Expedition) at about this time, and a much later paper, written by another archaeologist about the Hittite amulet that was part of the “Crock of Gold” hoard that they found during the season. I won’t provide a link to those, as they are behind a paywall. The fact that I did pay for and download both articles shows just how attached to this project I have become!
I haven’t yet bought the biography of JDS Pendlebury. At the back of the book Mary describes his fate – parachuted into Crete (where he had been site Director at Knossos under Sir Arthur Evans), he coordinated the resistance to the German invasion, was wounded and captured, and then dragged from his sickbed to be executed. It saddens me every time I read it. Not just because of him, but because of the thousands of others, young and not so young, who were also cut off at the height of their powers, with so much yet to contribute to the world.
A Class Piece Finished!
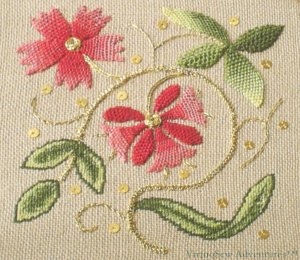
Class Piece from the Elizabeth Embroidery Course
In October last year I went up to Durham for a weekend course in Elizabethan Embroidery with Tracy Franklin. She provided us with a kit of materials, including the design ready-traced onto a coarsely-woven canvas-like fabric fused to a muslin backing, and a good deal of tuition, advice, and demonstration, all fairly easy to see because there were only twelve of us on the course.
The leaves in the lower section of the design are worked in tent stitch, and here the challenge was to create the right shaded effect on the leaves. Tracy showed us some photographs of original Elizabethan embroidery so that we could see what they did then. Tent stitch is not really one of my favourite stitches, but making up the shaded pattern as I went along was much more fun.
Then we moved on to Corded Single Brussels Stitch. I’ve found a whole list of the needlelace stitches in this family here at Lacemakers Lace. This also seems to be a stitch much used in the Plimoth Jacket (story told in full on the Thistle threads blog), and it’s fairly straightforward, although made trickier in this case because we were using two plies of stranded cotton. That produced some more even blending of colours because we could mix colours in the needle, but it’s a bit more difficult to keep tidy because you have to make sure that both plies are picked up in each stitch.
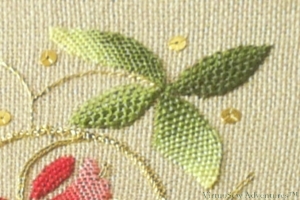
Detail of the Class Piece
You can see in this shot that I played around with my Corded Brussels stitch. Two of the leaves are shaded and worked conventionally, from tip to stem. The other two are worked longways, from the centre outwards, producing a marked vein. You see what I mean about having fun with it?
The main stem was supposed to be worked in Plaited Braid Stitch. Now, I can do Braid Stitch – just ( I have to keep the book open all the time while I do it!) – but so far I’ve not nailed Plaited Braid Stitch. In the interests of finishing the piece, releasing the frame, and starting on the project that has been nagging me for the past ten years or so, I’ve done the stem in the ordinary Braid Stitch, and filed Plaited Braid Stitch under “Must Try Harder”.
I’m not the only one. Mary Corbet posted about the stitch last year, and a quick Google shows that there’s more than one stitch out there called plaited braid stitch – just to make things more difficult. And there is a description of the stitch on this page as well.
Still, now this is finished – if not entirely according to the original plan! – I can find a box top to mount it in, and move on…