
Jane Rainbow Kit – second installment
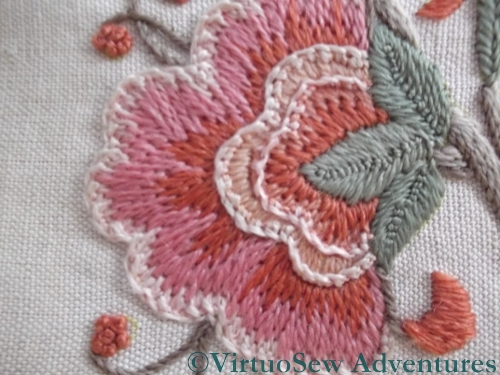
Flower 1 on the Jane Rainbow Kit
The raised edges of the petals of this flower are produced by working one row of blanket stitch along the edge and then working detached buttonhole stitch into that. It creates a fairly subtle effect in real life, and it’s always satisfying to see small details like this appearing in kits.
You can also see in this close up that although I was beginning to get to grips with satin stitch, my Long and Short Stitch wasn’t very good.
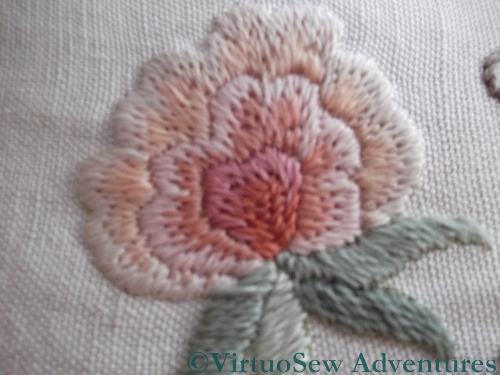
Flower 2 on the Jane Rainbow Kit
Really not very good, in fact! The stitching on the second flower looks more like brick stitch. I think this is the only bit of the design I didn’t enjoy doing, and that’s entirely because I simply could not get to grips with Long and Short Stitch. No-one had told me to think “Long and Longer”, which is what has cracked it for me since then. Besides, working a colour change into such narrow rows is not the easiest way to tackle Long and Short stitch!
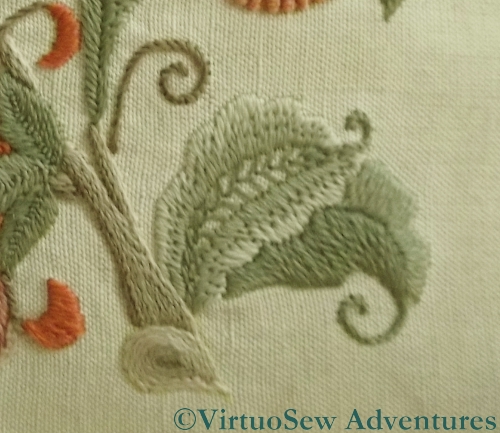
Leaves and stems on the Jane Rainbow Kit
I did like the rows of stem stitch shading from dark to light that were used for the stems – in fact I used the same technique in the stems on the Piano Shawl. The detail of the end of the stem – concentric rows of stem stitch – was particularly charming.
The leaves in the bottom corner worked well, too. The openwork at the centre of the upper leaf makes a nice contrast with the rest of the design which is very densely stitched.
I did enjoy working this – even if it was finished at the speed of lightening!
Funny that…I was trying to make long and short stitch fit into what I was doing yesterday. Your long and short stitchings are beautiful and take me all the way back to my crewel embroidery days.
Funny that … I have been thinking about doing detached buttonhole stitch along a line of stitches (I was thinking backstitch but blanket stitch is another option).
I had the same issue with LSS when I started, it looking more like brick stitch. I think a lot of the reason for that is the instuctions that come with kits like this and in some books. LSS is always drawn looking like brick stitch so that is what we try to do.
One of my break through moments was to think of LSS as staggered satin stitch.
The Jane Rainbow kit is pretty and I can see why you enjoyed it.
Don’t be so hard on yourself. The piece looks lovely and you knew that the stitch wasn’t right and went onto learn how to do it correctly. This makes it a pivotal piece.
Your work is so meticulous and lovely! I am always awed by your patience!!
Good work. Love the pink hues of the petals!
This project is lovely ! I’d say your long and short stitch is better than mine :).
It looks lovely to me!! I love the shading of the soft greens.
I always found long and short stitch difficult when I was doing crewel work. I take it this was before you learned that it’s easier to come up on plain fabric and go down through the existing stitching (which you mentioned before, and I will now always remember to do). Apart from the difficulties with that stitch (which you’d have to be looking for to notice, by the way) it is beautifully stitched.
I found the Jane Rainbow book I was telling you about. It’s
here .
I have a signed copy. I used to live not far from Jane – she was in the Cotswolds, as was the needlecrafts shop I used for most of my supplies back then. I never met her but I seem to remember booking myself on course with her which was then cancelled.
Anyway, your design is not in the book but several of the stitches you have used are, and also the colour scheme you have used. It’s a nice book, and all this looking at crewel work has made me think about giving it another go…. Perhaps!
long and longer! what a great way to solve the problem….