
Tag: apparel
The Circles Skirt

Layout For The Skirt
You may recall that I bought some rather gorgeous Donegal tweed at the Harrogate Knitting And Stitching Show, with the intention of embellishing a skirt. I decided that this time I would use simple circles, and cut some paper patterns in circles of different sizes, to decide on placement. Here is the result. Most of the drama is at the front, where the skirt is a simple A-line shape. The back of the skirt flares out a little in the centre, so the patterning tails out there, but the pattern is asymmetrical, which is why I’ve chosen to show you a sort of all-round view.

Skirt Partly Arranged
It seemed to me that the easiest way to decide what went where was to sneak up on it. I stared at the layout for a while, picked a fabric for a particular placement, cut it out, pinned it on in place of the paper circle, and then stared again. Repeat…

Skirt Layout completed
I’ve needlefelted the circles to the fabric – that seemed the best way to attach them more or less permanently so I won’t be stabbed with pins when I’m adding the embroidery. Now there will be a lot more cycles of staring at it and doing something, staring at it and doing some more.
And since the circles are firmly attached, I can in fact wear it now if I decide to!
A Needlelace Embellished Blouse
I must have worked the Needlelace Embellished Blouse when I was sixteen or seventeen – probably it was about the third or fourth project that I did, ever. Once I’d got hooked on embroidery – which happened over a piece that I’ve yet to show you, partly because I’m not sure where it’s hidden itself – I went from technique to technique and project to project almost without drawing breath!
I wanted something “Floral-inspired but modern”, I remember, so my mother suggested a pentagon for a flower and triangles for leaves. Thus:

The Geometric Floral we designed for my Needlelace Embellished Blouse
We divided the pentagon into triangles, because I wanted to use three different needlelace stitches (and also because it would be more interesting that way), and transferred it to a boat-necked summer top with a V at the back.
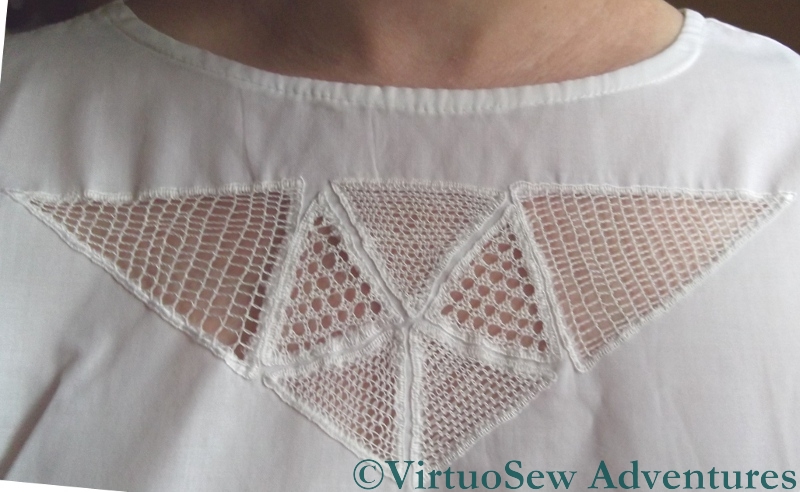
Needlelace Blouse
It’s hardly surprising I gave needlelace a try – both Grandmama and my mother had worked needlelace embellished table cloths, so it was in the air, so to speak. It’s also not surprising that I didn’t attempt another tablecloth. Even then I knew that I didn’t have the patience for that size of project!
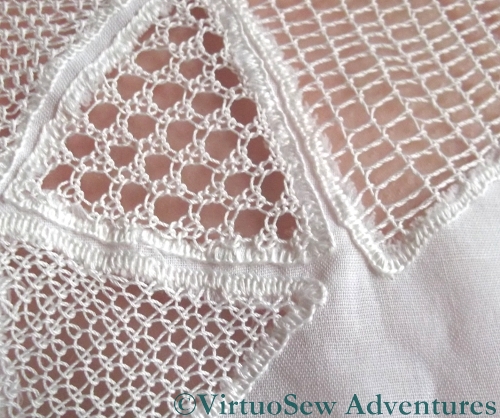
Needlelace Close Up
The triangles forming the flower I worked either in Pea Stitch or Corded Single Brussels Stitch, and the “leaves” were Corded Point d’Espagne. There’s a Needlelace Tutorial starting here on a lacemakers’ website for those who are interested. Then I buttonholed the edges (the wrong way round, I think, now I look at the photo again!) and, with much trepidation, cut away the fabric at the back.
And it worked! I wore the blouse quite a lot for a few years, and now I’ve found it again I suspect I’ll be wearing it some more – although not this year <shiver>!
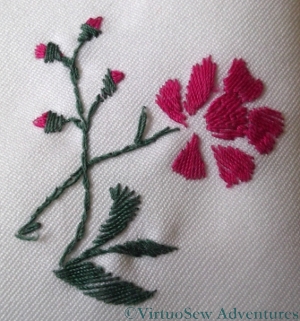
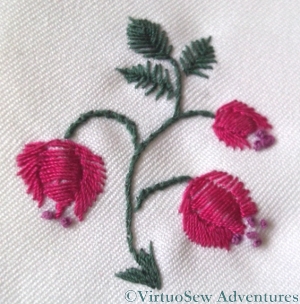
Close Ups on the Flowered Blouse – Part Two
Flower 6 - Close Up
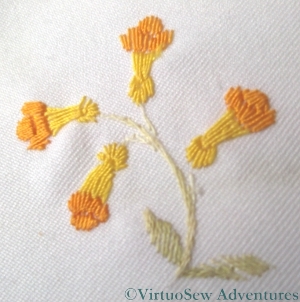
Here is the second installment of close-ups of the Flowered Blouse embroidery. I’ve noticed in picking out the Needlewoman magazine that the transfers came in that the colours I have used bear absolutely no resemblance to those suggested. For instance, flower 6, here on the left, is named as “Lobelia”, and a quick search suggests that real lobelias are bluey-purple!

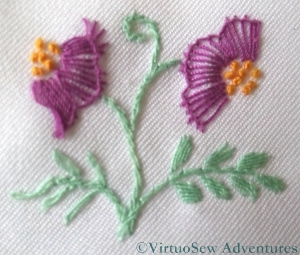
Flower 7 - Close up
Flower 7, here on the right, is the same as Flower 2, but in different colours, and in fact stitched more openly. It is described as a Convolvulus in the the magazine.
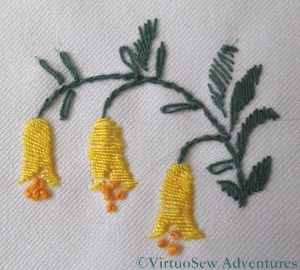
Flower 8 - Close up
The Flower 8 is the same as Flower 3. This time I used the same stem colours, again to help maintain a certain unity. They are supposed to be Globe flowers.
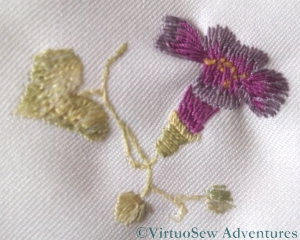
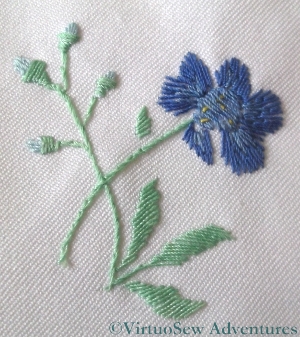
Flower 9 - Close up
Flower 9 is the same pattern as flower 5, and I think is supposed to be a Peony. I distinctly remember finding this one troublesome to stitch – partly, I think, because of the size of some of the stitches, and partly because I couldn’t make sense of the flower as depicted in the transfer. Nowadays, of course, I would go and find a peony, and stare at it until it made sense, but that method had not occurred to me at the time!
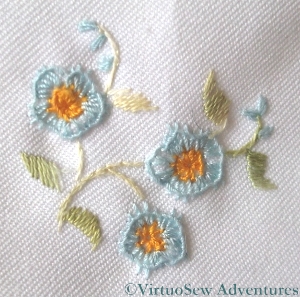
Flower 10 - Close up
Flower 10 is described as a Wood Anenome. Like Flower 4 (Forget-me-nots) it shows the edge of the blanket stitch curling in, rather than staying flat, but I am glad to see that at least the French knots loook better than I expected. I have always had trouble with French knots…
The magazine suggests a variety of uses for these transfers, including a “delightful party frock” for a little girl, a “dainty bed jacket”, and embellishment on a “puff handkerchief” which is an accessory I’ve never heard of before. For once the internet has not been my friend, although the drawing suggests some sort of combination of a powder-puff and a handkerchief that I strongly suspect would be nothing like as practical as the “two-tools-in-one” brigade would have us believe!
Close-ups on the Flowered Blouse – Part One
Flower 1 - Close up
You may recall, not so long ago, a post that I wrote about a blouse embroidered some years ago, during a particularly impoverished period in my life. Here are the promised close-ups of the floral motifs.
Or at least some of them. When the connection started slowing when I put all ten in one post (before I even started to add any text!), I decided to split them up. I’m hoping to put five per post and just write two posts…
Flower 2 - Close Up
I’m no botanist, and if I am honest, I suspect the original designer wasn’t either. The various pictures and descriptions in the magazine did not suggest a slavish adherence to the natural colours of the flowers – even supposing one could be sure of their likely species!
Flower 3 - Close Up
The polyester was not an easy fabric to embroider, and frankly the blouse wasn’t worth the effort I put into it, being a lot like a cheap school or office uniform blouse, but as I said in the original post, I didn’t really have a choice at the time. That said, I do still wear it, not without pleasure, so there is something to be said for all that effort, perhaps.
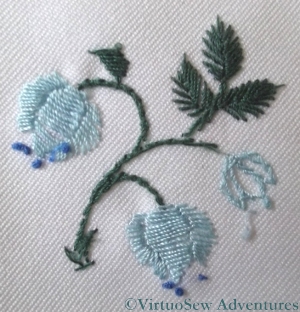
Flower 4 - Close Up
The stitches used were very simple ones, for the most part – satin stitch, fishbone stitch, stem stitch, blanket stitch, and the occasional French knot. The close ups show that the blanket stitch refused to settle properly and the spine of the stitch has rolled inwards from the edge, but that may simply be the result of years of wear and tear. The blouse goes in the washing machine when it needs a wash – inside a pillow case or lingerie bag, admittedly, but I don’t hand wash it.
Flower 5 - Close Up
When I was choosing the colours and the stitches was more concerned to balance the colours across the front of the blouse than to create accurate depictions of plants, but for all that, there are some motifs more reminiscent of the real thing than others!
A flowered blouse
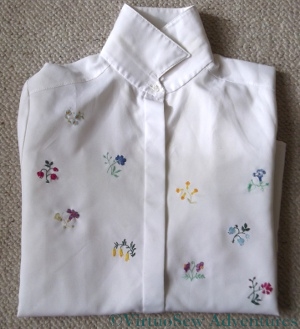
Blouse embroidered with flower sprigs
As Spring shows her head after the chill of Winter, I am beginning to fish out clothes other than bulky winter woollies. This is a simple polyester blouse I embroidered some years ago when I had time, an itch to embroider, but absolutely no money to buy fabric.
I used a Free Transfer from The Needlewoman of January 1934 (from the boxful that Grandmama gave me), showing sprigs of flowers which they suggested might be used for lavender bags, traycloths, handkerchiefs, or underwear (if only I had the time and skill to make lovely silk embroidered undies!). The silk threads came from my stash (even fifteen years ago my stash was extensive and varied!), and in fact I think the whole idea of the project was that I wanted to use those threads in particular.
I’m not really a “floral”-type person, or at least the florals I stitch tend to be quite heavily stylised, and I’m also not someone who likes perfect symmetry. So I snipped out some elements from the transfer and arranged them irregularly on the front of the blouse. Once they were transferred, I arranged the threads, so each colour appears on each side of the button placket, but not on the same flower sprig.
I will provide close ups in another post, when I have worked out how to format them!
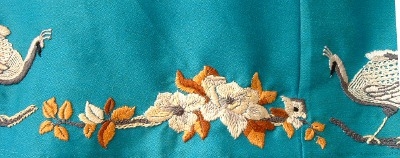
More Details on the Peacock Skirt
Do you remember my Peacock Skirt? Megan of Elmsley Rose asked for some more close ups of the embroidery, and while I have been remodelling it (for a slightly less sylph-like waistline – I was a skinny teenager!) I took the opportunity to take some.
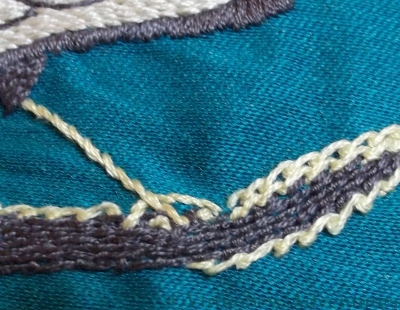
Close Up Of Branch
This, therefore, is a close up of the branch the peacock is standing on. I simply followed the instructions here, using coral stitch for the dark grey elements of the branch and scroll stitch for the pale yellow. I think that now if I were do something like this again, I would spend a bit of time tweaking the colours a little more, because I’m not sure I like having the peacock’s legs the same colour as the highlight on the branch!
You can see, too, that I struggled somewhat with tension and the fabric is a little puckered. This seems not to matter when I’m wearing the skirt – people still admire it!
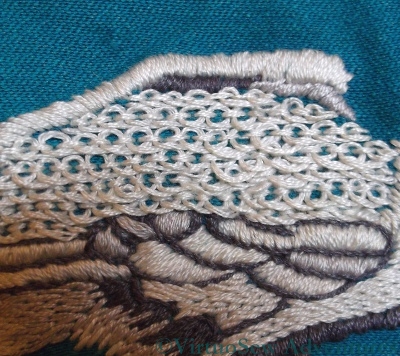
Pekinese Stitch On The Peacock's Back
The instructions for the Peacock’s back said to work the Pekinese Stitch fairly loosely to create a slight variation on colour and texture. Since the embroidery was worked in two strands of stranded cotton, that too contributes to a slightly “fluffy” appearance. The satin stitch sections around where the wing should be are in slightly different shades of grey, and worked at slightly different angles, again to produce varying tones and textures.
Looking at this close up now, I think the rows of stem stitch used for some sections of the body represent the feathers of the bird more successfully (although, again, the design doesn’t attempt a photo-realistic representation) than the sections of satin stitch or pekinese stitch. I do admit, however, that it was the chance to work pekinese stitch that attracted me to the design!
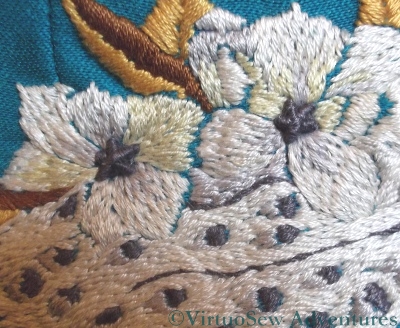
Spiders Web Flower Centre
The centres of the flowers were worked using a Spiders Web Wheel. The instructions specified working as much thread into the stitch as possible to obtain a raised and highly textured effect. This contrasts very well with the long and short stitch flowers and the stem stitches on the peacock’s tail.
Again, coming back to these pieces years after stitching them, it’s fascinating to look at surprising details. The gold and russet leaves look as though they’ve been padded, but I’m quite sure they weren’t. I remember doing padded satin stitch for the first time quite recently and wishing I’d known about it earlier!
More Peacocks!
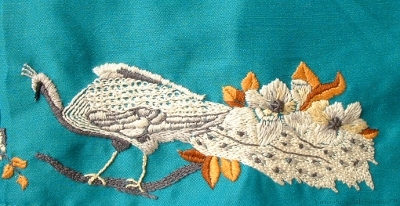
Peacock Motif
This design of peacocks and flowers was taken from a Time Life book on couture embellishments, and embroidered on a full skirt. It still attracts attention, and now full skirts are back “in”, I shall probably fish it out and start wearing it again. Although it has always been a challenge to find a suitable top!
I worked this as a teenager, and wore it at a cousin’s wedding. The design was worked at three places around the skirt, with each third showing two peacocks confronting one another across the sprig of flowers. The original design used two shades of grey-green, several shades of grey, lemon and white on a red satin background. I simply changed the two shades of grey green to a dark yellow and a chestnut brown to work on the bright turquoise/teal background.
The design attracted me because – alone of the surface embroidery patterns I had seen up to that point, it included more than the basic stem stitch, satin stitch, and long and short stitch. The peacock’s back was worked in Pekingese Stitch, deliberately worked loose and spaced so as to create a slightly mottled effect. The flower centres used a whipped spiders web wheel, worked close and tight so as to be slightly raised. The branches were worked in a combination of Coral Stitch and Scroll Stitch – neither of which I remember seeing used in a commercial design up to that point.
It was quite fun to stitch, but the deadline made life a bit exciting, and my mother had to help out with some of the embroidery so that I could get the job done!
Flower Motif
The Autumn Leaves Skirt
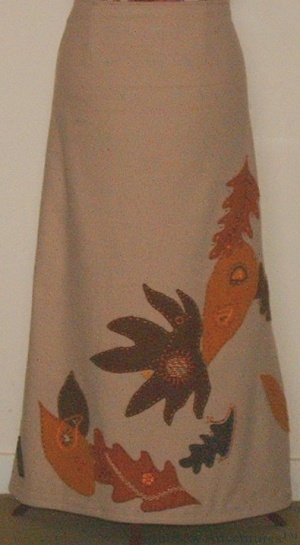
Autumn Leaves Skirt
I made this skirt last winter, and originally needlefelted the leaves onto the fabric. However, after a winter’s wear, and after looking at a good few blogs over the summer, I thought I could do better.
I took some ideas from some of SharonB’s Pintangle posts on seam treatments, fished some additional inspiration from a host of other blogs (wish I’d taken notes, now – I want to find some of them again!) and then proceeded to some adventures in embellishment.
It occurred to me that there was no need to keep within the leaf shapes, or even to add embellishment that resembled leaf characteristics in any way, so paisley shapes, spiders web wheels and trailing lines of feather stitch showed up all over the place.
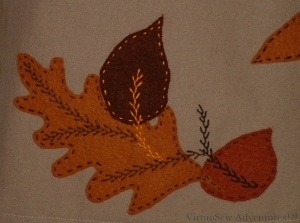
I started off by sewing around the edges of all the leaf shapes in ordinary running stitch, and originally I had intended to stop there. However, when I did, it looked a little half-hearted, and I’m never that, so Something Had To Be Done!
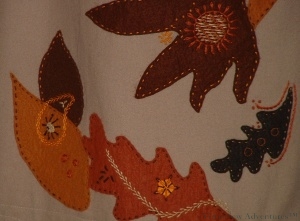
First Skirt Detail
There’s a trail of French knots across the largest leaf, which has a circle of Rosette Chain on it, surrounding a disc of an interlaced filling stitch in three different colours.
I also realised (about halfway through!) that I didn’t have to keep the embellishment only on the applied fabric, so the skirt fabric acquired stem stitch lines with French knot finials, a spiders web wheel, and more French knots.
Second Skirt Detail
It is all worked in six strands of stranded cotton, un-separated to maintain a sort of cohesion. I chose colours that were fairly close to the colours of the felt leaf shapes, but working in the opposite direction, as it were, so dark felt was running-stitched in light stranded cotton.
All this on a skirt I originally made purely because I wanted a long winter skirt to cut the draughts in the office!