
Tag: Trapunto
An Experiment For Aethelflaed
I’m beginning to realise that if I take into account at the beginning of a project the final destination of it or the way it’s going to be displayed, life might be a bit easier.
I think the Medieval Movers and Shakers may end up displayed on banners, but while the clerics Rahere and Dame Julian should probably be on a simple vertical drop, like a pulpit fall, I think William and Aethelflaed might want somethiing more ornate.

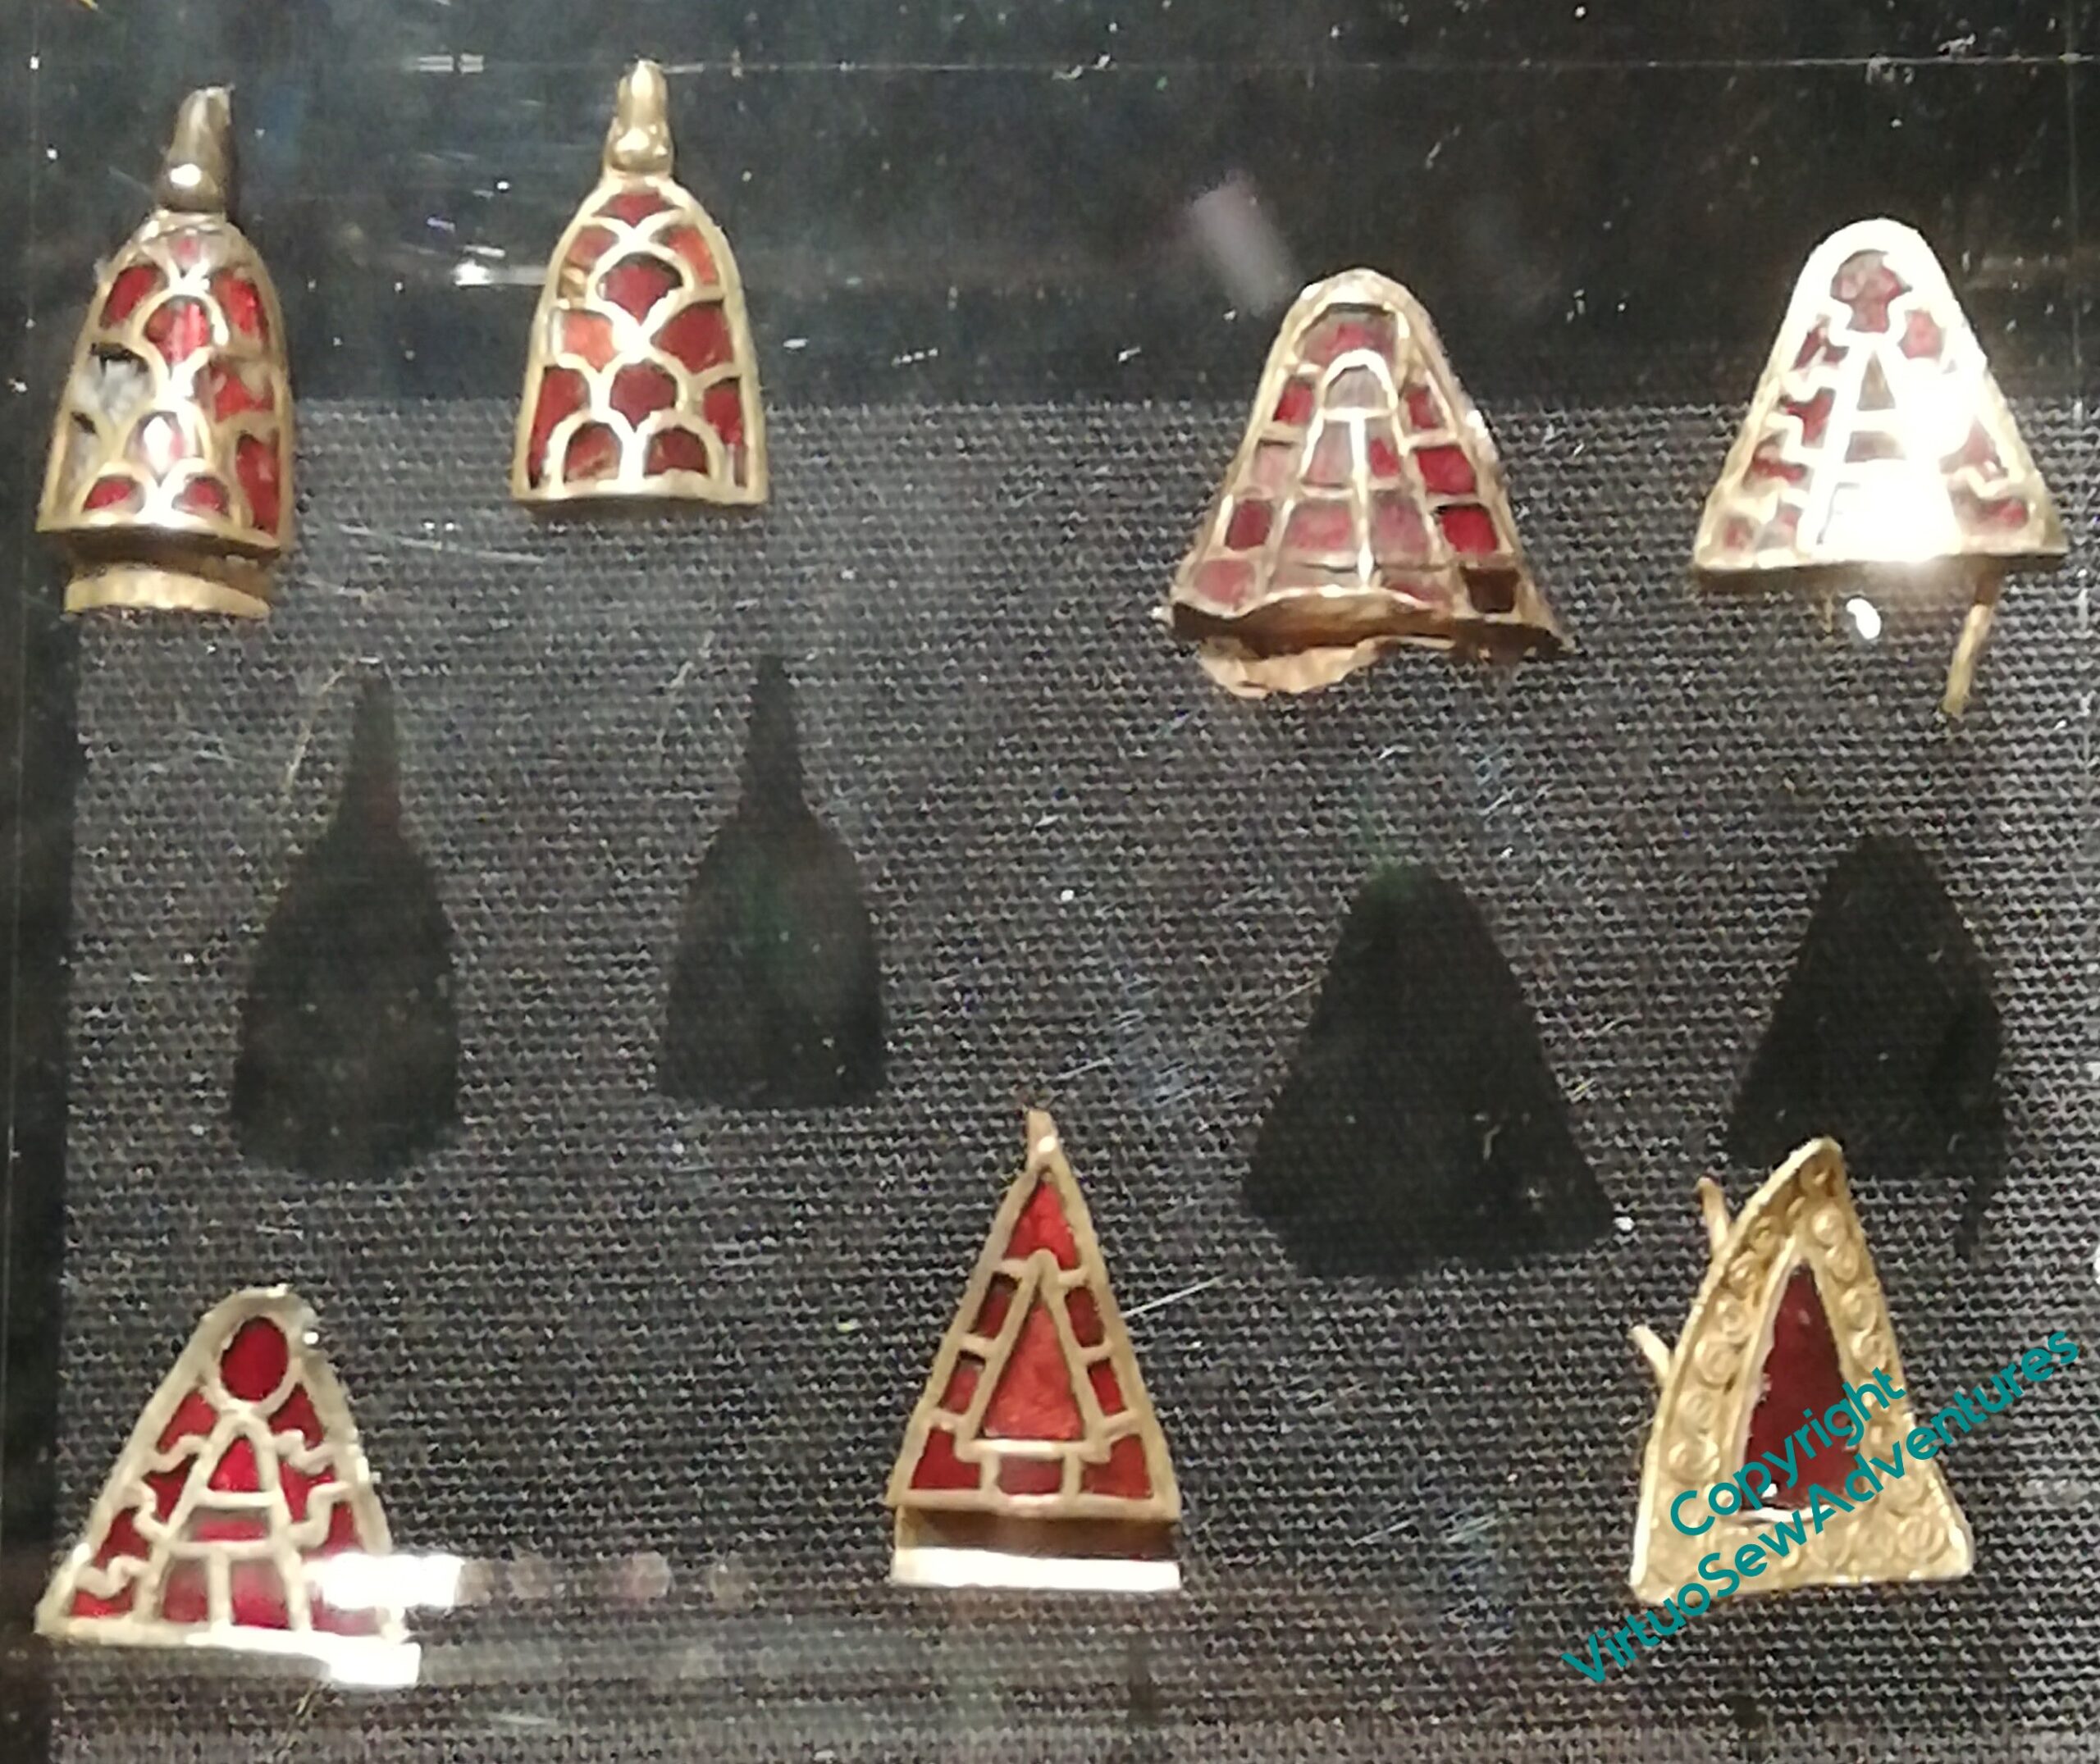
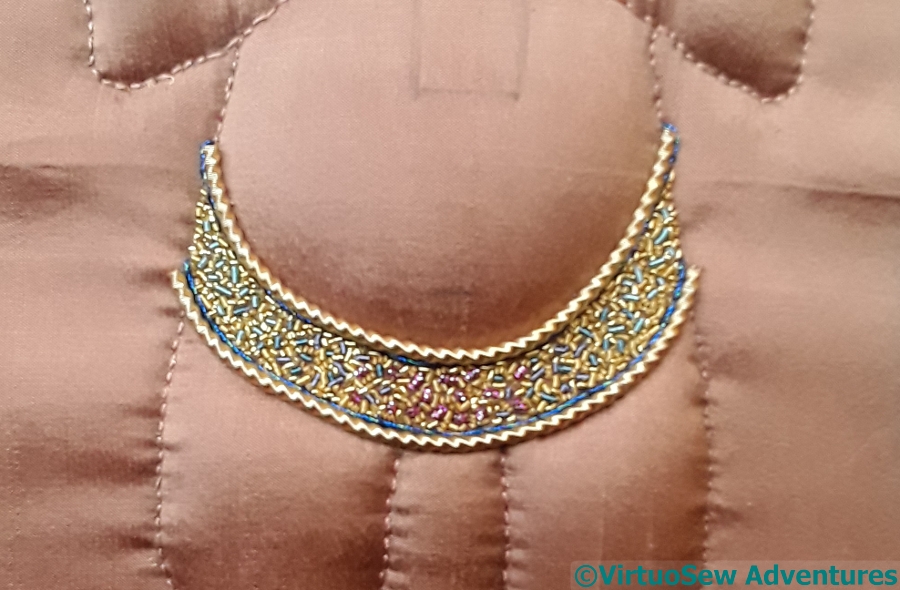
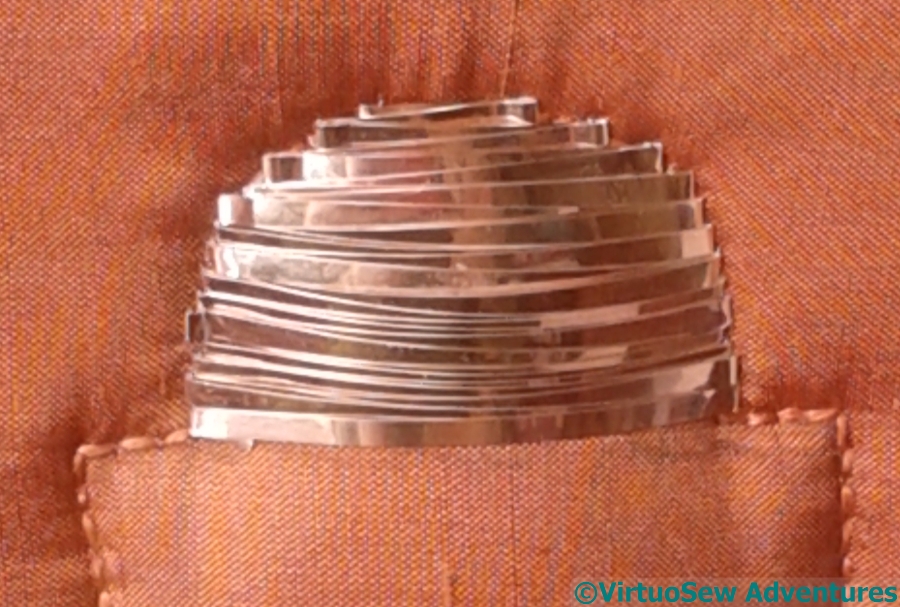
With that in mind, one idea I had for Aethelflaed was to ornament her banner with reproductions of Anglo Saxon jewels in trapunto quilting. Easier said than done, and I don’t imagine I’ll get it right first time, so I hope that this will give me some thoughts!
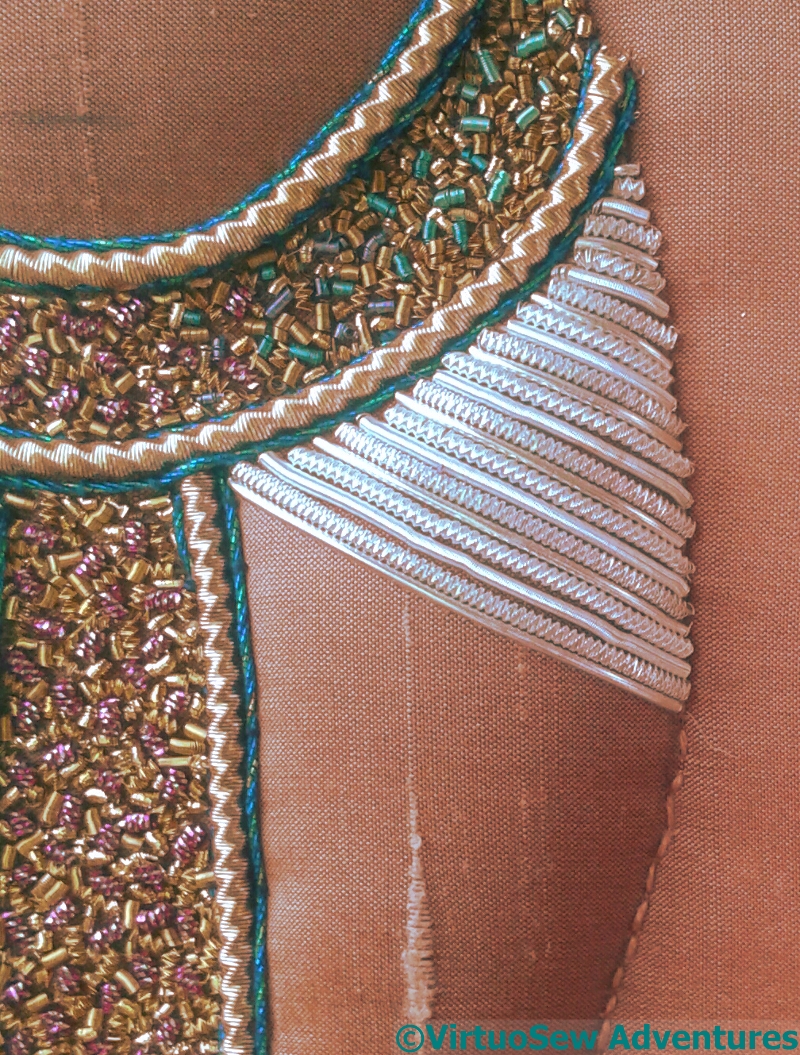
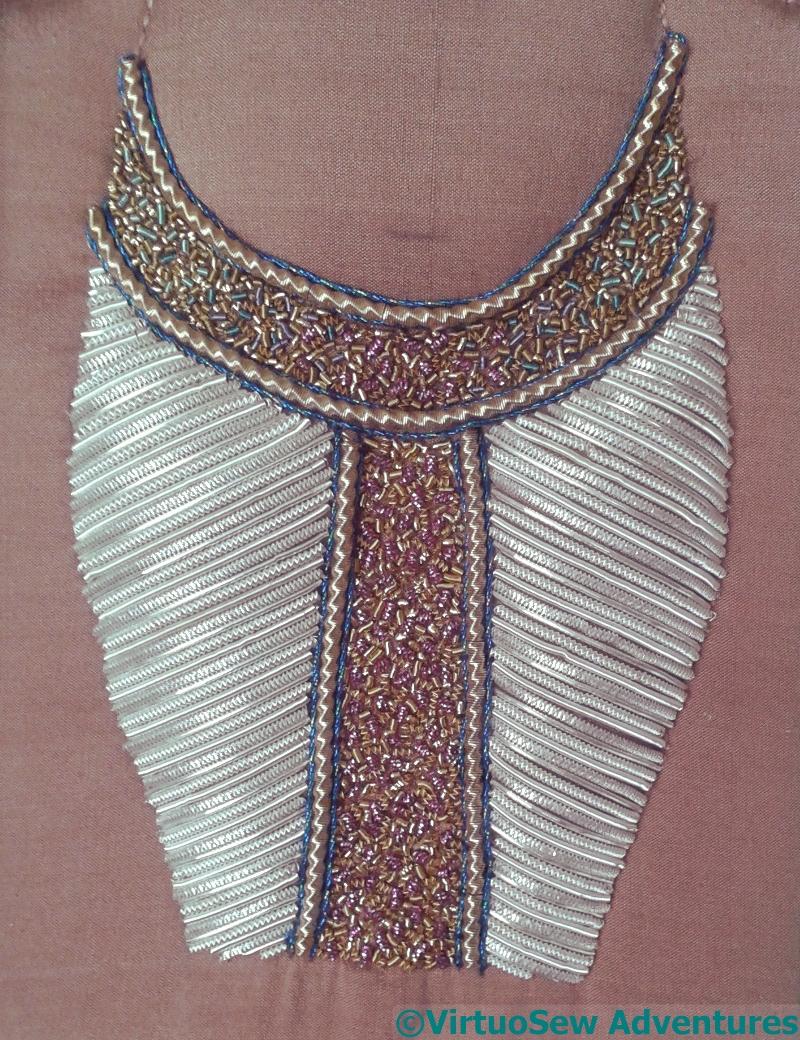
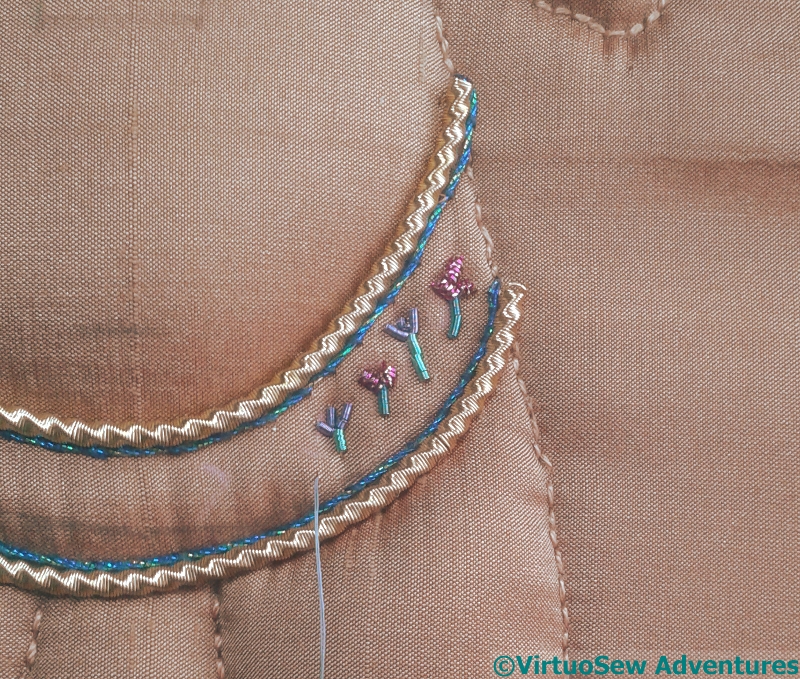
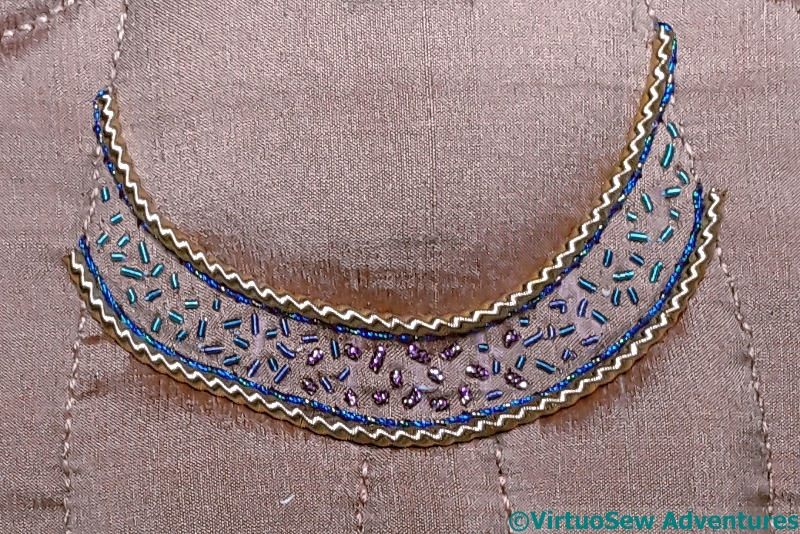
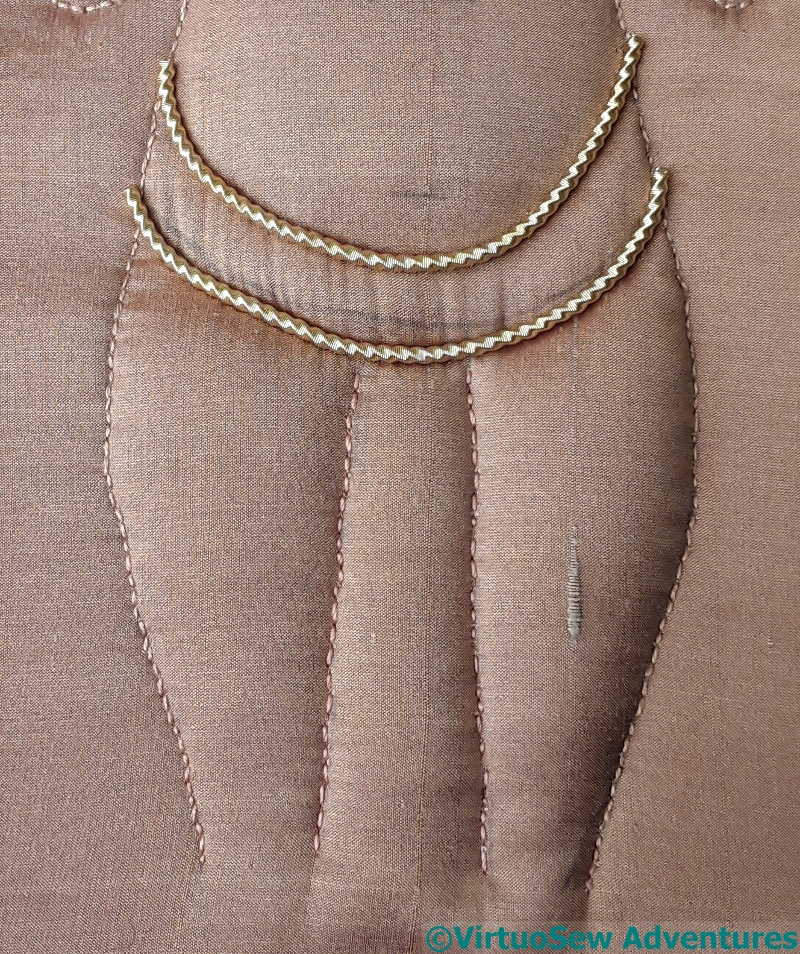
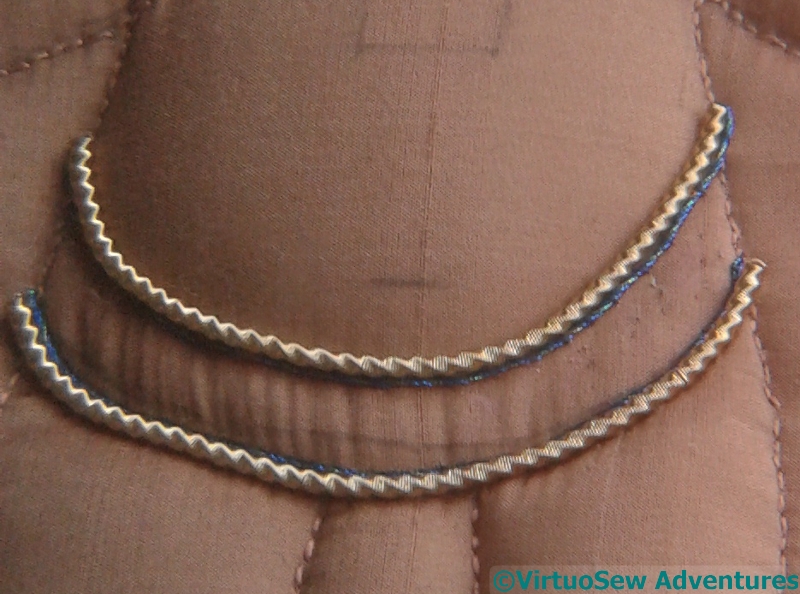
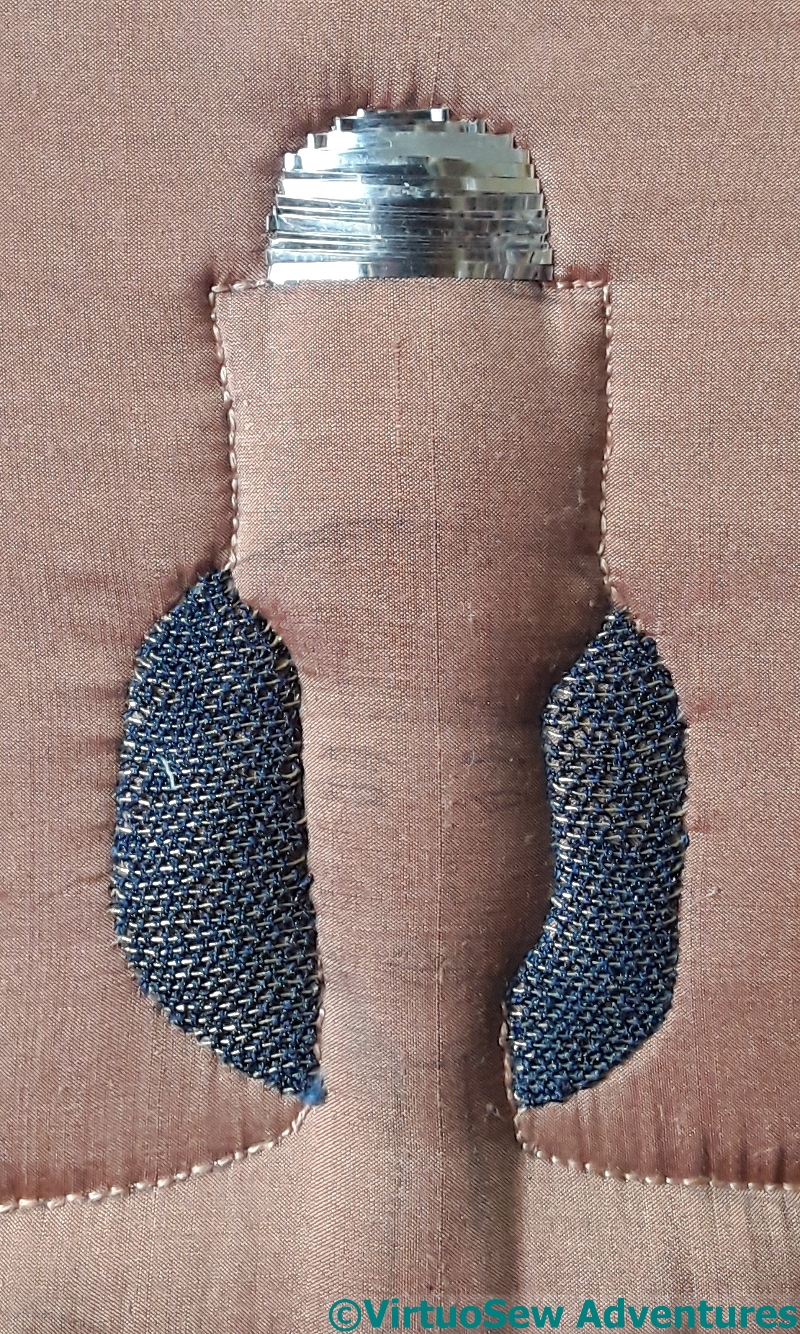
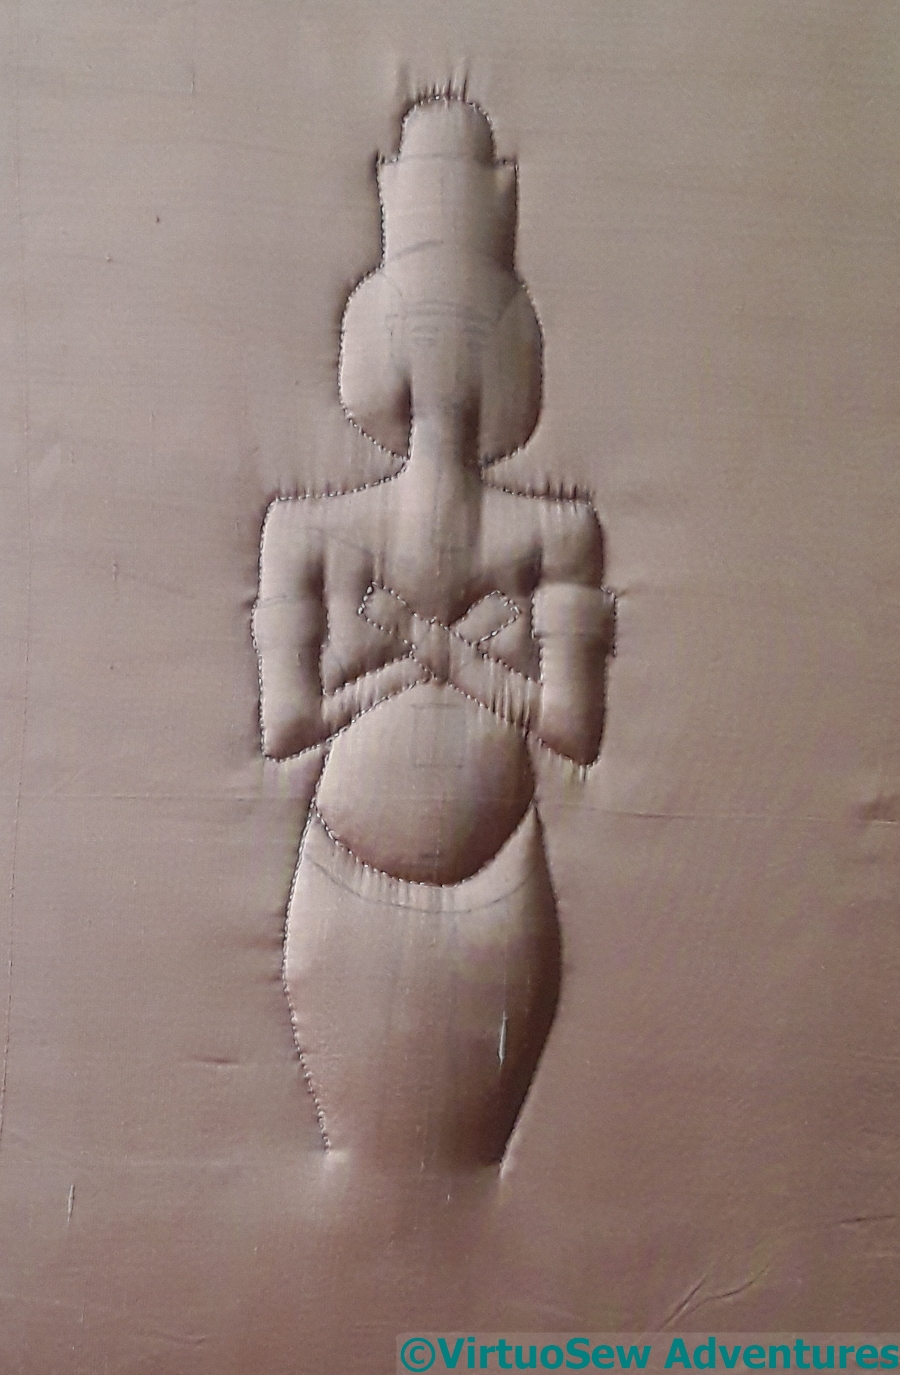
Trapunto involves creating channels and cells that can then be filled with coloured yarns or wool. This experiment is done using leftover gauze from the Amarna overlays, and the design was quite roughly hand-drawn to make a first approximation, but in due course I had all the lines done in split stitch.

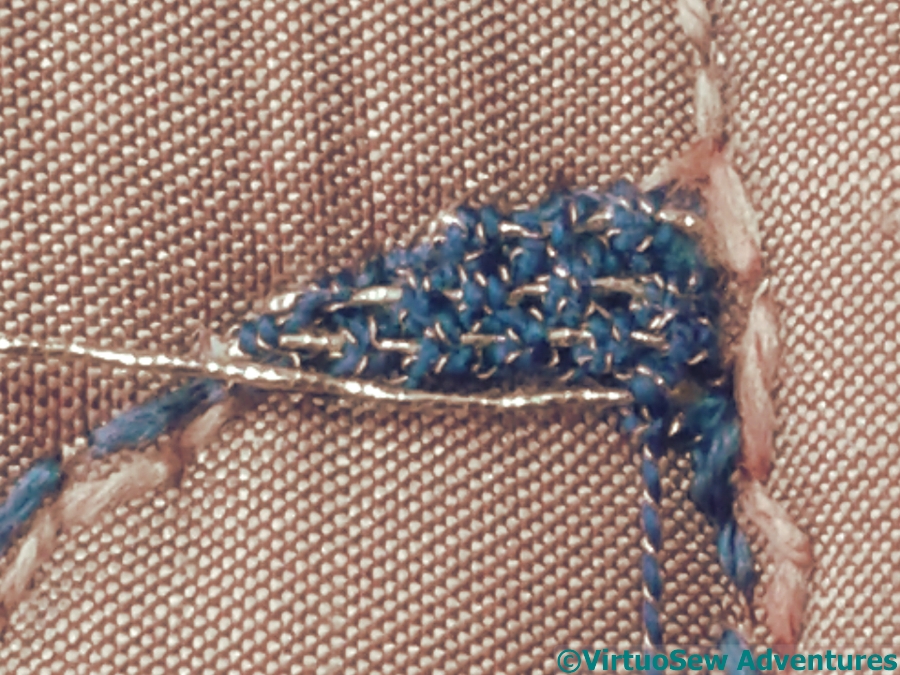
Then it was time to fill in the channels and cells. Mindful of my recent experience with the Golden Accessories, when I found there was definitely a Right Order in which to fill in the strapwork, I did (believe it or not!) pause for thought before just barrelling in. I think I made the right choice – the channels are quite narrow, and it was definitely easier to fill them in first. I’ve used tapestry wool, and I’m not sure that’s necessarily the best choice, but it’s the right sort of colour, and with the narrow channels, it’s easier than fleece. Especially as I don’t have any to hand!
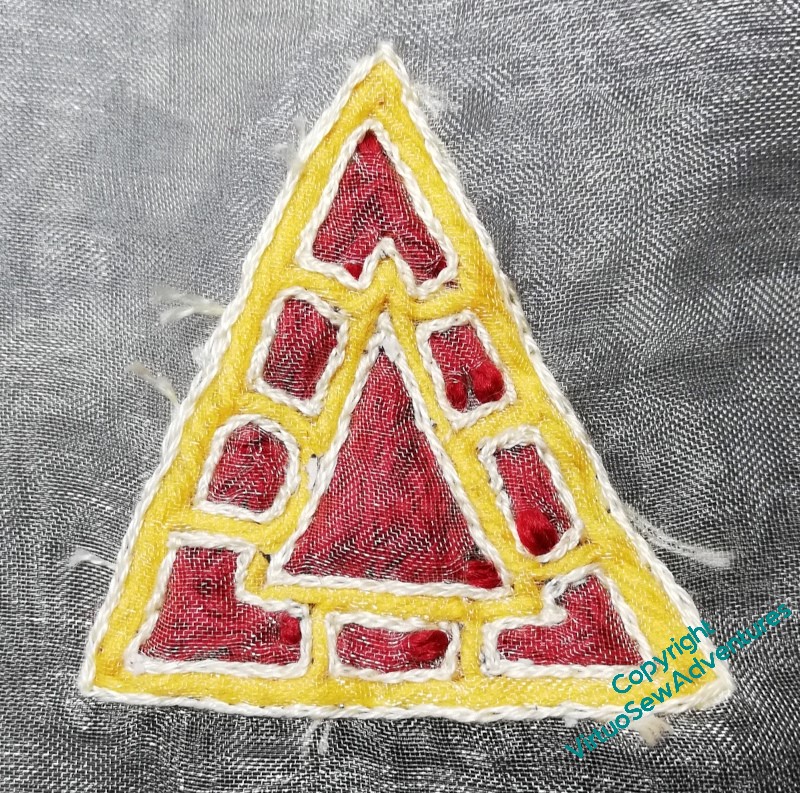
The final stage was to fill in the cells – this time with Paternayan. I think I would prefer to use fleece for cells, to avoid having shadow lines between the “stitches”, but as a first attempt, I think it’s worked well.
Two layers of gauze are a bit much, though, I think it would be easier to manage if the backing were in calico. So next time I have a moment for this sort of experimentation, I might start with that, and maybe a different shade of gauze.
Akhenaten’s Beard, And Other Details
Starting The Beard
I spent a bit of time looking at images of pharaonic tie-on beards (now there’s a sentence I never expected to write – not in a normal frame of mind, anyway!) while I tried to work out how best to portray the impression created, even if maybe not the precise pattern that was used for Akhenaten’s version.
The patterns included a sort of interlaced pattern, and a vaguely herringbone-brick-like pattern, and some widened towards the base, and others became narrower and curled up a little at the tip. My version – based on the images of the Colossi of Akhenaten that inspired this piece – widens towards the base.
Akhenaten’s Beard
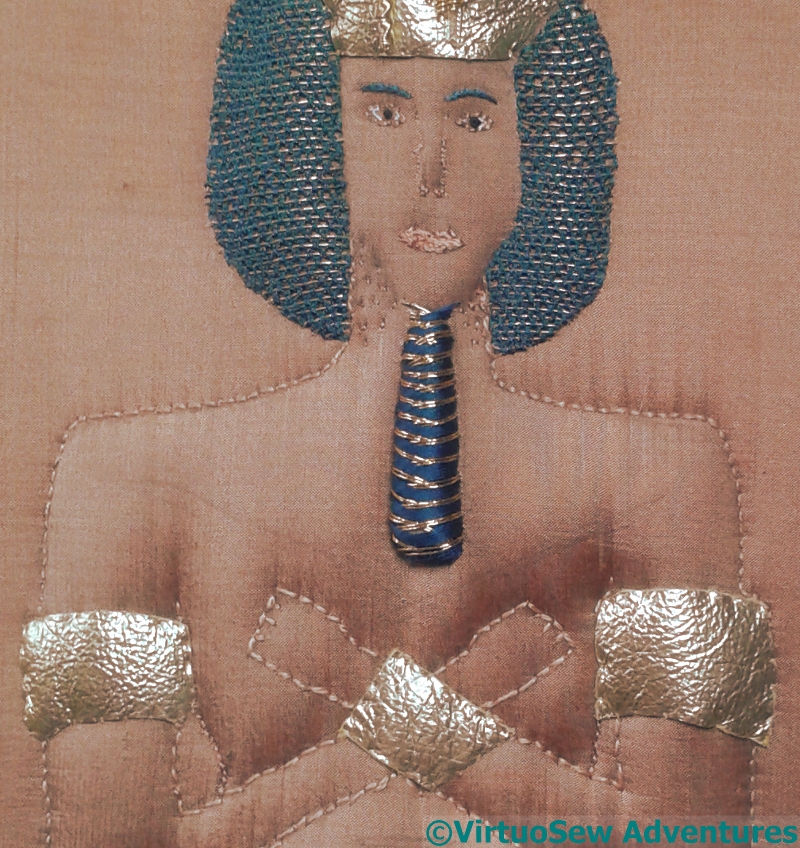
I’ve chosen a plaited effect in blue and gold, using one of the standard gold threads from Thistle Threads and a plain blue silk perle, alternating two stitches from each side (the blue is used double, so had to be flattened and untwisted at every stitch). It required a bit of juggling with needle, thread, and bone stiletto to keep everything in order, but once I had the trick of it, the beard progressed relatively smoothly.
The widened base isn’t quite as wide as it was, but on the whole, I’m fairly pleased with it. So I’ve added a few more details, and some of them I am really not sure about.
Torso To Assess
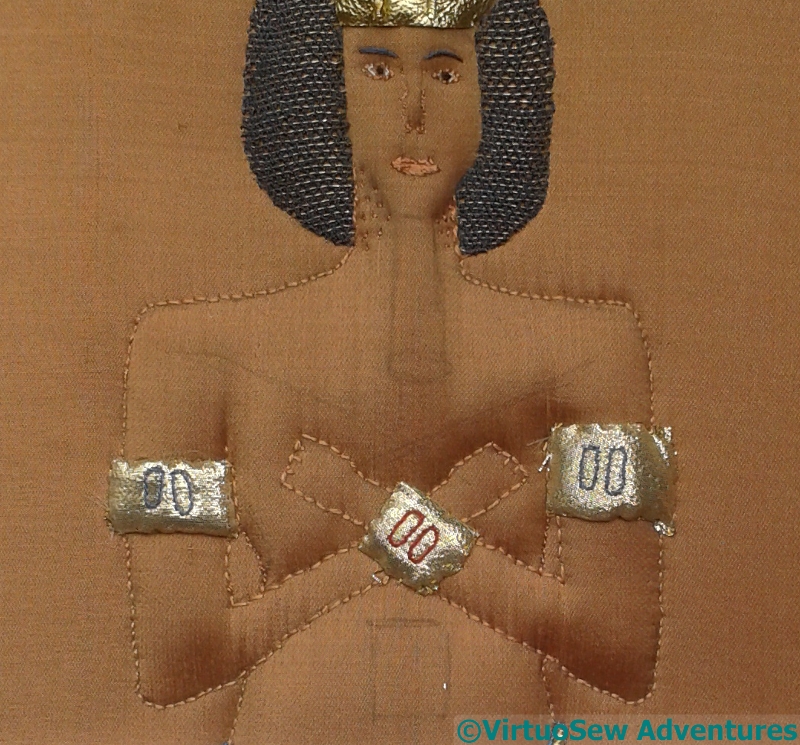
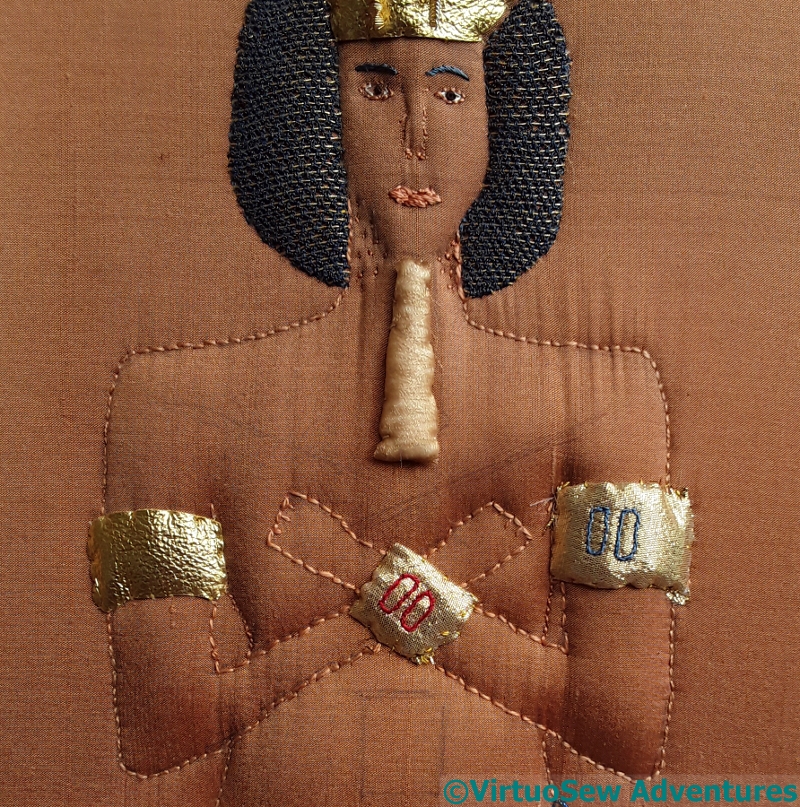
I’m happy with his belly button. Somehow it makes him even chubbier!
I think I’m also happy with the cartouches on his tummy. It’s the same silk as the background, but turned at right angles, which shades the colour slightly.
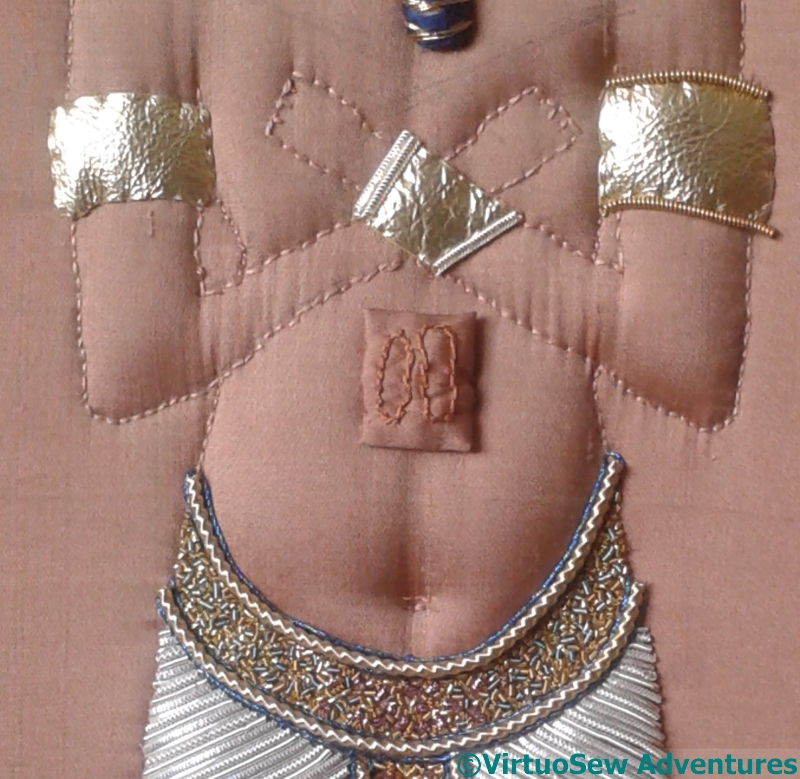
My concern lies with the armlets and wristlet. I’ve given two of them edgings, one of gold pearl purl, the other of flattened silver purl with a gold strip threaded through, and at the moment, neither of them looks right.
I do have an idea for the crook and flail he is holding, but I may leave those and buy the materials at the Harrogate Knitting And Stitching Show. So I have time to think, assess, and Stare Thoughtfully.
And as one of my offline friends reminded me recently – Akhenaten wasn’t known for smoothly following the existing tracks during his lifetime. It would be too much to expect his stitched representation to do so!
Akhenaten – more details
First Trial Armbands
My first attempt to dress Akhenaten with his armlets and wristband used a strange gold fabric I’ve had for some years. An old friend bought it originally to make herself an evening dress, but it’s a very difficult fabric to work with – it frays if you even breathe near it, it doesn’t drape at all well, but it doesn’t like structured shapes either.
She despaired, and gave it to me. What are friends for, after all?
I’m playing with fragments to see whether I can find something to do with it. So far I have discovered that iron-on interfacing doesn’t stay ironed on to it, either.
Second Trial Armband And Beard Padding
And, frankly, I think the armlets look more like waterwings. So it doesn’t work for a Pharaoh’s armlets, either!
The next attempt was to use gold kid leather. I’m a bit happier with the kid leather, even though I’ve not been able to put the cartouches on it, but while I was thinking about that, I decided I should maybe think about the tie-on beard which seems to have been an element of royal iconography in ancient Egypt – to the point that even the female pharaoh, Hatshepsut, had herself depicted wearing one.
I made a small, padded form, using cotton padding covered with gauze, and attached it carefully. Then I had to work out how to cover it, and what sort of pattern would be appropriate.
And I really need to think of some way to pad out his nose, don’t I!
Akhenaten’s Loincloth
Belt Fall Finished
In fact I had finished the belt before I started on “Leaving the Tyne, 1915“, so it was just as well that I had the belt fall to work on. It gave me something definite to do while I started to get myself mentally back in the groove, as it were. I thought about fading out to the blue green down the length of the belt fall, but in the end I decided to work it with only one colour of additional purl – just the purple.
I’m quite pleased. I can’t see a difference between the chipwork of the belt and the chipwork of the belt fall, which is especially good, considering there were five months, more or less, between them!
Started The Purls
So at this point I could start on the element that I first “saw” in my mind’s eye, the element that inspired me to start on this piece. Unnerved, much?
The pleated linen of the loincloth is being represented by row upon row of silver purl, using four different types: smooth purl, bright check purl, rough purl and wire check purl. The varying reflectances of the different types create different shades, representing the light falling on the various surfaces of the pleats.
And now you can see – in case you were worried – why I was not at all worried by the big slub in the middle of the fabric. I always knew it would be covered with silver purl!
Loincloth Finished
For those who don’t know, purl is made by wrapping very, very fine wire around a former. So it is basically a tiny spring. A fraction of a second’s inattention, and it spangs around the room, snags on curtains (and even the silk background fabric), and generally becomes a severe trial. On top of that, it has to be gently handled lest it bruise or break, creating a flattened section or a dark line in the finished piece.
And yet, surprisingly, I rather enjoyed doing it!
Classically, I believe purls like this would be edged with something, but even though the edges of my purls aren’t completely even, I think this helps with the impression of a garment wrapped around the body. And I love the effect of the different shades of silver!
Getting started on Akhenaten’s Belt
Trial Run – but Not Happy
I knew I wanted to fill in the belt with coloured chipwork, but how?
I had started off with the idea of making lotus flower shapes, but very soon became frustrated. I didn’t like the way it was looking, and, adding insult to injury, it was exceptionally fiddly to do.
So, no, think again. It might be possible to do something like this another time, but at the moment I can’t quite think how I would do so!
Scatter Of Coloured Purl
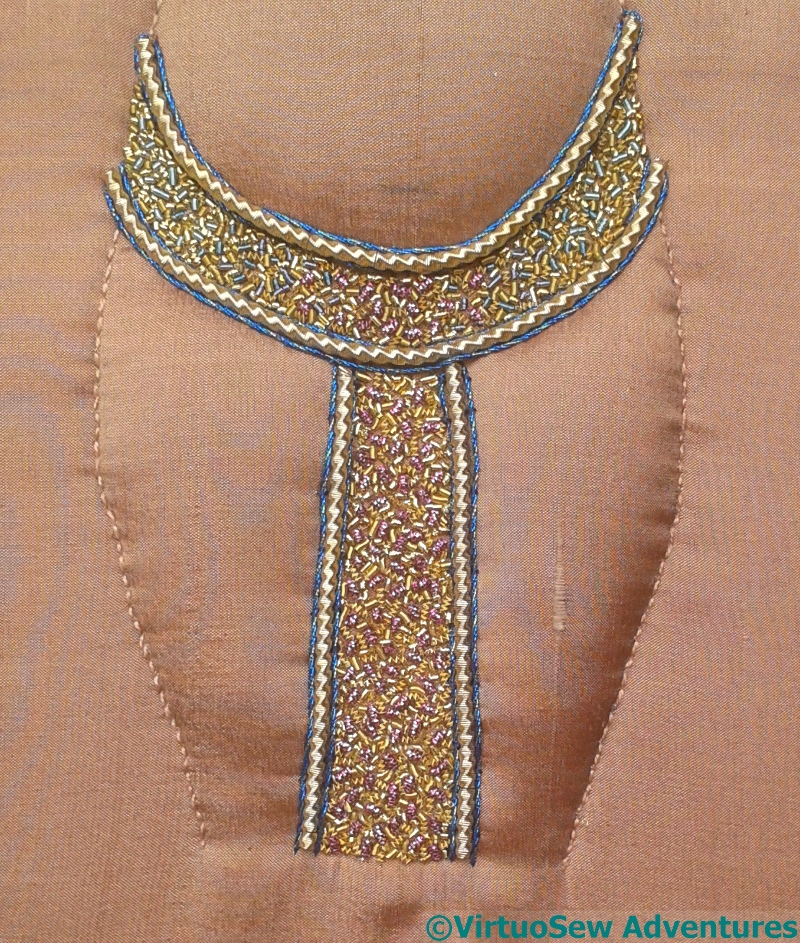
The next attempt was to use standard chipwork without attempting to make pictures. I know that the chips are very spread out here, but I began with the coloured purls, scattered across the belt to create a graduated colour effect, which shades from purple in the middle through blue to dark blue-green and light blue-green. The gold background had to wait until I had the colourwork right.
Belt Complete
Once that was done, I went back and added the gold chipwork. I have four different types of gold purl, some smooth and some rough, so the sparkles would have some variety and colour. I think I’m much more pleased with this, and I will be able to tweak the blue twist to bring it more to the foreground.
Beginning Akhenaten’s Loincloth
Beginning Loincloth
While I mull over the gold section of Akhenaten’s headdress, I’ve decided to work on his loincloth and belt.
The original inspiration here was for the silver purls to represent the pleats of the loincloth, but when I talked with Sarah at Golden Hinde, when I was buying all the wonderful metal threads, she suggested that I should probably do the belt and fall first, not least, to have somewhere to tuck any untidy ends of the purls while I’m still getting the hang of it!
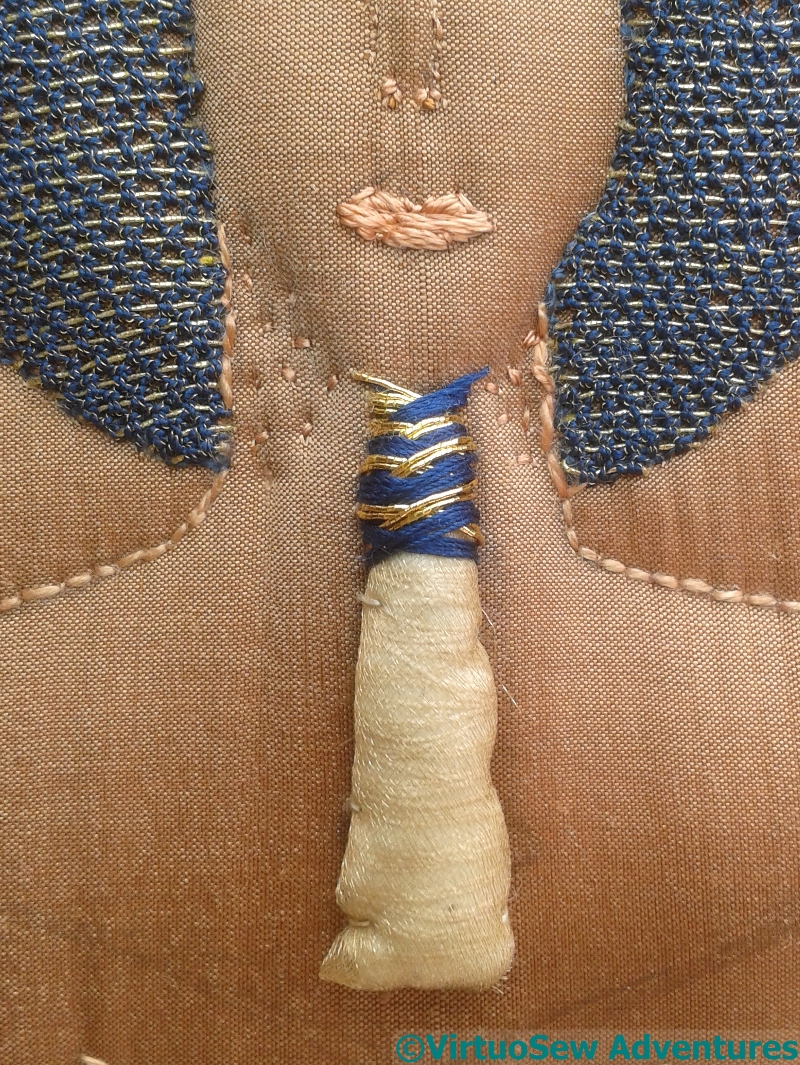
Adding Blue Twist
So I started with a very large gold purl with a sort of twist on it, and settled it neatly into the stitching lines from the quilting. That was followed by a slightly iridescent blue twist. It’s going to be tricky to keep that as visible as I want it to be, and I may very well end up playing around with the placement, or even removing and reinstating it later.
Still, onwards and forwards….!
More on Akhenaten’s headdress
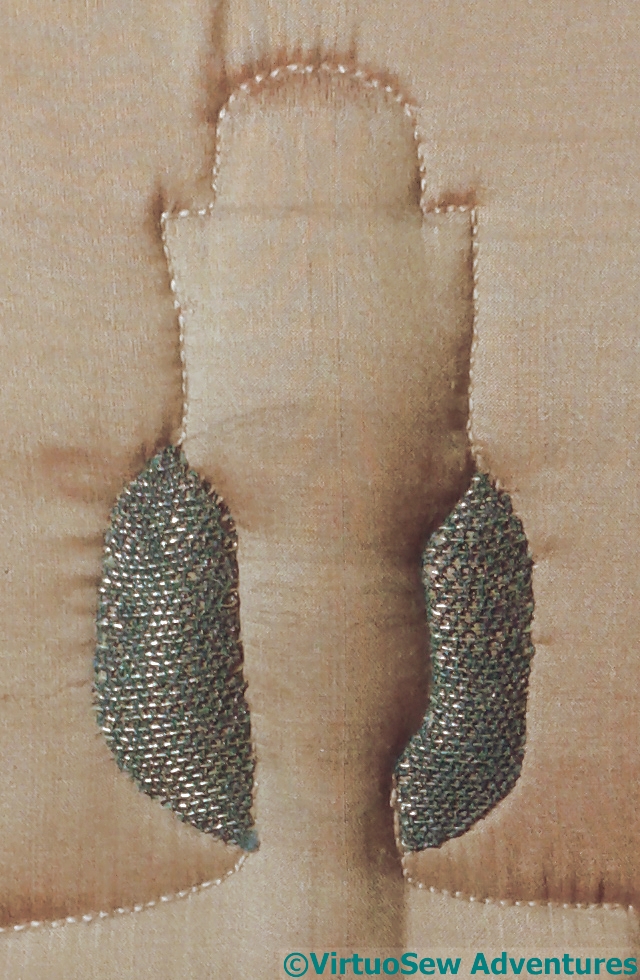
Sinking Ends
When you last saw Akhenaten I was starting to sink the ends for the headdress. There were so many ends to sink, and so much tugging to do so, that I was beginning to worry that I would lose the texture of the basketweave. So I threaded some old, blunt needles through the floats to keep them raised, and reduce the rearrangements and tweakings I needed to do as I went along.
Progress On The Headdress
And once all the ends were duly sunk – which took several sittings! – the crimson section of the headdress did turn out rather well.
The next section will be golden, and will bear the cobra and the vulture heads, but I’m not quite sure how to tackle it, so I’m going to leave the ideas to marinate a bit before doing it. I think it may be separate from the rest, and run up over the crimson, which is why the basketweave couching runs further down the head than it ordinarily would.
More Progress on Akhenaten
 I’ve decided that Akhenaten’s headdress should continue with basketweave couching in crimson twist. I was in a quandary about the padding for this – it would be dreadful to have white padding leering at me where the twist changes from up to down – when it occurred to me to colour my own. So this is the ordinary cotton “string” used for padding, which I have coloured with one of my inktense blocks and a little aloe vera gel, and then waxed once it had dried.
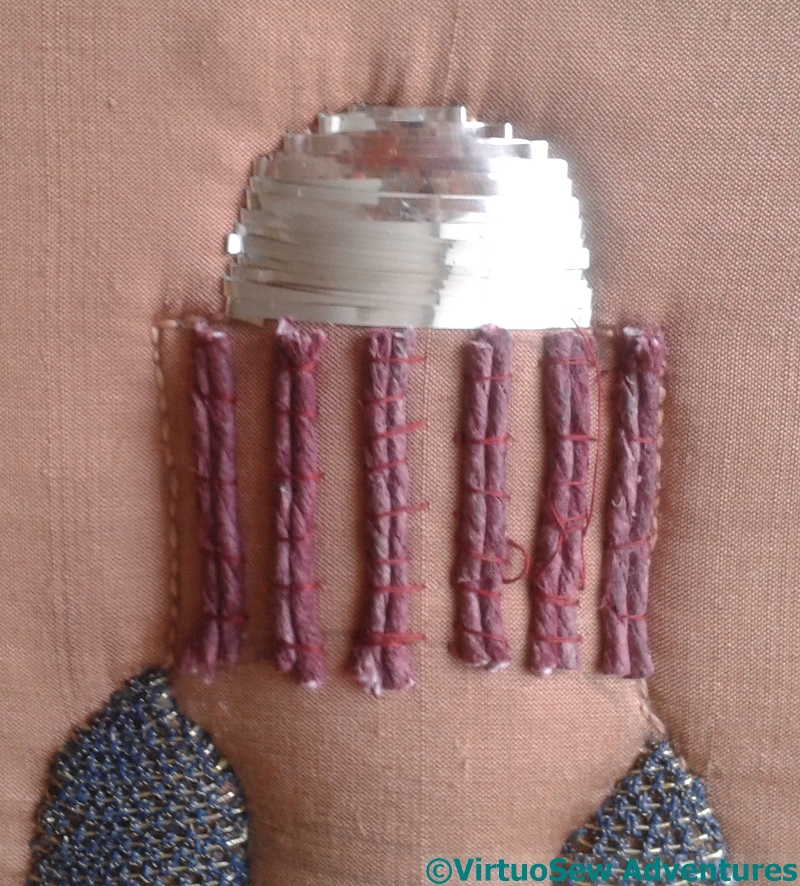
Couched Coloured String
Of course, the colour didn’t seep all the way through, as you can see from the whitish-grey ends of the couched pairs here, but at least the colour will ease back rather than drawing attention to itself.
You would think, by the way, that the waxed string would be fairly easy to couch in place, but it wasn’t. It had a will of its own, and far too many ideas about wandering off!

Bastketweave Couching
But it worked beautifully.
As I understand it, basketweave couching can be worked turning the thread at the end of each row, or sinking it. I would have liked to have turned it, as that is the more economical technique, but I felt that this would create the impression of a compact and complete shape, whereas – however stylised it is – this shape represents a three-dimensional object, the headdress wrapping around Akhenaten’s head.
That means more than 70 ends to sink, through silk, thin padding, and calico.
Oh well, onwards, ever onwards!
Progress on Akhenaten
Finished The Wig
Working with goldwork in a European winter is optimistic at best, and much as I enjoyed working the Detached Up and Down Buttonhole Stitch with Return, it took rather longer than I might have hoped. When I managed to sit down with a quiet mind, a good light, and plenty of time, I found that the work would speed up. It was tricky to keep it even – I didn’t entirely succeed, either – and I wondered, halfway through when it was rather too late, whether I should have worked it “upside down” as in Jacquie Carey’s book “Elizabethan Stitches”.
Silver Plate
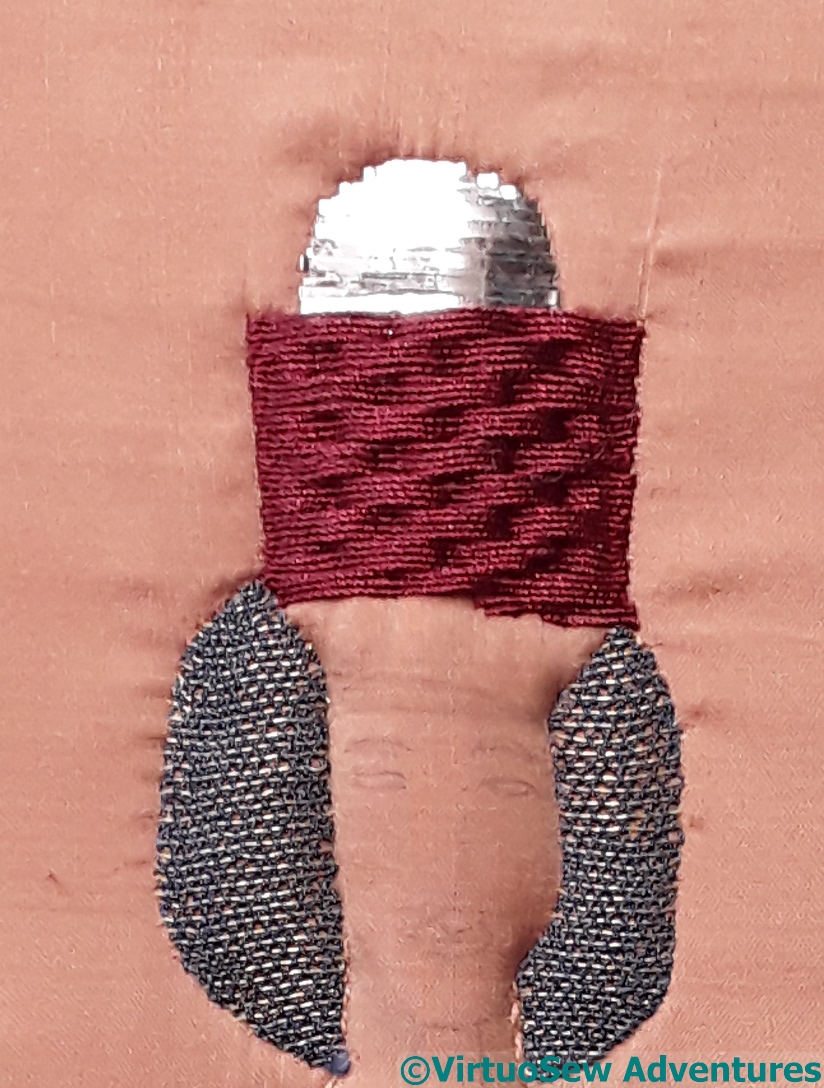
I have decided to keep working on the head and the crown, at least until I don’t know what to do next, so the next section was to be the top of the headdress. Now, although the colossi don’t show Akhenaten wearing the combined crown of upper and lower Egypt, I’ve decided to reference it in the colours for the headdress.
Finished Upper Crown
So the top section of the headdress is a zigzag of sliver plate. It’s not as even as I would like, perhaps, and I am wondering (I’m doing a lot of wondering with this one, aren’t I!) whether I should have started at the bottom and worked up. I’m not sure I have enough left over to do it again, so unless and until I decide I can’t bring myself to leave it this way, I’m going to remain content with my very first effort using silver plate.
Akhenaten – the next stage
BackStitch Details
Once I had stuffed the figure from the back, I began to add to the backstitch outline with, for want of a better term, internal outlines.
I realise that the detail of the crossed arms has given him a hollow chest, but as the embroidered details are added I will be able to adjust the padding, if necessary removing some of it. Adding the stitching is going to be interesting. Some of it will need to balance over the curve of the padding, and some of it I will need to tighten a little through the padding – for example, his carefully-carved belly button.
At this point, I had to pause for thought. When the idea first came to me, it was the pleated loincloth that I could visualise, but the rest of the piece had yet to come into focus. I went rummaging on the web for polychrome representations of Akhenaten, and rummaging in my stash of threads for inspiration. And then suddenly, that inspiration duly arrived….
Detached Up And Down Buttonhole Stitch With Return
I remembered the ornamental stitches of the Tudor Rose Project, and fished out the Gold Special Tambour and Gilt Sylke Twist. Akhenaten’s wig is sometimes represented as black, and sometimes as blue. Black can be a somewhat problematic colour, often too dominating or simply “killing” other colours, so I decided I would go for blue, and the Indico Blewe Gilt Sylke Twist looked like it would produce just the right effect. Using the Gold Special Tambour as the thread for the return of the Detached Up And Down Buttonhole Stitch With Return helps to give a little more emphasis to the glint of the gold in the Gilt Sylke Twist.
But it’s not a quick stitch. This is going to take a while….