
Category: General Embroidery
The Kingfisher Continues

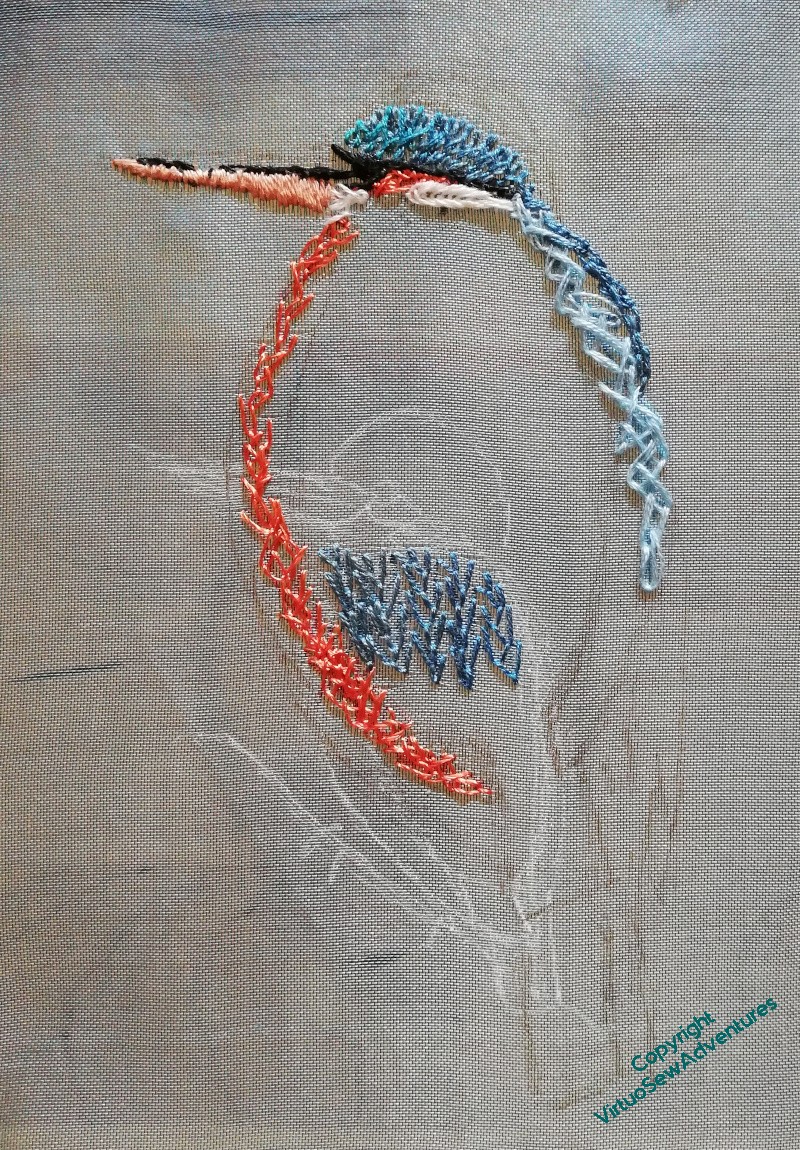
The kingfisher is proving more complex than some of the earlier animal vignettes. This is partly because the shape is complex, and partly, I think, because this is one of the elements I really want to include, so it’s hard to “play” quite so freely!
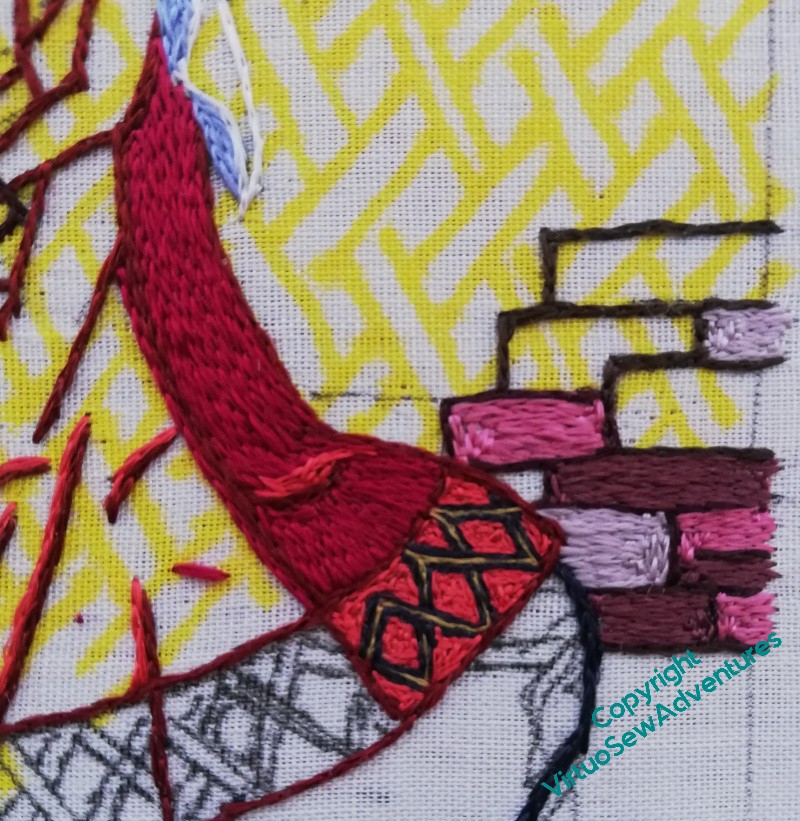
The lower stitching – part of the wings, maybe, or the tail? – is densely stitched in stranded cotton, and the head is small, tangled stitches again in stranded cotton. The original photograph that I’m using as a guide shows much smaller speckles of colour over the head, so the smaller stitches should help with that..
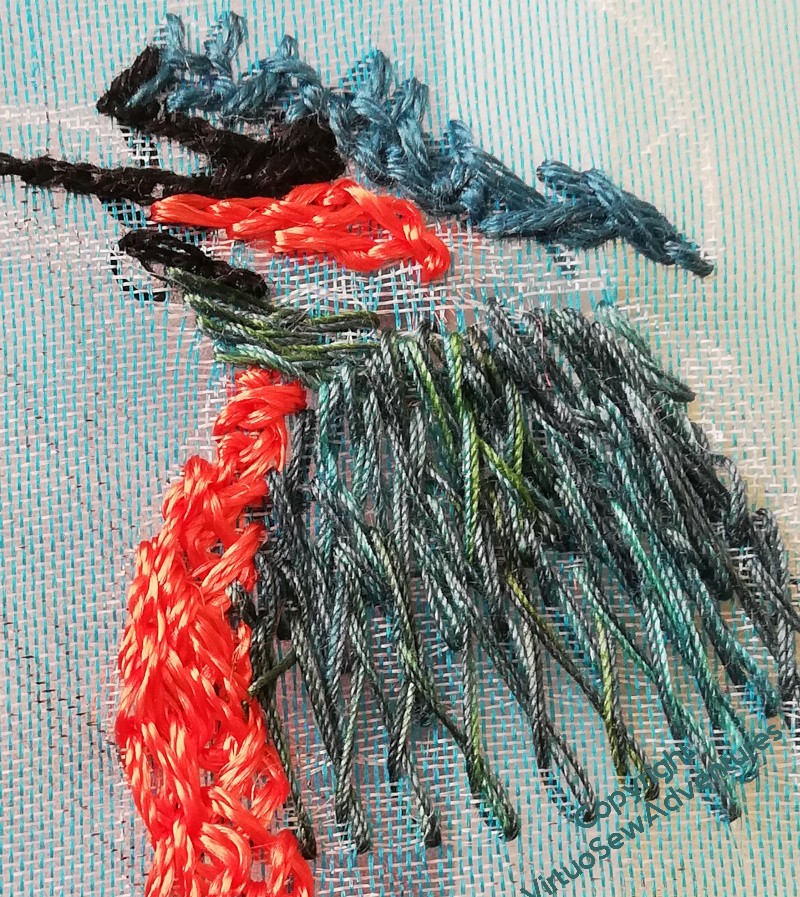
I’ve put a line down the beak which I need to make narrower as I stitch the rest of the beak, and I’ve started on the wing.
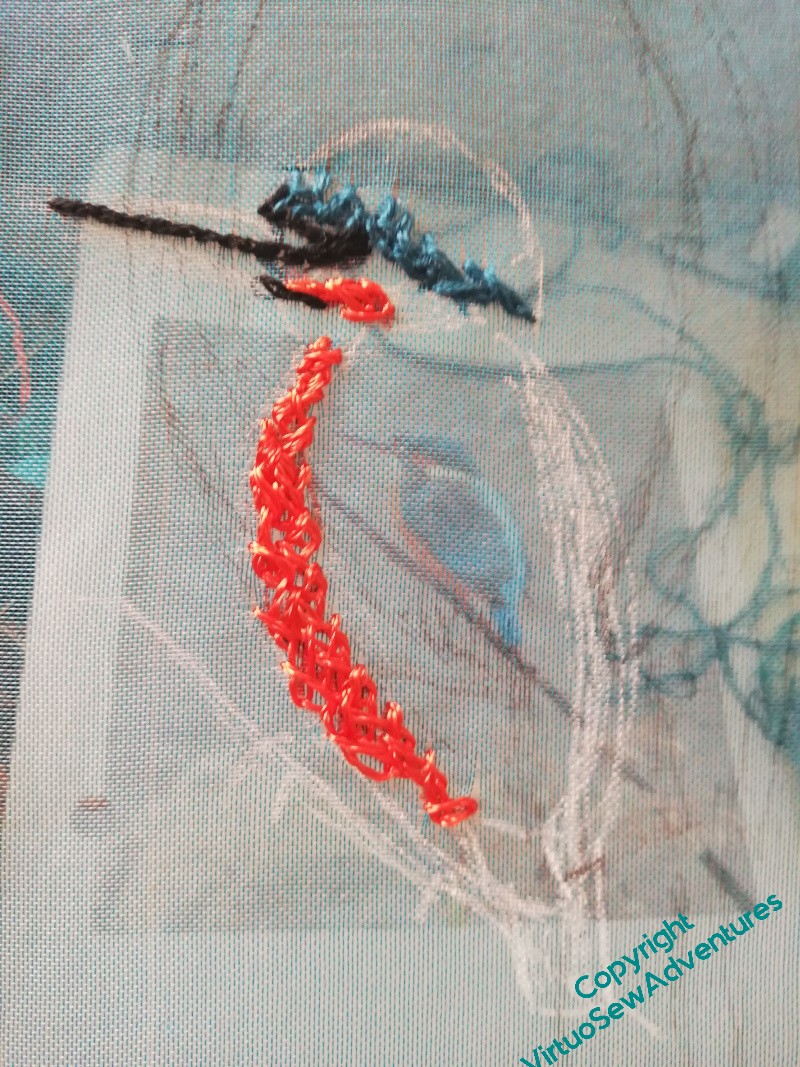
You can see in this close up that I’m using two strands of a variegated mercerised cotton for the wings, overlapping and tangling my Cretan Stitches to create something like the effect of the feathers. Considering that fluffy effect it has created for fur in some of the other Vignettes, I’m astonished and delighted that it’s not looking fluffy this time. The colour helps, of course, and the stitches are more closely packed, but still, I’d not realised until now just how versatile Cretan Stitch is!
I’m very pleased with progress so far. I need to find the right bright shade for that stripe down the back and the end of the tail, fit in his white collar, and the bright colour on the top of his head, and then work out how to keep the beak neat and crisp.
So far, that’s defeating me, so wish me success, please…!

A reminder that I shall be giving a talk for the Embroiderers Guild on June 3!
I believe I’ve turned this image into a link to the Eventbrite page, and for anyone not in the right timezone, or otherwise occupied on the day of the talk, the Guild makes recordings available for some time afterwards.
I shall (continue to) remind you every week until it happens!
Tackling Stones And Tussocks
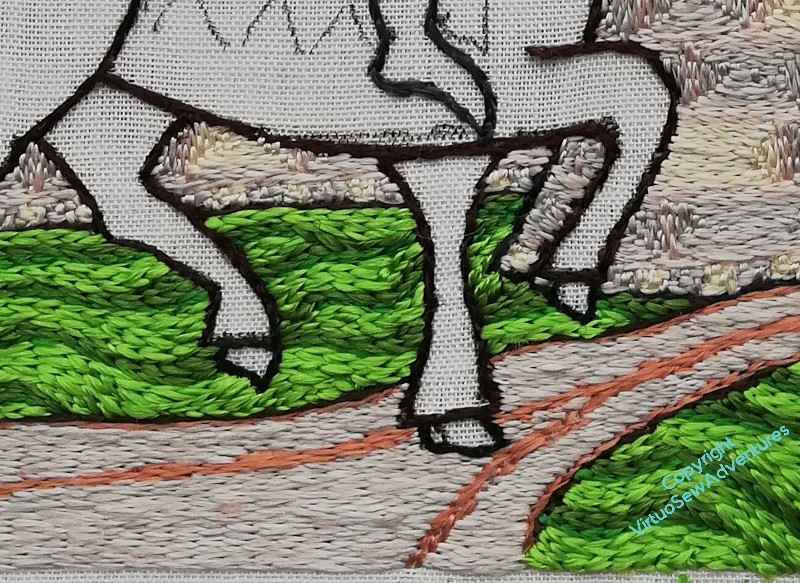
You may recall that when I was stitching William Marshall, I chose to use more strands of silk in the needle, and to stitch relatively calm curves and unevennesses in the ground. I wanted to suggest that William’s kinsman kept the land around the walls of his stronghold close clipped (by grazing, one presumes) so as to ensure that he could not be take too much by surprise, whether by welcome or unwelcome visitors.

Aethelflaed, of course, is visiting, in effect, a building site. She has no road, and her horse is picking its way around heaps of building stone and over grass that’s tussocky and and uneven. I gave some thought to the question of how to represent that, staying true to the aesthetic, using only silk and split stitch, but creating some of my own variations. After all, this is modern, inspired by the past, not a reconstruction of an existing piece. I have a little freedom of movement here!
So I’m using three different greens, and I’ve not increased the thickness of the silk in my needle. I’m not stitching the curves quite as regularly, and I’ve devised a way to stitch little tussocks at uneven intervals across the ground. They are just little groups of split stitch lines crossing the flows of colour, but I think they are working rather well so far.
It has only just occurred to me, however, that I may have a slight tweak to make in my process for doing them, as I come forward: they need to get bigger, cross more of the lines of colour. Do I now just put the colour in, so that small tussocks don’t compete visually with large tussocks, or do I just carry on regardless?
Now, a reminder that I shall be giving a talk for the Embroiderers Guild on June 3!
I believe I’ve turned this image into a link to the Eventbrite page, and for anyone not in the right timezone, or otherwise occupied on the day of the talk, the Guild makes recordings available for some time afterwards.
I shall remind you every week until it happens!
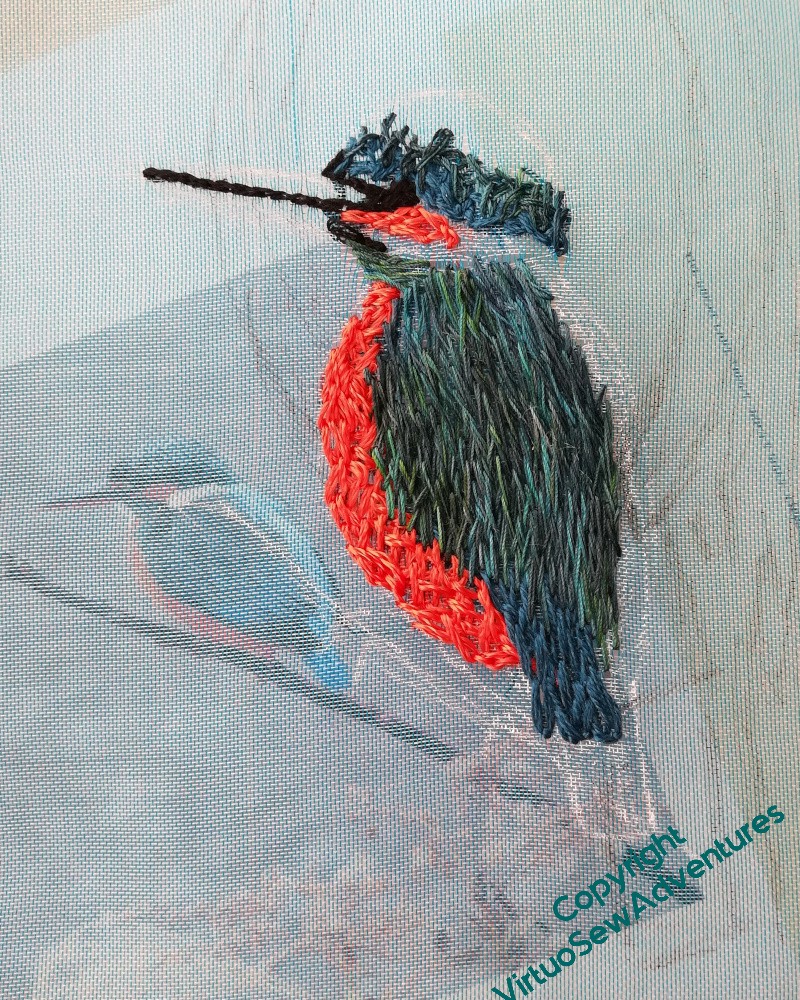
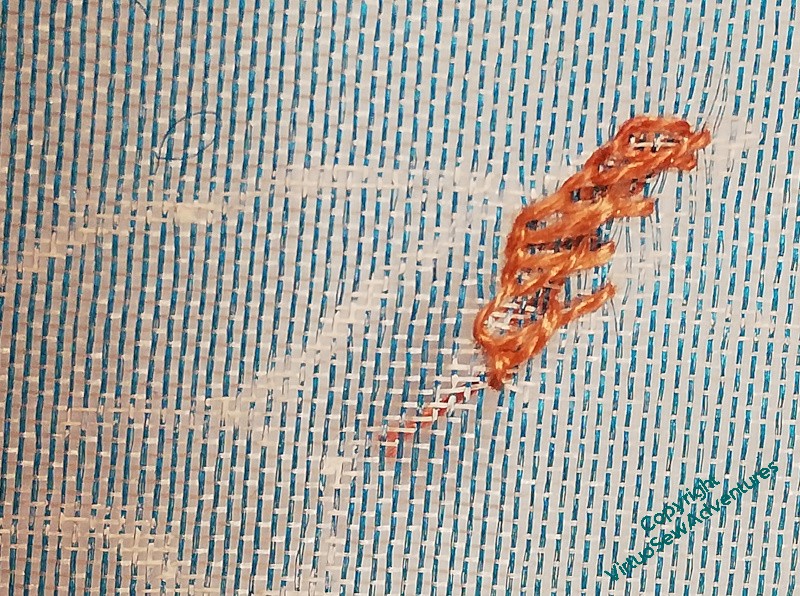
And now for a kingfisher…
Many years ago – but after I first thought of doing a panel for the Conversion of Placidus – I went to a tour of Flag Fen, guided by Francis Pryor who had discovered and excavated it. As we strolled at the side of the fen, having much explained to us, there was a flash of bright orange, and a kingfisher shot across our bows. The effect, in glorious sunshine, with our minds in the Bronze Age, was absolutely electrifying, and I vowed that there would be a kingfisher in Placidus, somehow.
Of course, that’s easier said than done!
You maybe able to see in the first picture that I’d had two goes at drawing the Kingfisher, and started to embroider the larger one. I was intending him to be in the border, so I wanted him larger than a vignette. But that was not the way to do it, he’s too long in the body, and generally adrift. So I decided to go back to the first drawing, and not worry too much about leftover drawing.
It’s always sad to be unpicking, but once I’ve decided it’s necessary, I don’t repine, or even growl (much…). The next version will be better.
So I have started agin. The kingfisher’s breast is a tangle of overlapping feather stitch and feather stitch variation using Marlitt. It’s a good, vibrant colour, and I seem to have not had too trying a time with it, all things considered. Viscose threads such as Marlitt are very lively and twitchy, and if I want a smooth satin stitch, I try to damp out the kinks. For this, not so much, I want the light sparkling off the stitches, the speckles and high spots catching the light.
Well, it’s a start!
Now, a reminder that I shall be giving a talk for the Embroiderers Guild on June 3!
I believe I’ve turned this image into a link to the Eventbrite page, and for anyone not in the right timezone, or otherwise occupied on the day of the talk, the Guild makes recordings available for some time afterwards.
I shall remind you every week until it happens!
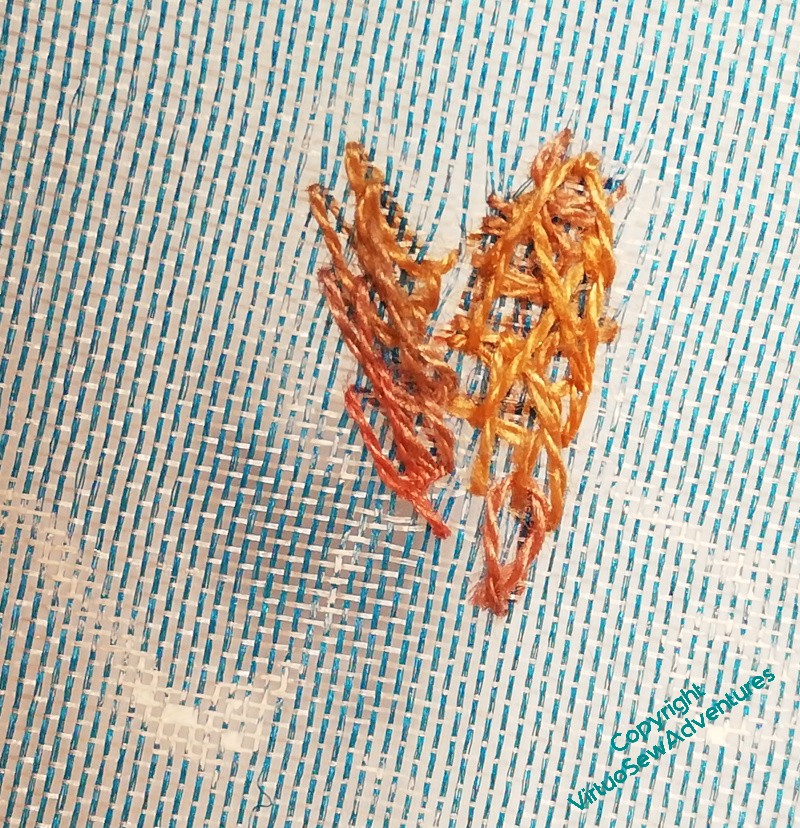
Finishing the Fawn
So, the Fawn…
Started, just like the rabbit, with a bit of pinky orange and a peculiar stitch choice (welcome to my world!).
Then I’ve continued, also just like the rabbit, by using Cretan Stitch, single strands, and some straight stitches. I’ve grouped some of the lighter stitches to help with the spots, I’ve put in the ears and hoof.
And the eyes. It does help, I think. These animals are being worked so freely, so approximately, if you follow me, that I need to find navigation markers to help me keep on track!
You will see that the finished Fawn isn’t quite right in all proportions, perhaps. The eyes aren’t balanced, and I’ve not managed to convey the narrow little face with its velvety fur.
But I’ve produced something that “reads” as a fawn, that is makes use of fabric and stitch, using the edges of blanket stitches to give me lines where I need them also to tie into the perpendicular direction. In a year’s time, I may come up with another way of doing this, but for now, I’m content.
Now – a very exciting thing! – I shall be giving a talk for the Embroiderers Guild on June 3!
I believe I’ve turned this image into a link to the Eventbrite page, and for anyone not in the right timezone, or otherwise occupied on the day of the talk, the Guild makes recordings available for some time afterwards.
I shall remind you every week until it happens!
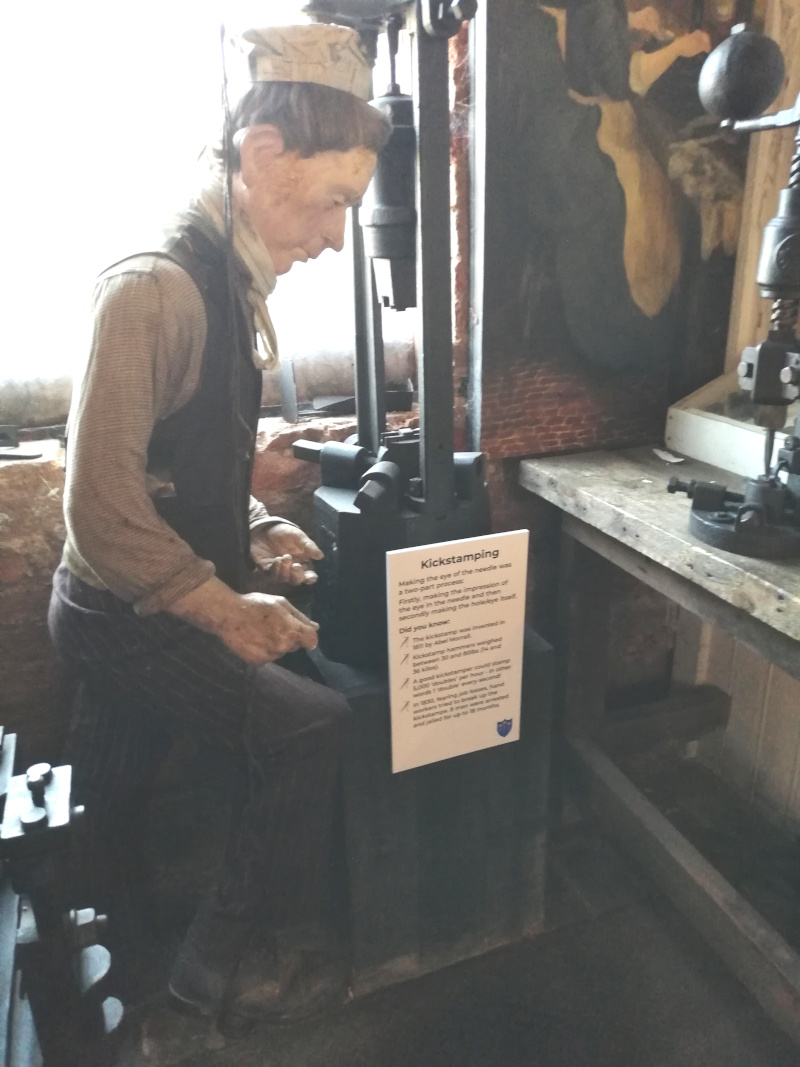
Forge Mill Needle Museum
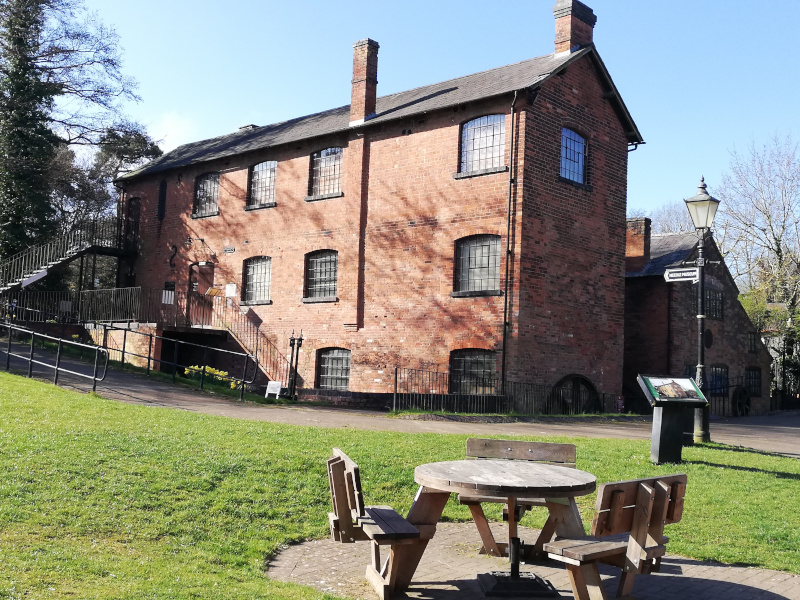
Did you know that Redditch was once the centre of needlemaking, pretty much world wide? Did you know that there was a museum (Forge Mill Needle Museum) devoted to needle making and needle use?
No?
Neither did I. But I had a splendid time when I found it!
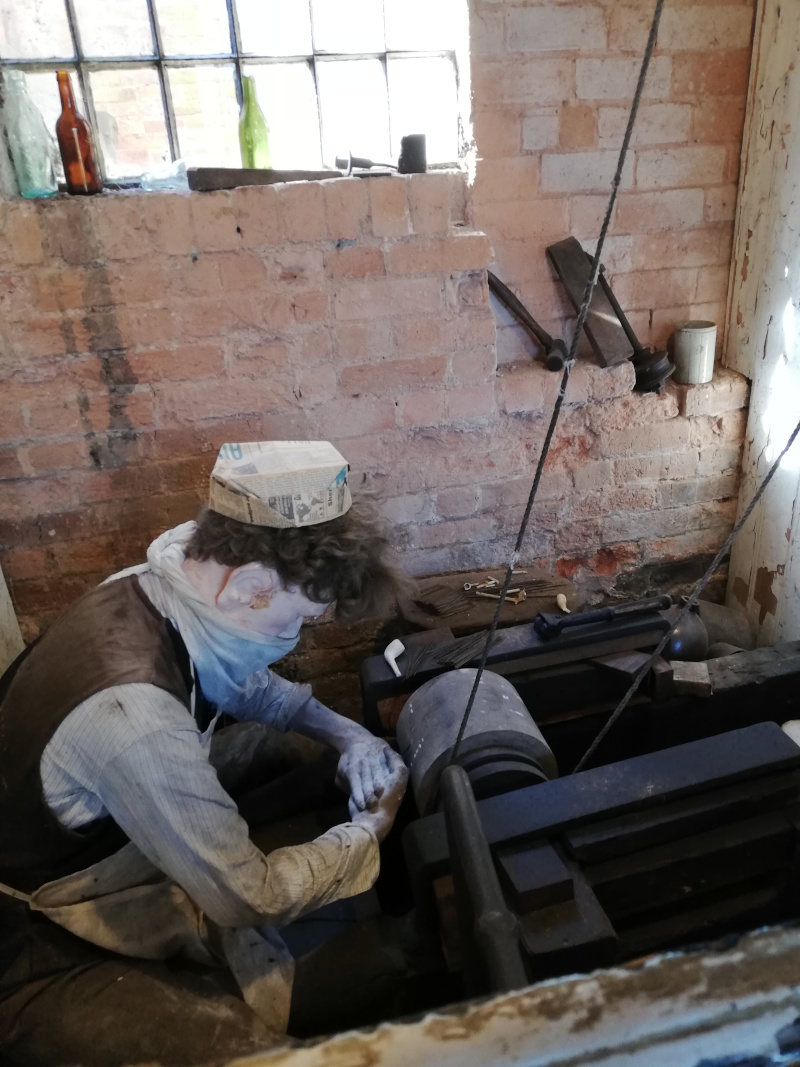
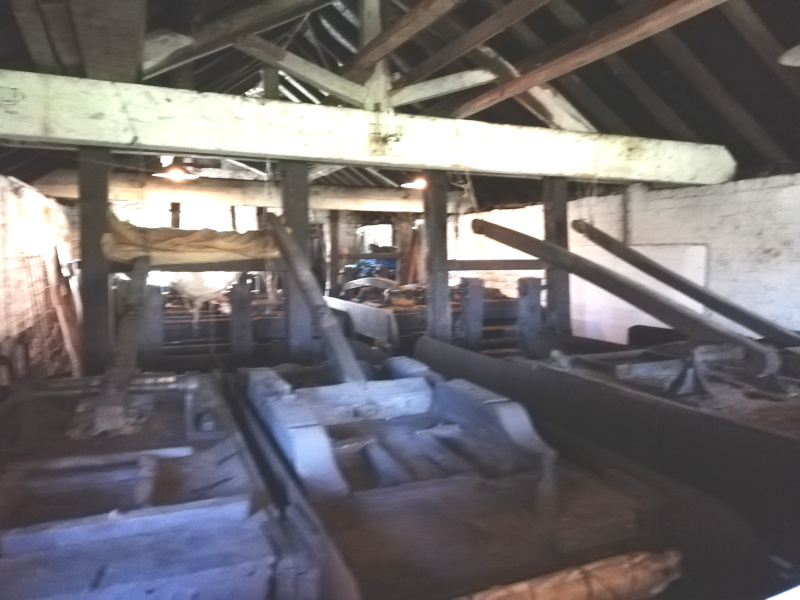
It’s not a big museum, but it includes information and displays about needle making in the eighteenth and nineteenth centuries, and there are volunteer guides who provide tours. I was lucky to be there on a day there was a tour – until that morning I hadn’t even known the place existed. Anyone who knows anything about the development of manufacturing processes and technology won’t be especially surprised by the poor labour practices or unsafe working conditions of the period, but in an era when some industrial diseases are on the rise (silicosis,:plague of miners, pointers, and now the makers of granite and faux granite kitchen worktops), it is good to be reminded that firstly improvements have been made, and secondly that they have to be kept.
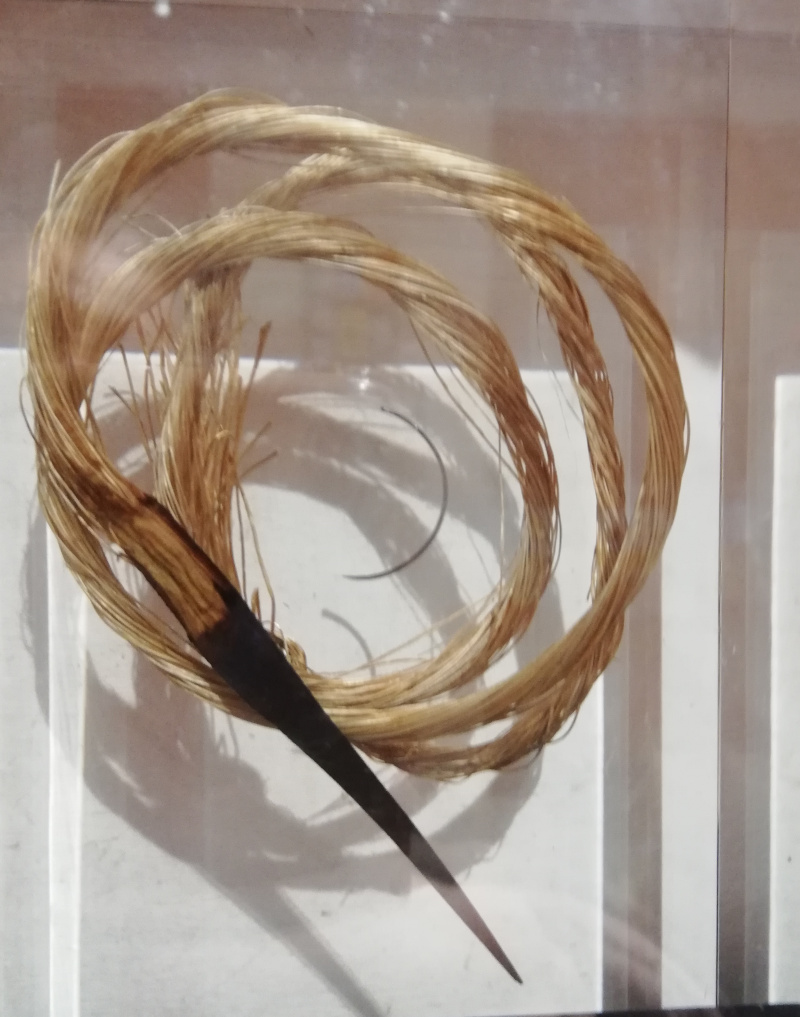
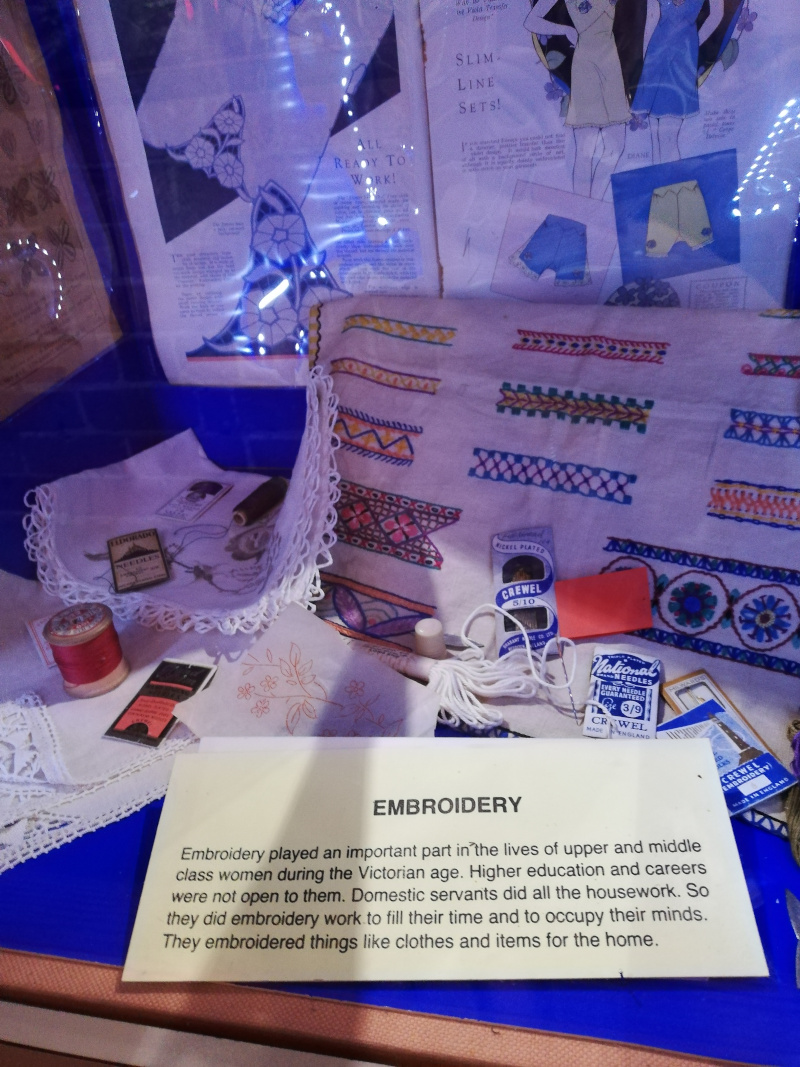
The displays on the upper floor included needles right from the very start – a dried yucca thorn with fibre attached, referred to as “Eve’s Needle” – to the very modern, needles used in the space programme, or the preposterously fine needles used for corneal surgery. There were displays about uses of needles, in embroidery, book binding, sailmaking,surgery. The dressmaking display even included an absolute dead ringer for my dearly-loved hand cranked Jones sewing machine. There were displays about fish-hooks and fly tyeing (after all, a fish hook is basically a needle with a barb on the end. There was even a video about the operation of the scouring mill, each process demonstrated by an elderly man who’d been apprenticed there as a youth.
There’s also a cafe, and a visitor centre for the adjoining Abbey ruins on the site, and what looks like an interesting two or three hour ramble along the watercourse that I didn’t have time for.
I had a delightful day. Highly recommended!
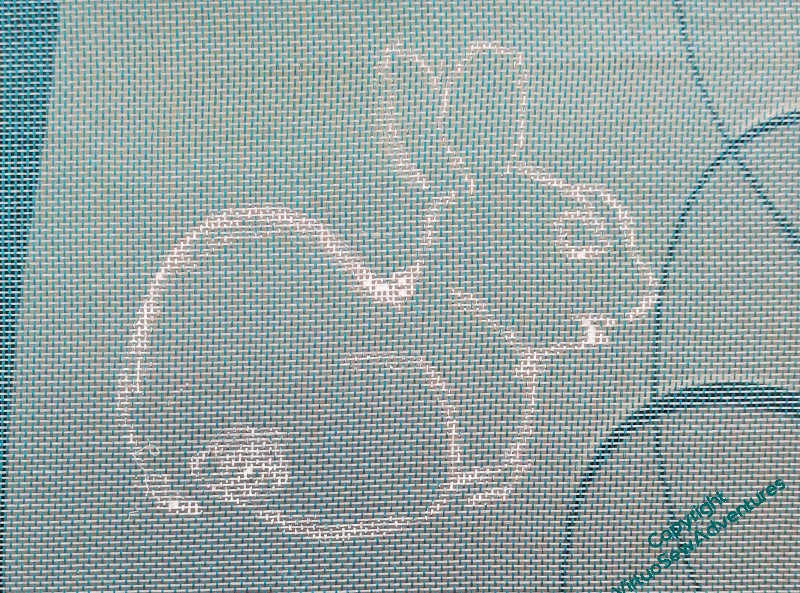
Finishing the Rabbit
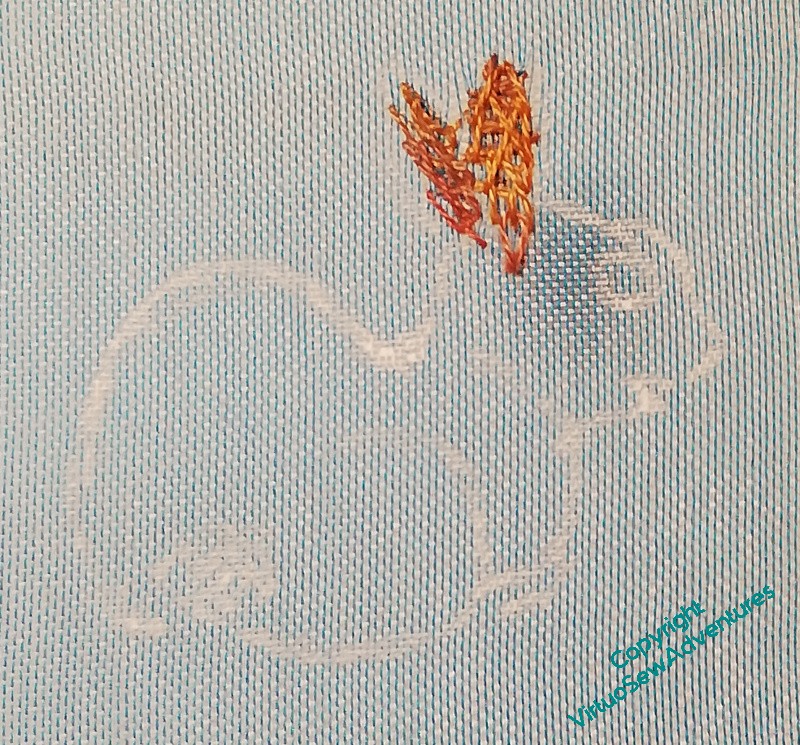
When we last saw Mr Rabbit, he was barely begun, just the ears with some interesting stitch choices.

Much of the stitching thereafter has been in varying random Cretan Stitch. I’m finding it quite useful for layering and intertwining the stitches around one another, each modifying the tone of the other. The gauze is also surprisingly useful, allowing the stitches to show through, modified once again by the colour of the fabric.
I’ve learnt from some of the first few animals and decided to put the eye in at an earlier stage. It’s not easy to get eyes entirely right, and if they are wrong it can look dreadful. As well as being harder to put in and harder to take out, the later it happens.
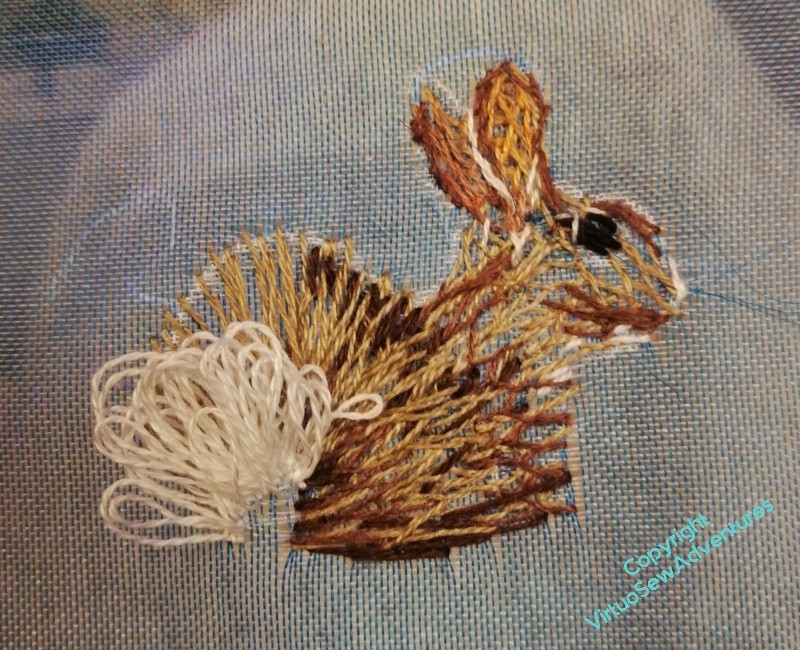
As I carried on, I put more layers of colour in, and then had the bright idea of doing the bunny’s tail in velvet stitch.
Of course I did.
I can tell you that pile stitch on gauze in single strands of stranded cotton is extremely fiddly and frustrating to do!
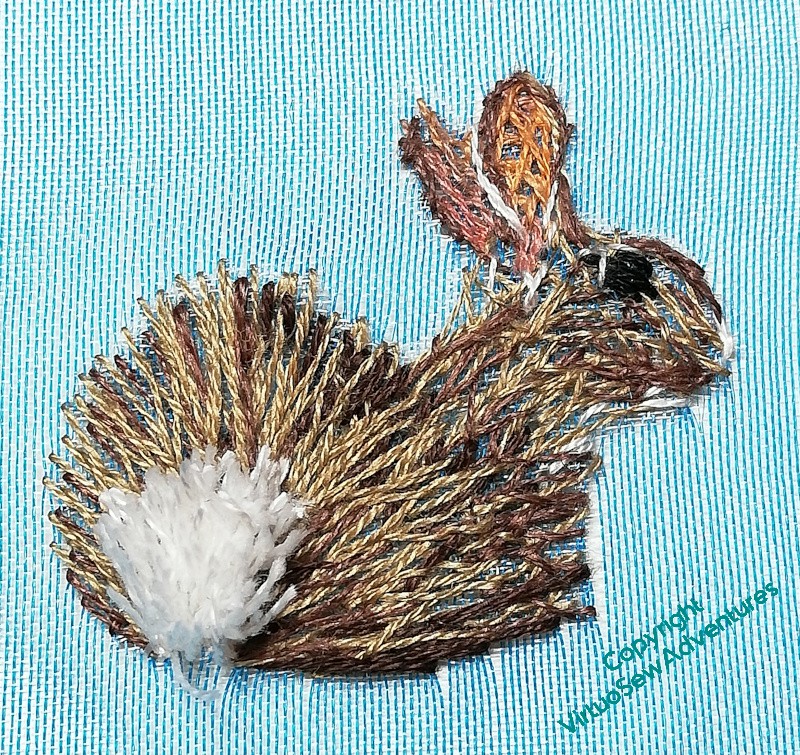
It works, though!
Starting More Animal Vignettes
Since I’ve decided to start on the animal vignettes for the Vision of Placidus, I’ve been making a hay while the sun shines, thinking of animals I want to include and finding picture sources. I do need to re-read the book to make sure I don’t miss out a critical element, but with Aethelflaed, Rahere, and the Lady Julian all swirling around in my head, a lot of research is also swirling around a bit, making it hard to keep things in order. However, while I have the gauze mounted on frames, I might as well keep going.
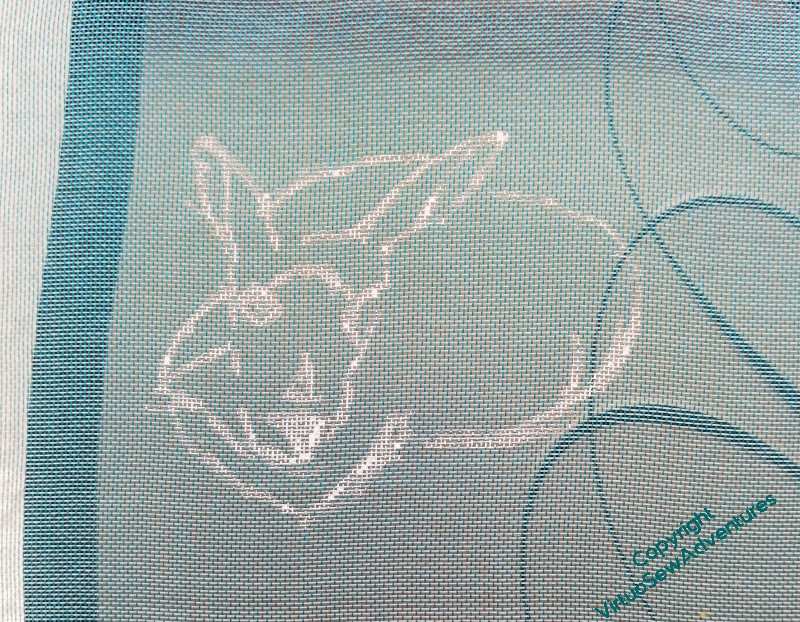
So here we have a fawn and a rabbit. The drawing is maybe not quite the success of the brockis, but it’s all so much stronger than it would have been two or three years ago that I’m taking merely the doing of the drawing as a huge success. I’ll probably keep on going on about this. At school, not only did I have no discernible skill with pencil and pen, I could make a biro blotch just by taking it in my hand. I’ve only really started to work on my drawing skills since late 2018, so when it works I’m almost indecently thrilled!
The sketches are side by size on the gauze, so I started thinking about them and working on them at the same time.
I probably won’t continue to give you quite such close ups, but I wanted to emphasise a few things about how this is beginning to come together in my head. The Medieval Movers and Shakers (William Marshall, Aethelflaed, Rahere, and Lady Julian) are going to be fairly strictly constrained to true Opus Anglicanum, split stitch and underside couching, and I will do that joyfully because it is part of my conception of them.
However – as I believe I may have said before! – my true love in embroidery is in playing with the texture and intricacy of thread and stitch. Even though it’s going to be a huge piece – I’m intending it to be five foot by four, at least – I want it to live and breathe my enthusiasm, in every detail and however closely you look at it. Each ear of these two has something slightly different about the fall of light and the way the lines and edges show, so I’ve tackled them slightly differently.
I’ve learnt from Mus’ Renard, and for now I’m using a single strand of stranded cotton (a Stef Francis variegated one, since you ask). I’ve used crossed blanket stitch in some places, because that gives me a thin line of the pinky-orange in a distinct area. And in the larger one of the two ears of the rabbit, I started with some fly stitches overlying each other. That gives some little shadows and helps everything come together with varying degrees of coverage.
Already this has changed from the Hawk, who was all in satin stitch to cover the gauze. I’m not trying to cover the gauze completely anymore – I’m already quite happy to allow the back to show through, just a little.
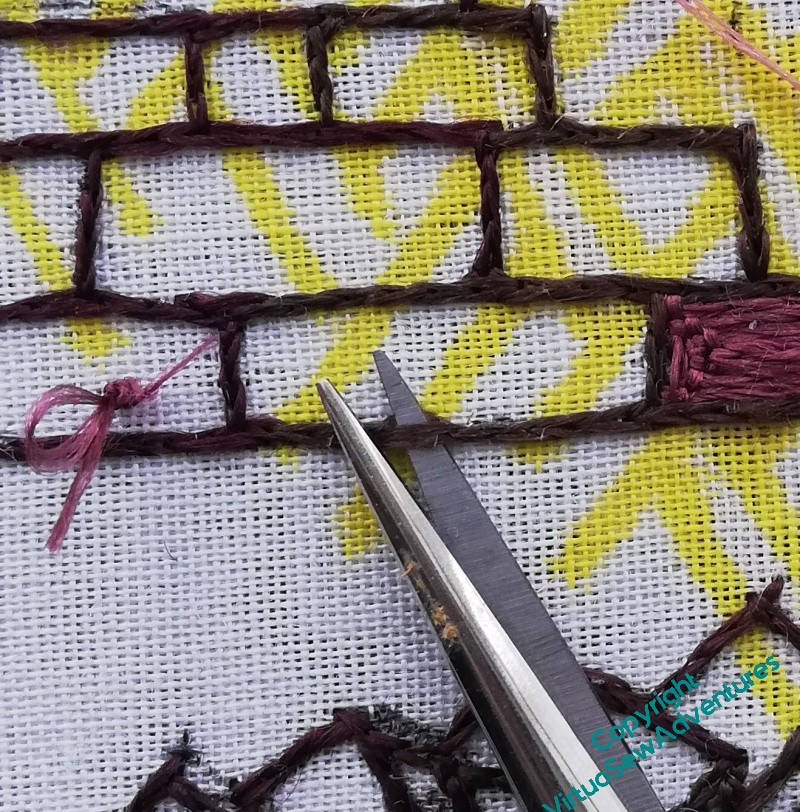
Questions About A Wall
So, having once decided to redo the walls, I had to actually do it!
I’m rediscovering the quiet process I found with William Marshall, sitting down at my frame of a morning, working until the sun comes around and casts shadows across the work, or until I find myself losing focus, whichever comes the sooner. You may recall that I was surprised to find myself so enamoured of a technique that involves only a single stitch!
This time, however, that single stitch is very much part of the conception of the project, and I have learned that I can delight in the subtleties of something that once would have bored or frustrated me. I am pleased to find I’m still enjoying it, and in spite of the unusual level of pre-designing I’ve done (and I’ve yet to really get started on Rahere and Lady Julian!), there are still details and ideas to work out.
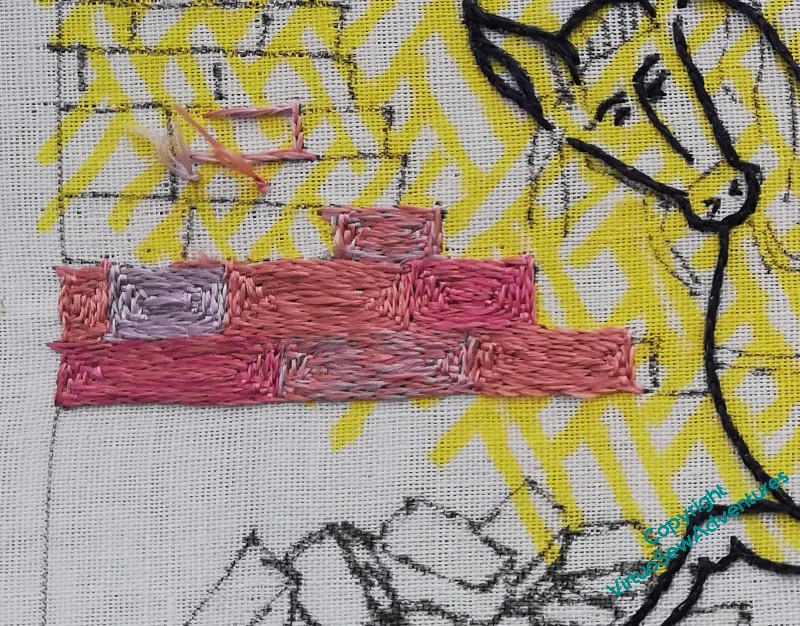
I’m keeping to the close tones I chose, using two of the three possible blends, and two solid colours. I think that is working well to represent the assorted colours in Cheshire sandstone, while being pale and pulled back, not dominating Aethelflaed but allowing her to dominate instead.
I have been quietly, methodically, choosing a silk, stitching my square spirals, stitch by stitch and block by block, thinking only to raise the remnants of the Roman Walls so that Aethelflaed can restore them.
And then, last week, I was blamelessly stitching my blocks, when I looked at my design with a new eye, and suddenly I have a thought to think through.
Notionally, for me, Aethelflaed in this design is outside the walls, touring the building site, as it were. That’s one of the reasons that I made the wall more than head-high on the rider. However, last week it suddenly seemed to me that visually, that high wall was blocking Aethelflaed’s view, and I’m not sure I want that.
Fortunately, I have all the rest of the silk embroidery, including the borders (still not entirely designed!) before I need to be certain of my decision.
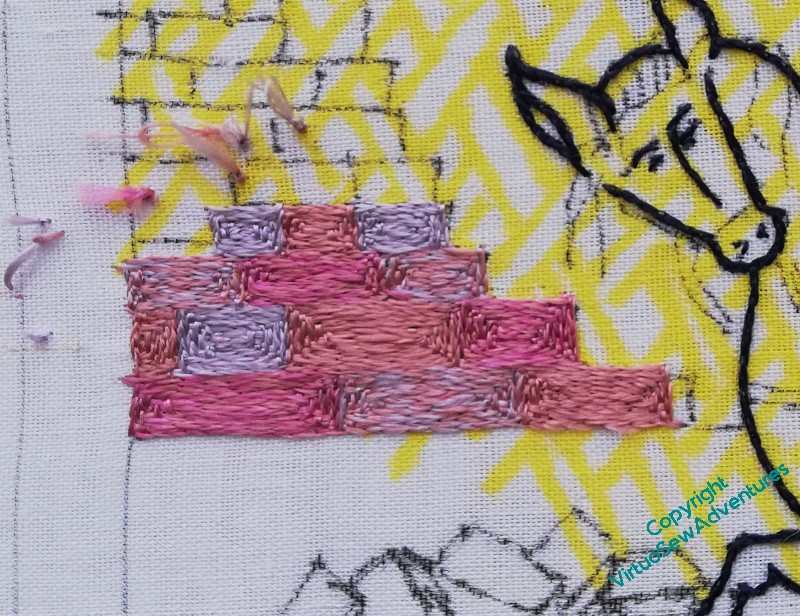
Not quite starting over…
Well, what with putting her away over Christmas and then taking some time to make a decision about what to do next, it’s been a while since you saw Aethelflaed..
And here I am, snipping and snipping away at all of the wall outlines, the blocks I’d already stitched, and even the pile of blocks ready to be reused.
All gone!
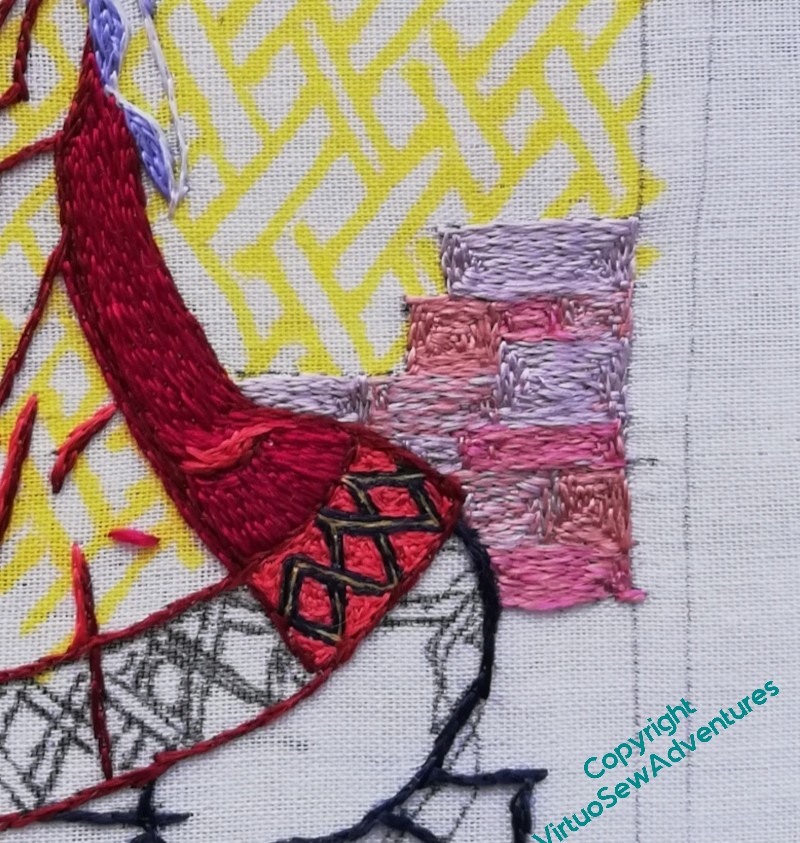
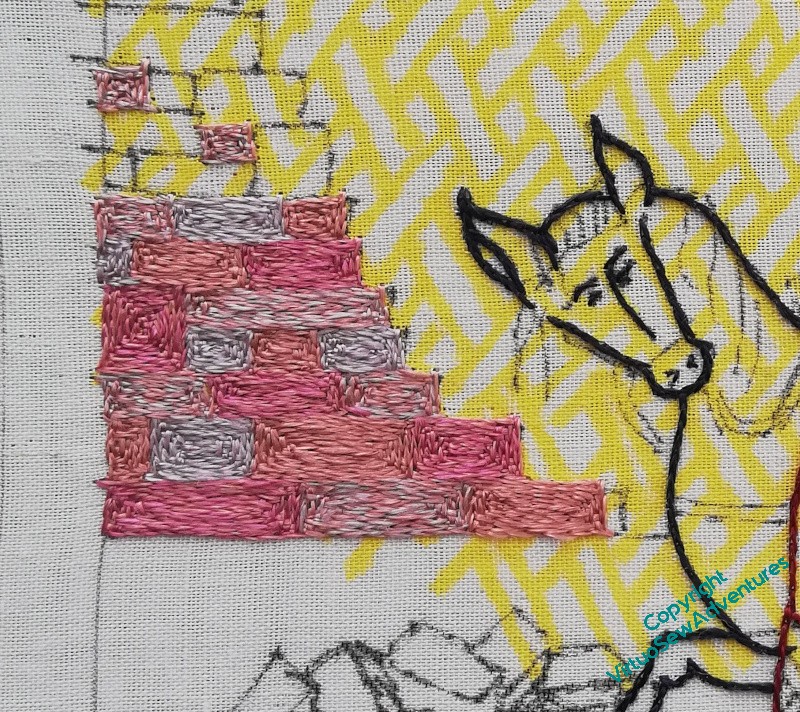
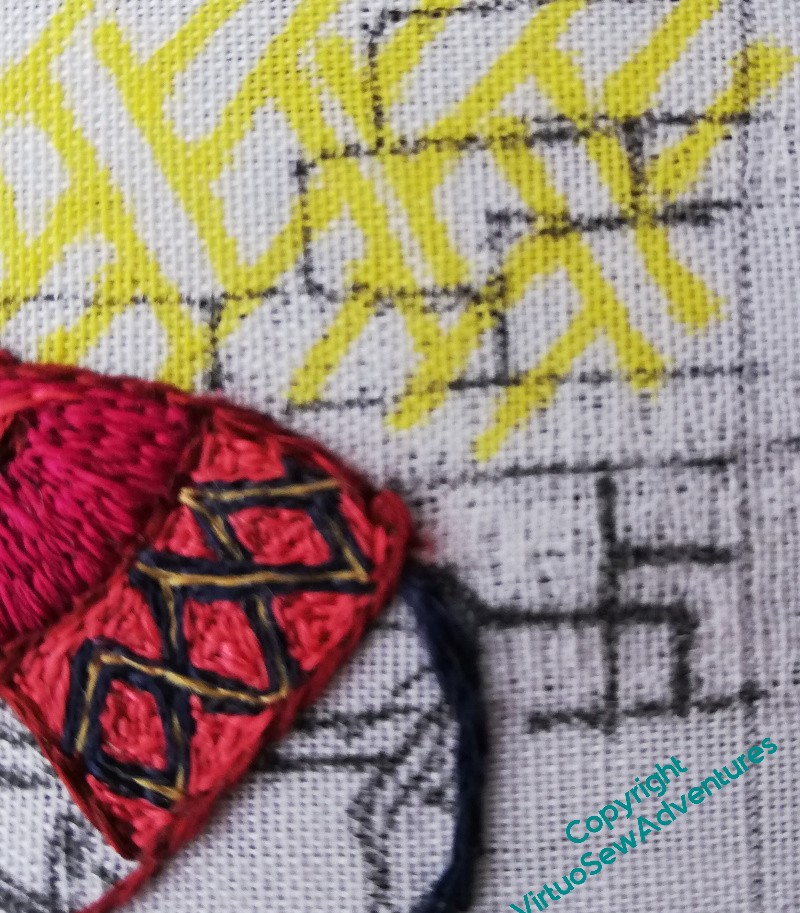
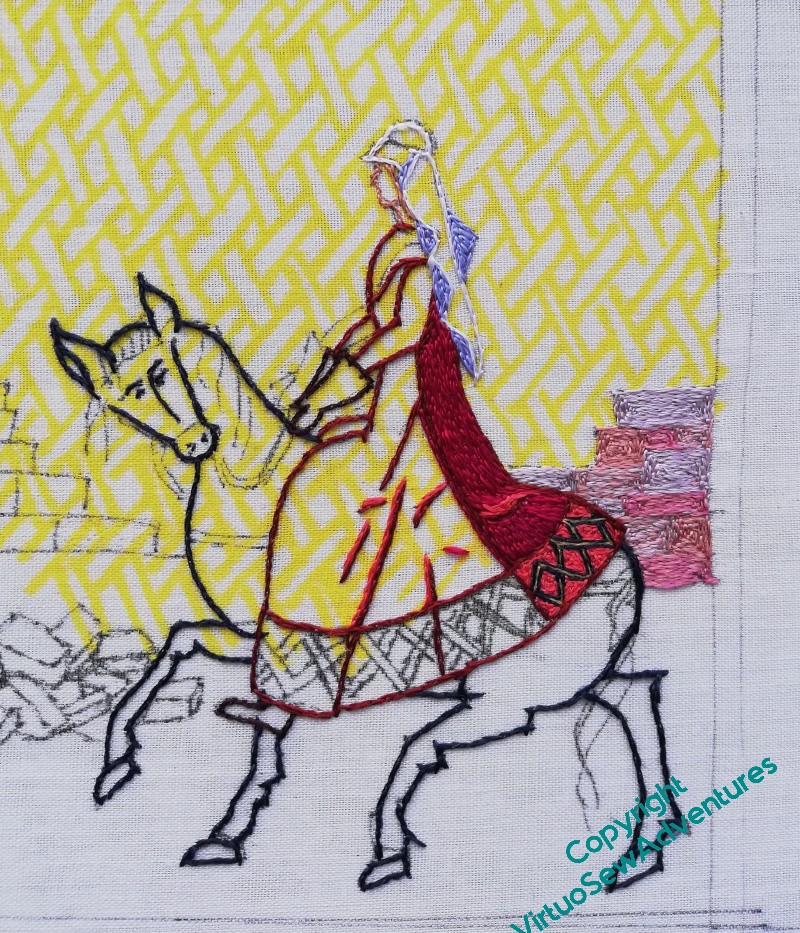
And now, the section behind her and her horse is reinstated, using a mixture of blends and a couple of single colours. The tones are much closer together than they were originally, and I’ve also chosen not to use the dark outlines and dark “mortar”. This will help to create a more subtle background, while still having the pinky-orange of Cheshire sandstone. I’ve seen all these colours in various bits of Chester’s Walls – I’ve just chosen, this time, not to include the much darker browns and plum colours which are also there.
So much of representational art, whether it be painting or embroidery, comes down to a question of editing. What do I want to emphasize? What do I want to play down? How can I balance the colours, the shapes, the patterns, to tell the story I want to tell?
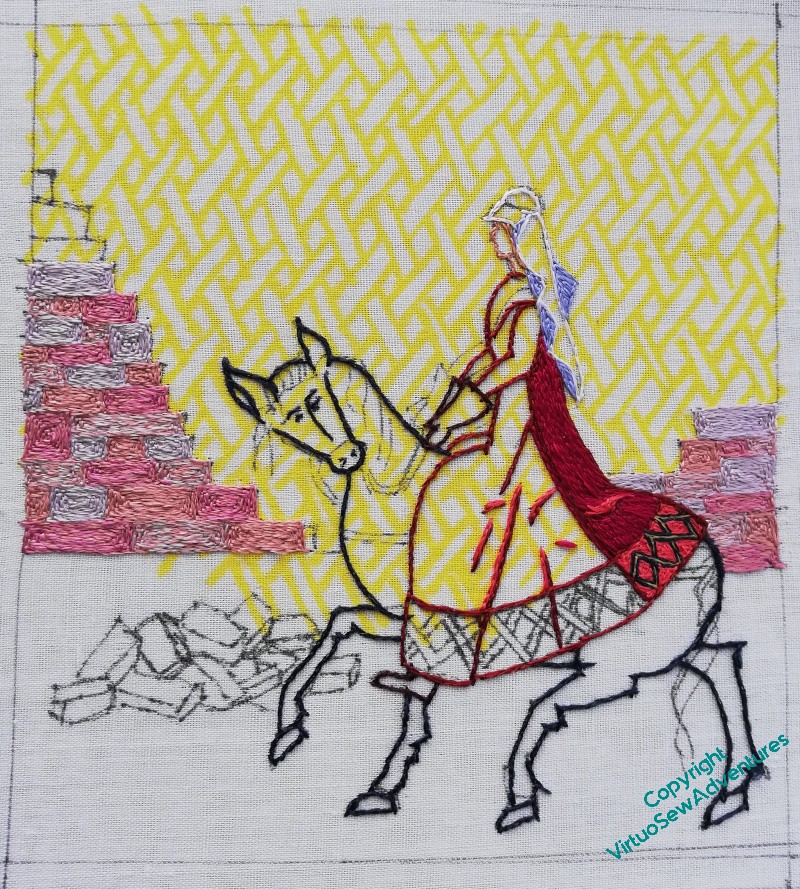
Looking at the newly worked section from further away, I think I’m happy now that the wall will pull back as I need it to.
Now I just need to keep going!
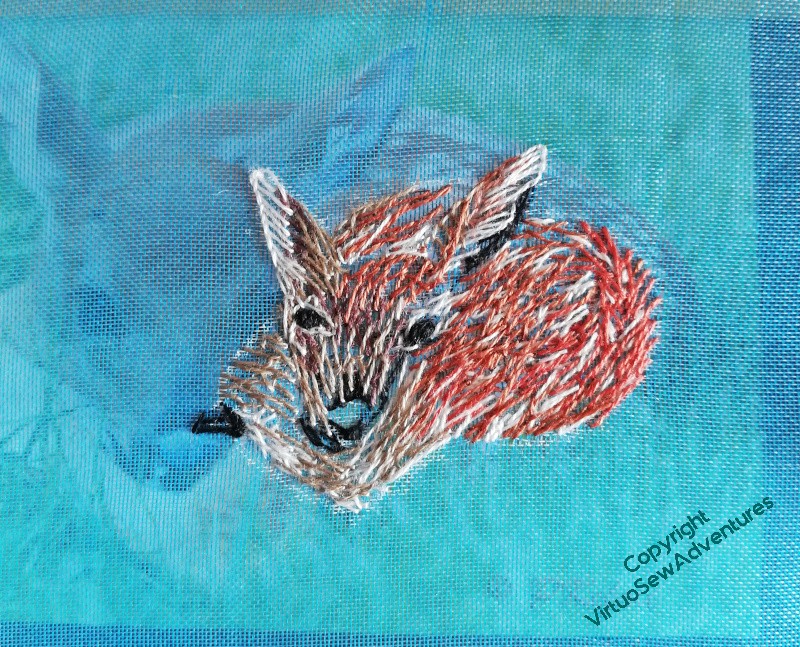
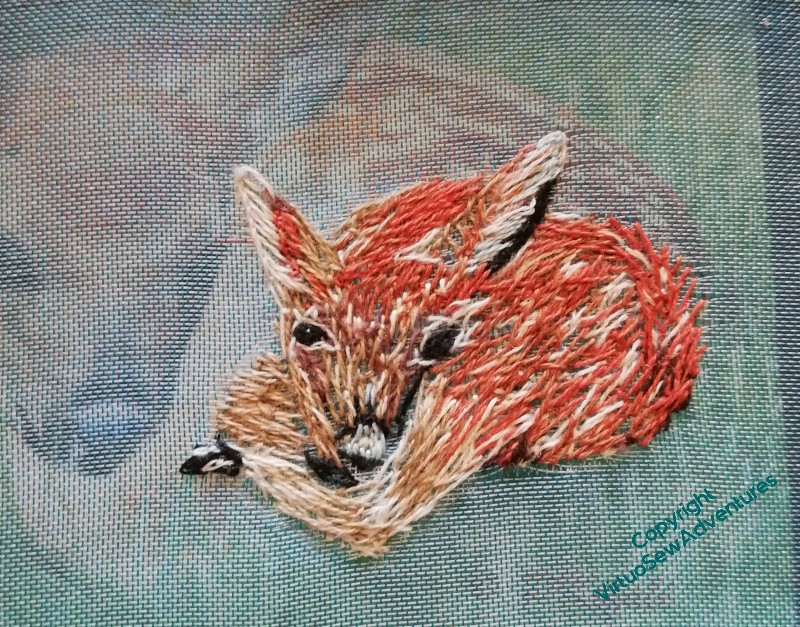
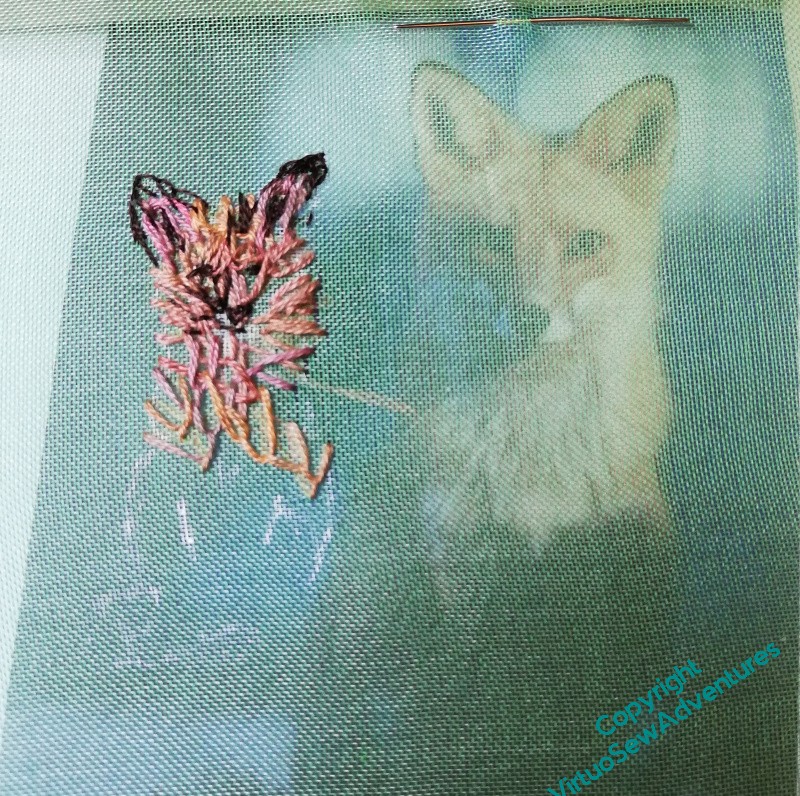
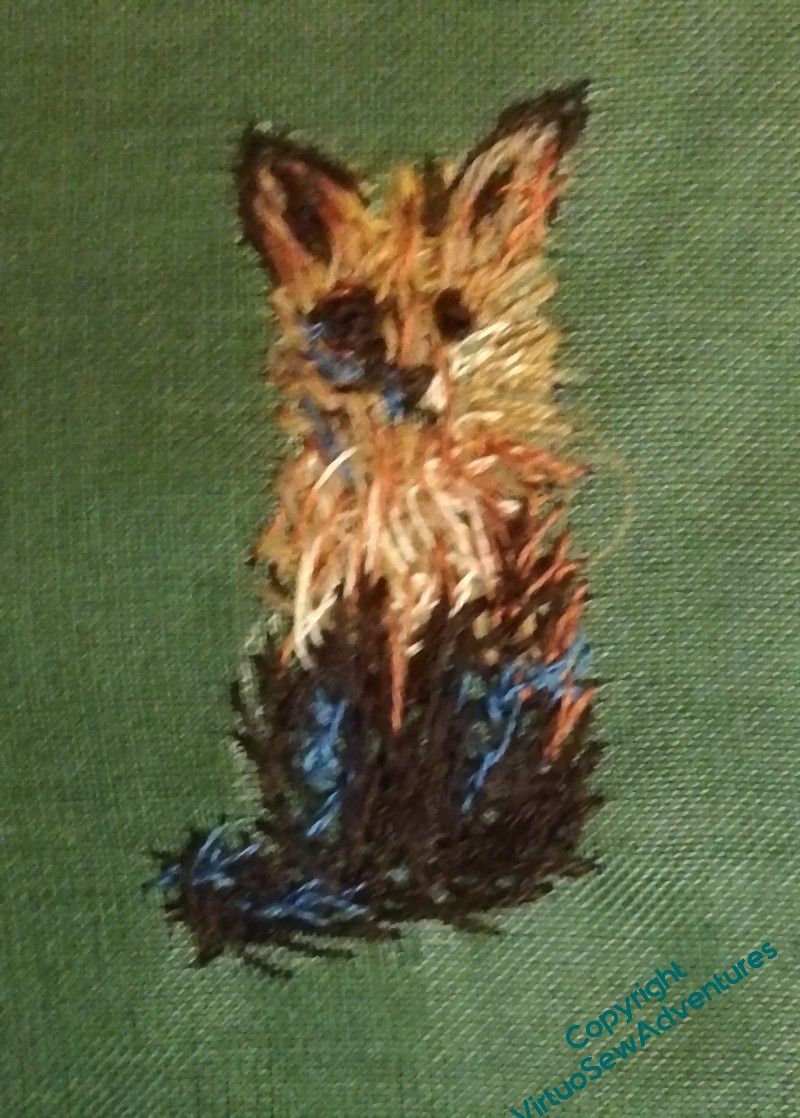
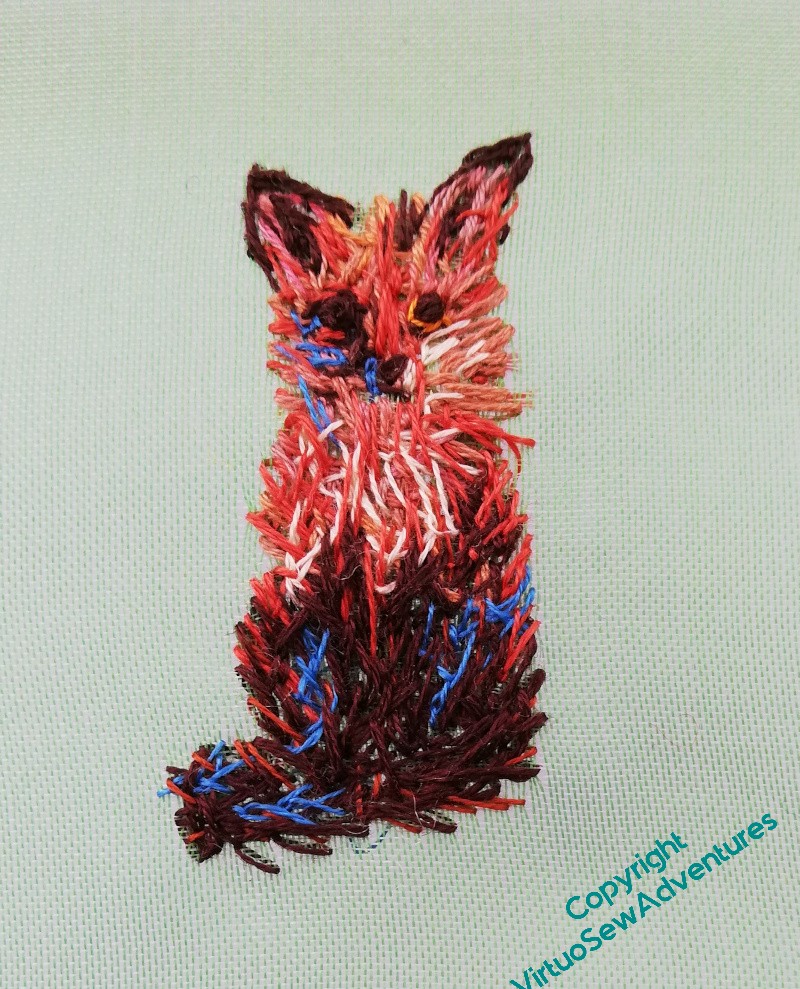
Mus’ Renard, Mus’ Renard…
This getting started on the animal vignettes seems to be working, for the moment.
I found a lovely picture of a fox staring straight out of the picture, so I’ve gathered russets and browns for this one. He’s awkwardly sized – maybe too big, when I finally get to the assembly of the panel – and I kept changing from one to two strands of stranded cotton and not being happy with either.
The half stage shows – rather blurrily, unfortunately – that I’ve used blue for the white-in-shadow. It’s amazing how often white does, genuinely, look blue or purple, but in any case, it helps to “lift” the general effect. When you’re mixing colours in painting, you can get lovely blacks and greys which have shades of other colours in them, and aren’t as deadening as straight lamp black would be. In embroidery, as I’ve said before, flat black has a tendency to unbalance a design, and in truth a lot of the greys aren’t much better. You might recall I turned Akhenaten’s black wig blue...!
Well, the gauze really does vanish under light, doesn’t it!
Some of the stitches had to be woven into to shorten the length of the colour on display, and I’m not as happy with Mus’ Renard as I was with the Brockis. But he looks much better from the distance that he’ll be viewed from than he does in analytical close up, and I have to regard at least some of these as studies for the final piece, rather than necessarily parts of that finished piece.
We’ll just have to wait and see…