
Experiments in Woolwork
Kays Practical Embroiderer
EBay is a very dangerous place…
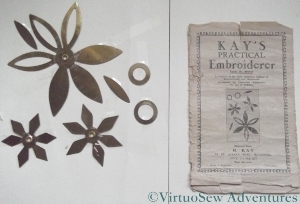
I bought several more copies of The Needlewoman magazine on eBay when I first discovered it (eBay, that is!), and some of those magazines mentioned “a new style of embroidery” using metal templates. It was called Kay’s Practical Embroiderer. Some time later, a set of the templates came up for sale. Furthermore, I won the auction, so I can now experiment!
Getting Started with Kay's Practical Embroiderer
The templates are mentioned in passing in the book Stitching For Victory (mentioned in my post about the teacloth that took three generations to complete), as a quick and easy method to create stylish embellishments using what was most readily available – darning wool.
Of course, darning wool is almost impossible to find nowadays, but I have plenty of Paterna Persian yarn, so I am using that for this first experiment. It’s much fluffier and more springy than darning wool, so it won’t be exactly like the original, but I’m hoping it will give me some more ideas. It’s certainly making a huge change from the fine work I’ve been doing on the Spot Sampler!
Snipping Away From the Template
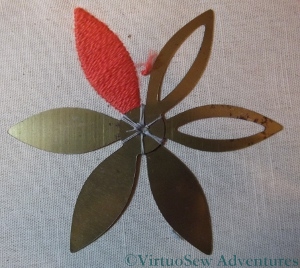
So here is the beginning of my experiment. The idea is that there are several layers of surface satin stitch worked over the metal template. I have to say that I would tend to quarrel with the idea of this being a quick technique. As I made progress and added each of the layers on to the petals, it became more and more difficult to to make the stitches. In fact, I made copious use of a needlgrabber (which did help, very much indeed), and frequently broke the thread. I wonder whether that might have been partly because darning wool would have been stronger and more tightly spun than the Persian yarn, and also, perhaps, because the darning wool would have been finer. The instructions say to use two strands of wool in each layer, and I’ve done so. I’m still wondering whether that was right, although I am rather afraid that if I were to use a single strand it might look a bit half-hearted.
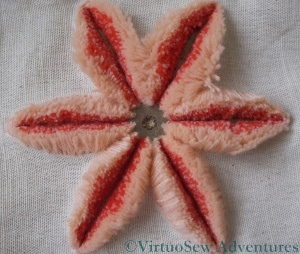
Once the stitching is complete, you snip down the centreline of the shape (not easy, even with my very special sharp embroidery scissors), and end up with a raised, furry shape. Finish it off with a few lines of ordinary stitching, and you have a very textured, striking piece of work. The leaflet has a selection of suggested designs and ideas, and it will be interesting to see whether I can manage to devise ways to use the ideas in new ways.
Fascinating! I’ve heard of this technique but never seen it, so thank you. I would tend to agree with you in that darning wool is probably stronger, but you seem to have done a fine job without it. Thanks for a great post.
Aha!!! So that’s what they’re for! I have one large and two small ones (from one of my grandmothers) and I’ve wondered for years what they were for and how to use them. Mystery solved! Thank you very much. Incidentally, I bet you could find a supply of vintage darning wool on ebay without much trouble too…
Do you think it might get easier with practise?
I have some of those metal things…I wondered what they were for!! I got them in a bag of random stuff that somebody gave me. It looks really effective, well done!!
HI Rachel! I wish I had your email address so we could continue some of the conversations you start on my blog…I have to wait to make bobbin lace because there is no other time to take on any NEW art forms…My disposable time is already full…I’ll have a bit more once he is gone…God willing…
And….I thoroughly enjoyed your post today about your experiment with the metal templates! The finished flower looks very chenille like…
Metal templates? Love the finished flower with all those layers, so it must work…
Thanks very much for all your fabulous (and very helpful) comments on my alliums and also thanks for the tips on how to get the best out of the flower templates. Sounds like a needle grabber would be a good thing to invest in!
The templates look like new – I’ve never seen them before. The effect is lovely. Reminded me of a lily.
I’ve heard of this technique from my teacher when I was learning machine embroidery,but couldn’t understand then .Thank you for showing the template. Lovely flower,looks like a punch needle flower .
Thanks for this post, I’m studying embroidery and very interested in Kay’s Practical Embroiderer, I wondered if you did any more with it and if you have an image you could send me of your finished flower without the template still in it?
Thanks!
So pleased to read your post. My aunt has just shown me a set of these templates she has and used to use a lot years ago on embroidered charback covers etc… My first attempt at using them was this week but impressed at the result you have shown above using 2 colours. Thanks
Spotted a set of these, plus instruction booklet, in an “antique” shop this afternoon. As a madly enthusiastic crafter, I just HAD to buy them (£3 the lot!). I’ve never seen or heard of them before, but your post has helped. Now watch this space . . .