
Tag: applique
Embellishing The Circles Skirt – Part Three

Spanish Knotted Feather Stitch
Naturally some of the threads I chose to use were from my extensive stash of variegated and over-dyed yarns. The Spanish knotted feather stitch running around the edge here is stitched using one of Stef Francis’s pearl cotton type yarns. This one has very little sheen, unlike the more standard pearl cottons, but the colour change brings up the texture of the stitch beautifully. I think this is the first time I’ve ever used that stitch, and I really enjoyed it.
Spiral Of Ladder Chain
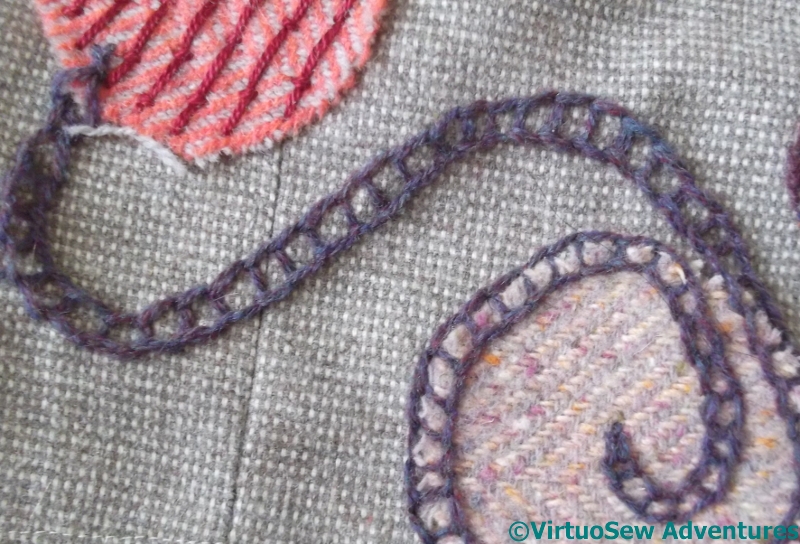
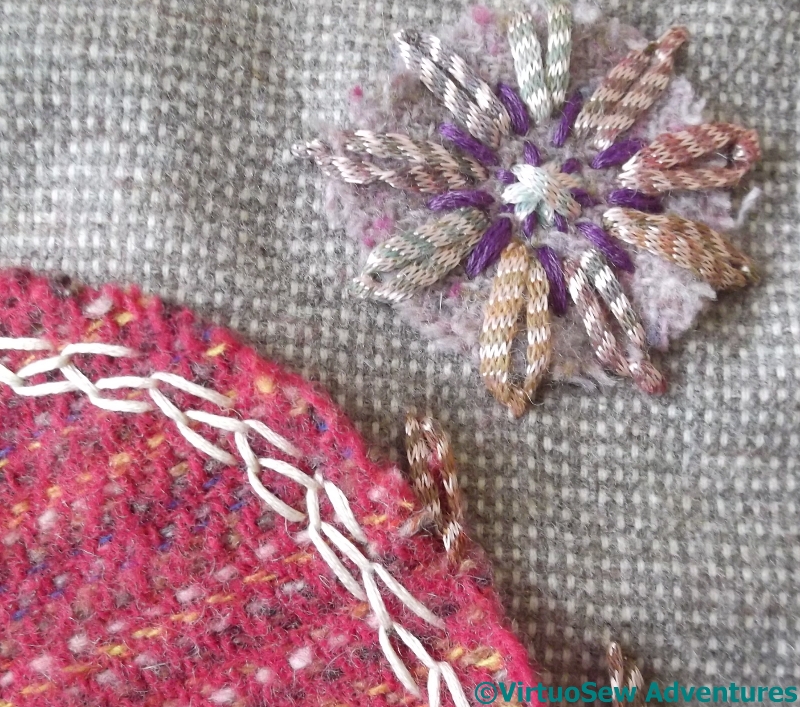
I realised that I had fallen somewhat into the trap of stitching around the edges of the circles, and wanted to create some sort of variation, so when it came to the pinky circle, I added a layer of widely-spaced burden stitch to alter the colour and effect a little. Then I used ladder chain stitch to join that circle to another.
I continued the Ladder Chain across the skirt fabric and around the rim of another circle, spiralling around it and then into the centre.
Glove Stitch And Daisies
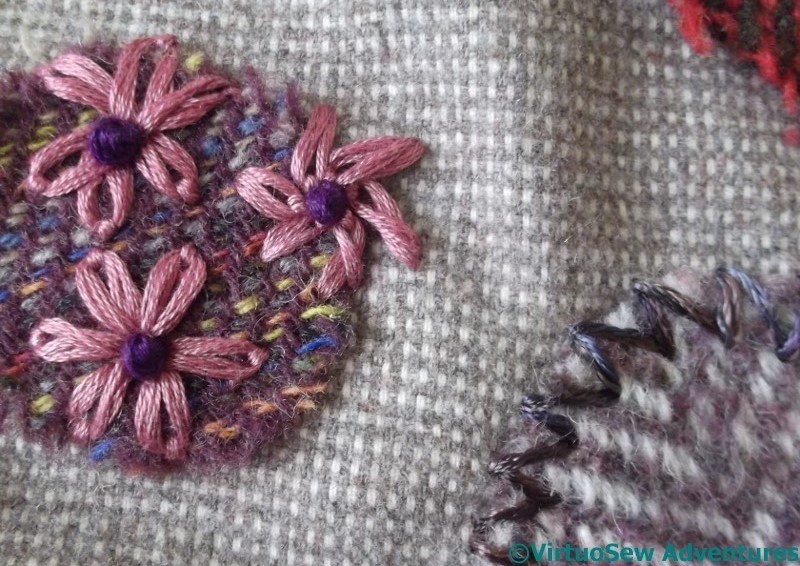
More daisies, this time on one of the smallest circles. I may add to the grouping in due course, but for now, there are just the three pinkish ones with dark centres, one of them falling off the edge of the circle.
The shiny rayon in stormy colours around the edge of the other circle is glove stitch. It was surprisingly hard to bend the stitch around the circle. I expected it would be easier, since with a name like “Glove Stitch” you would expect the stitch to be intended to run around fingertips, which are much more tightly curved than this circle!
Embellishing the Circles Skirt – Part Two
There are a lot of circles to embroider, and since even though I’ve done a lot, I’m not sure I’ve finished, it will be some time before I show you the skirt complete. In the meantime, though, I’ll continue to describe some of the circles and the embroidered embellishment as it has developed.
Three More Circles
The light chain stitch around the edge of the darkest tweed circle looks a little stark, and I may have to do something else to break it up a little. Edith John’s various suggestions may help there!
The stranded cotton I used for the blocks of straight stitch on the pinkish tweed is actually too close in weight to the threads in the tweed, and at some angles in relation to the weave, it sinks in a little too much. I like the effect of the sheen of the cotton against the matte wool, but another time I might choose to separate and recombine the strands.
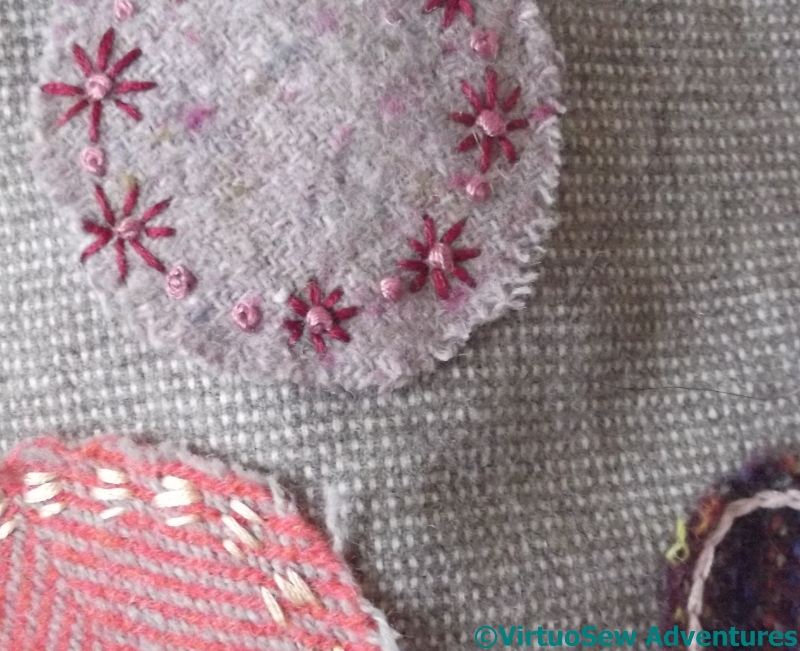
The lilac tweed shows what happens when you improvise. I started with a ring of French knots about half a centimetre in from the edge, decided it wasn’t enough, and turned alternate French knots into flowers with a ring of straight stitches. It turned out that I was one French knot short of a complete ring!
Cretan and Interlaced Running Stitch
The small, dark tweed circles are predominantly at the back of the skirt, on the sections that flare out slightly. By and large, I’ve not done anything too dramatic in embellishing them, either. I want the patterning to reach all around the skirt, but it doesn’t have to be equally heavy or equally detailed at every point.
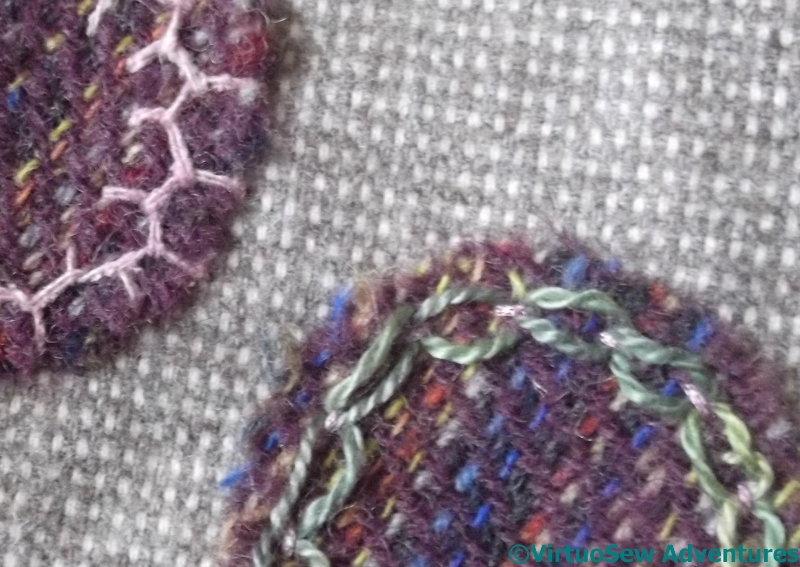
The cretan stitch is worked in a fine but quite rough silk thread. I liked the combination before I stitched it, but the silk thread wasn’t easy to work through the tweed fabrics, so I was very glad it was only a small circle!
The second circle is ringed with double interlaced running stitch using a medium weight pearl cotton. The pearl cotton sits up above the tweed, and the shine contrasts nicely with the matte silk thread on the other circle.
Embellishing the Circles Skirt – Part One
I have two books by Edith John, “Creative Stitches” and “New Stitches for Needlecraft”, and in the latter, she in turn quotes from another book “Needlework through the Ages” by Mary Symonds and Louisa Preece, who say
“It should be remembered that it is not the stitch itself, but the manner of its use which constitutes the art of embroidery”.
I’m going to have to think about that. I think – I would like to think – that in my embroidery the “manner of use” of a stitch is an important element of my approach, but I want to think a little bit more about the How and the Why of some of my stitch choices. It might involve a little more practice stitching, but since it’s the process of stitching that appeals to me as much as the finished result, that probably won’t be a problem!
Much of Edith John’s introductory text is concerned with encouraging experimentation – not something I need much encouragement in! – but one thing she does emphasize is the delight that can be gained purely from stitchery. The whole idea of this skirt is that it should look as though I had fun with it. This is probably not a project in which the answer to Why is likely to be anything other than Because.
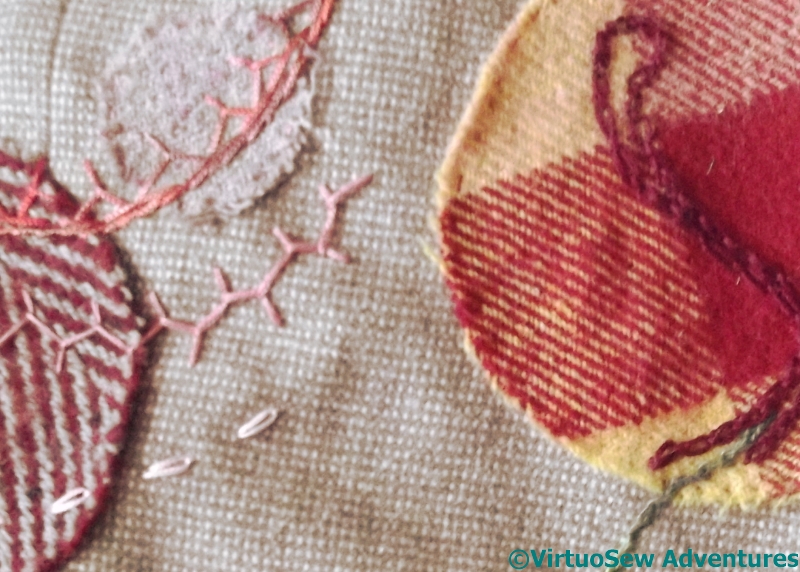
Ghost Circles
Some of the circles will be embroidered within their edges, some will have embroidered elements that extend beyond there edges, and some are ghost circles, linking several of the tweed circles together. In the top left corner of this first picture, you can see part of a series of concentric ghost circles, using solitary chain stitches, cretan stitch, stem stitch and half-chevron stitch.
The large checked circle is joined to a nearby one using some cable chain and twisted chain stitches, set out to suggest that the stitching is itself a stitch, running underneath the main fabric and onto the tweed.
Feather And Lazy Daisy
One of the smaller circles acquired a Lazy Daisy in chainette ribbon, with a couple of falling petals on the main fabric. I’ve emphasized the centre – a circular boss using the same chainette in star stitch – using a darker stranded cotton.
I’ve learnt over the past few years that sometimes a design is best created using layers of detail. The darker stranded cotton was added after I’d done a few other circles. I came back to it, and wanted to point up the petals a little. Since the tones are all very similar, the darker thread helps. I may yet come back and add some more.
The large crimson circle is very simple at present, with a single row of closed feather stitch around the edge. That may yet change…
The Circles Skirt

Layout For The Skirt
You may recall that I bought some rather gorgeous Donegal tweed at the Harrogate Knitting And Stitching Show, with the intention of embellishing a skirt. I decided that this time I would use simple circles, and cut some paper patterns in circles of different sizes, to decide on placement. Here is the result. Most of the drama is at the front, where the skirt is a simple A-line shape. The back of the skirt flares out a little in the centre, so the patterning tails out there, but the pattern is asymmetrical, which is why I’ve chosen to show you a sort of all-round view.

Skirt Partly Arranged
It seemed to me that the easiest way to decide what went where was to sneak up on it. I stared at the layout for a while, picked a fabric for a particular placement, cut it out, pinned it on in place of the paper circle, and then stared again. Repeat…

Skirt Layout completed
I’ve needlefelted the circles to the fabric – that seemed the best way to attach them more or less permanently so I won’t be stabbed with pins when I’m adding the embroidery. Now there will be a lot more cycles of staring at it and doing something, staring at it and doing some more.
And since the circles are firmly attached, I can in fact wear it now if I decide to!
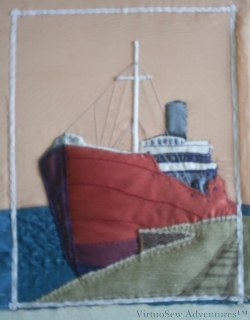
My Very First Appliqué

First Surface Embroidery
Rummaging in the archives is a very salutary experience. This indescribable piece of appliqué is the first embroidery I did without guiding holes in the fabric (like the little mat I described in an earlier post). I remember starting it when I was visiting a friend – it was a rainy day, and I think her mother was at her wits’ end with us. She sat us down with fabric, needle and thread, and (I suspect) prayed for peace and quiet..
Even though the stitches are dog-legged and the colour choices leave a lot to be desired, the piece still reveals things about Rachel-the-Stitcher that I recognise today. One side of the piece for the house is sewn down with blanket stitch, two with running stitch, and one with zigzag back stitch. You can take that two ways – either as evidence of my butterfly mind, never sticking to a single method, or as evidence that even then I was thinking about the implications of a stitch. Blanket stitch is a good “grounding” stitch, because of the combination of uprights and horizontals, and the zigzags are rather reminiscent of the wavy edges of some roof tiles.
The tweeds chosen for the windows and the pattern-woven braid for the door also show early signs of thinking about what I’m doing – the square patterns of the tweed recalling leaded windows and the pattern-woven braid creating a different texture for the entrance.
The braid edging glued to the frame is also symptomatic of a tendency to over-complicate, which I’ve not eradicated to this day. I think I keep it under control, but that is all I’ve managed to do…
Incidentally, like all those little girls of long ago, working on samplers with their governesses, unaware that students of social history and students of needlework would be poring over their work in the future, I noted on the back when I finished the piece – 30th September 1975. Unlike most of those little girls, I also noted – in so many words – that “It was fun.”
..And the Sailor home from the Sea.
Framed
Once the Camberwell was finished, I handed the piece, still stretched on the bars I used to work it, over to my client (Action Ma’am) and her picture framer. I’m very pleased with what they came up with, so I’ve asked her to write up a little bit about framing the piece and where the Camberwell is living now.
At quite an early stage, I had decided that Camberwell was going to hang in the bathroom. An odd choice, maybe, but her colours went beautifully with the accent colours I had already chosen and the theme of nauticalia.
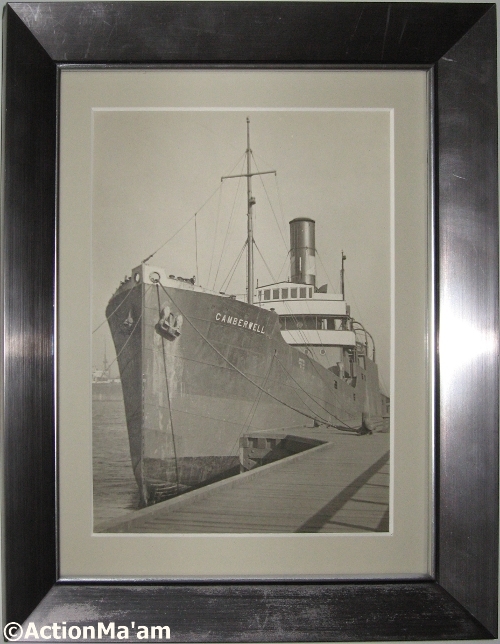
Original Photo
My local picture framer enthusiastically accepted the challenge of creating a suitable box-frame. We chose a rounded moulding, to echo the curve of the funnel, and charcoal for both mount and moulding to match the colour of the ribbon used for the funnel. Since it was to hang by an east-facing window, we selected a grade of conservation glass which excludes 98% of UV light. I took the opportunity to have the inspirational photo properly mounted in the frame I had bought for it from a high-street newsagent a year or so previously.
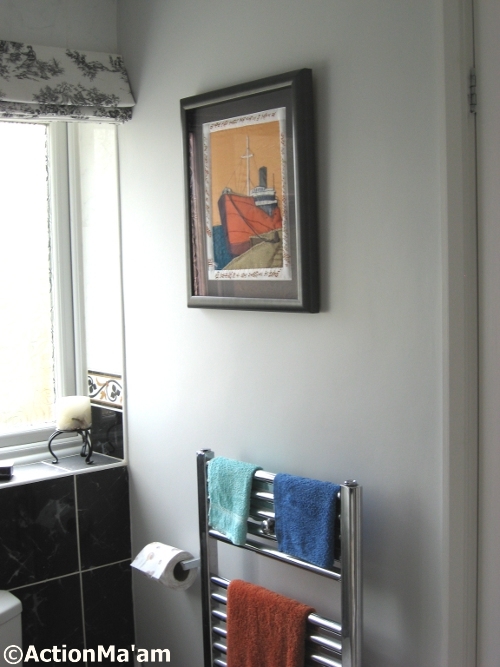
Camberwell Where She Belongs
The pictures now hang either side of the bathroom door. Rachel and I had a little ceremony with sparkling white wine to hang the finished panel. I can bore for England on how wonderful it is, and admire it in comfort whilst lounging in the bath.
The title of this post is taken from RL Stevenson’s “Requiem” – text here. Or alternatively from AE Housman’s “Home Is The Sailor” (here). We both thought it was the right title, but neither of us could remember where we’d heard it, and when I Googled for it, I found myself with a positive embarrassment of riches!
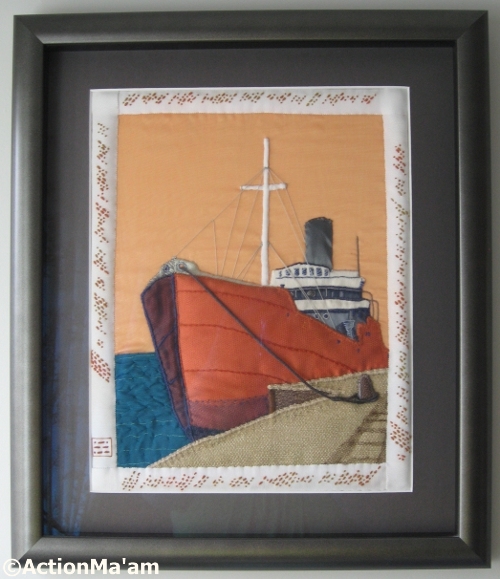
The Camberwell Panel – Fourteen
Final view
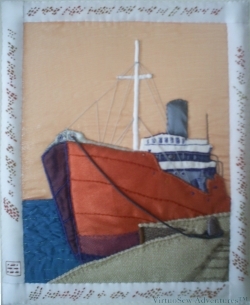
So at last, Finished!
By the time I had finished stitching it all I could nearly read Morse Code, even when it was running diagonally. The dedication runs from the bottom left anticlockwise around the picture – so the top border is upside down!
When I’d finished the whole dedication, and got to the left hand border I felt the end looked a little vague, so then I worked the little cartouche at the end of the left-hand border which contains my initials in Morse code. Somehow that provided me with the “full stop” the piece needed. The dedication itself already included the date, so I only had to sign it.
My cousin has had it beautifully mounted and framed in a box frame, and I gloat over it every time I visit her. Fortunately she loves it too, and she is going to write a guest post about framing and hanging the Camberwell in her house.
I also provided a booklet for her which documented all of the process of planning, designing, and working the piece, so there is a complete “provenance” attached to the piece as well.
The Camberwell Panel – Thirteen

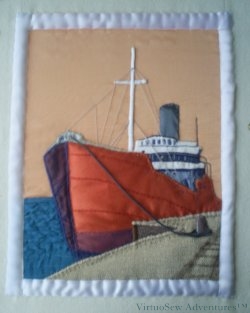
"S.S. Camberwell" in Morse code
I spent a lot of time in practising stitched Morse Code, in order to arrive at the best way of producing an ornamental but legible effect.
Eventually I settled on this as the best option. The Morse letters are laid out diagonally, using Colonial Knots and Bullion Knots (respectively the dots and the dashes). I discovered that I could mark up the ribbon with the Morse code one word at a time and then stitch over it, making the work slightly less unnerving than if I had had to work it without markings.
Satin Edges
My husband wrote a little programme that took the text, converted it to Morse code and then rendered it as a graphic that I could then print out at the appropriate size. That made it possible to mark up the ribbon before I stitched it. I pricked holes – dots and dashes – in the printout, laid it on the ribbon, and marked the ribbon with a quilter’s pencil. A variation of the prick-and-pounce method, I suppose you could say!
However, before applying the stitched Morse code to the piece itself, I created a padded border using fine wadding and satin ribbon. I wanted to ensure that the edges of the panel did not show through the border, and as it turned out the petersham ribbon was rather fine and showed everything underneath it.
The end is in sight! And even at this point, I have to confess that I was very pleased with the way this was turning out. I hadn’t expected that it would turn out so well with quite so little upset!
The Camberwell Panel – Twelve
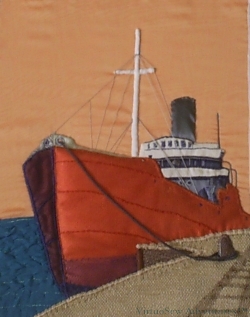
Moored At Last
There were a few final details to be added to the panel while we discussed the wording of the border, and tracked down suitable materials for working it. These are things like the radio mast and framework beside the superstructure which were worked in a mid-toned, matte grey cotton. The radio mast is in broad chain stitch, which produces a smooth and heavy line, while the framework is in whipped stem stitch which produces a more rounded effect.
Then even more importantly, there was the mooring line. In reality there would be one fore and aft and possibly another amidships, but there is such a thing as too much accuracy!
I tried several ideas, such as crochetted single chain, or even a heavy, single thread, but I finally made the mooring line with mid grey pearl cotton, using a lucet. This is an ancient technique which produces a strong, square braid. It was looped twice around the bollard (which is layered with gauze and padded), and then the free end was whipped to the standing end to simulate the looped cable that would be the first thrown to the quay on mooring. It is only attached at the ends (that is, where it is lead through the scuttle at the bows, and by the bollard about which it is wrapped). That means that it hangs in a fairly natural curve, although it is also both heavy and stiff enough that it has held that curve through the process of framing and transport of the finished article.
Can you tell that my grandfather, too, was a Master Mariner?
The Camberwell Panel – Eleven
Rigging The Camberwell
At last I could get started on the rigging. I was hoping to get it right as far as it went, although I don’t imagine it is as complex as the real thing. The thread is a medium weight matte cotton thread in a mid toned grey. Essentially each piece of rigging is a single long straight stitch. The connections across the spars are made using a simple figure of eight knot, which interlaces across the spar. This creates the suggestion of a connection, without trying to give great detail.
I used some brown net to represent the shadows on the quayside (railings, I imagine, although the photo doesn’t give that much detail), and stitched another set of catching stitches just inside the quayside edge.
The cotton tape is simply there to give me an approximate idea of where the border is going to go, and thus the true extent of the design.
While I was doing this, I was also thinking – and discussing with my Client – the form that the border would take. We finally settled on a “Dedication” in Morse Code embroidered on to petersham ribbon.
That’s a lot of dots (French Knots) and dashes (Bullion Knots)!