
Category: Tudor and Stuart Gold Master Class
Petite Pincushion Finished
Petite Pincushion - Embroidery Finished
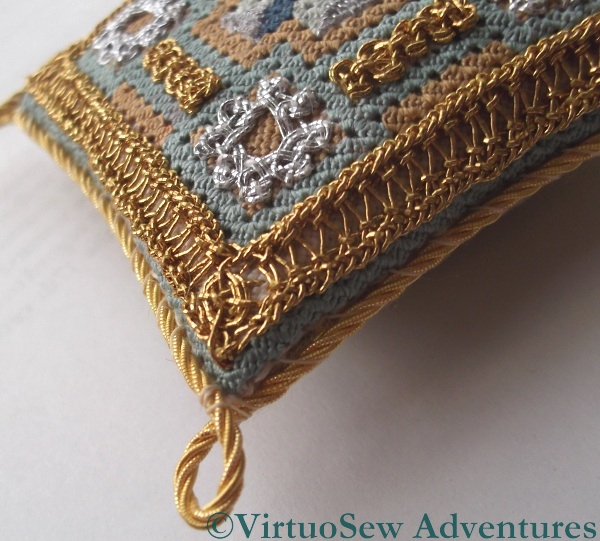
I said the Petite Pincushion had accelerated – it’s finished!
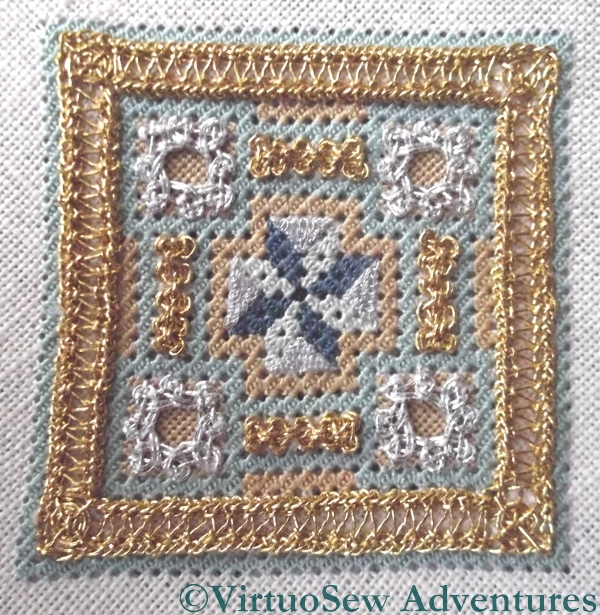
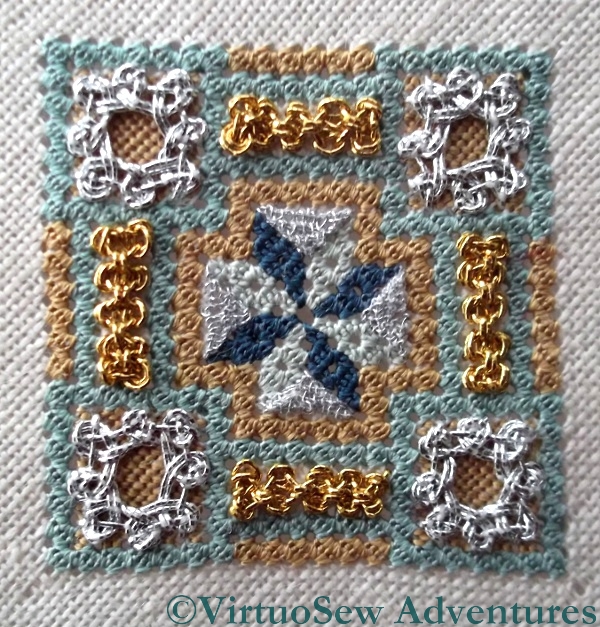
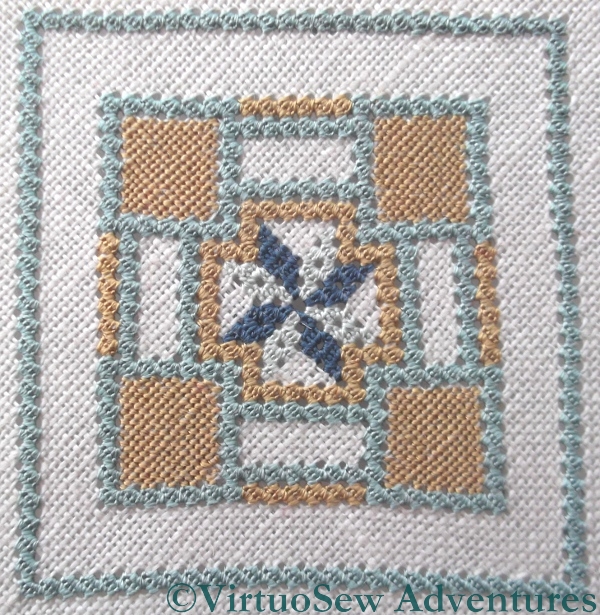
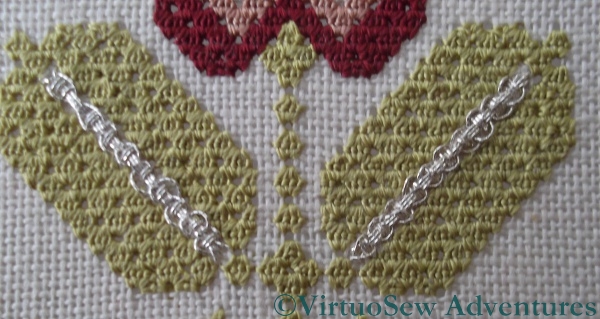
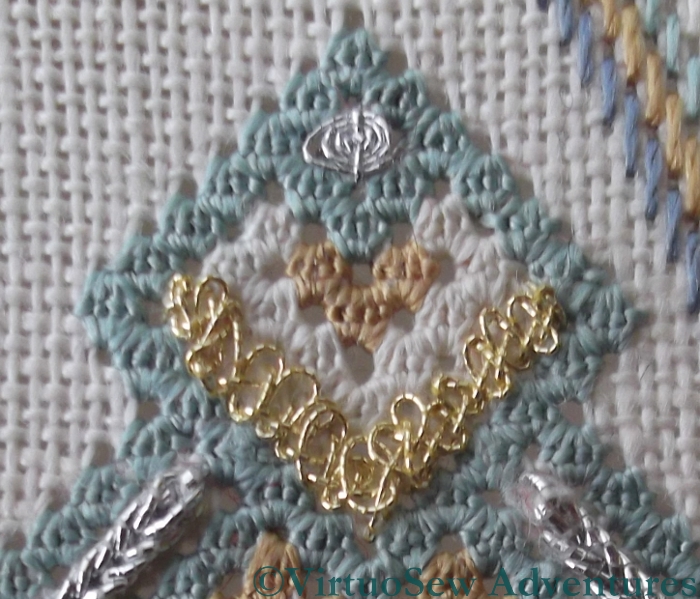
First here is a view of the finished embroidery, still stretched on the frame. You can see the zig zags of the the Hem Stitch on Ladder Stitch, the spirals of the Spider’s Webs, the intricate patterns of the Eight Sided Interlacing and the Figure Eight Interlacing, and the regular background texture of the Queen Stitches. Looks good, doesn’t it!
Making up the pincushion was relatively easy, especially after the Tulip Slip Pincushion and the Tudor Pincushion. The kit included a lovely piece of jacquard woven silk for the back, and Fine Grecian Twist to trim the pincushion. I backed the embroidered section with calico to keep the stuffing in – I couldn’t find silk in the right sort of colour (stash not big enough!) and the calico is unobtrusive. All the sewing was done by hand – I find it easier to do that than to get the sewing machine out!
Petite Pincushion Finished
Petite Pincushion Again
Goldwork on the Petite Pincushion – Stage Two
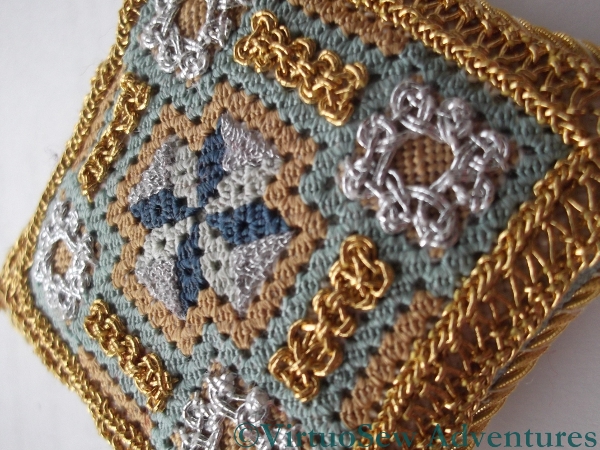
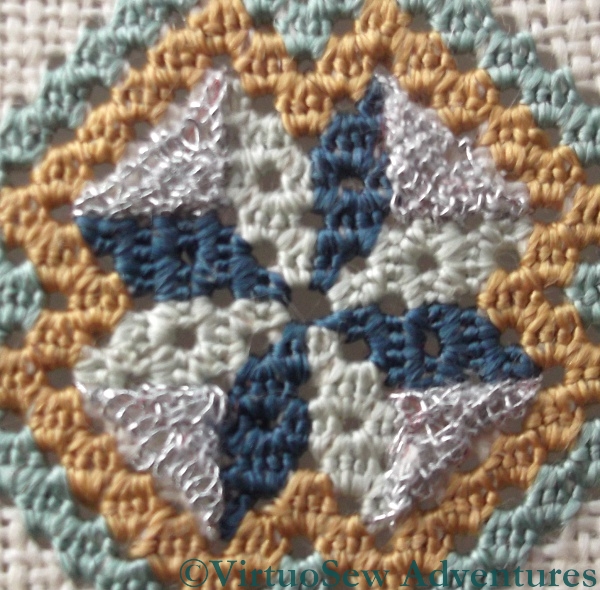
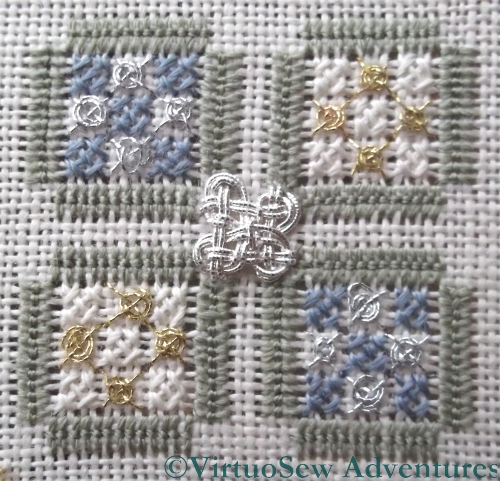
Petite Pincushion Eight Sided Interlacing
Somehow, progress on the Petite Pincushion accelerated hugely once the silkwork was finished. Each separate metal element (except the border!) proved to be fairly quick to do, and as I’ve already said, I enjoyed them immensely.
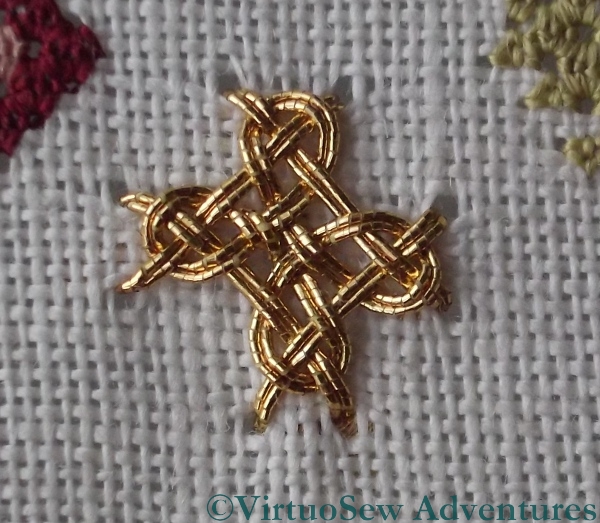
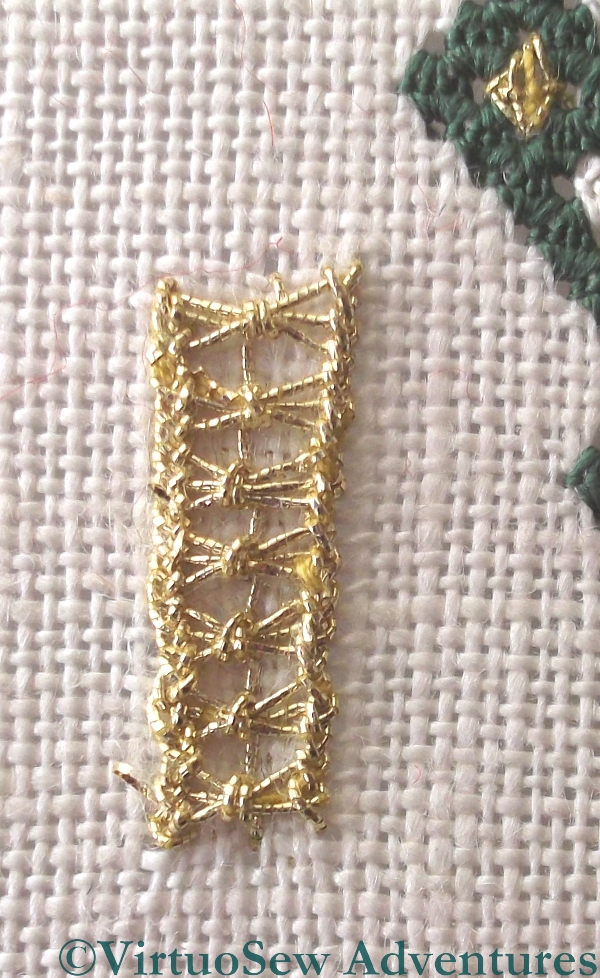
The next elements of the Petite Pincushion were the four spots of Eight Sided Interlacing in silver – so, yet another different metal thread to sample. Putting in the foundation stitches was made much easier because the foundation of tent stitches was square, and neatly segmented along each side by the Queen Stitches. Working these fairly zipped along, and I really enjoyed them.
Petite Pincushion - CloseUp
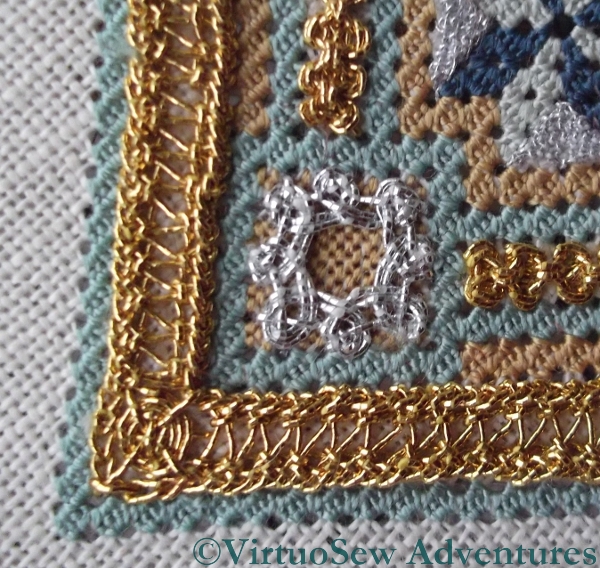
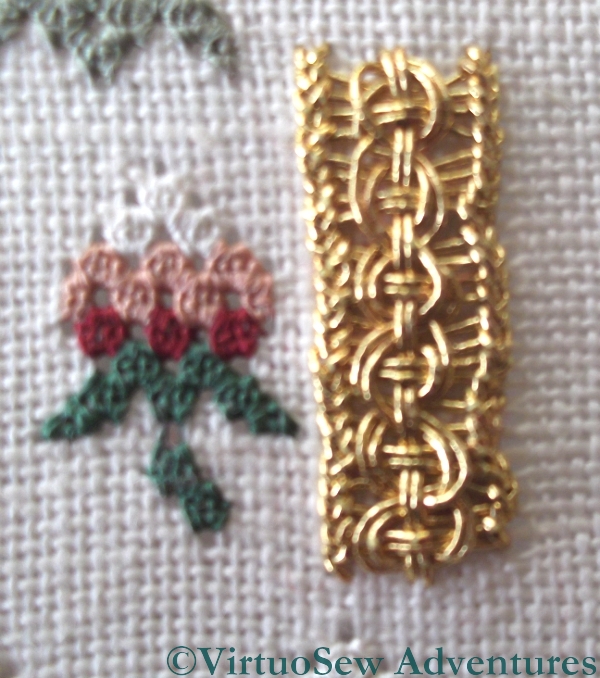
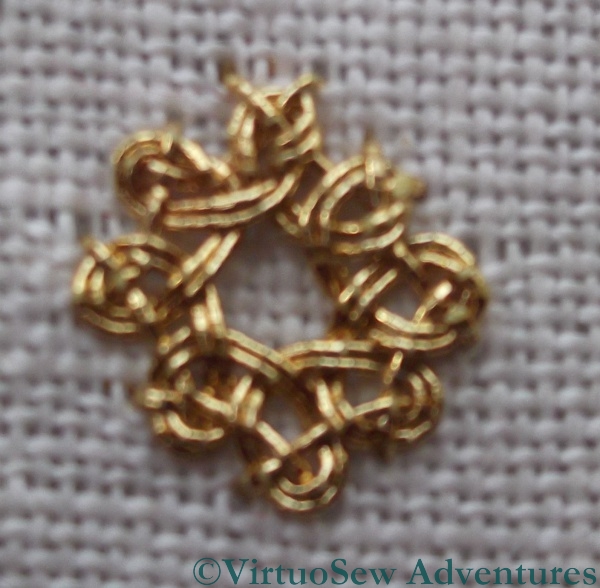
The final section was a border of hemstitch on Ladder Stitch, with Eight legged Spider’s Web stitch in each corner.
The Eight Legged Spiders Web stitches were easy and fun, filling in the otherwise blank corners beautifully. They’re more stable than the Four Legged variation, so if I were to be mad enough to use this as a pincushion when it’s finished, the spider’s webs would continue to look good under the strain!
I’ve been struggling with ladder stitch throughout the course – if you recall, when I first started working it on the Spot Sampler, I had serious problems with tension and with the thread breaking up. Practice makes perfect, I’m glad to say. By the time I’d worked Ladder Stitch all around the edge of the Petite Pincushion, it was going swimmingly – much to my relief.
The Hemstitches on either side of the Ladder Stitches increase the thickness of the edges, and create a zig zag effect with the horizontals, subtly altering the overall effect.
Goldwork on the Petite Pincushion – Stage One
Petite Pincushion Detached Buttonhole
The diagram in the instructions listed the goldwork stitches from the centre outwards, so that is the order in which I decided to work them.
The detached buttonhole stitch at the centre was worked in a very fine silver thread. It was terrifyingly lively and had a will of its own, which made it hard to be sure of what I was doing. Yes, I had the magnifier, but looking at the closeup, the stitches are not especially consistent in size or shape.
I also caught down the detached fabric in the middle of the long side – not a step listed in the instructions, but one which seemed sensible at the time.

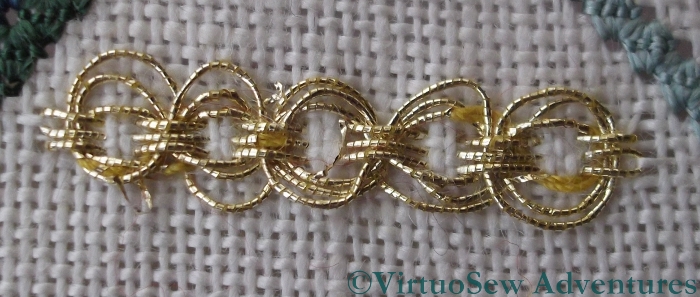
Petite Pincushion Figure Eight Interlacing
The Figure Eight Interlacing stitch filled in the strapwork in the middle of each side of the panel. I really enjoyed working this stitch, and this element of the Petite Pincushion seemed to be finished in no time at all! And believe me, I’m very glad I worked the detached buttonhole stitch first. I shudder to think how that whippy silver thread would have caught around edges of these panels, which stand proud of the surface to a considerable degree!
Finished the silkwork on the Petite Pincushion!
Petite Pincushion Silkwork Finished
Born teacher that she is, Tricia provided two additional projects with the Tudor and Stuart Goldwork Masterclass. After all, practice makes perfect, and practice is much more palatable when it produces something pretty at the end.
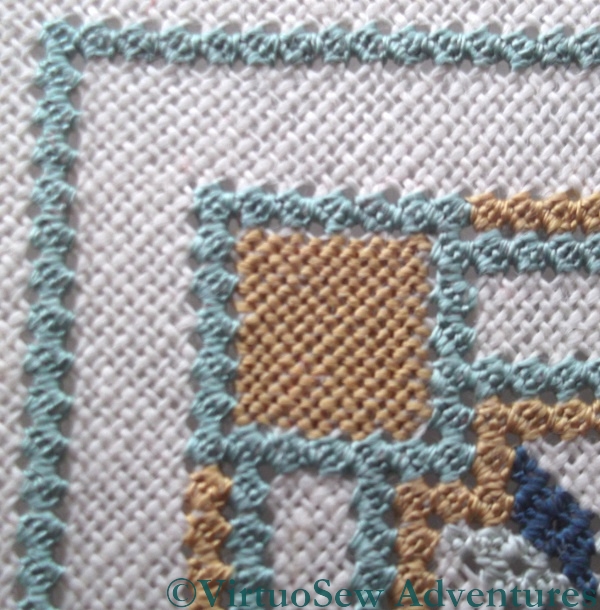
The silkwork of the Petite Pincushion is primarily worked in queen stitches. As you may have gathered, I’m not especially keen on counted work, regarding it as a salutary discipline rather than a pleasant pastime. I’ve been rather pleased that I’ve persisted with it in these cases, which is testament to the enjoyment I’ve been getting from learning the new stitches, and my desire to play with them even more.
Petite Pincushion Quadrant CloseUp
Not that it has been entirely straightforward. The tent stitch corner panels were quite a strain – it’s astonishing how, even with a magnifier, I’ve managed to miss the odd stitch or set it crooked and have to unpick it and try again.
I never thought I would say this, but the queen stitches were easier! They interlock nicely, creating a textured, almost brocade-like surface which will make a good background for all the goldwork stitches that fill in the strapwork.
Further investigations on the Spot Sampler
Guilloche In Different Threads
The central veins of the leaves here are in Guilloche Stitch, and in one case I have have used the “imitation silver” thread and in the other case, one of the other, very fine silver threads. This shows – if we needed it pointed out, at this stage – that all metal threads are not created equal. We tend to think of silver and gold as being unchanging colours, but in fact you’ve only to look at jewellery to realise that there are many colours of gold (or in this case, silver). The threads are slightly different weights, as well, but one is clearly a brighter colour than the other.
Cross Interlacing Stitch
I loved the diagonal cross shaped interlacing stitch. I can’t for the life of me think what I would do with it (something with a Celtic theme, perhaps?), but I loved working it, and like all these interlacing stitches, it looks harder than it is. That’s the right way around. Satin Stitch looks easy, but neat, smooth satin stitch is really only possible to the experienced embroiderer!
Once the foundation is correct, it is obvious where the interlacing threads need to go over and where under, and then hey presto! one fabulous, dazzling, interlaced spot.
Plaited Braid And Circle Interlacing Stitch
You may recall that the plaited braid stitch was one of the reasons I wanted to do the course. My post about tackling it mentioned that I felt I was beginning to get to grips with it, and would be able to pick it up in future if or when I wanted to. So this was my first test of that confidence.
And yes, nailed it! I did have to unpick my first attempt, and I decided that the backstitch was rather hindering my efforts, but I really think that I can count this as a stitch I can take on whenever I want to!
The circle interlacing stitch is another of those wonderful, easier-than-it-looks stitches, and would make a great oversized “sequin” if one wanted to play with scales of stitches and design elements.
More variations of Goldwork on the Spot Sampler
Two Versions Of Heavy Chain Stitch
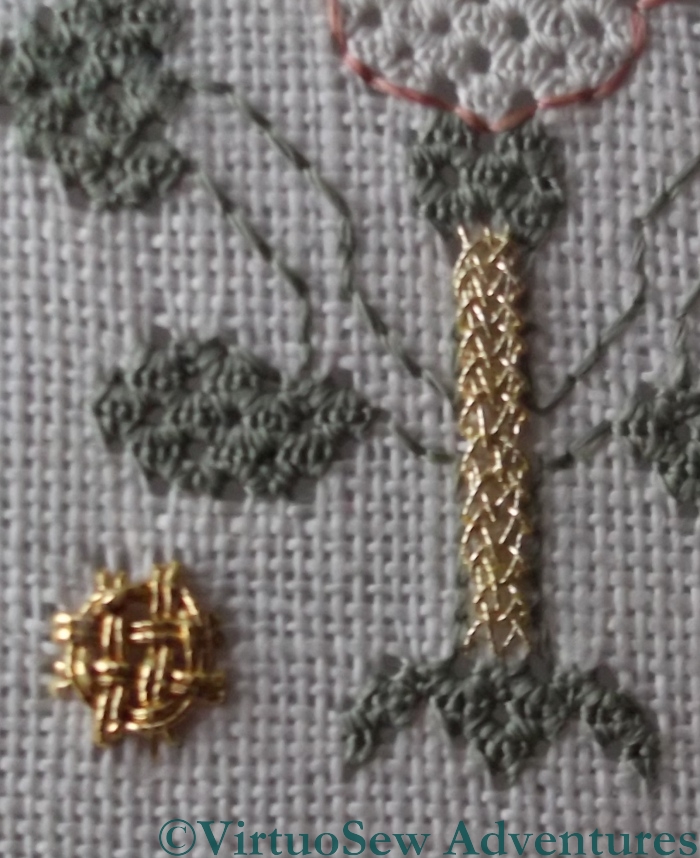
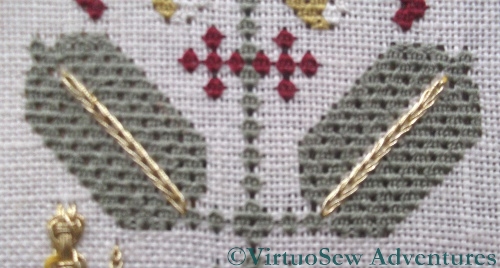
There are two more versions of heavy chain stitch here, again using different threads. This time the threads are so different that I snipped out the larger one, on the right, and reinstated it using the finer thread. This photo also shows the detached buttonhole filling with return, worked in the finest of the gold threads. This was rather a challenge as well. I believe it will appear again in the Petite Pincushion, so I will soon get to practise it once more.
Braid Stitch Finishing the Spot
In ordinary pearl cotton, braid stitch is one of my favourites, but in metal thread it is much more of a challenge, especially at a diagonal, and on a fabric which is coarse enough to be much better used in a counted fashion! As you can see in this photo, it creates a lovely rich looped effect – rather like a braid you might use in furniture or to trim a coat, but it doesn’t really bear close inspection, because some of the loops more closely resemble knots!
The tiny four legged spiders web stitch seemed to come together much more easily than the first set I did, so I am clearly getting a better grip on it!
Guilloche Variation
This Guilloche Variation is actually the stitch that most of my stitch dictionaries refer to as “guilloche stitch”, although they generally only have one run of interlacing rather than three. For some reason the thread broke up quite a bit, and I had my customary trouble with the interlacing loops. I wonder whether the relative simplicity of the stitch makes me rush more when I’m doing it?

Figure Eight Interlacing Stitch
Figure Eight Interlacing stitch is great fun. I had a little trouble getting the first set of loops to lie flat as they are supposed to, but after that, the stitch just fell into place. This would be another good one for using to represent intricate gold jewellery or ornamentation on my Dreams of Amarna panels.
More spots on the Spot Sampler
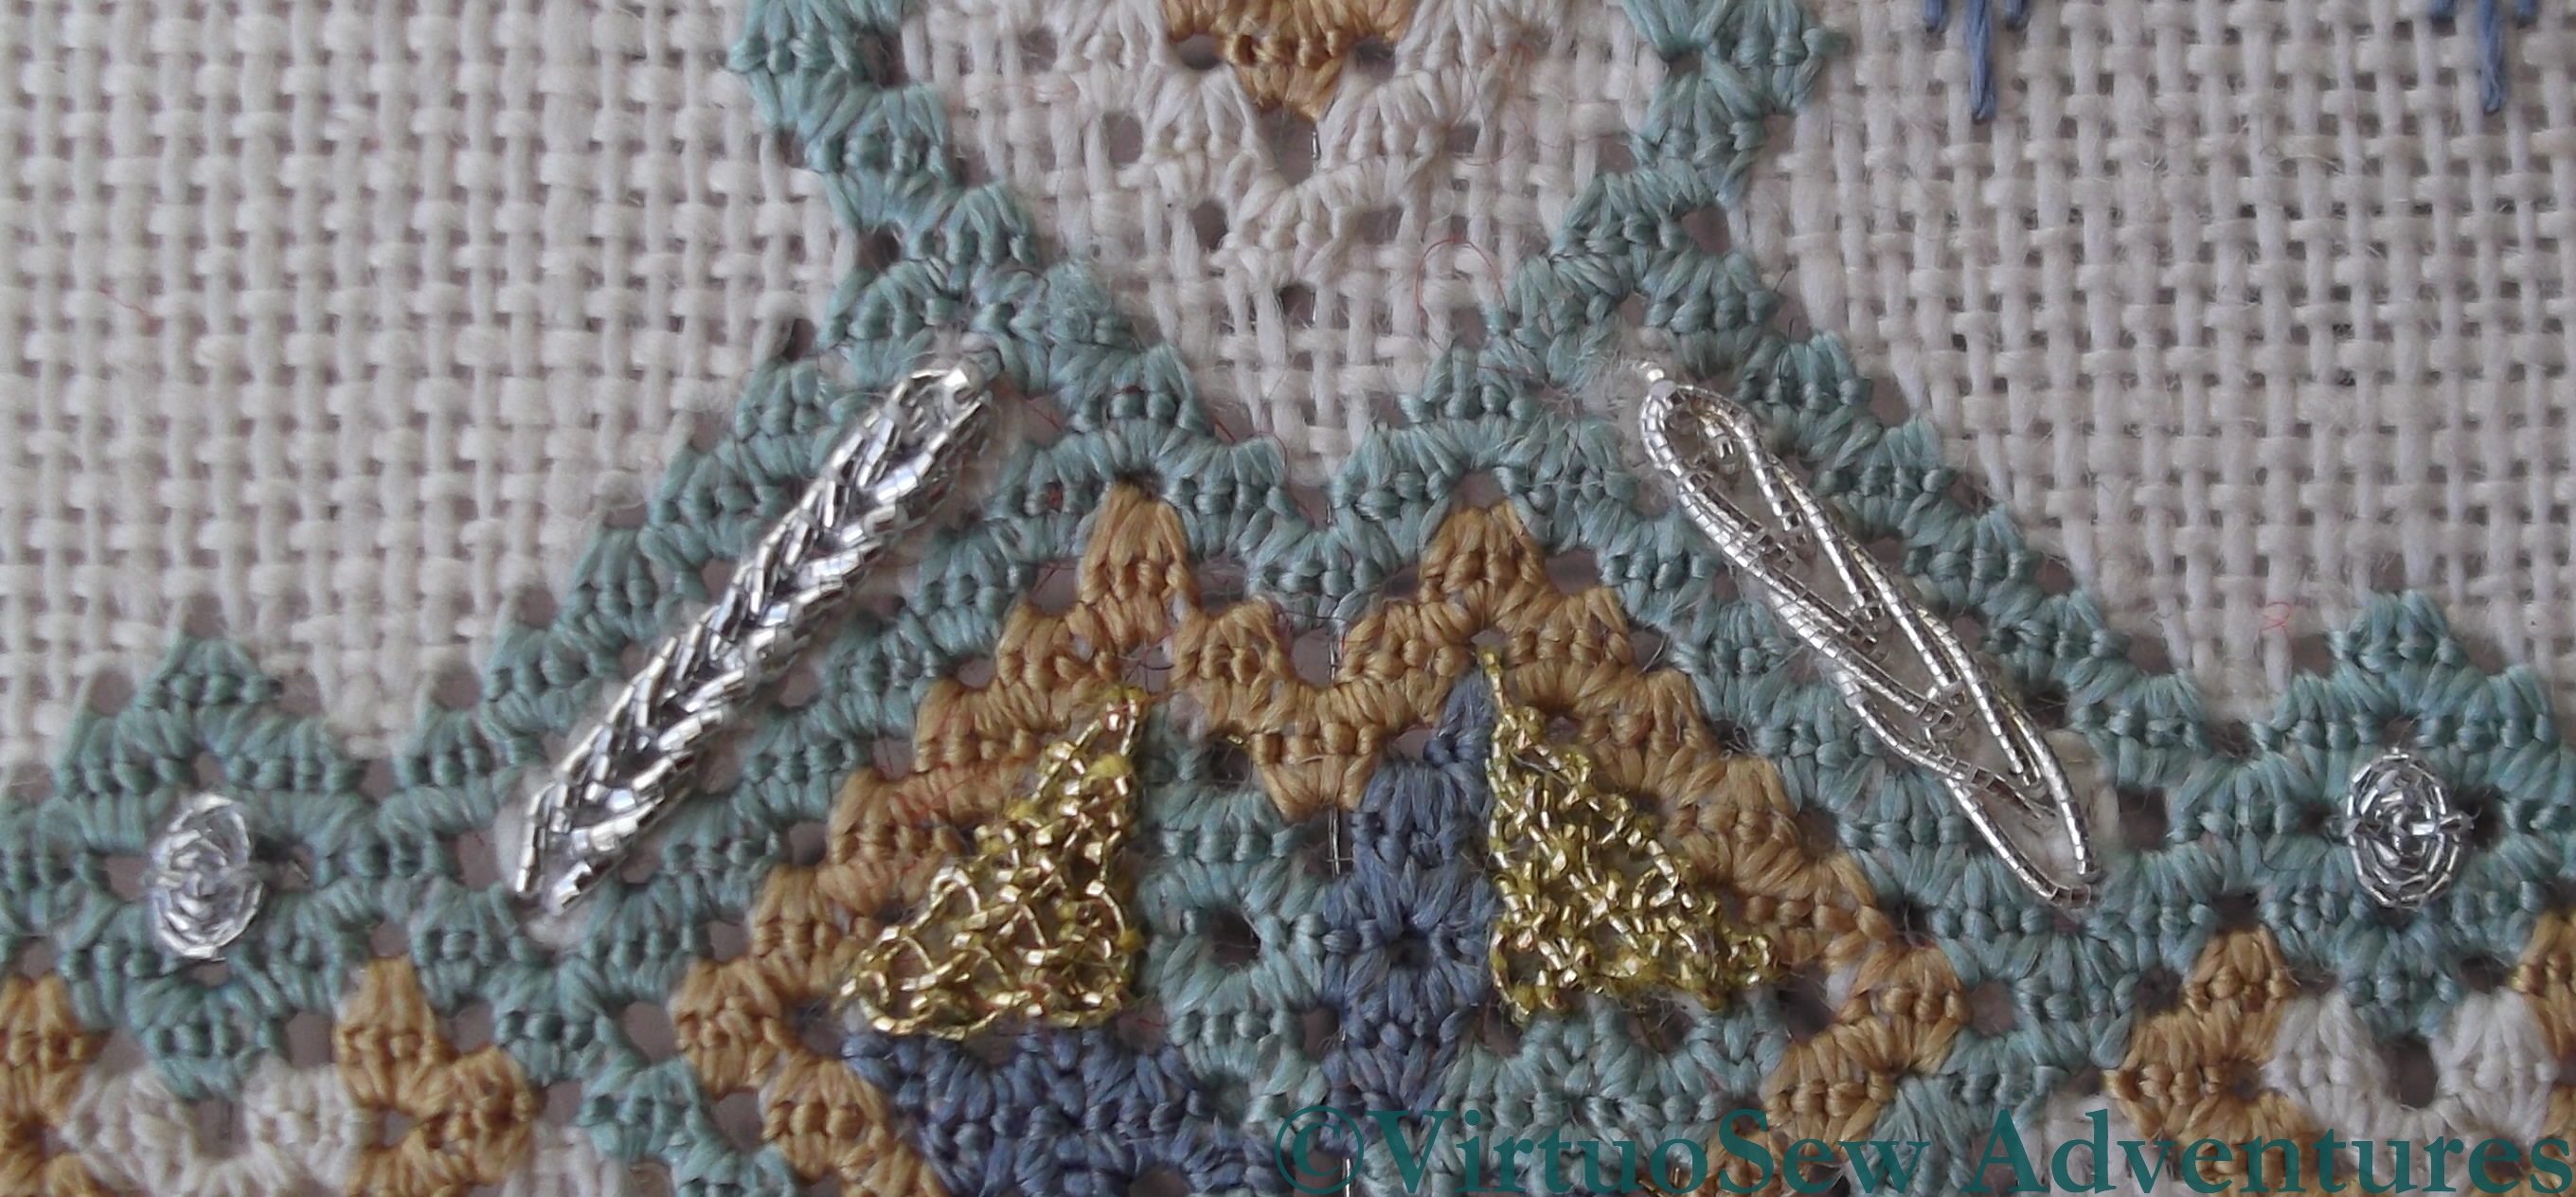
Interlacing And Flat Webs
Even the macro setting on my camera has trouble with some of the fine detail here. The fine gold and silver threads used for the four-legged spider’s web stitches is barely heavier than the silk thread, and was quite a challenge to stitch with. At true size they create the smallest of subtle glimmers, rather than any dramatic effect.
The square interlacing stitch, on the other hand, makes its presence felt in no uncertain terms! It was fun to do, although using the heavy silver thread I did wonder whether the interlacing was going to create rather a congested appearance. I don’t think it does, but if there is one thing I have learnt from this course, it is “Test, Test, Test”. It is all very well being confident of how to work the stitch, but with the huge range of metal threads available and the variants of scale and flexibility, it’s much harder to be confident of the final effect if you don’t test it on the right fabric at the right scale!
Heavy Chain Stitch
The two rows of heavy chain stitch here are worked with different threads. The difference is subtle, and harder to see on the photo than in real life, because even the fact that the row of stitches are at different angles contributes to the effect. I’ve found heavy chain stitch a remarkably difficult stitch to work using metallic threads, and I’m not sure quite why, because I don’t find it at all difficult using cotton or silk!. I am assuming that it is a matter of tension, but since my various efforts haven’t cracked it yet, all I can say is “Needs More Work!”
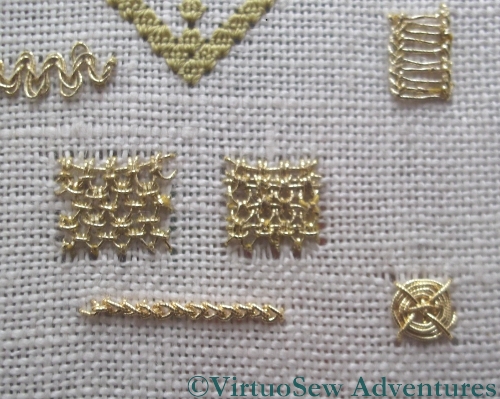
An Array Of Spots
Here you see a whole range of spots, worked with varying degrees of success.
I’ve had plenty more practice with Ladder Stitch since I worked this set, but I still find that one side of the stitch ends up appearing “turned over” compared with the other, which lies flat. Another stitch that needs more work…
I like the dense fabric produced by the two variants on Up-And-Down Buttonhole Filling, although strangely they don’t look as different from one another in the photo as they do in real life.
Eight-legged spider’s web stitch is more stable than the four-legged version – there are more stitches to keep it under control – and it produces a good, flat boss. It would probably be a good choice in places where the square interlacing stitch would draw too much attention to itself!
Still more on the Spot Sampler
Wheatsheaf On Ladder Stitch
We’ve had a sudden spurt of good weather and good light recently, so I’ve been making hay while the sun shone (literally!). I’ve also been making an effort to use all of the different gold threads that Tricia provided in the kit, some of them real metal threads, some of them imitation, some thick and some thin.
Guilloche On Ladder Stitch
The Wheatsheaf on Ladder Stitch and the Guilloche on Ladder Stitch are in different shades of gold and even different types of thread. There is even a Queen Stitch in a very fine gold thread in the top corner of the picture showing the Wheatsheaf on Ladder Stitch. The one I used for the Guilloche variation is the one I used for most of the practice cloth. It’s surprisingly floppy for a metal thread, which helps with some of the stitches, but not all. In this particular case, at least there were no breaks in the metal, unlike in the Wheatsheaf stitch!
Eight Sided Interlacing Stitch
The Eight Sided Interlacing Stitch was an absolute treat to do. It’s important to count the foundation correctly, but from then it was simply a matter of repeating the same set of actions. I’m rather pleased that, by and large, the threads have stayed neatly side-by-side!
Cross Variation Guilloche
The Cross Variation Guilloche Stitch makes a great contrast with Eight Sided Interlacing – not only yet another different thread, this one a little stiffer, and a slightly different shade of gold, but also an upright, angular form, rather than the almost circular appearance of Eight Sided Interlacing.
Tudor and Stuart Masterclass – Month Seventeen
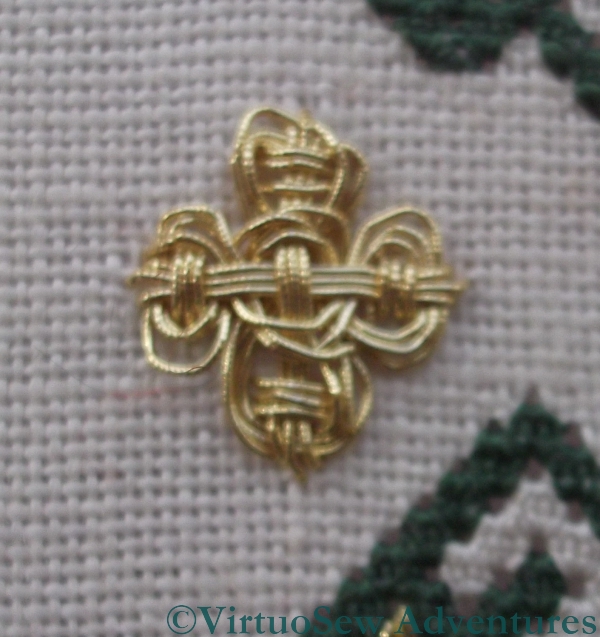
Eight Sided Interlacing And Josephina Knot
Month Seventeen’s stitches were Eight Sided Interlacing Stitch, and the Josephina Knot. I rather enjoyed them, too – they’re both very ornamental indeed!
The Eight Sided Stitch is less scary than you might expect on first sight, although I was slightly surprised to realise that the foundation layer interlaced in the direction contrary to the one I expected.
It will be more exciting at the smaller size on the real sampler, but I feel that I understand the structure, at least, and that is the important point, at this stage.
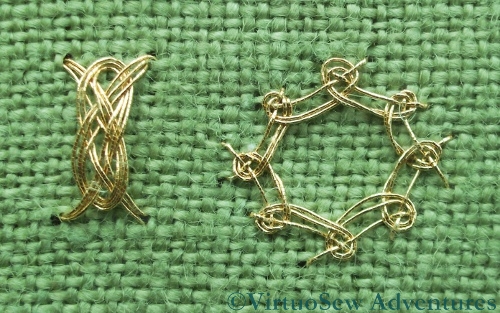
Josephina Knot in Pearl Cotton
However, if you look at the gold Josephina Knot in the top picture, you will see that I didn’t quite get the hang of that one…
This pearl cotton version shows what I was aiming for. It’s a really lovely ornamental spot stitch, with a slightly Celtic feel to it. However, if the interlacing goes wrong at any point during the working, it is very hard to recover – and not always easy to see before you’ve finished, either.
I made extensive use, for these stitches, of a belated birthday present from Elmsley Rose – a set of bone needlework awls/stilettos. I have a steel laying tool, but it’s so sharp that it’s not a good tool for coaxing threads into place. My birthday presents were just perfect – Thank You, Megan!
Tudor and Stuart Goldwork Masterclass – Bonus Instructions
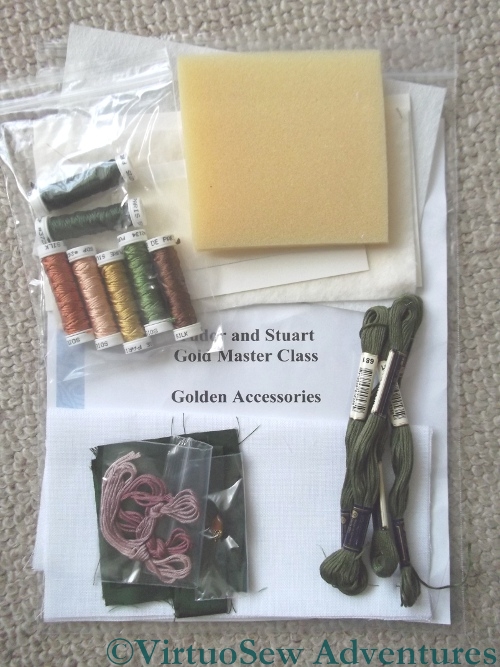
Golden Accessories Kit
There was a set of Bonus Instructions in the instructions for Month Fifteen, from a teaching project that Tricia had retired from use. She was asked whether she’d produce kits of the materials for those of us who don’t have easy (or even difficult!) access to a really good needlework shop. Yet again, apparently, demand outstripped her expectations (a good problem to have!), and here is my kit.
It includes finishing materials for the various accessories, as well as the fabric and the silk thread, but not the metal thread, since all of us already have large spools of that from doing the main Spot Sampler.
My intention is to finish these to add to that planned “winter decoration corner” I’ve mentioned a couple of times. I’ve found some masks which I’m going to decorate in silver and gold, and I will use some metallic gauze or something similar for the background. Already the two Needlework Nibbles, the Floral Glove Needlecase and the Tudor Pincushion look like they will create some wonderful reflective textures for a dark corner…