
Month: March 2011
Dreams of Amarna – The Patches on The Map
After finishing the text and the villages on the Map, I need to decide what to use for the cultivation… You may recall from my earlier post that I have decided on the stitch I’m going to use – tête de boeuf stitch – but that I’ve not quite worked out what thread to use.
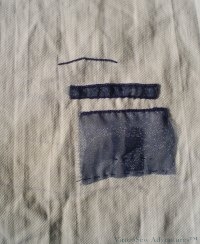
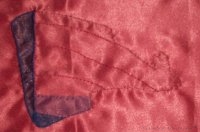
Trial Patches On The Map
I’ve stitched a variety of trial patches, using stranded cotton, flower thread, pearl cotton, and several different silks, and now all (all!) I have to do is make a decision. I’ve propped up the fabric in the living room and stand staring at it every chance I get!
So far, I feel sure I won’t be using the pearl cotton (too chunky) or the flower thread (also too chunky), but that leaves me two variegated silks (one pale green shading to pinkish purple and one brighter green shading to terracotta) and two plain silks (one slightly darker than the colour of the fabric, and one the same colour as the stranded cottons I used for the contour lines. I’ve tried very hard to get a photo that does reasonable justice to the various threads and colours, but I don’t think that the one I’ve got here helps very much…
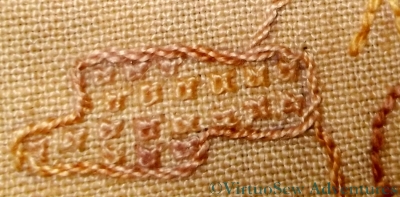
Sorbello Stitch Village
I chose Sorbello stitches to represent the modern villages. These are worked at a very small scale, as you can see from the thread count. Again, had I followed the cartographer’s symbols, I would have used something like Jacobean Couching, but I felt that this stitch in fact reflects the idea of buildings rather better. I’ve used the same gold-shading-to-purple thread for all the modern villages, both the names and the associated areas. It doesn’t draw the eye, in real life, quite as much as you might expect.
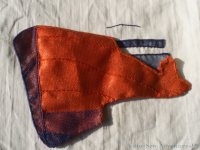
An Experimental Seahorse
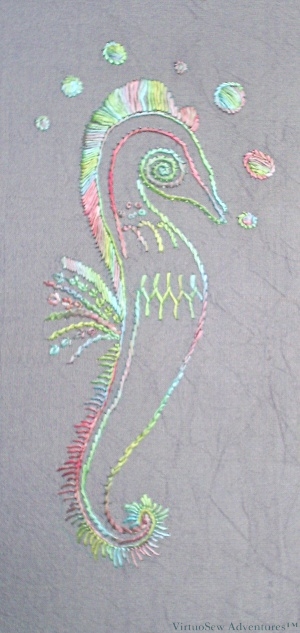
Small Seahorse in overdyed filament silk
Sometimes I play with threads for no other reason than to play with them. In this case Stef Francis gave me a skein of overdyed filament silk to play with. She tends to create a much more “freeform” style of embroidery than I do and she wanted to know what I thought of the thread.
I found a simple transfer that offered scope for several different stitches, and started playing. I had been concerned that it might twist up when I didn’t want it to, but it stayed fairly flat most of the time, and it is noticeable that the stitches look and feel different in a flat thread, as compared with a round one.
For example, in a round thread, the stem stitch line tends to be more textured, and the direction of slant is more obvious. Here, the slight flatness creates a smoother line. That same flatness makes the satin stitch smoother and cleaner looking. It also helps to mask any slight imperfections in the stitching!
On the other hand, that same slight “spread” of the filaments clouds the distinctiveness of the Wheatear Stitch in the fin on his back, so not an unalloyed success, but interesting and worth trying all the same.
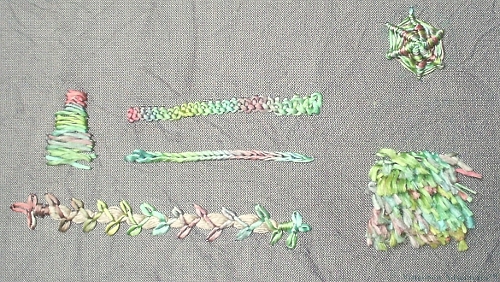
Silk Filament Experiments
Then I started just to play with stitches in a spare corner of fabric. The Braid Stitch (top row) works quite nicely, I think, and the Turkey work (bottom right hand corner) is better than I hoped, especially considering that I’ve not done it before. I can’t imagine what I would use that texture for in these colours, but Stef has a fabulous range of overdyed shades and I am sure that something would spring to mind for one of them. The little triangle of Closed Herringbone Stitch is hardly a success, but that may be a problem of scale. I don’t think the Braid Stitch would have worked if it had been any wider than it is here.
I don’t think this thread adds anything to the Reverse Chain Stitch, or to the Spider’s Web Wheel, but I do like the Chained Feather Stitch couching. In fact, that might have been better had I had the courage of my convictions and made the base that’s being couched about twice the width.
All in all, I had a lot of fun playing with this thread. I’ve now got a much better idea of What To Do and more importantly What Not To Do with it. One important thing to remember – make sure hands are smooth! Silk catches on everything and filament silk does so even more!
The Camberwell Panel – Five
Gauze on the Superstructure
This shows the start of the work on the cotton twill which will form the basis for the hull and superstructure. I have used two layers of navy gauze where the shadows need to be darker and cut sections out of one of the layers where I want a lighter shade. The transferred outline – made using an iron-on transfer pencil – barely shows at all, and fades with age, so there is little risk of anything showing where it should not.
As the additional slip for the hull will cover the raw ends of the fabrics, I decided only to sew down firmly those elements that will be unprotected. I found that as I added embroidery and fabrics to my slips-in-preparation, they shrank – not something my books had ever mentioned, although it really should have occurred to me. That is why I ran the gauze down into the area which would be covered by the hull, although I only caught it down lightly. Although there will be padding under the hull, I was afraid that a strongly stitched line might show where it wasn’t wanted.
Camberwell Hull
It is hard to see what I’m aiming for in these photos of the work in progress, so in this picture I have overlaid the slip made for the hull on the cotton drill in approximately the correct place to show the general effect I hope to achieve.
It was at about this point that the project woke up and started talking to me.
Before you book my place in an asylum, let me explain: that’s how I describe the feeling of having a near-absolute certainty of what to do next or how to achieve the next stage. Some of my projects never really do wake up, but the Camberwell chattered incessantly for the next several months, even when I decided to undo and redo some elements. When I was in doubt, I found that if I could in some way lay out the choices, they became blindingly obvious as soon as they progressed from imagination to fabric.
That made the Camberwell enormous fun to work on!
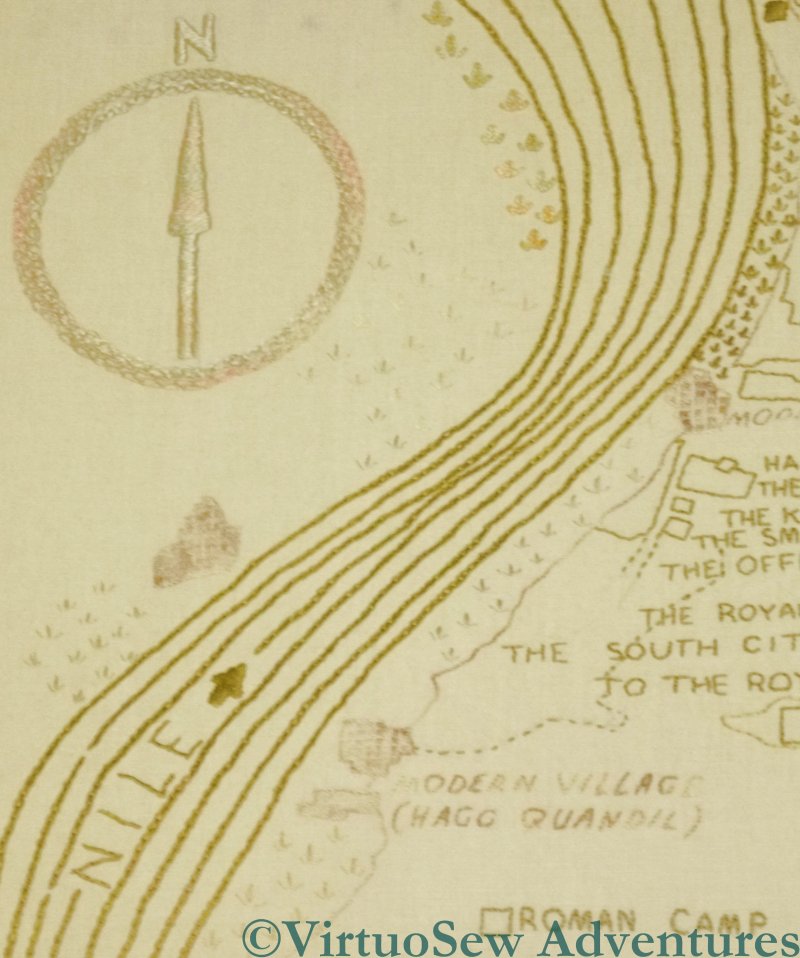
Dreams of Amarna – Approaching The Final Decision on the Map
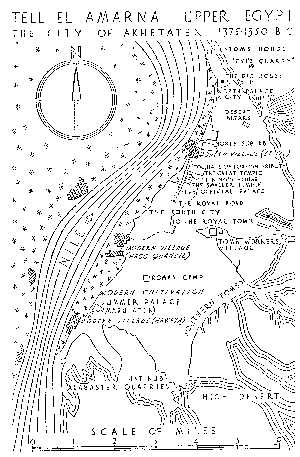
Map of the dig site at el-Amarna
You may recall that the first large element of the panels for Dreams of Amarna that I am stitching is a map of the site shown in Mary Chubb’s book.
It was easy to decide that I wanted to use reverse herringbone stitch for the contours of the high ground around the site, and unbroken lines of chain stitch for the Nile.
The compass rose and the titles were more difficult, although I made a decision eventually.
Now, however, I am near to finishing the text, and I can’t really put off my final decision any longer.
Areas of cultivation are shown on the original map using stars drawn roughly using four strokes. The obvious choice is to use Star Stitch, which exactly replicates the symbol used by the cartographer, but I don’t want to do that.
The aim of my stitching is not to reproduce a painting or a drawing, or even to reproduce those effects. I want to use embroidery techniques to produce impressions and effects that couldn’t be produced any other way, but that are inspired by the subject.
Tricky.
I finally settled on a stitch, after considerable thought and several hours leafing through my (never-ending shelf of) embroidery books – tête de boeuf stitch. But I’m still trying to work out what thread to use, and at what scale. So I’ve worked several test patches, and when I’ve finished the other stitching (the text and the villages), I’m going to wash and iron the whole thing and then sit back and look at them for a while…
Dreams of Amarna – More Research
This weekend I went to the exhibition “Tutankhamun – His Tomb and His Treasures” at the Museum of Museums near Manchester’s Trafford Centre. Partly just for fun, and partly because Mary Chubb mentions the huge excitement over Howard Carter’s discovery of Tutankhamun’s tomb as some of the “social background”, if you will, in her book “Nefertiti Lived Here”. I was hoping to catch some of the flavour of that excitement as well…
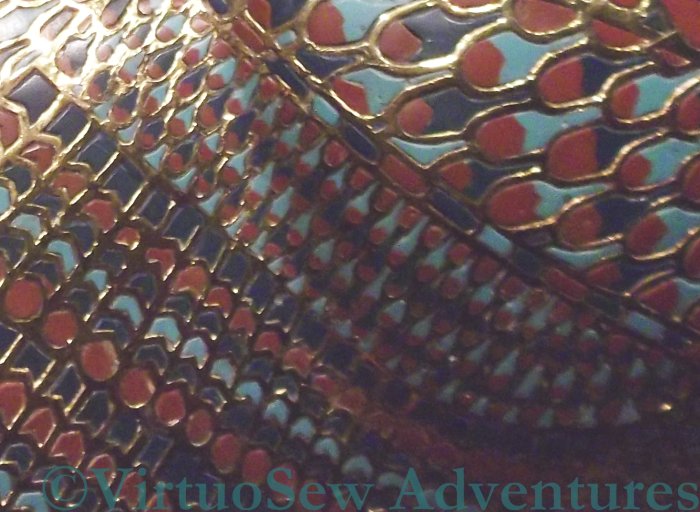
Cloisonne Feather Pattern on the Sarcophagus
It was an excellent exhibition. The usual introductory hall, with panels describing ancient Egypt and the development of Egyptology, but this one also included a reproduction of the Rosetta Stone. I knew that one of the languages was hieroglyphic and the other was Greek, but I hadn’t quite registered that the third was demotic, which was the “workday” script of ancient Egypt, as it were. Then there were films about Tutankhamun, and about Howard Carter, and then we turned a corner and found ourselves face to face with a reproduction of the antechamber of the tomb, just as Carter would have seen it. There is a British Museum page showing one of the original photos here. Except that doesn’t begin to give you any sense of the impact, because nearly every item is covered in gold. It speaks volumes for the self-discipline of Carter and his colleagues that the whole affair did not degenerate into a snatch and grab. I was too startled and overwhelmed to take a photo at this point, although non-flash photography was permitted.
Although I knew, of course, that the tomb contained a mixture of Amarna-period pieces and later pieces, I wasn’t aware that the cloisonné on the middle sarcophagus (close-up above) was an explicitly Amarna period design. So maybe I need to do a small patch using that pattern.
I took quite a lot of photos, which came out, on balance, much better than I expected them to, and may even turn out to be interesting and useful.
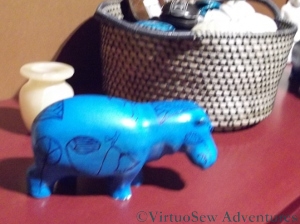
The Hippo In The Shop
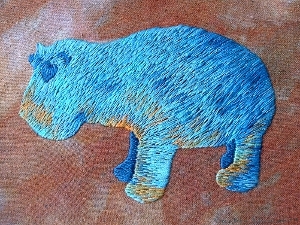
The Faience Hippo Finished
There was a short exhibition at the end which included some of Howard Carter’s watercolours – he was clearly a very fine archaeological artist and illustrator, and then we were sent out though the inevitable shop. Where I couldn’t fail to take one final photo…!
The Glittering Snail Finished!

Glittering Snail Ornament
The Glittering Snail Ornament from Stitching A Snail For Storage is Finished!
He was a lot of fun to stitch. I was introduced to silk gimp and silk purl (as I’ve already said, I don’t know what I will use them for, but I’m sure I’ll find something!). I don’t think I’ve ever stitched anything quite so small, either.
Tricia provided the blue silk thread to make the cord, and a silk fabric to back the ornament, although I think I need more practice at making cord, since mine ended up a bit floppy! However, it has now ended up with the whole thing, from hanging loop to tassel, made from a single length of cord, and I am hanging it up in my living room to keep it from getting crushed.
My local art shop sells cutouts of mount-card, presumably for people to do papercrafts with, but I find they make perfect mounts for this sort of ornament. I used one card for the front and one for the back, lightly glued fine wadding to the card and then stretched the fabric over the top (using glue or thread to secure it, depending upon which seems most appropriate). Front and back are then held together and overstitched, and the stitching can be covered with cord.
I used almost exactly the same technique – on a larger scale – when I was mounting “Starbright” a couple of years ago.
Yet more designs launched!
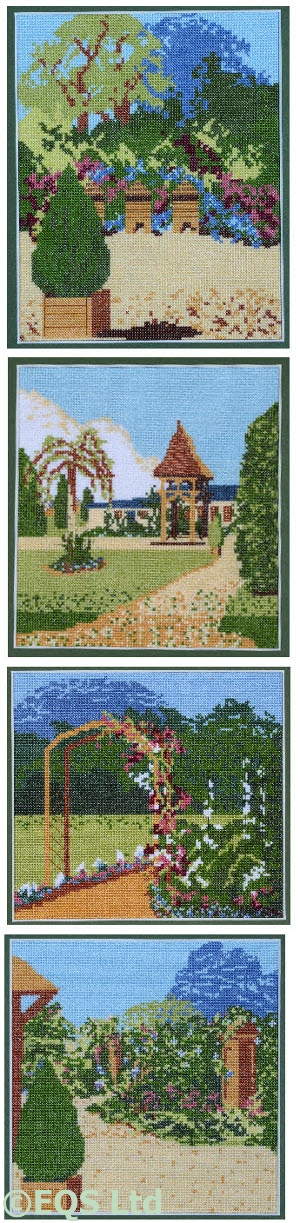
The Garden Scenes
You may have noticed my glee last week at the launch at the “Stitches” trade show of two more “Designs Inspired by Clarice Cliff“. I enjoy designing for other people as well as myself, and it is always so satisfying when all the thinking, the planning, and the scrambling around the floor picking colours finally reach their culmination in the launch of the new kits. I usually design counted cross stitch for publication because my embroidery gets reworked on the fly so often that timetables might sometimes be unacceptably stretched. I’m hoping that what I learn by thinking about my embroidery designs and writing about my designs will help me to develop my skills to the point where my designs for publication need not be in counted work!
Last year I worked on some designs for a second company producing counted cross stitch kits, EQS Limited. EQS are now UK distributors for Madeira threads, and each kit contains full spiral packs of each colour, which they hope will help to differentiate their offerings from all the other kits available. Some of these kits have been launched recently, and I’m so pleased with them that I wanted to share them with you.
The four “Garden Scenes” were originally inspired by some of the gardens that were being developed at the Blists Hill Open Air Museum when I visited with my parents when I was in my early twenties. The designs no longer bear any resemblence to the gardens I saw at the time – in particular, there was nothing so grand as an orangery with a summerhouse in front of it, as there is in the second design – but they do provide some sunny pictures of summer gardens – scenes which were in short supply in England last summer!
The last design here was I think inspired by the front garden of the Doctor’s house, and the view into the garden through the railings. I added beehives to the first design because while I was working on the charts, there was so much in the news about the collapse of the bee population. Living as I do in a house with no garden at all I am in no position to keep real bees!
Naturally in working gardens such as the ones that were being developed at Blists Hill there would be very little lawn – a lawn takes considerable upkeep without actually providing anything in return – but in the stitched versions there needed to be something flat to contrast with the plants, so I’ve stretched reality rather considerably there.

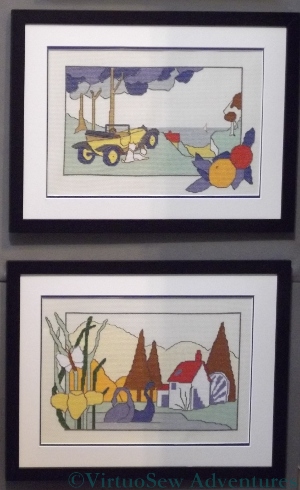
Working Boats - the first two designs
I have produced a second range for EQS Limited as well, this one entitled “Working Boats“. As the grand-daughter, great-grandaughter (twice) and great-niece (four times) of merchant seaman, it seemed very appropriate for me to offer a homage to the merchant and fishing fleets that support our island nations, and have done for centuries. The first two designs show, firstly, a canal boat on the Llangollen canal – a local tourist attraction throughout my childhood, and in a way a link to the Gardens, because the canals provided vital inland transport during the industrial revolution and beyond. The second design shows a Clyde Puffer, a very particular design of coasting cargo vessel with a flat bottom so that it could run itself ashore to be unloaded in places where there was no quayside. The mast is a cargo hoist, rather than a support for sails, since the puffer was developed after the invention of the marine steam engine.
There are four more designs in the range which we expect will be launched in the coming year. All I need now is a local needlework shop to go to so I can get a quiet thrill from seeing my designs on sale!
The Camberwell Panel – Four
Cotton And Satin
This shows the cotton twill with the basic outline transferred to it for embroidering. I decided that the whole ship would be made on this cotton twill and then the twill applied to the background fabric over the sky and sea fabrics, with some padding to raise it. I checked with my client (my cousin, remember!) to be sure that she was happy with raised and padded appliqué, rather than wanted something very flat, and on receiving an intrigued and enthusiastic “Go for it” started planning what would be padded and by how much.
The photo also shows the satin that I chose for the hull, with the design, again, outlined in running stitches.
Progress on the hull
The next stage was to apply a layer of navy net and a layer of navy gauze to the satin where the hull was in shadow, and stitch over those edges in navy satin stitch. I built up several layers of net at the forefoot, with lines of stitching to add form.
Then I added a layer of tawny net to the light side of the hull to cloud the colour slightly and stitched along the main plating lines of the hull to help reveal the shape.
The next stage on this piece was to stitch over all the edges that will not be covered by other stitches and fabrics to ensure that no raw edges show. At various stages in the project I chose different stitches for this job, but in this particular case I used buttonhole stitch to make the edge crisp and clear.
More Excitement – New Designs Launched!
Two New Designs Inspired by Clarice Cliff - Just Launched
Some of you may recall that this time last year I was very excited because some designs I produced for Classic Embroidery had just been launched.
Well, over the past year I’ve created another two, “On Guard” and “Swimming Swans”. They’ve been charted and test-stitched, photographed and the kits prepared, and now they are launched.
I went down to the NEC in Birmingham last week, to the trade show, to look at the finished pieces and discuss further projects. The other four “Designs Inspired By Clarice Cliff” are still selling, and part of our discussion was also concerned with whether to create more designs in the range, or move on to something else.
We’ve decided that for now, the range is complete – there are four small(ish) square designs and two slightly larger rectangular designs. In each case the crisp geometry of the edges is broken by part of the design spilling out, and the colours are bright and clear.
As trade shows go, “Stitches”, as we all still call it, is a fun, friendly event. I remember the first time I ever went, introducing myself as new to the needlecraft world and being greeted with beaming smiles and welcoming handshakes on every stand. That hasn’t changed, although a good many years have passed and the show is now called “Craft, Hobby, and Stitch” and encompasses papercrafts and ceramics (among other crafts) as well as needlecrafts.