
More on the Candlestick
Second Stage of working the Candlestick
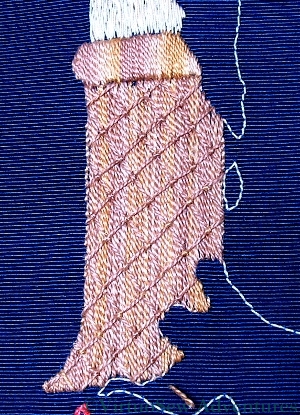
I wanted to create the appearance of engraved brass on my candlestick, so I began by laying long stitches vertically over the whole area. It didn’t occur to me for a moment to do the surface satin stitches horizontally. When you look at a shiny or patterned metal candlestick the reflected colours tend to blur out vertically, colours of the thread create vertical, slightly blurred stripes in the first layer.
Then I worked a basic laid work pattern over the top, with the diagonal threads couched down with an upright cross at the crossing points.
The background looks a little strange because the light was poor and I had to use a flash. It has washed out the detail of the stitching, and created a strange watermarked effect on the grosgrain ribbon. The weave is so tight that with every stitch I feared I would break the needle, especially at the edges with other layers of stitching to stitch through.
Now I move on to the dripping wax. No, I’ve not forgotten the wick. I just need the candle and the flame in place to weave the thread into the back!
It can be so hard to get it looking right in the pictures can’t it!!
I love the couched technique having done all the bayeux tapestry stuff it is certainly one of my favorites.
Can’t wait to see it finished
sarah
http://borninthewrongage.blogspot.com/
The body of the candlestick is looking good!
Squint a bit and it DOES look reflective!
Wow! and wow again, that is stunning.