
Month: May 2010
The Canvaswork Knot Garden
The Canvaswork Knot Garden
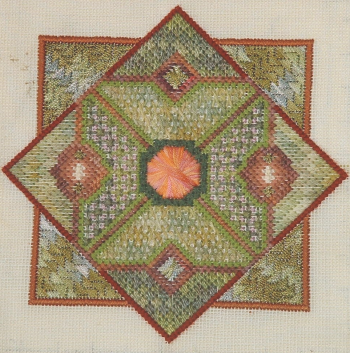
This piece arose from my fascination with the knot gardens and parterres of early formal garden design.
It began with the octagonal Rhodes Stitch at the centre. I wanted to use the stitch, but not as part of a repeating pattern. In fact it proved much more difficult to get right than I was prepared for. I now can’t remember how many times I unpicked that wretched octagon!
From that central point a variety of little paths and beds radiate out, using slightly subdued colours again inspired in particular by the colours of herbs. The variegated threads are all from Stef Francis, pearl and soft cottons, and a chainette (in the corners). The stitches include Hungarian Stitch, cashmere stitch, and upright cross stitch (which for some reason turns up a lot in my canvaswork).
I realised that the interesting stitches I was using weren’t producing complete coverage of the canvas, but I decided not to worry about that, as I felt it might lead to something interesting.
As you can tell, what it has not yet lead to is a sensible finishing decision. I cannot for the life of me decide what to do with this. It would be a pity to put it under glass, as that wonderful raised boss of the octagon would lose all of its impact. At the same time, because the coverage is so varied, and because the octagon is such a vulnerable point, turning it into a cushion seems positively half-witted.
Take heed, and design your pieces with their end-use in mind!
Floral Glove Needlecase – More Progress
Floral Glove Needlecase - progress
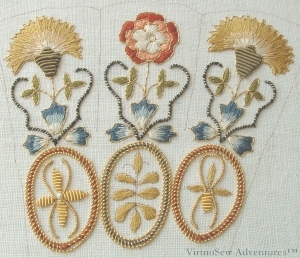
It became clear as I was working on the medallions that I was having more trouble with this than I had with the silk work or couching the Elizabethan Twist, so I thought I would give a sort of “interim report”.
The medallions are outlined with three couched rows of slightly stretched purl purl or lizardine, one of which is wrapped with silk. That in itself was fairly hair-raising (it sounds so simple, but believe me, it isn’t!), and yes, I know that the outlines aren’t perfect and you can see the joins, but they did get neater. The man who said “The more I practice the better I get” was onto something!
The tendrils are slightly stretched lizardine again – stretched by a different amount, just to make sure we paid attention! Then the silk of the motifs is covered with couched lengths of purl, like the calyxes of the carnations. It is surprisingly difficult to cut this stuff accurately – the instructions say to use an old pair of embroidery scissors, which I did, but I find myself wondering whether a sharp craft knife would do the job better. Certainly there would be less chance of crushing the thread. Purl is very fine wire, wound spirally around a former, and when the scissors crush it, the ends are bent out of shape and catch on the thread as you try to thread it through. Since purl is attached by threading it like a bead, this isn’t ideal; even waxing the thread only helps some of the time.
It’s astonishing to see the difference made to the medallion on the left when I added the seed pearl in the centre. I thought it looked neat and finished as it was, but adding the pearl brought the whole thing to life. Now there’s a lesson worth remembering – a small change can make a huge difference to the impression given by a piece. At least embroiderers can undo some of their additions. If you add something to a watercolour that turns out to be a mistake, there’s nothing you can do about it!
Still, I do think I am beginning to get the hang of it. Now it will be interesting to see whether I’ve slid all the way back to the start, or whether, when I continue on the next medallion, I retain some of the improvement I made yesterday.
Grandmama’s Embroidery – One
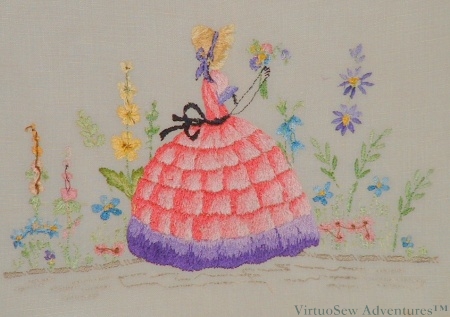
Grandmama embroidered this lovely lady on a nightdress case for my mother during the War, when they were evacuated to Westmorland. The colours have faded rather now, but it is still beautiful, and the long and short stitch puts me firmly in my place!

- The Front of “The Lady in the Garden”
The reason it is all so neat is that Grandmama had an embroidery teacher at the time, called Miss Hunter (I mentioned her in an early post). I’m sure Miss Hunter must have been trained at the Royal School of Needlework, because her standards were ferociously high. Grandmama once told me that one of the other ladies in the class at the time was working a Willow Pattern design in single strands of stranded cotton.
The back shows how the colours once appeared, and also how neatly Grandmama worked it all. With the exception of the centres of the hollyhocks, you really can’t be sure you aren’t looking at the front!
The Back of "The Lady In the Garden"
Miss Hunter’s influence still prevails. A few years ago I taught an engineering friend of mine to do counted cross stitch, and he rapidly picked up our habit of checking that the back was as neat as the front!
A closer look at Modern Goldwork – One
As it was such an interesting and useful two days, I thought I would write a bit more about my course with Tracy Franklin on Modern Goldwork. We worked samples of various techniques, each demonstrated by Tracy before we began. I don’t want to make the posts too long, so I will only put two techniques in each post.
Kid Leather Twists
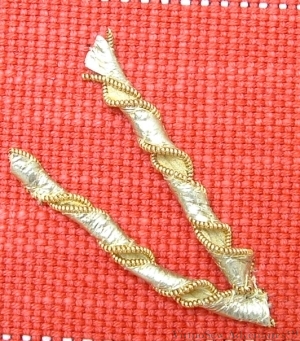
The base for our Modern Goldwork sampler was a sturdy but loosely-woven cotton upholstery fabric. We began by pulling out evenly spaced threads to mark the fabric into squares. Then in each square we worked a different technique.
The first square had Kid leather strips edged with unstretched pearl purl and then twisted. The twists were then couched in place. It was surprisingly difficult to attach the pearl purl to the edge of the leather, but creates an interesting variation as by twisting the strips, a glimpse of the back of the leather is provided, matte in contrast to the shiny metallised surface that is intended to be seen.
This technique might provide me with the gold in some jewellery for the Amarna panels as a change from simply using gold embroidery thread.
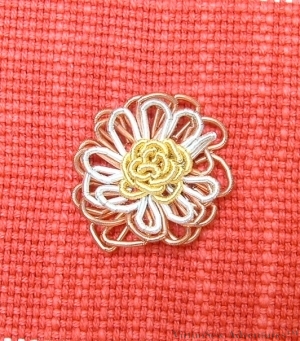
Purl Rose
The second square shows a flower shape made of loops of purl which are threaded onto the needle like beads. There are three different colours of purl, using gradually longer lengths to make larger, slightly floppier petals. The small, closely packed loops in the centre show that this technique could be used to create a very solid, shiny, “curly” texture.
I find myself thinking maybe when I’ve got the Amarna panels done, I could work on a panel about the legend of the Golden Fleece. Just imagine a whole fleece shape covered in that dense, looped surface!
Look What I’ve Found!
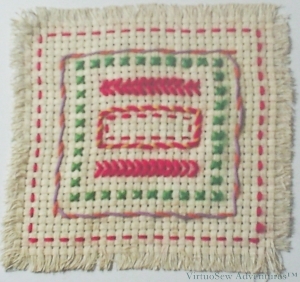
First Stitches
A little while ago, Yvette at White Threads blog interviewed me for her blog. In the interview, we talked about how I started to embroider, and I described – and provided a picture of – a piece that I worked on with Grandmama when I was about eight or nine.
I went to visit my parents a few days ago and they fished this mat out of the archives. I made it at school, when I was about six – you can tell my family has a bit of a thing about making things, from the fact it was still in existence.
I remember almost nothing about making it, except that I got bored of running stitch very quickly, and I must have mentioned that to Grandmama; maybe she suggested the arrowhead stitches and the whipped running stitch. I am fairly sure that I was the only one in the class who did anything but running stitch in a square. Embroidery wasn’t fashionable at the time, so I suspect most of the other children’s parents and grandparents wouldn’t have taken much interest in what we were doing.
The back looks hair-raising – Miss Hunter would have had a fit! – but how many of us have our very first piece of stitching to bring us back to earth?
Anyone?
Floral Glove Needlecase – Month Three Finished!
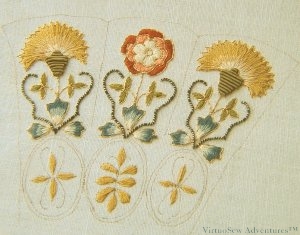
Month Three Finished
So, making progress here. All the silkwork is outlined in Elizabethan Twist, carefully following the suggested paths so as to have the smallest possible number of ends to sink.
Then the calyxs of the two carnations are covered with Olive smooth purl, cut to size and treated like a bead. This was fairly tricky because it was easy for the end of the purl (which is a very fine wire, coiled up) to catch on the silk thread being used to sew it down. In fact for the second calyx, I waxed the thread, which made the whole experience less fraught! I notice I didn’t quite get all the lengths or maybe spacings right for the first calyx, but for now I shall leave it as it stands.
Then I couched the striped thread curlicues. Again it was tricky to place the black couching thread where it would disappear into the thread being couched, but I think a few tweaks with a needle will fix that!
Through A Glass Clearly
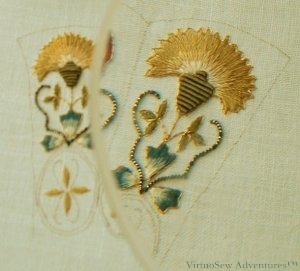
Finally, I thought I would show what a difference a magnifier makes. As I think I have said before, it is the change in size that terrifies. I began by stitching without a magnifier and was reasonably happy doing so. I just felt that it would be a useful additional tool, especially given some of the other projects I have in mind.
My eyes become accustomed to regarding the magnified view as normal, then when I stop for a cup of tea, I push the magnifier to one side to have a “proper” view. At which point there’s a small squawk and my husband asks what’s wrong. “It’s gone all tiny”, I say, “Don’t tell me I stitched that!”. After the said cup of tea, ordinary views reassert themselves and it doesn’t seem quite so astonishing.
Which is really just as well. We don’t embroider to scare ourselves, after all!
Starting Another Course
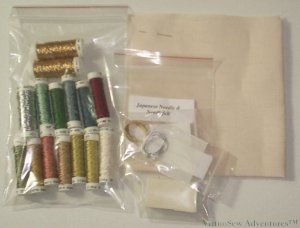
Tudor And Stuart Goldwork Kit
I decided to follow another Thistle Threads Online University course. This time it is the Tudor and Stuart Gold Master Class, and my first materials kit arrived today. There is more of that lovely Au Ver A Soie, and a lot of gold thread for practising with, as well as for working on the spot sampler.
The real attraction of this course to me is that Tricia has worked out how some of the ornate and now mysterious stitches of the period would have been worked. The stitches shown on the video look fascinating, and as well as providing instructions, she is providing animations to help her students learn how to work them. First, however, there is the silkwork to do, largely in Queen Stitch, Rice Stitch (a cross stitch variation), and Roman Stitch.
As with the Floral Glove Needlecase, there was a larger number of students enrolling than Tricia expected, and between us we appear to have wiped out the worldwide stocks of some colours in the silk thread. As with all specialist enterprises, the manufacturers tend to expect small orders, and it may take years for a dye lot to be used up. However, we can hope that more people will be introduced to these threads and will begin to use them more. Potentially this will lead to more shops stocking the more unusual materials, and make it easier for us to buy them.
As Shakespeare would have said, “A consummation devoutly to be wished!”
Dreams of Amarna – Working on ideas
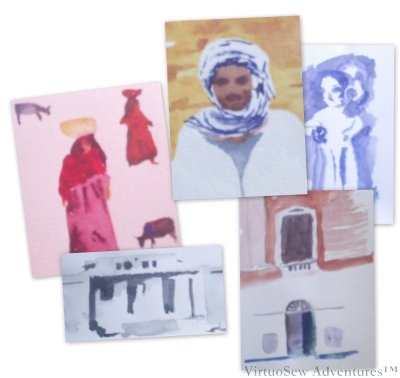
Collage of painted sketches for the Dreams of Amarna project
I’m still trying to think about and plan what to include, so I have been taking some of the photographs, and trying to produce paintings or drawings based on them.
This is serving a twofold purpose, as I have been developing my understanding of techniques, as well as learning how to distil the detail in the photographs. If it is important to simplify the sources in painting, it is more important in embroidery, where the effects created through stitch choice, thread choice, or the decision to raise the surface with padding also contribute to the final result.
The paintings aren’t particularly good, but that really isn’t the point of them, so I don’t mind. They aren’t finished pieces – I simply want to force myself to look at the photographic sources with an analytical eye. I hope then that it will come more naturally each time I find a bit I want to work on and embroider.
In fact as I look at this collage of paintings, I’m quite pleased. At least I have shown an appreciation of where the darks and the lights need to be, and those are what make a picture easy to understand.